Difference between revisions of "AY Honors/String Art/Answer Key"
m (→References) |
|||
| (46 intermediate revisions by 7 users not shown) | |||
| Line 1: | Line 1: | ||
| − | {{ | + | {{HonorSubpage}} |
| − | + | <section begin="Body" /> | |
| + | {{ansreq|page={{#titleparts:{{PAGENAME}}|2|1}}|num=1}} | ||
| + | <noinclude><translate><!--T:16--> | ||
| + | </noinclude> | ||
| + | <!-- 1. Describe the following: string craft, symmography, geometric stitchery. --> | ||
| − | + | <!--T:2--> | |
| − | + | ;String Craft: String Craft is making something (craft or art) out of string. | |
| − | |||
| − | |||
| − | + | <!--T:3--> | |
| + | ;Symmography: Symmography is creating 3D designs with string without knotting or knitting. | ||
| − | + | <!--T:4--> | |
| − | + | ;Geometric Stitchery: Geometric Stitchery is like Symmography but instead of using nails to hold the string on the surface of the media you use a needle or precut holes to go through the media and come out to a new point in the media. Much like sewing on a patch. | |
| − | |||
| − | |||
| − | |||
| − | |||
| − | |||
| − | |||
| − | |||
| − | == | + | <!--T:17--> |
| − | + | <noinclude></translate></noinclude> | |
| + | {{CloseReq}} <!-- 1 --> | ||
| + | {{ansreq|page={{#titleparts:{{PAGENAME}}|2|1}}|num=2}} | ||
| + | <noinclude><translate><!--T:18--> | ||
| + | </noinclude> | ||
| + | <!-- 2. Draw and stitch on cardboard in equally spaced points: --> | ||
| + | <gallery perrow=3 widths=200px> | ||
| + | Image:StringArt-RightAngle.png|<center>'''a. A right angle'''</center> | ||
| + | Image:StringArt-AcuteAngle.png|<center>'''b. An acute angle'''</center> | ||
| + | Image:StringArt-ObtuseAngle.png|<center>'''c. An obtuse angle'''</center> | ||
| + | </gallery> | ||
| − | [[ | + | <!--T:19--> |
| + | <noinclude></translate></noinclude> | ||
| + | {{CloseReq}} <!-- 2 --> | ||
| + | {{ansreq|page={{#titleparts:{{PAGENAME}}|2|1}}|num=3}} | ||
| + | <noinclude><translate><!--T:20--> | ||
| + | </noinclude> | ||
| + | <!-- 3. Name three ways to prepare wood for string art. --> | ||
| + | There are many ways to prepare the wood for string art: | ||
| + | ;Paint: Paint covers the wood and gives you a smooth surface with the color(s) of your choice. | ||
| + | ;Stain: Stain changes the color of the wood while still showing the nature and texture of the wood. Stained wood can be lacquered or varnished to make it glossy. | ||
| + | ;Lacquer: Lacquer (clear) protects the wood without changing its color. It leaves a glossy finish. | ||
| + | ;Felt: Cover the wood with felt. Use staples on the back or a thin, ''even'' coat of white glue on the front. Dots of glue will show through, so if you are going to use glue, it must be spread evenly, as if you were painting with it. Stretch the felt over the wood tightly, eliminating all wrinkles. | ||
| + | |||
| + | <!--T:7--> | ||
| + | Once the wood has been finished, the string artist will drive small nails partway into the board. These nails are the ''points'' around which the strings are run. When setting the nails, at least half the nail should be left exposed above the wood. Care must be taken to drive the nails to a sufficient depth so that they do not pull out when placed under tension by the string. The project will look far better if all the nails are set to the same height, and if they are perfectly vertical. | ||
| + | |||
| + | <!--T:8--> | ||
| + | If you have difficulty setting the nails (big fingers plus little nails equal trouble!) try holding the nail in place with a pair of needle nose pliers. | ||
| + | |||
| + | <!--T:9--> | ||
| + | It is a good idea to draw the pattern out on paper first. Then tape the paper over the wood and drive the nails through it. Once the nails are in place, the paper should be removed. It is tempting to leave the paper in place to serve as a guide while running the string, but this temptation should be resisted. It is nearly impossible to remove the paper without removing at least some of the string. Do yourself a favor and remove the paper ''before'' running the string. | ||
| + | |||
| + | <!--T:10--> | ||
| + | To begin, anchor the first string to the first nail using a slip knot. Tug on it to be sure it will hold before spending a lot of time running the string. If it pulls loose halfway through the design, it will be difficult to salvage all that hard work. | ||
| + | |||
| + | <!--T:21--> | ||
| + | <noinclude></translate></noinclude> | ||
| + | {{CloseReq}} <!-- 3 --> | ||
| + | {{ansreq|page={{#titleparts:{{PAGENAME}}|2|1}}|num=4}} | ||
| + | <noinclude><translate><!--T:22--> | ||
| + | </noinclude> | ||
| + | <!-- 4. Use stringing methods on wood to do four of the following: --> | ||
| + | <noinclude></translate></noinclude> | ||
| + | {{ansreq|page={{#titleparts:{{PAGENAME}}|2|1}}|num=4a}} | ||
| + | <noinclude><translate><!--T:23--> | ||
| + | </noinclude> | ||
| + | : In a 'Filled circle', the string would cross the center point of the circle. There would be no empty space in the center area of the circle. | ||
| + | <gallery> | ||
| + | Image:StringArt-FilledCircle.png|Filled Circle | ||
| + | </gallery> | ||
| + | <noinclude></translate></noinclude> | ||
| + | {{CloseReq}} <!-- 4a --> | ||
| + | {{ansreq|page={{#titleparts:{{PAGENAME}}|2|1}}|num=4b}} | ||
| + | <noinclude><translate><!--T:24--> | ||
| + | </noinclude> | ||
| + | : In a 'Hollowed circle', the string would not go pass the center point of the circle. There would be no string in the center area of the circle. | ||
| + | <gallery> | ||
| + | Image:StringArt-HollowCircle.png|Hollow Circle | ||
| + | Image:StringArt-HollowCircle2.png|Hollow Circle | ||
| + | </gallery> | ||
| + | <noinclude></translate></noinclude> | ||
| + | {{CloseReq}} <!-- 4b --> | ||
| + | {{ansreq|page={{#titleparts:{{PAGENAME}}|2|1}}|num=4c}} | ||
| + | <noinclude><translate><!--T:25--> | ||
| + | </noinclude> | ||
| + | : The hollow and filled circles are also of a star design. | ||
| + | <gallery> | ||
| + | Image:StringArt-HollowCircle.png|Star design with hollow circle | ||
| + | Image:StringArt-FilledCircle.png|Star design with filled circle | ||
| + | </gallery> | ||
| + | <noinclude></translate></noinclude> | ||
| + | {{CloseReq}} <!-- 4c --> | ||
| + | {{ansreq|page={{#titleparts:{{PAGENAME}}|2|1}}|num=4d}} | ||
| + | <noinclude><translate><!--T:26--> | ||
| + | </noinclude> | ||
| + | [[Image:StringArt-InsideOutside.png|thumb|200px|Curve from within, Curve from without]] | ||
| + | : Edging basically ''edges'' or outlines the design. | ||
| + | <noinclude></translate></noinclude> | ||
| + | {{CloseReq}} <!-- 4d --> | ||
| + | {{ansreq|page={{#titleparts:{{PAGENAME}}|2|1}}|num=4e}} | ||
| + | <noinclude><translate><!--T:27--> | ||
| + | </noinclude> | ||
| + | : When you ''curve from within'' the string covers some part of the inside curve. | ||
| + | <noinclude></translate></noinclude> | ||
| + | {{CloseReq}} <!-- 4e --> | ||
| + | {{ansreq|page={{#titleparts:{{PAGENAME}}|2|1}}|num=4f}} | ||
| + | <noinclude><translate><!--T:28--> | ||
| + | </noinclude> | ||
| + | : The ''Curve from within'' and ''Curve from without'' are two different types of ''edging''. In the example here, we are using a circle. Edging basically ''edges'' the design. When you ''curve from within'' the string covers some part of the inside curve. When you ''curve from without'' the string does not cross the space on the inside of the curve (because the nails in the wood keeps them on the outside of the curve). | ||
| + | |||
| + | <!--T:12--> | ||
| + | <br> | ||
| + | |||
| + | <!--T:29--> | ||
| + | <noinclude></translate></noinclude> | ||
| + | {{CloseReq}} <!-- 4f --> | ||
| + | {{ansreq|page={{#titleparts:{{PAGENAME}}|2|1}}|num=4g}} <!--T:13--> | ||
| + | <noinclude><translate><!--T:30--> | ||
| + | </noinclude> | ||
| + | <gallery> | ||
| + | Image:StringArt-Filler.png|Filler, the zig-zag parts in the leaves | ||
| + | </gallery> | ||
| + | <noinclude></translate></noinclude> | ||
| + | {{CloseReq}} <!-- 4g --> | ||
| + | {{ansreq|page={{#titleparts:{{PAGENAME}}|2|1}}|num=4h}} | ||
| + | <noinclude><translate><!--T:31--> | ||
| + | </noinclude> | ||
| + | <gallery> | ||
| + | Image:StringArt-WingWeave.png|Wing Weave, using existing circle template | ||
| + | </gallery> | ||
| + | |||
| + | <!--T:32--> | ||
| + | <noinclude></translate></noinclude> | ||
| + | {{CloseReq}} <!-- 4h --> | ||
| + | {{CloseReq}} <!-- 4 --> | ||
| + | {{ansreq|page={{#titleparts:{{PAGENAME}}|2|1}}|num=5}} | ||
| + | <noinclude><translate><!--T:33--> | ||
| + | </noinclude> | ||
| + | <!-- 5. Complete one original string art hanging on wood for display. --> | ||
| + | : This is your part. Enjoy! | ||
| + | {|border=0 | ||
| + | |- | ||
| + | |[[Image:StringArt-Project1.png|left|thumb|300px]] | ||
| + | |[[Image:StringArt-Project2.png|right|thumb|380px]] | ||
| + | |} | ||
| + | {{clear}} | ||
| + | |||
| + | <!--T:34--> | ||
| + | <noinclude></translate></noinclude> | ||
| + | {{CloseReq}} <!-- 5 --> | ||
| + | <noinclude><translate></noinclude> | ||
| + | ==References== <!--T:15--> | ||
| + | * http://www.b4scouts.com/Library/String_Art_NZ.pdf | ||
| + | * http://www.montessoriworld.org/handworkrevised/Curve_Stitching/Home.html | ||
| + | * http://www.architectureartdesigns.com/30-creative-diy-string-art-ideas/ | ||
| + | <noinclude></translate></noinclude> | ||
| + | {{CloseHonorPage}} | ||
Latest revision as of 22:30, 5 November 2021
Skill Level
1
Year
1975
Version
28.04.2024
Approval authority
General Conference

1
- String Craft
- String Craft is making something (craft or art) out of string.
- Symmography
- Symmography is creating 3D designs with string without knotting or knitting.
- Geometric Stitchery
- Geometric Stitchery is like Symmography but instead of using nails to hold the string on the surface of the media you use a needle or precut holes to go through the media and come out to a new point in the media. Much like sewing on a patch.
2
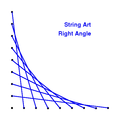
a. A right angle 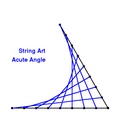
b. An acute angle 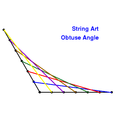
c. An obtuse angle


3
There are many ways to prepare the wood for string art:
- Paint
- Paint covers the wood and gives you a smooth surface with the color(s) of your choice.
- Stain
- Stain changes the color of the wood while still showing the nature and texture of the wood. Stained wood can be lacquered or varnished to make it glossy.
- Lacquer
- Lacquer (clear) protects the wood without changing its color. It leaves a glossy finish.
- Felt
- Cover the wood with felt. Use staples on the back or a thin, even coat of white glue on the front. Dots of glue will show through, so if you are going to use glue, it must be spread evenly, as if you were painting with it. Stretch the felt over the wood tightly, eliminating all wrinkles.
Once the wood has been finished, the string artist will drive small nails partway into the board. These nails are the points around which the strings are run. When setting the nails, at least half the nail should be left exposed above the wood. Care must be taken to drive the nails to a sufficient depth so that they do not pull out when placed under tension by the string. The project will look far better if all the nails are set to the same height, and if they are perfectly vertical.
If you have difficulty setting the nails (big fingers plus little nails equal trouble!) try holding the nail in place with a pair of needle nose pliers.
It is a good idea to draw the pattern out on paper first. Then tape the paper over the wood and drive the nails through it. Once the nails are in place, the paper should be removed. It is tempting to leave the paper in place to serve as a guide while running the string, but this temptation should be resisted. It is nearly impossible to remove the paper without removing at least some of the string. Do yourself a favor and remove the paper before running the string.
To begin, anchor the first string to the first nail using a slip knot. Tug on it to be sure it will hold before spending a lot of time running the string. If it pulls loose halfway through the design, it will be difficult to salvage all that hard work.
4
4a
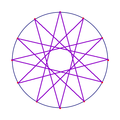
- In a 'Filled circle', the string would cross the center point of the circle. There would be no empty space in the center area of the circle.
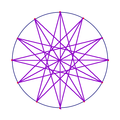
Filled Circle

4b
- In a 'Hollowed circle', the string would not go pass the center point of the circle. There would be no string in the center area of the circle.
Hollow Circle
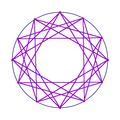
Hollow Circle


4c
- The hollow and filled circles are also of a star design.
Star design with hollow circle
Star design with filled circle
4d

4e
- When you curve from within the string covers some part of the inside curve.
4f
- The Curve from within and Curve from without are two different types of edging. In the example here, we are using a circle. Edging basically edges the design. When you curve from within the string covers some part of the inside curve. When you curve from without the string does not cross the space on the inside of the curve (because the nails in the wood keeps them on the outside of the curve).
4g
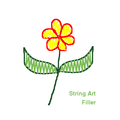
Filler, the zig-zag parts in the leaves

4h
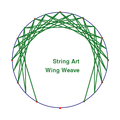
Wing Weave, using existing circle template

5


