Translations:AY Honors/Leather Craft - Advanced/Answer Key/25/en
From Pathfinder Wiki
Hatchet or Ax Sheath
Follow the same procedure for making an ax sheath as for a hatchet sheath. These instructions custom fit the sheath to the ax or hatchet head.
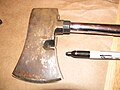
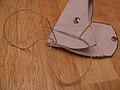
Trace an outline of the hatchet head.
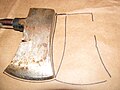
Flip the hatchet over and trace it again.

Draw the rear tabs.
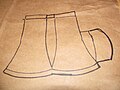
Allow stitching space, and draw the flap.
Finished pattern.
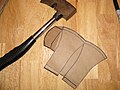
Test fit.
Transfer the pattern to leather and cut it out.
Stitch up the back.
Attach the snaps.
Saddle stitch the blade side.
Finished product.


- Lay the hatchet on a large paper bag and trace an outline of the hatchet head.
- Flip the hatchet over and trace another image. The butt end of the hatchet head needs to be spaced such that it is as wide as the hatchet's thickness. The blade ends of the two outlines should touch.
- Outline a tab on each end of the pattern. The width of the tab should be half the thickness of the hatchet head.
- Add a quarter inch to the blade end of the outline.
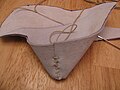
- Draw the flap that will fold around the hatchet head and fasten with a snap. In the photo above, the flap joins the pattern at the end of the blade - this was a mistake. It is better to continue the sweep of the blade's outline, including the allowance for the seam. The other thing to watch for is that the other end of the flap allows for room to wrap around the thickness of the blade at the handle. That end of the flap is longer than the tip end.
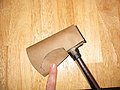
- Cut out the pattern and fold it around the hatchet head, testing the fit.
- Transfer the pattern to a piece of leather and cut it out.
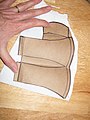
- Fold the rear tabs and stitch them together to make a T-shaped seam. The first stitch is made across the top of the T. A second stitch is made to fasten the two tabs together (forming the vertical part of the T). Sewing the seam will be a lot easier if you make the needle holes with an awl first.
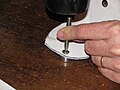
- Fasten the snaps to the folding tab. To make sure the snaps are properly aligned and the flap is not too tight, put the hatchet in the sheath (such as it is). Slip a piece of scrap leather between the hatchet blade and the sheath directly beneath the place where the snap will go. Then fold the flap over and punch through both pieces with a hollow punch. The piece of scrap leather will keep you from dulling the punch when you break through the second layer of sheath. If using a rotary punch, punch the snap hole on the flap first, fold it closed, and mark the hole beneath by poking a marker or an awl through the hole. Once the holes are punched, rivet the snap in place.
- Make a saddle stitch along the blade. Again, the stitching will be a lot easier if you make the holes with an awl. Be sure to pierce both pieces at the same time. Start stitching at the top end of the blade (farthest from the handle). If you start at the other end, you may have difficulty tying off the saddle stitch. Pass the needles through only one piece of leather for the final hole, so that the two ends may be tied together on the inside of the sheath. It is easiest to tie them off if you turn the sheath inside out first.
- Once the saddle stitching is done, you may opt to place a dot of white glue on the knot (both in the saddle stitch and in the back seam).
- Ta da! Put the hatchet in the sheath and snap it closed!
