Difference between revisions of "AY Honors/Electricity/Answer Key/es"
(Created page with "</noinclude> <!-- 6. Demostrar la capacidad para sustituir fusibles o reajustar un cortacircuito y demostrar el empalme aprobado del Código Eléctrico Nacional (N.E.C. por su...") |
(Created page with "Category:Adventist Youth Honors Answer Book/es <noinclude>") |
||
| Line 30: | Line 30: | ||
<!-- 3. Conectar un timbre, campana o una luz con una batería utilizando un interruptor en línea. --> | <!-- 3. Conectar un timbre, campana o una luz con una batería utilizando un interruptor en línea. --> | ||
| − | + | {{clear}} | |
| − | |||
| − | |||
| − | + | {{clear}} | |
| − | |||
| − | |||
<noinclude></noinclude> | <noinclude></noinclude> | ||
| Line 44: | Line 40: | ||
<!-- 4. Hacer y ejecutar un simple motor eléctrico de un equipo a escala o desmontar un motor e identificar las partes, y explicar cómo funciona. --> | <!-- 4. Hacer y ejecutar un simple motor eléctrico de un equipo a escala o desmontar un motor e identificar las partes, y explicar cómo funciona. --> | ||
| − | + | {{clear}} | |
| − | |||
| − | |||
| − | + | {{clear}} | |
| − | |||
| − | |||
| − | + | {{clear}} | |
| − | |||
| − | |||
| − | + | {{clear}} | |
| − | |||
| − | |||
| − | + | {{clear}} | |
| − | |||
| − | |||
| − | |||
| − | + | {{clear}} | |
| − | |||
| − | |||
| − | + | {{clear}} | |
| − | |||
| − | |||
<noinclude></noinclude> | <noinclude></noinclude> | ||
| Line 81: | Line 62: | ||
{{clear}} | {{clear}} | ||
| − | + | {{clear}} | |
| − | |||
| − | |||
<div lang="en" dir="ltr" class="mw-content-ltr"> | <div lang="en" dir="ltr" class="mw-content-ltr"> | ||
| Line 149: | Line 128: | ||
{{CloseReq}} <!-- 9 --> | {{CloseReq}} <!-- 9 --> | ||
{{ansreq|page={{#titleparts:{{PAGENAME}}|2|1}}|num=10}} | {{ansreq|page={{#titleparts:{{PAGENAME}}|2|1}}|num=10}} | ||
| − | <noinclude> | + | <noinclude></noinclude> |
| − | </noinclude> | + | <!-- 10. Leer un medidor de luz correctamente y calcular el gasto a pagar en la residencia de acuerdo a la tasa aplicada en su comunidad. --> |
| − | <!-- 10. | ||
| − | |||
| − | |||
| − | + | {{clear}} | |
| − | |||
| − | |||
| − | + | {{clear}} | |
| − | |||
| − | |||
<div lang="en" dir="ltr" class="mw-content-ltr"> | <div lang="en" dir="ltr" class="mw-content-ltr"> | ||
| Line 197: | Line 169: | ||
</div> | </div> | ||
| − | + | [[Category:Adventist Youth Honors Answer Book/es]] | |
| − | [[Category:Adventist Youth Honors Answer Book | + | <noinclude></noinclude> |
| − | <noinclude | ||
| − | |||
{{CloseReq}} <!-- 10 --> | {{CloseReq}} <!-- 10 --> | ||
{{CloseHonorPage}} | {{CloseHonorPage}} | ||
Revision as of 14:54, 17 May 2021
1
2
Batteries are capable of storing DC voltage only - they cannot store AC voltage. Most electronic circuitry runs on DC, and electronic appliances that run on AC power usually convert it to DC before it can be used. The advantage AC has over DC is that it can be transmitted over long distances with less loss than a DC circuit providing an equivalent amount of power.
AC circuitry produces a constantly varying magnetic field, and a constantly varying magnetic field will induce a current in an adjacent conductor. The induced current can be measured with a current meter. DC circuitry will only induce a current when a sudden change in the circuit takes place, such as powering it on. The induced current will "spike" briefly and then decay to zero.
3
4
5
Connect multiple cells in parallel to boost the current capacity (necessary to light up a bulb). To do this, connect all the nails together with one wire and connect all the copper terminals together with another wire.
6
A breaker is a current-sensing switch. Circuits can be turned off by flipping the switch away from the center of the breaker panel, and turned back on again by flipping the switch towards the center of the breaker panel. When a breaker senses that the current flowing through it exceeds its rated threshold, the switch opens by itself, moving the toggle between the off position and the on position. The breaker is said to have "tripped" when this happens. Before a tripped breaker can be reset, it must first be turned fully to the off position, and then it can be returned to the on position. If the breaker trips again, the circuit is still overloaded. If this is the case, turn off some of the appliances in the circuit before attempting to reset the breaker again.
7
Once the victim has been disconnected from the current, call 911. If the victim is not breathing, start CPR. If the victim is breathing, but unconscious, maneuver the body onto its side to prevent the victim's tongue from blocking the air passage.
8
9
The schematic above shows a typical circuit in a household. The circuit as shown is protected by a fuse (although a breaker would be applicable as well), and has three loads:
- A light controlled by a single switch
- An unswitched outlet
- A light controlled by two switches
More outlets and switches can be added to the circuit, but note that they will all be connected in parallel. All circuits will connect to the black "'hot'" wire and to the white "'neutral'" wire.
A typical house will have about two dozen breakers, and it is rare for a circuit to have more than about eight outlets or lights. Having too many lights or outlets on a single circuit will cause the breaker to trip or the fuse to blow, so several circuits are run in a house.
10
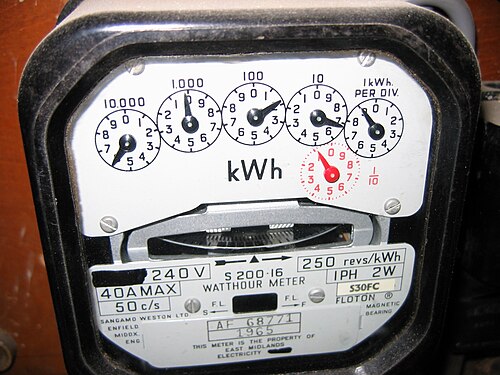
The meter pictured above shows 60169.1 kilowatt hours (not 60279.1 - the dials have not yet reached the 2 or the 7 yet). To calculate an electric bill assume the following:
Previous month's reading: 59023.6 kWh
Aggregate rate: 11.274 cents per kWh
Flat fees: $20
The bill would be calculated as follows:
[math]\displaystyle{ \begin{matrix}bill & =& \left( (60169.1 - 59023.6) \times 0.11274\right) \ +\ $20 \\ \ & =& (1146.5 \times 0.11274)\ +\ $20 \\ \ & =& $129.14\ +\ $20\\ \ &=& $149.14\end{matrix} }[/math]
Note that this is rounded to the nearest cent.


