Difference between revisions of "AY Honors/Gardening/Answer Key 2/es"

From Pathfinder Wiki
< AY Honors‎ | GardeningAY Honors/Gardening/Answer Key 2/es
(Created page with "Especialidades JA/Jardinería/Respuestas")
 
 
(36 intermediate revisions by 2 users not shown)
Line 1: Line 1:
<languages /><br />
+
{{HonorSubpage}}
<noinclude></noinclude>
+
{{#vardefine:reqpage|{{#titleparts:{{PAGENAME}}|2}}/Requirements 2}}
 
 
{{honor_desc
 
|stage=100
 
|honorname=Gardening
 
|skill=1
 
|year=1928
 
|category=Outdoor Industries
 
|authority=North American Division
 
|insignia=Gardening_Honor.png
 
}}
 
{{covid|tip=This honor can be earned during shutdown presuming:  
 
#A yard with enough space to set out a 10ftx10ft (3mx3m) garden.
 
#You have access to seeds or can purchase and have them delivered safely to your locale.}}


{{division variant|division=General Conference}}


<noinclude></noinclude>
 
 
<section begin="Body" />
 
<section begin="Body" />
{{ansreq|page={{#titleparts:{{PAGENAME}}|2|1}}|num=1}}
+
{{ansreq|page={{#var:reqpage}}|num=1}}
 
<noinclude></noinclude>
 
<noinclude></noinclude>
<!-- 1. Prepare soil, fertilize, and plant a vegetable plot of not less than 100 square feet (9 square meters). Grow at least six different vegetables, three from seeds and three from seedlings, through harvesting. -->
+
<!-- 1. Preparar la tierra, fertilizar y sembrar una huerta de no menos de 100 pies cuadrados (9 metros cuadrados). Cultivar al menos seis diferentes vegetales y hortalizas, tres a partir de semillas y tres de las plantas de las cuales haya tomado las semillas directamente a través de la cosecha. -->
  
===Preparing the soil===
+
{{clear}}
The first step in soil preparation is to select a suitable site for the garden. It should be clear of trees and relatively level, and it should receive full sunlight. The soil should be at least {{units|30 cm|1 foot}} deep.
 
  
Once the site is selected, it needs to be plowed and tilled. Plowing can be done with a plow for large (and medium-sized) plots, or with a spade for very small plots (this is ''heavy'' labor though). Plowing loosens the soil so that the plants will have easy access to the soil to a depth of {{units|30 cm|1 foot}}. Tilling can be accomplished with a disc for large plots or with a garden tiller for smaller plots. The purpose of tilling is to break the soil into a fine aggregate. The ideal time to till is when a dirt clod can be picked up and easily crumbled in the hand - it should not be done immediately following a rain.
+
{{clear}}
  
===Fertilizing===
+
{{clear}}
It's generally a good idea to test the soil before fertilizing it so that you know what type of fertilizer to apply. Soil testing kits are available in garden centers. Once you have tested the soil and have selected an appropriate fertilizer, it can be spread over the garden with a broadcast seeder. You can do this before tilling or after.
 
  
===Planting===
+
{{clear}}
Planting includes plant selection and placement. In general, taller plants should be planted on the side of the garden furthest from the Earth's equator. (In the Northern Hemisphere plant them on the north side. In the Southern Hemisphere plant them on the south side.) This is so they do not shade the smaller plants. Seed packets will contain data on them telling you how deep, how far apart from one another, and when to plant them in your geographic area. Seedlings can be bought from a nursery or grown from seeds indoors before the outdoor growing season begins.
 
  
For planted seeds, start by making a furrow with a hoe. The depth of the furrow should equal the desired depth of the seed. Then walk along and drop seeds in the furrow, burying them as you go. Be sure to space them as per the instructions on the seed packet. Do not pack the soil tightly over the furrow as you bury the seeds. A common practice is to place the seeds in the furrows in pairs so that if one does not come up, there's a chance the other will. If both come up, one of them ''must'' be thinned, even if they both look healthy.
+
{{clear}}
  
For seedlings, dig a small hole for each plant so that you can bury it to the soil line. Do not remove the seedling from the container until you are ready to plug it into the hole, and avoid exposing the roots to direct sunlight. Lightly pack soil around the plant.
+
{{clear}}
  
Once the seeds and seedling have been planted, water the garden generously. After that, you will need to make sure the garden is watered deeply and on an ''irregular'' basis. If you over-water the garden, the roots will stay near the surface where they will be susceptible to disease, and where they will do a poor job of anchoring the plant should a stiff wind arise. Watering deeply and irregularly will cause the plants send the roots deeply into the ground in search of water and other nutrients. This will also protect them from disease and strengthen the plant against the wind.
+
{{clear}}
  
===Plant Selection===
+
{{clear}}
Popular plants grown from seeds include:
 
*Corn
 
*Squash
 
*Beans
 
*Radish
 
*Watermelon
 
*Carrots
 
*Peas
 
*Cucumber
 
Popular plants grown from seedlings include:
 
*Tomatoes
 
*Eggplant
 
*Peppers


<noinclude></noinclude>
 
<noinclude></noinclude>
 
{{CloseReq}} <!-- 1 -->
 
{{CloseReq}} <!-- 1 -->
{{ansreq|page={{#titleparts:{{PAGENAME}}|2|1}}|num=2}}
+
{{ansreq|page={{#var:reqpage}}|num=2}}
 
<noinclude></noinclude>
 
<noinclude></noinclude>
<!-- 2. List ways to control insects and/or disease in your garden. Know when and how to apply insecticides and fungicides. -->
+
<!-- 2. Hacer una lista de formas de control de insectos y/o enfermedades en su jardín. Saber cuándo y cómo aplicar los insecticidas y fungicidas. -->
=== Pest control===
 
When chemical pesticides were first introduced, they were used to the exclusion of all other types of pest control. This had the unfortunate effect of poisoning the environment. In the 1970's this situation was recognized, and Integrated Pest Management (IPM) techniques were introduced. Pesticides are still used, but they are a last resort.
 
  
When most people think of pests, they think of insects. In vegetable cultivation, this term should be expanded to include weeds, microorganisms, and mites. Pest control depends on the early and correct identification of the pest. The grower can use cultural mechanical, biological, or chemical controls to reduce the effect of pests. These methods all rely on constant vigilance by the grower.
+
{{clear}}
  
'''Cultural Controls''' include the selection of disease and pest-resistant cultivars. Crop rotation  is another important cultural control, as certain pests feed exclusively on one type of plant. Eliminating the plant from the environment for a year or two will disrupt that cycle. Another important control mechanism is to mulch, water, prune, and fertilize the plants correctly. A healthy plant is better able to defend itself from pests.
+
{{clear}}
  
'''Mechanical Controls''' include covering the plants with netting or setting traps for expected (or observed) pests. Pests can also be removed with vacuums or by hand. Hoeing and cultivating around the plants will help control weeds. It is also important to remove infected plants from the crop as soon as possible so that the disease does not spread.
+
{{clear}}
  
Many insects prefer to feed on the underside of leaves where they will be more difficult for a predator to find. These pests can be discouraged by laying aluminum foil on the ground, shiny-side-up to reflect additional sunlight to the underside of the leaves. This confuses the insects and encourages them to feed elsewhere.
+
{{clear}}
  
'''Biological Controls''' include the introduction of natural predators. For instance, ladybug beetles feast on aphids, and poultry feed on a number of insect pests. Be careful when introducing predators though, that you do not introduce a non-native species which has no natural enemies of its own. This can - and has caused its own form of environmental damage. You can also use commercially available pheromones to disrupt the mating cycle of many insects.
+
{{clear}}
  
'''Chemical Controls''' can be used when all else fails. Selection of a pesticide and a fungicide will depend on the particular pest being combated (which his why proper identification is so important). Sprays are generally more effective than dusts, as nearly all pesticides rely on contact with the pest for their effectiveness. Read the instructions on the chemical containers carefully before using, especially noting whether the chemical is safe to use on food plants. Many times a pesticide will warn against its use for a period of time before harvesting.
+
{{clear}}
  
 
<noinclude></noinclude>
 
<noinclude></noinclude>
 
{{CloseReq}} <!-- 2 -->
 
{{CloseReq}} <!-- 2 -->
{{ansreq|page={{#titleparts:{{PAGENAME}}|2|1}}|num=3}}
+
{{ansreq|page={{#var:reqpage}}|num=3}}
 
<noinclude></noinclude>
 
<noinclude></noinclude>
<!-- 3. What is mulch? How and why is it used in the garden? -->
+
<!-- 3. ¿Qué es el mantillo acolchado? ¿Cómo y por qué se utiliza en el jardín? -->
Mulch is decomposed plant materials that are used as a planting bed, source of nutrients, and protective top layer that can maintain soil moisture levels and keep heat in.


<noinclude></noinclude>
 
<noinclude></noinclude>
 
{{CloseReq}} <!-- 3 -->
 
{{CloseReq}} <!-- 3 -->
{{ansreq|page={{#titleparts:{{PAGENAME}}|2|1}}|num=4}}
+
{{ansreq|page={{#var:reqpage}}|num=4}}
 
<noinclude></noinclude>
 
<noinclude></noinclude>
<!-- 4. What is hardiness? Which vegetables are considered hardy in your area? -->
+
<!-- 4. ¿Qué es la rusticidad? ¿Qué hortalizas se consideran rústicas en su área? -->
Hardiness determines the extent to which a plant or tree can tolerate cold or heat. Normally this is measured in cold such as "plant hardiness to 27 degrees." This means that below 27 degrees the plant will begin to be effected by the cold, starting with freezing of leaves and or fruit.
 
  
In North America hardiness is classed by ''hardiness zone'' (see below). Seed packets usually have a color-coded map on the back showing these zones - and accordingly, an indication of when the seeds should be planted.
+
{{clear}}
[[Image:USDA Hardiness zone map.jpg|thumb|600px|Hardiness Zones of North America]]
 
<br style="clear:both">


<noinclude></noinclude>
 
<noinclude></noinclude>
 
{{CloseReq}} <!-- 4 -->
 
{{CloseReq}} <!-- 4 -->
{{ansreq|page={{#titleparts:{{PAGENAME}}|2|1}}|num=5}}
+
{{ansreq|page={{#var:reqpage}}|num=5}}
 
<noinclude></noinclude>
 
<noinclude></noinclude>
<!-- 5. Do one of the following: -->
+
<!-- 5. Realizar una de las siguientes actividades: -->
 
<noinclude></noinclude>
 
<noinclude></noinclude>
{{ansreq|page={{#titleparts:{{PAGENAME}}|2|1}}|num=5a}}
+
{{ansreq|page={{#var:reqpage}}|num=5a}}
 
<noinclude></noinclude>
 
<noinclude></noinclude>
Testing germination can be accomplished with a ''rag-doll test''. Note that this is also a requirement for the [[../../Nature/Seeds - Advanced|Seeds - Advanced]] honor and the Agriculture Honor.
 
  
{{:Adventist Youth Honors Answer Book/Germination testing}}
+
{{:AY Honors/Germination testing/es}}
  
 
<noinclude></noinclude>
 
<noinclude></noinclude>
 
{{CloseReq}} <!-- 5a -->
 
{{CloseReq}} <!-- 5a -->
{{ansreq|page={{#titleparts:{{PAGENAME}}|2|1}}|num=5b}} <!--T:23-->
+
{{ansreq|page={{#var:reqpage}}|num=5b}} <!--T:23-->
 
<noinclude></noinclude>
 
<noinclude></noinclude>
{{:Adventist Youth Honors Answer Book/Hotbed cold frame}}
+
{{:AY Honors/Hotbed cold frame/es}}
  
 
<noinclude></noinclude>
 
<noinclude></noinclude>
 
{{CloseReq}} <!-- 5b -->
 
{{CloseReq}} <!-- 5b -->
{{ansreq|page={{#titleparts:{{PAGENAME}}|2|1}}|num=5c}} <!--T:24-->
+
{{ansreq|page={{#var:reqpage}}|num=5c}} <!--T:24-->
 
<noinclude></noinclude>
 
<noinclude></noinclude>
When preparing vegetables for market, consider the following attributes:
 
;Ripeness: Choose vegetables that are at their optimum ripeness.
 
;Color: Bright colors are more attractive to buyers than dull colors.
 
;Size: Consumers do not like vegetables that are too small or too large.
 
;Shape: Look for vegetables that have a "regular" shape.
 
;Injury: Choose vegetables that are free from injury.
 
;Cleanliness: Wash and trim them before taking them to market.


<noinclude></noinclude>
 
<noinclude></noinclude>
 
{{CloseReq}} <!-- 5c -->
 
{{CloseReq}} <!-- 5c -->
{{ansreq|page={{#titleparts:{{PAGENAME}}|2|1}}|num=5d}} <!--T:25-->
+
{{ansreq|page={{#var:reqpage}}|num=5d}} <!--T:25-->
 
<noinclude></noinclude>
 
<noinclude></noinclude>
A vegetable storage bin is a small cabinet with compartments for vegetables. They are often equipped with a wire mesh door to allow air to circulate. Some use solid doors to keep the inside of the bin dark (potatoes will sprout if exposed to light). Some have dark compartments as well as airy compartments to support different types of vegetables.
 
You can find free plans for a combination bin online at http://www.woodworkersworkshop.com/cached_files/27838_files/


<noinclude></noinclude>
 
<noinclude></noinclude>
Line 135: Line 86:
 
{{CloseReq}} <!-- 5 -->
 
{{CloseReq}} <!-- 5 -->
 
<noinclude></noinclude>
 
<noinclude></noinclude>
==References==
+
==Referencias==
* http://learningstore.uwex.edu/pdf/A3306.pdf


[[Category:Adventist Youth Honors Answer Book|{{SUBPAGENAME}}]]
 
 
<noinclude></noinclude>
 
<noinclude></noinclude>
<section end="Body" />
+
{{CloseHonorPage}}

Latest revision as of 14:10, 7 October 2021

Other languages:
English • ‎español • ‎français
Jardinería

Nivel de destreza

1

Año

1928

Version

26.11.2024

Autoridad de aprobación

División Norteamericana

Gardening AY Honor.png
Jardinería
Actividades agropecuarias
Nivel de destreza
123
Autoridad de aprobación
División Norteamericana
Año de introducción
1928
Vea también


1

Preparar la tierra, fertilizar y sembrar una huerta de no menos de 100 pies cuadrados (9 metros cuadrados). Cultivar al menos seis diferentes vegetales y hortalizas, tres a partir de semillas y tres de las plantas de las cuales haya tomado las semillas directamente a través de la cosecha.


2

Hacer una lista de formas de control de insectos y/o enfermedades en su jardín. Saber cuándo y cómo aplicar los insecticidas y fungicidas.


3

¿Qué es el mantillo acolchado? ¿Cómo y por qué se utiliza en el jardín?


4

¿Qué es la rusticidad? ¿Qué hortalizas se consideran rústicas en su área?


5

Realizar una de las siguientes actividades:


5a

Examinar la germinación para 100 de las mismas clases de semillas.


El propósito de una prueba es determinar el porcentaje de semillas en un lote determinado que germinarán con éxito. Esta información se puede usar para calcular las tasas de siembra.

Una forma simple de tener una idea de la germinación del campo real antes de sembrar es realizar una prueba. Esto consiste en un tubo enrollado de papel humedecido que contiene las semillas que se analizarán para la germinación, se coloca en una bolsa de plástico y se almacena en un lugar cálido durante varios días. Las plántulas se cuentan a medida que germinan y se quitan, dando el porcentaje de germinación real.

Para realizar una prueba, humedezca una toalla de mano de papel marrón y exprima todo el exceso de agua que sea posible. No use una toalla de papel «blanda» como se encuentra típicamente en una cocina casera: las semillas pueden enviar raíces a través de esto, lo que complica el recuento. El exceso de agua en la toalla cortará el oxígeno y arruinará la prueba.

Extienda la toalla de papel sobre una superficie plana, cuente 100 semillas y colóquelas en una línea (en diagonal funciona mejor) sobre la toalla. Enrolle la toalla y colóquela en una bolsa de plástico. Selle la bolsa y colóquela en un lugar cálido, como en la parte superior de un refrigerador. Una temperatura de 30° C es ideal.

Después de cuatro días, retire la toalla de la bolsa de plástico, desenróllela, y cuente y quite las semillas que hayan germinado. Vuelva a enrollar la toalla, vuelva a colocarla en la bolsa de plástico, vuelva a sellarla y vuelva a colocarla en la parte superior del refrigerador.

Después de tres o cuatro días más, repita el conteo. El número total de semillas de ambos conteos igualará la tasa de germinación, suponiendo que se usaron 100 semillas. Si se usó un número diferente de semillas, puede calcular la tasa de germinación de la siguiente manera:

[math]\displaystyle{ Germinación\ Tasa = \frac{Semillas\ germinadas}{Semillas\ germinadas + Semillas\ no germinadas} \times 100 }[/math]


5b

Realizar y utilizar un semillero regular o uno que está recubierto de vidrio.


Hotbed (Semillero con calor)

Un semillero con calor es una pila de materia orgánica en descomposición más caliente que su entorno debido al calor que desprende el metabolismo de los microorganismos en la pila en descomposición. Los semilleros se utilizan para compostar y mantener calientes las plantas delicadas durante el invierno.

Cold Frame (cubierto con vidrio)

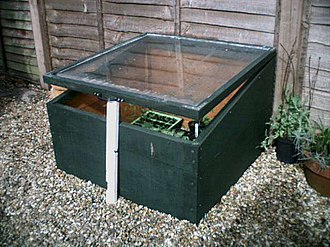
Un semillero tradicional cubierto con vidrio hecho en casa

En agricultura y jardinería, un semillero cubierto con vidrio es un recinto con techo transparente, construido cerca del suelo, que se utiliza para proteger las plantas del clima frío. La parte superior transparente admite la luz del sol y se basa en el efecto invernadero para reflejar el calor radiante que de otro modo se escaparía por la noche. Esencialmente, un semillero cubierto con vidrio funciona como un dispositivo de extensión de temporada de invernadero en miniatura.

Los semilleros cubiertos con vidrio se encuentran en los huertos familiares y en el cultivo de hortalizas. Crean microclimas que proporcionan varios grados de aislamiento de la temperatura del aire y del suelo y se protegen del viento. En las regiones de invierno frío, estas características permiten que las plantas se inicien antes en la primavera y sobrevivan más tiempo en el otoño y el invierno. Se utilizan con mayor frecuencia para cultivar plántulas que luego se trasplantan a campo abierto, y también pueden ser un hogar permanente para vegetales resistentes al frío que se cultivan para la cosecha de otoño e invierno.

La construcción del semillero cubierto con vidrio es un proyecto común de construcción de viviendas o granjas, aunque se encuentran disponibles kits y sistemas comerciales. Un plan tradicional utiliza ventanas de vidrio antiguas: se construye un marco de madera de 30-60 cm y la ventana se coloca en la parte superior. El techo a menudo está inclinado hacia el sol de invierno para capturar más luz y mejorar el escurrimiento de agua, y tiene bisagras para facilitar el acceso. Se puede usar plástico transparente, rígido o laminado en lugar del vidrio. Un cable calefactor eléctrico, disponible para este propósito, se puede colocar en el suelo para proporcionar calor adicional.


5c

Preparar tres variedades de hortalizas para el mercado.


5d

Hacer y usar un método de almacenamiento o caja para sus vegetales y hortalizas.


Referencias