Difference between revisions of "AY Honors/Digital Photography/Answer Key/en"
(Updating to match new version of source page) |
(Updating to match new version of source page) |
||
| Line 448: | Line 448: | ||
* [http://www.pathfindersonline.org/pdf/ayhonors/international/digital_photography.pdf Requirements from PathfindersOnline.org] | * [http://www.pathfindersonline.org/pdf/ayhonors/international/digital_photography.pdf Requirements from PathfindersOnline.org] | ||
* [http://honours.adventistconnect.org/photography-digital-1 Requirements from SPD] | * [http://honours.adventistconnect.org/photography-digital-1 Requirements from SPD] | ||
| − | |||
<noinclude></noinclude> | <noinclude></noinclude> | ||
{{CloseHonorPage}} | {{CloseHonorPage}} | ||
Latest revision as of 16:23, 14 July 2022
1
1a
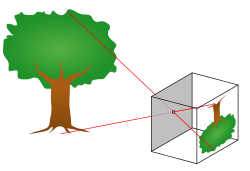
Cameras work with the light of the visible spectrum. A camera generally consists of some kind of enclosed hollow, with an opening or aperture at one end for light to enter, and a recording or viewing surface for capturing the light at the other end. Most cameras have a lens positioned in front of the camera's opening to gather the incoming light and to focus the image (or part of the image), on the recording surface. The diameter of the aperture is often controlled by a diaphragm mechanism, but some cameras have a fixed-size aperture.
Digital cameras use electronics, usually a charge coupled device (CCD) or sometimes a Complementary Metal–Oxide–Semiconductor (CMOS) sensor to capture images which can be transferred or stored in computer memory inside the camera for later playback or processing.
Here are more technical details on how the image is captured.
1b
Also look at: http://en.wikipedia.org/wiki/Image_sensor
An image sensor is a device that converts a visual image to an electric signal. It is used in digital cameras (as well as other imaging devices). It is usually an array of charge-coupled devices (CCD) or CMOS sensors such as active pixel sensors.
There are several main types of color image sensors, differing by the means of the color separation mechanism:
- Bayer sensor, low-cost and most common, using a Bayer filter that passes red, green, or blue light to selected pixels, forming interlaced grids sensitive to red, green, and blue. The image is then interpolated using a demosaicing algorithm.
- Foveon X3 sensor, using an array of layered sensors where every pixel contains three stacked sensors sensitive to the individual colors.
- 3CCD, using three discrete image sensors, with the color separation done by a dichroic prism. Considered the best quality, and generally more expensive than single-CCD sensors.
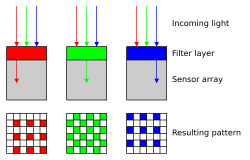
Bayer Filter
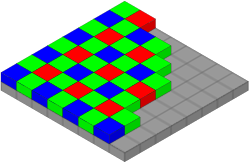
A Bayer filter mosaic is a color filter array (CFA) for arranging RGB color filters on a square grid of photosensors. The word comes from the name of its inventor, Dr. Bryce E. Bayer of Eastman Kodak, and describes an arrangement of color filters used in most single-chip digital image sensors used in digital cameras, camcorders, and scanners to create a color image. The filter pattern is 50% green, 25% red and 25% blue, and is also called RGBG or GRGB.
Bryce Bayer's patent called the green photosensors luminance-sensitive elements and the red and blue ones chrominance-sensitive elements. He used twice as many green elements as red or blue to mimic the human eye's greater resolving power with green light. These elements are referred to as sensor elements, pixel sensors, or simply pixels.
The raw output of Bayer-filter cameras is referred to as a Bayer pattern image. Since each pixel is filtered to record only one of three colors, two-thirds of the color data is missing from each. To obtain a full-color image, the red, green, and blue values are combined for each point.
Different algorithms for combining the three colors require various amounts of computing power and result in varying-quality final images. This can be done in-camera, producing a JPEG or TIFF image, or outside the camera using the raw data directly from the sensor.
And became these:
1c
To reconstruct a color image from the data collected by the color filtering array, you need to fill in the blanks. The mathematics here is subject to individual implementation, and is called demosaicing. If you have a RAW image, you can use different demosaicing than what is built into the camera, often yielding higher quality.
A digital camera has certain circuits to reconstruct the whole image using above information. It takes these:
and makes this:
1d
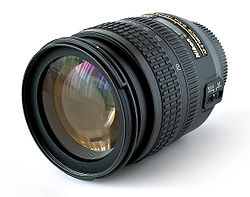
Camera Lens
A camera lens usually has an aperture adjustment mechanism to control the amount of light that may pass. It also has a shutter, to control the length of time during which light may pass through the lens.
Focal Length
The focal length is a measure of how strongly it converges (focuses) or diverges light. A shorter focal length has greater optical power than one with a long focal length.
In the photos below, the camera did not move, but the camera lens was changed as noted.
- When a lens with a shorter focal length is used, there is a wider angle of view.
- When a lens with a longer focal length is used, there is a narrower angle of view.
- Wikipedia on focal length.
- Wikipedia on photographic lens - see section on Aperture and focal length
2
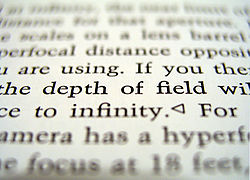
The aperture stop is an extremely important element in most optical designs. Its most obvious feature is that it limits the amount of light that can reach the image plane. This can either be undesired, as in a telescope where one wants to collect as much light as possible; or deliberate, to prevent saturation of a detector or overexposure of film. In both cases, the size of the aperture stop is constrained by things other than the amount of light admitted, however:
- The size of the stop is one factor that affects depth of field. Smaller stops produce a longer depth of field, allowing objects at a wide range of distances to all be in focus at the same time.
3
A pixel is generally thought of as the smallest complete sample of an image. The definition is highly context sensitive; for example, we can speak of printed pixels in a page, or pixels carried by electronic signals, or represented by digital values, or pixels on a display device, or pixels in a digital camera (photosensor elements). This list is not exhaustive, and depending on context there are several synonyms that are accurate in particular contexts, e.g. pel, sample, byte, bit, dot, spot, etc. We can also speak of pixels in the abstract, or as a unit of measure, in particular when using pixels as a measure of resolution, e.g. 2400 pixels per inch, 640 pixels per line, or spaced 10 pixels apart.
The measures dots per inch (dpi) and pixels per inch (ppi) are sometimes used interchangeably, but have distinct meanings especially in the printer field, where dpi is a measure of the printer's resolution of dot printing (e.g. ink droplet density). For example, a high-quality inkjet image may be printed with 200 ppi on a 720 dpi printer.
The more pixels used to represent an image, the closer the result can resemble the original. The number of pixels in an image is sometimes called the resolution, though resolution has a more specific definition. Pixel counts can be expressed as a single number, as in a "three-megapixel" digital camera, which has a nominal three million pixels, or as a pair of numbers, as in a "640 by 480 display", which has 640 pixels from side to side and 480 from top to bottom (as in a VGA display), and therefore has a total number of 640 × 480 = 307,200 pixels or 0.3 megapixels.
The pixels, or color samples, that form a digitized image (such as a JPEG file used on a web page) may or may not be in one-to-one correspondence with screen pixels, depending on how a computer displays an image.
In computing, an image composed of pixels is known as a bitmapped image or a raster image. The word raster originates from halftone printing technology, and has been widely used to describe television scanning patterns.
4
There are many image compression algorithms, but they can all be neatly divided into one of two types: lossless and lossy.
Lossless Compression
In lossless compression, when the image is restored from the compressed format, it is an exact binary match to the original. Every bit is exactly the same as in the original. Examples of lossless image compression file formats include:
- ABO - Adaptive Binary Optimization
- GIF - (lossless, but contains a very limited number color range)
- JBIG2 - (lossless or lossy compression of B&W images)
- JPEG-LS - (lossless/near-lossless compression standard)
- JPEG 2000 - (includes lossless compression method, as proven by Sunil Kumar, Prof San Diego State University)
- PNG - Portable Network Graphics
- TIFF - Tagged Image File Format
- WMPhoto - (includes lossless compression method)
Lossy Compression
With lossy compression, the uncompressed image is not exactly the same, but it can be very difficult to tell the difference with the naked eye. By permanently throwing away some of the information in the image, the file can be made much smaller.
- Fractal compression
- JPEG Joint Photographics Expert Group
- JPEG 2000, JPEG's successor format that uses wavelets.
- Wavelet compression
- JBIG2
- Cartesian Perceptual Compression: Also known as CPC
- DjVu
- ICER, used by the Mars Rovers: related to JPEG 2000 in its use of wavelets
- HAM, hardware compression of color information used in Amiga computers
5
Major graphic file formats
There are many graphic file formats, if we include the proprietary types. The PNG, JPEG, and GIF formats are most often used to display images on the Internet. These graphic formats are listed and briefly described below, separated into the two main families of graphics: raster and vector.
Raster formats
For a description of the technology aside from the format, see Raster graphics.
JPEG
The JPEG (Joint Photographic Experts Group) image files are a lossy format. The DOS filename extension is JPG, although other operating systems may use JPEG. Nearly all digital cameras have the option to save images in JPEG format. The JPEG format supports 8-bit per color - red, green, and blue, for 24-bit total - and produces relatively small file sizes. Fortunately, the compression in most cases does not detract noticeably from the image. But JPEG files do suffer generational degradation when repeatedly edited and saved. Photographic images are best stored in a lossless non-JPEG format if they will be re-edited in future, or if the presence of small "artifacts" (blemishes), due to the nature of the JPEG compression algorithm, is unacceptable. JPEG is also used as the image compression algorithm in many Adobe PDF files.
TIFF
The TIFF (Tagged Image File Format) is a flexible image format that normally saves 16-bit per color - red, green and blue for a total of 48-bits - or 8-bit per color - red, green and blue for a total of 24-bits - and uses a filename extension of TIFF or TIF. TIFF's flexibility is both a feature and a curse, with no single reader capable of handling all the different varieties of TIFF files. TIFF can be lossy or lossless. Some types of TIFF offer relatively good lossless compression for bi-level (black and white, no grey) images. Some high-end digital cameras have the option to save images in the TIFF format, using the LZW compression algorithm for lossless storage. The TIFF image format is not widely supported by web browsers, and should not be used on the World Wide Web. TIFF is still widely accepted as a photograph file standard in the printing industry. TIFF is capable of handling device-specific color spaces, such as the CMYK defined by a particular set of printing press inks.
RAW
The RAW image format is a file option available on some digital cameras. It usually uses a lossless compression and produces file sizes much smaller than the TIFF format. Unfortunately, the RAW format is not standard among all camera manufacturers and some graphic programs and image editors may not accept the RAW format. The better graphic editors can read some manufacturer's RAW formats, and some (mostly higher-end) digital cameras also support saving images in the TIFF format directly. Adobe's Digital Negative Specification is a recent (September 2004) attempt at standardizing the various "raw" file formats used by digital cameras.
PNG
The PNG (Portable Network Graphics) file format is regarded, and was made as, the free and open-source successor to the GIF file format. The PNG file format supports true color (16 million colors) whereas the GIF file format only allows 256 colors. PNG excels when the image has large areas of uniform color. The lossless PNG format is best suited for editing pictures, and the lossy formats like JPG are best for final distribution of photographic-type images because of smaller file size. Many older browsers do not yet support the PNG file format, however with the release of Internet Explorer 7 all popular modern browsers fully support PNG. The Adam7-interlacing allows an early preview even when only a small percentage of the data of the image has been transmitted.
GIF
GIF (Graphic Interchange Format) is limited to an 8-bit palette, or 256 colors. This makes the GIF format suitable for storing graphics with relatively few colors such as simple diagrams, shapes and cartoon style images. The GIF format supports animation and is still widely used to provide image animation effects. It also uses a lossless compression that is more effective when large areas have a single color, and ineffective for detailed images or dithered images.
BMP
The BMP (bit mapped) format is used internally in the Microsoft Windows operating system to handle graphics images. These files are typically not compressed resulting in large files. The main advantage of BMP files is their wide acceptance, simplicity, and use in Windows programs. However, they may pose problems for users of other operating systems. Commonly, BMP files are used for Microsoft's Paint program. Since most BMP files are uncompressed, and BMP's RLE compression has serious limits, the large size of BMP files makes them unsuitable for file transfer. However, Bit Map images are suitable for background images and wallpapers. This is especially true for screen shots. In addition, images from scanners are usually stored in BMP files.
HDP
The HDP format (formally known as WDP) is the newly introduced image format by Microsoft for media print quality, lossless image compression. This image standard has a specific applicability to mostly print media due to its size although it is rumored to be the standard for Microsoft Office 2007 and the brand new Windows Vista operating system. This format is very similar to the TIFF format, but can handle a much larger range of image types and qualities such as 8, 16, and 32 bits per channel processing, N-Channel support, and embedded tiling.
XPM
The XPM format is the default X Window System picture format (very popular in the Linux world). Its structure is based on the string format of the C programming language. Because XPM was designed to be human-readable, and is stored as uncompressed plain-text, the file size of these pictures can be more than twice as large as uncompressed binary bitmap files (such as BMP, uncompressed TIFF, MacOS-PICT, or Irix-RGB formats). This format is unsupported by most non-Unix software and operating systems (though many web-browsers retain display support for the XBM subset, which was the minimal image format in the early days of the WWW).
MrSID
The MrSID (Multiresolution Seamless Image Database) format is a wavelet compression format used mostly by Geographic Information Systems to store massive satellite imagery for map software.
Vector formats
As opposed to the raster image formats above (where the data describes the characteristics of each individual pixel), vector image formats contain a geometric description which can be rendered smoothly at any desired display size.
Vector file formats can contain bitmap data as well. 3D graphic file formats are technically vector formats with pixel data texture mapping on the surface of a vector virtual object, warped to match the angle of the viewing perspective.
At some point, all vector graphics must be rasterized in order to be displayed on digital monitors. However vector images can be displayed with analog CRT technology such as that used in some electronic test equipment, medical monitors, radar displays, laser shows and early video games. Plotters are printers that use vector data rather than pixel data to draw graphics.
SVG
SVG (Scalable Vector Graphics) is an open standard created and developed by the World Wide Web Consortium to address the need (and attempts of several corporations) for a versatile, scriptable and all-purpose vector format for the web and otherwise. The SVG format does not have a compression scheme of its own, but due to the textual nature of XML, an SVG graphic can be compressed using a program such as gzip. Because of its scripting potential, SVG is a key component in web applications: interactive web pages that look and act like applications.
6
Photography is used primarily for the following purposes: Recording events -- whether a campout, a family picnic, or other event, photography allows us to record the people and events involved. Later, we can "remember" by viewing the images/pictures.
Art appreciation -- Landscape, macro (close-up) photography, and other artistic photography allows a photographer to share their impressions of the world with friends and associates
The definition of Photography is as follows:
Photography [fә'tɑgrәfi:],[foʊ'tɑgrәfi:]
is the process of recording pictures by means of capturing light on a light-sensitive medium, such as a film or sensor. Light patterns reflected or emitted from objects expose a sensitive chemical or electronic medium during a timed exposure, usually through a photographic lens in a device known as a camera that also stores the resulting information chemically or electronically.
The word comes from the Greek words φως phos ("light"), and γραφίς graphis ("stylus", "paintbrush") or γραφή graphê ("representation by means of lines" or "drawing"), together meaning "drawing with light." Traditionally, the product of photography has been called a photograph, commonly shortened to photo.
Photography gained the interest of many scientists and artists from its inception. Scientists have used photography to record and study movements, such as Eadweard Muybridge's study of human and animal locomotion in 1887. Artists are equally interested by these aspects but also try to explore avenues other than the photo-mechanical representation of reality, such as the pictorialist movement. Military, police and security forces use photography for surveillance, recognition and data storage. Photography is used to preserve memories of favorites and as a source of entertainment.
7
(some of these details are copied from the Photography honor)
7a
When we use our eyes, we see the world in three dimensions. The biggest reason for this is because we have two eyes about 1 1/2" apart that give us "two photos" that our brain then interprets as being three-dimensional--big objects are closer than small objects.
However, cameras only have one "eye" the lens, so we have to intentionally take pictures that are "extra" 3-dimensional. One way we can do this by Framing.
Framing uses some element in the photograph to act as a foreground or middle-distance frame which overlaps or highlights the main subject of your photo.
For example, if you're taking a picture of rolling hills, give your picture "depth" by putting a tree or fence post that is closer to you on the right or left hand side of the photograph.
Other examples of Frames include: a tree branch, rocks on a seashore, a friend or an archway.
7b
Have you ever gotten pictures developed and all you see is a "blur" that was supposed to be a family member? Maybe you've taken a picture through the window of a car while its been moving. This is called camera blur and is most often caused when you're using a "fancy" SLR camera where the exposure setting is 1/125th of a second or slower. However, it can also happen when you don't practice good "camera posture" when composing your photograph.
When you're taking pictures, is very important that the camera doesn't wiggle as you take the picture! Some helpful hints for keeping this from happening are:
- Use both hands to steady the camera. One-handed picture taking is hazardous to your photographic health!
- If you're using a fancy SLR camera, be sure your exposure time is set equal to or greater than your film speed (ex. If you're using 200 speed film, have it set to 1/250, 1/500, or 1/1000). Otherwise use a table, wall or something else steady to steady yourself as you take the photo.
- Most point-and-shoot cameras have this film/exposure time ratio "built-in" to their cameras.
- The best way to hold a camera in a comfortable position but rigidly is to form an imaginary tripod with the camera pressed against your forehead and your elbows against your body. Take a breath, partially exhale, and gently press the shutter button.
- Be careful not to get any of your fingers or the camera chord in front of the flash or the lens!!
7c
Direction of lighting, Quality of Lighting, & Rule of Thirds Quiz question (not really. . .) Should the sun be behind the subject you're photographing, beside the subject, or shining on the subject?
People used to think that you could only take good pictures if the sun was behind the photographer (YOU!) shining on the subject they were taking a picture. But that's not true.
For instance, if you want to take a sunset picture and want your framing subject (such as a person walking down the beach) to be a silhouette, the sun should be behind him, shining toward you (back lighting).
Lighting:
Front lighting is best when you want to see the details, like if you're taking a close-up of someone's face. A downfall is, that if the lights too bright, such as in the middle of the day, there might be "glare" in your subject.
Side lighting is great for bringing out shapes and textures, such as a rocky mountain cliff or tree bark. These two photos are from Mono Lake In California. Notice how different the same rocks look depending on where the light is coming from?
Back lighting is lighting from behind the subject, tends to hide the subject, forming a silhouette. Some good places to use back lighting are a camporee flagpole at sunset, a cow/horse grazing at sunset, or a playground after everyone has gone home for the evening.
7d
- The best light conditions are 1 1/2 hours before sunset or the first hour after sunrise. The reason is that the light isn't SO BRIGHT that it washes out the colors in your picture, but at the same time the shadows are long (which makes side lighting pictures look extra special). Also, the sunset or sunrise gives off a kind of "pink" or "orange" light, which makes many nature pictures look very friendly & special. If you want to know when sunrise and sunset are going to be, check out www.adventist.org's sunset calendar!
- Be careful of evening shadows when photographing people. long shadows on faces hide features and expressions!
- Pictures taken during the middle of the day will be "stark" with hard lines and minimal shadows. Buildings & some landscapes such as mountains look especially regal or majestic during the middle of the day. Just remember that if you take a picture during the middle of the day, shade the top of the lens of your camera by placing one of your hands or a piece of paper horizontal about 2" above the lens to form a "shade for the lens. This will keep pink & blue "sparks" from showing up on your photos.
- When there is no sunshine (on a rainy day) don't give up on taking pictures! Zoom in close on flowers and other colorful objects. The color will be extra deep since its not being "washed out" by the sun. Fog which often accompanies soft rain also makes a very nice soft hazy look. Just be sure to protect you lens from specks of rain!
7e
A Picture looks best when you imagine a tic-tac-toe board on top of your picture you're going to take. Remember that we're wanting a photo to look 3 dimensional! Part of that is arranging it in combination with "Framing" and "Leading Lines" techniques, but putting objects in "3rds" on the photo.
For example: In a mountain scene the landscape in the bottom screen--maybe even a tree or rock to help it look "more 3-D"-- the mountains in the middle 3rd, and the sky in the top third.
Another Illustration: If you're taking a picture of a landscape with puffy clouds, take one picture where 2/3 of the picture is composed of the clouds and the landscape fills the bottom 1/3. Then try with 1/3 clouds and 2/3 landscape. Notice how different this same landscape looks with the "3rds" changed from top to bottom!
7f
Subjects look different depending on where you are in relation to them when you take the picture.
You'll need three photos for this requirement, though they don't have to be of the same object. A High-angle, Mid-angle, and Low-angle photograph.
High angle means: looking down on your subject
Mid-angle means: looking at your subject straight on.
Low-angle means: looking up at your subject
For this requirement, take a subject, such as some tall straight trees, and take a picture looking straight at them, then another one by laying on the ground looking up through the trees. Did the angle make a difference?
7g
7h
Have you ever taken a picture of a beautiful flower or some animals but when the photo came back, you had to explain to friends "that dot is a pretty rose," and "that dot over there is a buffalo."?
Filling the frame is all about making your subject (what you're taking a picture of) fill up most of the picture frame. This means standing closer to the subject than you're ordinarily used to doing and making sure there's not a lot of "green space" around your subject.
Some ideas for Pathfinders:
- Take a picture of your whole youth group. Be sure there are some standing and some standing/sitting in front of them. Then, get close enough so that there is almost NO "background green space" around them. You'll be impressed with how nice it is to have a photo that shows the expressions on everybody's face.
- Take a picture of your best friend while they're eating at a campout or lockin. Don't try to take a picture of the whole room, but zoom in on their upper body and the top of the table with the plate of food. You'll both laugh when you see the photo that shows how shocked your friend was at your "surprise" picture.
7i
Leading lines are anything in a photograph that will help lead your eyes towards the main subject. For example, do you want people eyes to travel "down the road into the sunset, just like the bus is doing? Or, do you want people to see the big cafeteria on the hill where you and your fellow pathfinders ate all weekend?
Leading Lines also help your photograph's "depth." If your eyes are able to wander into the picture, then your brain will think the picture looks more real, like the real 3-D world we live in.
Ideas for Pathfinders:
- Roads: take a picture of a windy road that leads to nowwhere; The road that leads to camporee or the road into the campsite you're staying at this weekend may also be a good leading line.
- Trails
- Fence Posts / Fence lines
- Tall buildings or tall trees. Take pictures straight up, and use those tall lines to guide your eyes to a Mountain peak, or to the sun / moon shining overhead.
7j
7k
Most flashes should be used no closer to a subject than 6 feet. and more than 20 feet away. Any closer and it will "wash out" your subject, (depending on flash), and any farther away, the light won't even reach. For example: Have you ever seen people use a flash at a football game, or in a large stadium in hopes of getting photos of the people on the field? The flash won't help because its too far away!
Don't try to use a flash when there is a reflective object directly in front of the lens. For example, a mirror or window behind your friends, or the fishtank glass between you and that shark at SeaWorld. Move off to the side diagonally a little, so that the light, when it flashes off the reflective object, won't bounce directly back to your lens, but instead will bounce into empty space beside you!
Use the flash to fill in shadows. If your subject has side-lighting erasing the features on its face that you want to capture on film, use the flash to erase the shadows. BE SURE you're far enough away, or the whol picture will be blotted out!
Some ideas for Pathfinders:
- Try using a flash when your friends are in a dark cave or room. Arrange them 6 feet away from your camera, then take 2 pictures. One with a flash and one without. Notice the difference. Now take one with your friend(s) only 3 feet away. What happened?
- At your next campout, just before sunset grab some friends and have them stand in front of camp, with the sunlight coming from one side, casting shadows on their faces. Take 2 pictures. One with fill-in flash, and one without. What was the difference?
8
Generally speaking, depending on your version of the presentation software, you follow the menu path: Insert -> Picture -> From File, and navigate to the picture you want to place. After that, you can right click on the picture, and select Format Picture and do some changes.
Do not feel constrained to using PowerPoint. You can download OpenOffice for free from http://www.openoffice.org and use the Impress package that comes with it. Impress can generate slides that PowerPoint can read. OpenOffice is available for Windows, Mac, Linux, and other operating systems.
9
Most modern photo editing software allows you to accomplish these tasks simply and quickly. Adobe's Photoshop is probably the best known photo editing package, but you may wish to experiment with The Gimp. It can be downloaded for free and runs under Windows, Mac, and Linux.
10
11
File - A computer file is a block of arbitrary information, or resource for storing information, just a sequence of binary digits. At a higher level, where the content of the file is being considered, these binary digits may represent integer values or text characters, or anything else. It is up to the program using the file to understand the meaning and internal layout of information in the file and present it to a user as a document, image, song, or program.
Organization - An organization is a social arrangement which pursues collective goals, which controls its own performance, and which has a boundary separating it from its environment. The word itself is derived from the Greek word ὄργανον (organon) meaning tool. The term is used in both daily and scientific English in multiple ways.
Put together, file organization asks that you understand how to organize files on your computer, on the bookshelf, etc. Do you place the files in some sort of established order? Alphabetically, by date? by subject?
