Difference between revisions of "AY Honors/Paper Quilling/Answer Key/es"
(Created page with "Especialidades JA/Filigrana de papel/Respuestas") |
(Updating to match new version of source page) |
||
| (5 intermediate revisions by one other user not shown) | |||
| Line 2: | Line 2: | ||
<section begin="Body" /> | <section begin="Body" /> | ||
{{ansreq|page={{#titleparts:{{PAGENAME}}|2|1}}|num=1}} | {{ansreq|page={{#titleparts:{{PAGENAME}}|2|1}}|num=1}} | ||
| − | <noinclude> | + | <noinclude></noinclude> |
| − | </noinclude> | + | <!-- 1. ¿Cómo fue llamada la filigrana en papel cuando la manualidad comenzó? --> |
| − | <!-- 1. | + | La filigrana en papel se llamó originalmente '''enrollar papel'''. |
| − | |||
| − | |||
| − | + | <noinclude></noinclude> | |
| − | <noinclude | ||
| − | |||
{{CloseReq}} <!-- 1 --> | {{CloseReq}} <!-- 1 --> | ||
{{ansreq|page={{#titleparts:{{PAGENAME}}|2|1}}|num=2}} | {{ansreq|page={{#titleparts:{{PAGENAME}}|2|1}}|num=2}} | ||
| − | <noinclude> | + | <noinclude></noinclude> |
| − | </noinclude> | + | <!-- 2. Conocer la historia de filigrana en papel. --> |
| − | <!-- 2. | + | Durante el Renacimiento, monjes y monjas francesas e italianas usaron la filigrana en papel para decorar portadas de libros y artículos religiosos. El papel más utilizado fue pedazos de papel recortados de los bordes dorados de los libros. Estos pedazos de papel dorados fueron luego enrollados para crear las formas de filigrana. La filigrana muchas veces la herrería original del día. |
| − | + | En el siglo XVIII, la filigrana se hizo popular en Europa donde las «damas del ocio» practicaban el arte. La filigrana también se extendió a las Américas y hay algunos ejemplos de la época colonial. Muchas de las piezas que se han conservado a partir de este momento se encuentran en placas religiosas y obras de arte. | |
| − | + | Hoy en día, la filigrana está viendo un resurgimiento en popularidad. La artesanía se ha vuelto cada vez más popular debido al bajo costo del material básico, el papel, que se requiere para hacer las formas. Se utiliza para decorar invitaciones de boda, anuncios de nacimiento, tarjetas de felicitación, páginas de bloc de notas y cajas. La filigrana en papel se puede encontrar en galerías de arte en Europa y en los Estados Unidos y es un arte que se practica en todo el mundo. | |
| − | |||
| − | |||
| − | + | <noinclude></noinclude> | |
| − | <noinclude | ||
| − | |||
{{CloseReq}} <!-- 2 --> | {{CloseReq}} <!-- 2 --> | ||
{{ansreq|page={{#titleparts:{{PAGENAME}}|2|1}}|num=3}} | {{ansreq|page={{#titleparts:{{PAGENAME}}|2|1}}|num=3}} | ||
| − | <noinclude> | + | <noinclude></noinclude> |
| − | </noinclude> | + | <!-- 3. Conocer las herramientas utilizadas en filigrana en papel. --> |
| − | <!-- 3. | + | * Bolígrafo con punta para filigrana (herramienta ranurada) |
| − | * | + | * Tiras de papel |
| − | * | + | * Pegamento |
| − | * | + | * Regla |
| − | * | + | * Pasadores y cartón (para hacer bobinas excéntricas si se desea) |
| − | * | ||
| − | |||
| − | + | <noinclude></noinclude> | |
| − | <noinclude | ||
| − | |||
{{CloseReq}} <!-- 3 --> | {{CloseReq}} <!-- 3 --> | ||
{{ansreq|page={{#titleparts:{{PAGENAME}}|2|1}}|num=4}} | {{ansreq|page={{#titleparts:{{PAGENAME}}|2|1}}|num=4}} | ||
| − | <noinclude> | + | <noinclude></noinclude> |
| − | </noinclude> | + | <!-- 4. Saber y ser capaz de realizar correctamente cada uno de los siguientes enrollados: --> |
| − | <!-- 4. | + | <noinclude></noinclude> |
| − | <noinclude | ||
| − | |||
{{ansreq|page={{#titleparts:{{PAGENAME}}|2|1}}|num=4a}} | {{ansreq|page={{#titleparts:{{PAGENAME}}|2|1}}|num=4a}} | ||
| − | <noinclude> | + | <noinclude></noinclude> |
| − | </noinclude> | ||
<gallery perrow=2 widths=300px> | <gallery perrow=2 widths=300px> | ||
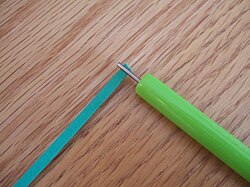
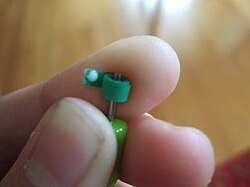
| − | image:Paper Quilling 1.jpg|1. | + | image:Paper Quilling 1.jpg|1. Para hacer un círculo apretado, tome un bolígrafo con punta y una tira de papel cortada la longitud deseada. Coloque el extremo de la tira de papel en la ranura del bolígrafo. |
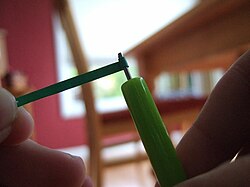
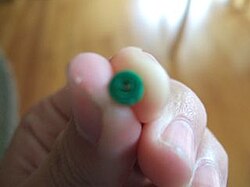
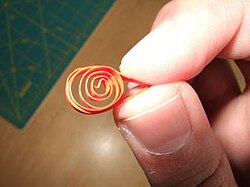
| − | image:Paper quilling 2.jpg|2. | + | image:Paper quilling 2.jpg|2. Luego, sosteniendo la tira de papel un poco tensa con la mano izquierda, gire el bolígrafo hacia la mano izquierda con la mano derecha. |
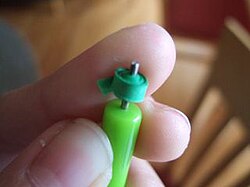
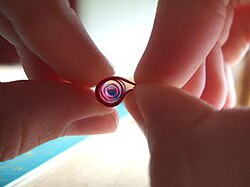
| − | Image:Paper quilling 3.jpg|3. | + | Image:Paper quilling 3.jpg|3. Continúe rodando y una vez que llegue al final de la tira de papel, coloque un pequeño punto de pegamento en el extremo de la tira, presione contra el lado del círculo y manténgalo allí durante 5-10 segundos para que se seque el pegamento. |
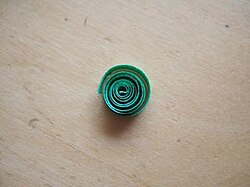
| − | Image:Paper quilling 4.jpg|4. | + | Image:Paper quilling 4.jpg|4. Luego, deslice el círculo cerrado del bolígrafo y... ¡voilá! Ha hecho un círculo apretado. |
</gallery> | </gallery> | ||
| − | |||
| − | + | <noinclude></noinclude> | |
| − | <noinclude | ||
| − | |||
{{CloseReq}} <!-- 4a --> | {{CloseReq}} <!-- 4a --> | ||
{{ansreq|page={{#titleparts:{{PAGENAME}}|2|1}}|num=4b}} <!--T:6--> | {{ansreq|page={{#titleparts:{{PAGENAME}}|2|1}}|num=4b}} <!--T:6--> | ||
| − | <noinclude> | + | <noinclude></noinclude> |
| − | </noinclude> | ||
<gallery perrow=2 widths=300px> | <gallery perrow=2 widths=300px> | ||
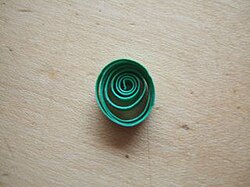
| − | Image:Circle.jpg|1. | + | Image:Circle.jpg|1. El círculo suelto es casi lo mismo que un círculo cerrado. Comienza de la misma manera que lo hizo con el círculo cerrado, pero cuando llega al final de la tira, no ponga pegamento en la tira, sino que extraiga el círculo del bolígrafo. |
| − | Image:Poof.jpg|2. | + | Image:Poof.jpg|2. ¡Ahora, póngalo en una mesa y déjelo suelto! |
| − | Image:Glueeee.jpg|3. | + | Image:Glueeee.jpg|3. Luego, coloque un poco de pegamento en el extremo de la tira de papel, presiónelo contra el lado del círculo y manténgalo ahí durante 5-10 segundos. |
| − | Image:Loose circlee.jpg|4. | + | Image:Loose circlee.jpg|4. ¡Y ahora tiene un círculo suelto! |
</gallery> | </gallery> | ||
| − | |||
| − | + | <noinclude></noinclude> | |
| − | <noinclude | ||
| − | |||
{{CloseReq}} <!-- 4b --> | {{CloseReq}} <!-- 4b --> | ||
{{ansreq|page={{#titleparts:{{PAGENAME}}|2|1}}|num=4c}} <!--T:7--> | {{ansreq|page={{#titleparts:{{PAGENAME}}|2|1}}|num=4c}} <!--T:7--> | ||
| − | <noinclude> | + | <noinclude></noinclude> |
| − | </noinclude> | ||
<gallery perrow=2 widths=300px> | <gallery perrow=2 widths=300px> | ||
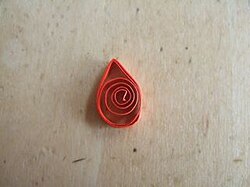
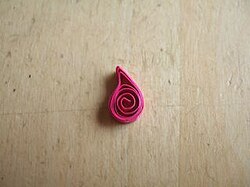
| − | Image:Teardroppaper.jpg|1. | + | Image:Teardroppaper.jpg|1. Para hacer una lágrima, comience con un círculo suelto. Pellizque un lado del círculo en un punto. |
| − | image:Teardropquilling.jpg|2. | + | image:Teardropquilling.jpg|2. ¡Ahora ha creado una lágrima! |
</gallery> | </gallery> | ||
| − | |||
| − | + | <noinclude></noinclude> | |
| − | <noinclude | ||
| − | |||
{{CloseReq}} <!-- 4c --> | {{CloseReq}} <!-- 4c --> | ||
{{ansreq|page={{#titleparts:{{PAGENAME}}|2|1}}|num=4d}} <!--T:8--> | {{ansreq|page={{#titleparts:{{PAGENAME}}|2|1}}|num=4d}} <!--T:8--> | ||
| − | <noinclude> | + | <noinclude></noinclude> |
| − | </noinclude> | ||
<gallery perrow=2 widths=300px> | <gallery perrow=2 widths=300px> | ||
| − | Image:Shaped tear.jpg| 1. | + | Image:Shaped tear.jpg|1. Para hacer una lágrima con forma, comience con una lágrima, pero doble la punta hacia abajo. |
| − | Image:Shapedteardrop.jpg| 2. | + | Image:Shapedteardrop.jpg|2. ¡Y ahora debe de haber creado una lágrima con forma! |
</gallery> | </gallery> | ||
| − | |||
| − | + | <noinclude></noinclude> | |
| − | <noinclude | ||
| − | |||
{{CloseReq}} <!-- 4d --> | {{CloseReq}} <!-- 4d --> | ||
{{ansreq|page={{#titleparts:{{PAGENAME}}|2|1}}|num=4e}} <!--T:9--> | {{ansreq|page={{#titleparts:{{PAGENAME}}|2|1}}|num=4e}} <!--T:9--> | ||
| − | <noinclude> | + | <noinclude></noinclude> |
| − | </noinclude> | ||
<gallery perrow=2 widths=300px> | <gallery perrow=2 widths=300px> | ||
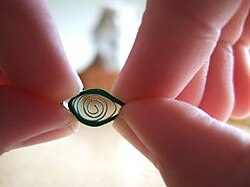
| − | Image:Marquise! .jpg| 1. | + | Image:Marquise! .jpg|1. Para hacer una marquesa, comience con un círculo suelto, luego pellizque los lados opuestos. |
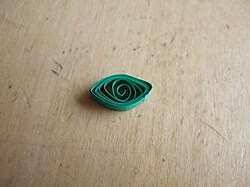
| − | Image:Marquiseeeeee.jpg| 2. | + | Image:Marquiseeeeee.jpg|2. ¡Ha creado una marquesa! |
</gallery> | </gallery> | ||
| − | |||
| − | + | <noinclude></noinclude> | |
| − | <noinclude | ||
| − | |||
{{CloseReq}} <!-- 4e --> | {{CloseReq}} <!-- 4e --> | ||
{{ansreq|page={{#titleparts:{{PAGENAME}}|2|1}}|num=4f}} <!--T:10--> | {{ansreq|page={{#titleparts:{{PAGENAME}}|2|1}}|num=4f}} <!--T:10--> | ||
| − | <noinclude> | + | <noinclude></noinclude> |
| − | </noinclude> | + | <noinclude></noinclude> |
| − | <noinclude | ||
| − | |||
{{CloseReq}} <!-- 4f --> | {{CloseReq}} <!-- 4f --> | ||
{{ansreq|page={{#titleparts:{{PAGENAME}}|2|1}}|num=4g}} | {{ansreq|page={{#titleparts:{{PAGENAME}}|2|1}}|num=4g}} | ||
| − | <noinclude> | + | <noinclude></noinclude> |
| − | </noinclude> | + | <noinclude></noinclude> |
| − | <noinclude | ||
| − | |||
{{CloseReq}} <!-- 4g --> | {{CloseReq}} <!-- 4g --> | ||
{{ansreq|page={{#titleparts:{{PAGENAME}}|2|1}}|num=4h}} | {{ansreq|page={{#titleparts:{{PAGENAME}}|2|1}}|num=4h}} | ||
| − | <noinclude> | + | <noinclude></noinclude> |
| − | </noinclude> | + | <noinclude></noinclude> |
| − | <noinclude | ||
| − | |||
{{CloseReq}} <!-- 4h --> | {{CloseReq}} <!-- 4h --> | ||
{{ansreq|page={{#titleparts:{{PAGENAME}}|2|1}}|num=4i}} | {{ansreq|page={{#titleparts:{{PAGENAME}}|2|1}}|num=4i}} | ||
| − | <noinclude> | + | <noinclude></noinclude> |
| − | </noinclude> | + | <noinclude></noinclude> |
| − | <noinclude | ||
| − | |||
{{CloseReq}} <!-- 4i --> | {{CloseReq}} <!-- 4i --> | ||
{{ansreq|page={{#titleparts:{{PAGENAME}}|2|1}}|num=4j}} | {{ansreq|page={{#titleparts:{{PAGENAME}}|2|1}}|num=4j}} | ||
| − | <noinclude> | + | <noinclude></noinclude> |
| − | </noinclude> | + | <noinclude></noinclude> |
| − | <noinclude | ||
| − | |||
{{CloseReq}} <!-- 4j --> | {{CloseReq}} <!-- 4j --> | ||
{{ansreq|page={{#titleparts:{{PAGENAME}}|2|1}}|num=4k}} | {{ansreq|page={{#titleparts:{{PAGENAME}}|2|1}}|num=4k}} | ||
| − | <noinclude> | + | <noinclude></noinclude> |
| − | </noinclude> | + | <noinclude></noinclude> |
| − | <noinclude | + | {{clear}} |
| − | |||
{{CloseReq}} <!-- 4k --> | {{CloseReq}} <!-- 4k --> | ||
{{ansreq|page={{#titleparts:{{PAGENAME}}|2|1}}|num=4l}} | {{ansreq|page={{#titleparts:{{PAGENAME}}|2|1}}|num=4l}} | ||
| − | <noinclude> | + | <noinclude></noinclude> |
| − | </noinclude> | + | <noinclude></noinclude> |
| − | <noinclude | ||
| − | |||
{{CloseReq}} <!-- 4l --> | {{CloseReq}} <!-- 4l --> | ||
{{ansreq|page={{#titleparts:{{PAGENAME}}|2|1}}|num=4m}} | {{ansreq|page={{#titleparts:{{PAGENAME}}|2|1}}|num=4m}} | ||
| − | <noinclude> | + | <noinclude></noinclude> |
| − | </noinclude> | + | <noinclude></noinclude> |
| − | <noinclude | ||
| − | |||
{{CloseReq}} <!-- 4m --> | {{CloseReq}} <!-- 4m --> | ||
{{ansreq|page={{#titleparts:{{PAGENAME}}|2|1}}|num=4n}} | {{ansreq|page={{#titleparts:{{PAGENAME}}|2|1}}|num=4n}} | ||
| − | <noinclude> | + | <noinclude></noinclude> |
| − | </noinclude | ||
| − | |||
| − | + | <noinclude></noinclude> | |
| − | <noinclude | ||
| − | |||
{{CloseReq}} <!-- 4n --> | {{CloseReq}} <!-- 4n --> | ||
{{CloseReq}} <!-- 4 --> | {{CloseReq}} <!-- 4 --> | ||
{{ansreq|page={{#titleparts:{{PAGENAME}}|2|1}}|num=5}} | {{ansreq|page={{#titleparts:{{PAGENAME}}|2|1}}|num=5}} | ||
| − | <noinclude> | + | <noinclude></noinclude> |
| − | </noinclude> | + | <!-- 5. Saber y ser capaz de realizar correctamente uno de los siguientes rollos: --> |
| − | <!-- 5. | + | <noinclude></noinclude> |
| − | <noinclude | ||
| − | |||
{{ansreq|page={{#titleparts:{{PAGENAME}}|2|1}}|num=5a}} | {{ansreq|page={{#titleparts:{{PAGENAME}}|2|1}}|num=5a}} | ||
| − | <noinclude> | + | <noinclude></noinclude> |
| − | </noinclude> | + | <noinclude></noinclude> |
| − | <noinclude | ||
| − | |||
{{CloseReq}} <!-- 5a --> | {{CloseReq}} <!-- 5a --> | ||
{{ansreq|page={{#titleparts:{{PAGENAME}}|2|1}}|num=5b}} | {{ansreq|page={{#titleparts:{{PAGENAME}}|2|1}}|num=5b}} | ||
| − | <noinclude> | + | <noinclude></noinclude> |
| − | </noinclude> | + | <noinclude></noinclude> |
| − | <noinclude | ||
| − | |||
{{CloseReq}} <!-- 5b --> | {{CloseReq}} <!-- 5b --> | ||
{{ansreq|page={{#titleparts:{{PAGENAME}}|2|1}}|num=5c}} | {{ansreq|page={{#titleparts:{{PAGENAME}}|2|1}}|num=5c}} | ||
| − | <noinclude> | + | <noinclude></noinclude> |
| − | </noinclude> | + | <noinclude></noinclude> |
| − | <noinclude | ||
| − | |||
{{CloseReq}} <!-- 5c --> | {{CloseReq}} <!-- 5c --> | ||
{{ansreq|page={{#titleparts:{{PAGENAME}}|2|1}}|num=5d}} | {{ansreq|page={{#titleparts:{{PAGENAME}}|2|1}}|num=5d}} | ||
| − | <noinclude> | + | <noinclude></noinclude> |
| − | </noinclude> | + | <noinclude></noinclude> |
| − | <noinclude | ||
| − | |||
{{CloseReq}} <!-- 5d --> | {{CloseReq}} <!-- 5d --> | ||
{{ansreq|page={{#titleparts:{{PAGENAME}}|2|1}}|num=5e}} | {{ansreq|page={{#titleparts:{{PAGENAME}}|2|1}}|num=5e}} | ||
| − | <noinclude> | + | <noinclude></noinclude> |
| − | </noinclude | ||
| − | |||
| − | + | <noinclude></noinclude> | |
| − | <noinclude | ||
| − | |||
{{CloseReq}} <!-- 5e --> | {{CloseReq}} <!-- 5e --> | ||
{{CloseReq}} <!-- 5 --> | {{CloseReq}} <!-- 5 --> | ||
{{ansreq|page={{#titleparts:{{PAGENAME}}|2|1}}|num=6}} | {{ansreq|page={{#titleparts:{{PAGENAME}}|2|1}}|num=6}} | ||
| − | <noinclude> | + | <noinclude></noinclude> |
| − | </noinclude> | + | <!-- 6. Hacer un simple diseño floral utilizando al menos tres de los métodos mencionados. --> |
| − | <!-- 6. | ||
| − | |||
| − | + | ¡Estos son muy divertidos para hacer! Todo lo que necesita saber es cómo hacer las formas básicas y los rollos mencionados anteriormente. Puede combinar las formas para hacer hermosas flores, mariposas y diseños. Luego, puede pegarlos en una tarjeta o en un pedazo de papel y colgarlo en su cuarto. Aquí hay un diseño floral simple que utiliza marqueses, rollos S, rollos sueltos, rollos V, lágrimas y círculos apretados. | |
| − | |||
| − | |||
| − | |||
[[Image:Flowerdesign.jpg|right]] | [[Image:Flowerdesign.jpg|right]] | ||
| − | |||
| − | |||
{{clear}} | {{clear}} | ||
| − | |||
| − | + | <noinclude></noinclude> | |
| − | <noinclude | ||
| − | |||
{{CloseReq}} <!-- 6 --> | {{CloseReq}} <!-- 6 --> | ||
{{ansreq|page={{#titleparts:{{PAGENAME}}|2|1}}|num=7}} | {{ansreq|page={{#titleparts:{{PAGENAME}}|2|1}}|num=7}} | ||
| − | <noinclude> | + | <noinclude></noinclude> |
| − | </noinclude> | + | <!-- 7. Hacer un llenado en una imagen o adorno. --> |
| − | <!-- 7. | + | <noinclude></noinclude> |
| − | <noinclude | ||
| − | |||
{{CloseReq}} <!-- 7 --> | {{CloseReq}} <!-- 7 --> | ||
| − | <noinclude> | + | <noinclude></noinclude> |
| − | </noinclude> | + | ==Referencias== |
| − | == | + | <noinclude></noinclude> |
| − | <noinclude | ||
| − | |||
| − | |||
{{CloseHonorPage}} | {{CloseHonorPage}} | ||
Latest revision as of 21:27, 14 July 2022
Nivel de destreza
1
Año
2006
Version
10.02.2026
Autoridad de aprobación
Asociación General
1
La filigrana en papel se llamó originalmente enrollar papel.
2
Durante el Renacimiento, monjes y monjas francesas e italianas usaron la filigrana en papel para decorar portadas de libros y artículos religiosos. El papel más utilizado fue pedazos de papel recortados de los bordes dorados de los libros. Estos pedazos de papel dorados fueron luego enrollados para crear las formas de filigrana. La filigrana muchas veces la herrería original del día.
En el siglo XVIII, la filigrana se hizo popular en Europa donde las «damas del ocio» practicaban el arte. La filigrana también se extendió a las Américas y hay algunos ejemplos de la época colonial. Muchas de las piezas que se han conservado a partir de este momento se encuentran en placas religiosas y obras de arte.
Hoy en día, la filigrana está viendo un resurgimiento en popularidad. La artesanía se ha vuelto cada vez más popular debido al bajo costo del material básico, el papel, que se requiere para hacer las formas. Se utiliza para decorar invitaciones de boda, anuncios de nacimiento, tarjetas de felicitación, páginas de bloc de notas y cajas. La filigrana en papel se puede encontrar en galerías de arte en Europa y en los Estados Unidos y es un arte que se practica en todo el mundo.
3
- Bolígrafo con punta para filigrana (herramienta ranurada)
- Tiras de papel
- Pegamento
- Regla
- Pasadores y cartón (para hacer bobinas excéntricas si se desea)
4
4a
4b
4c
4d
4e
4f
4g
4h
4i
4j
4k
4l
4m
4n
5
5a
5b
5c
5d
5e
6
¡Estos son muy divertidos para hacer! Todo lo que necesita saber es cómo hacer las formas básicas y los rollos mencionados anteriormente. Puede combinar las formas para hacer hermosas flores, mariposas y diseños. Luego, puede pegarlos en una tarjeta o en un pedazo de papel y colgarlo en su cuarto. Aquí hay un diseño floral simple que utiliza marqueses, rollos S, rollos sueltos, rollos V, lágrimas y círculos apretados.
7
