Difference between revisions of "AY Honors/Flower Culture/Answer Key/es"
(Created page with "{{clear}}") |
(Updating to match new version of source page) |
||
| (36 intermediate revisions by 2 users not shown) | |||
| Line 1: | Line 1: | ||
| − | + | {{HonorSubpage}} | |
| − | |||
| − | {{ | ||
| − | |||
| − | |||
| − | |||
| − | |||
| − | |||
| − | |||
| − | |||
| − | }} | ||
| − | |||
| − | |||
<section begin="Body" /> | <section begin="Body" /> | ||
{{ansreq|page={{#titleparts:{{PAGENAME}}|2|1}}|num=1}} | {{ansreq|page={{#titleparts:{{PAGENAME}}|2|1}}|num=1}} | ||
| Line 37: | Line 25: | ||
<noinclude></noinclude> | <noinclude></noinclude> | ||
<!-- 2. Dar las instrucciones generales para hacer un semillero. ¿Cuál es la diferencia entre un semillero con calor (hotbed) y el que está recubierto de vidrio (cold frame)? --> | <!-- 2. Dar las instrucciones generales para hacer un semillero. ¿Cuál es la diferencia entre un semillero con calor (hotbed) y el que está recubierto de vidrio (cold frame)? --> | ||
| − | {{: | + | {{:AY Honors/Hotbed cold frame/es}} |
<noinclude></noinclude> | <noinclude></noinclude> | ||
| Line 53: | Line 41: | ||
{{ansreq|page={{#titleparts:{{PAGENAME}}|2|1}}|num=4}} | {{ansreq|page={{#titleparts:{{PAGENAME}}|2|1}}|num=4}} | ||
<noinclude></noinclude> | <noinclude></noinclude> | ||
| − | <!-- 4. | + | <!-- 4. Nombrar tres plagas de plantas y mencionar cómo controlarlas. --> |
| − | |||
| − | |||
| − | |||
| − | |||
| − | |||
| − | |||
| − | |||
| − | |||
{{clear}} | {{clear}} | ||
| − | {{clear}} | + | {{clear}} |
{{clear}} | {{clear}} | ||
| Line 71: | Line 51: | ||
{{clear}} | {{clear}} | ||
| − | + | {{clear}} | |
| − | + | {{clear}} | |
| − | |||
| − | |||
| − | + | {{clear}} | |
| − | + | {{clear}} | |
| − | + | {{clear}} | |
| − | + | {{clear}} | |
| − | + | {{clear}} | |
| − | |||
| − | + | {{clear}} | |
| − | + | {{clear}} | |
| − | + | ||
| − | + | {{clear}} | |
<noinclude></noinclude> | <noinclude></noinclude> | ||
| Line 98: | Line 75: | ||
{{ansreq|page={{#titleparts:{{PAGENAME}}|2|1}}|num=5}} | {{ansreq|page={{#titleparts:{{PAGENAME}}|2|1}}|num=5}} | ||
<noinclude></noinclude> | <noinclude></noinclude> | ||
| − | <!-- 5. | + | <!-- 5. Dar instrucciones para hacer una maceta jardinera (para las ventanas) y decir su uso. --> |
| − | |||
| − | |||
| − | + | {{clear}} | |
| − | + | {{clear}} | |
| − | + | {{clear}} | |
| − | |||
<noinclude></noinclude> | <noinclude></noinclude> | ||
| Line 113: | Line 87: | ||
{{ansreq|page={{#titleparts:{{PAGENAME}}|2|1}}|num=6}} | {{ansreq|page={{#titleparts:{{PAGENAME}}|2|1}}|num=6}} | ||
<noinclude></noinclude> | <noinclude></noinclude> | ||
| − | <!-- 6. | + | <!-- 6. Preparar la tierra (suelo), fertilizar, sembrar y cultivar hasta la maduración tres clases diferentes de plantas anuales. --> |
| − | + | {{:AY Honors/Soil preparation/es}} | |
| − | {{: | + | {{:AY Honors/Fertilizing/es}} |
| − | + | {{:AY Honors/Planting/es}} | |
| − | {{: | ||
| − | |||
| − | {{: | ||
| − | |||
| − | |||
<noinclude></noinclude> | <noinclude></noinclude> | ||
| Line 127: | Line 96: | ||
{{ansreq|page={{#titleparts:{{PAGENAME}}|2|1}}|num=7}} | {{ansreq|page={{#titleparts:{{PAGENAME}}|2|1}}|num=7}} | ||
<noinclude></noinclude> | <noinclude></noinclude> | ||
| − | <!-- 7. | + | <!-- 7. Cuidar dos o más flores perennes al aire libre para una temporada, fertilizándolas, regándolas, deshierbándolas y tratándolas contra plagas, según sea necesario. Mantener un registro escrito con entradas semanales, mencionando el trabajo realizado. --> |
| − | |||
| − | + | {{clear}} | |
<noinclude></noinclude> | <noinclude></noinclude> | ||
| Line 136: | Line 104: | ||
{{ansreq|page={{#titleparts:{{PAGENAME}}|2|1}}|num=8}} | {{ansreq|page={{#titleparts:{{PAGENAME}}|2|1}}|num=8}} | ||
<noinclude></noinclude> | <noinclude></noinclude> | ||
| − | <!-- 8. | + | <!-- 8. ¿Qué tres nutrientes para plantas son más importantes para las plantas con flores? --> |
| − | |||
<noinclude></noinclude> | <noinclude></noinclude> | ||
| Line 143: | Line 110: | ||
{{ansreq|page={{#titleparts:{{PAGENAME}}|2|1}}|num=9}} | {{ansreq|page={{#titleparts:{{PAGENAME}}|2|1}}|num=9}} | ||
<noinclude></noinclude> | <noinclude></noinclude> | ||
| − | <!-- 9. | + | <!-- 9. Identificar tres plantas con flores adaptadas a cada una de las siguientes condiciones: --> |
<noinclude></noinclude> | <noinclude></noinclude> | ||
{{ansreq|page={{#titleparts:{{PAGENAME}}|2|1}}|num=9a}} | {{ansreq|page={{#titleparts:{{PAGENAME}}|2|1}}|num=9a}} | ||
<noinclude></noinclude> | <noinclude></noinclude> | ||
| − | |||
| − | |||
| − | |||
| − | |||
| − | |||
| − | |||
| − | |||
| − | |||
| − | |||
| − | |||
<noinclude></noinclude> | <noinclude></noinclude> | ||
| Line 162: | Line 119: | ||
{{ansreq|page={{#titleparts:{{PAGENAME}}|2|1}}|num=9b}} <!--T:31--> | {{ansreq|page={{#titleparts:{{PAGENAME}}|2|1}}|num=9b}} <!--T:31--> | ||
<noinclude></noinclude> | <noinclude></noinclude> | ||
| − | |||
| − | |||
| − | |||
| − | |||
| − | |||
| − | |||
<noinclude></noinclude> | <noinclude></noinclude> | ||
| Line 173: | Line 124: | ||
{{ansreq|page={{#titleparts:{{PAGENAME}}|2|1}}|num=9c}} <!--T:32--> | {{ansreq|page={{#titleparts:{{PAGENAME}}|2|1}}|num=9c}} <!--T:32--> | ||
<noinclude></noinclude> | <noinclude></noinclude> | ||
| − | |||
| − | |||
| − | |||
| − | |||
| − | |||
| − | |||
| − | |||
| − | |||
| − | |||
| − | |||
<noinclude></noinclude> | <noinclude></noinclude> | ||
| Line 188: | Line 129: | ||
{{ansreq|page={{#titleparts:{{PAGENAME}}|2|1}}|num=9d}} <!--T:33--> | {{ansreq|page={{#titleparts:{{PAGENAME}}|2|1}}|num=9d}} <!--T:33--> | ||
<noinclude></noinclude> | <noinclude></noinclude> | ||
| − | |||
| − | |||
| − | |||
| − | |||
| − | |||
| − | |||
<noinclude></noinclude> | <noinclude></noinclude> | ||
| Line 200: | Line 135: | ||
{{ansreq|page={{#titleparts:{{PAGENAME}}|2|1}}|num=10}} | {{ansreq|page={{#titleparts:{{PAGENAME}}|2|1}}|num=10}} | ||
<noinclude></noinclude> | <noinclude></noinclude> | ||
| − | <!-- 10. | + | <!-- 10. ¿Cuál es el propósito un suelo de prueba? --> |
| − | |||
<noinclude></noinclude> | <noinclude></noinclude> | ||
| Line 207: | Line 141: | ||
{{ansreq|page={{#titleparts:{{PAGENAME}}|2|1}}|num=11}} | {{ansreq|page={{#titleparts:{{PAGENAME}}|2|1}}|num=11}} | ||
<noinclude></noinclude> | <noinclude></noinclude> | ||
| − | <!-- 11. | + | <!-- 11. Hacer un dibujo de diez plantas anuales, cinco perennes y dos bienales. Etiquetar y saber el nombre de cada uno de memoria. --> |
| − | |||
| − | |||
| − | |||
| − | |||
| − | |||
| − | |||
| − | |||
| − | |||
| − | |||
| − | |||
| − | |||
| − | |||
| − | |||
| − | |||
| − | |||
| − | + | {{clear}} | |
| − | |||
| − | |||
| − | |||
| − | |||
| − | |||
| − | |||
| − | |||
| − | |||
| − | |||
| − | + | {{clear}} | |
| − | |||
| − | |||
| − | |||
| − | |||
| − | |||
| − | |||
| − | |||
| − | |||
| − | |||
| − | |||
| − | |||
| − | |||
| − | |||
| − | |||
| − | |||
<noinclude></noinclude> | <noinclude></noinclude> | ||
{{CloseReq}} <!-- 11 --> | {{CloseReq}} <!-- 11 --> | ||
| + | |||
<noinclude></noinclude> | <noinclude></noinclude> | ||
| − | == | + | ==Referencias== |
| − | |||
| − | |||
| − | |||
| − | |||
| − | |||
| − | |||
<noinclude></noinclude> | <noinclude></noinclude> | ||
| − | + | ||
| + | {{CloseHonorPage}} | ||
Latest revision as of 18:55, 21 July 2022
1
1a
1b
1c
2
Hotbed (Semillero con calor)
Un semillero con calor es una pila de materia orgánica en descomposición más caliente que su entorno debido al calor que desprende el metabolismo de los microorganismos en la pila en descomposición. Los semilleros se utilizan para compostar y mantener calientes las plantas delicadas durante el invierno.
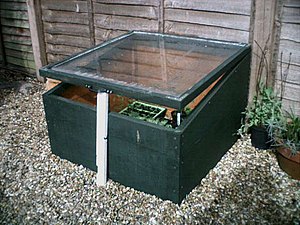
Cold Frame (cubierto con vidrio)
En agricultura y jardinería, un semillero cubierto con vidrio es un recinto con techo transparente, construido cerca del suelo, que se utiliza para proteger las plantas del clima frío. La parte superior transparente admite la luz del sol y se basa en el efecto invernadero para reflejar el calor radiante que de otro modo se escaparía por la noche. Esencialmente, un semillero cubierto con vidrio funciona como un dispositivo de extensión de temporada de invernadero en miniatura.
Los semilleros cubiertos con vidrio se encuentran en los huertos familiares y en el cultivo de hortalizas. Crean microclimas que proporcionan varios grados de aislamiento de la temperatura del aire y del suelo y se protegen del viento. En las regiones de invierno frío, estas características permiten que las plantas se inicien antes en la primavera y sobrevivan más tiempo en el otoño y el invierno. Se utilizan con mayor frecuencia para cultivar plántulas que luego se trasplantan a campo abierto, y también pueden ser un hogar permanente para vegetales resistentes al frío que se cultivan para la cosecha de otoño e invierno.
La construcción del semillero cubierto con vidrio es un proyecto común de construcción de viviendas o granjas, aunque se encuentran disponibles kits y sistemas comerciales. Un plan tradicional utiliza ventanas de vidrio antiguas: se construye un marco de madera de 30-60 cm y la ventana se coloca en la parte superior. El techo a menudo está inclinado hacia el sol de invierno para capturar más luz y mejorar el escurrimiento de agua, y tiene bisagras para facilitar el acceso. Se puede usar plástico transparente, rígido o laminado en lugar del vidrio. Un cable calefactor eléctrico, disponible para este propósito, se puede colocar en el suelo para proporcionar calor adicional.
3
4
5
6
Por lo general, debe seguir las instrucciones incluidas con la planta que compra. Cave un hoyo a la profundidad adecuada según las instrucciones. También querrá controlar el pH (acidez) del suelo. Agregue cal para aumentar el pH o agregue estiércol para disminuirlo. Sin embargo, asegúrese de que estén bien mezclados con la tierra, porque los grupos concentrados pueden dañar sus plantas. Puede comprar kits de medición de pH y analizar el suelo usted mismo. El suelo debe estar bien labrado y suelto.
Cuando cave un hoyo para plantar, no se sienta obligado a rellenar ese hoyo con la misma tierra que le quitó. Para los ambiciosos, hay docenas de recetas de suelo para elegir, combinando marga, vermiculita, turba, cal, fertilizante, arena, compost, carbón, estiércol, etc. Por lo general, solo necesita un galón de tierra por planta, no 40 acres de tierra perfecta.
No fertilice en exceso y espere de cuatro a seis semanas después de plantar antes de fertilizar. Haga un círculo alrededor de cada planta con una onza de sulfato de amonio durante el primer año. Después de eso, haga lo mismo con dos onzas tan pronto como las plantas florezcan, y nuevamente un mes después.
Nuevamente, debe seguir las instrucciones que vienen con una nueva planta. Necesitará cavar un hoyo a la profundidad adecuada y, por lo general, colocará la planta en el hoyo para que la nueva línea de suelo coincida con la antigua línea de suelo. Si la planta se ha atado a las raíces en el contenedor, debe cortar las raíces que están enrolladas alrededor del exterior para permitir que crezcan las raíces más nuevas dentro del cepellón. Una vez que la planta se haya colocado en el hoyo al nivel adecuado, entierre las raíces. Empaque la tierra sin apretar alrededor de la raíz - ¡no apretada!
Coloca una capa de mantillo. El mantillo ayuda a controlar las malas hierbas y retener la humedad. Esto ayudará en los calurosos meses de verano. Las astillas de madera son excelentes para esto. No utilice hojas ni aserrín, ya que absorberán la humedad de las plantas y dificultarán la penetración del agua en las raíces.
7
8
9
9a
9b
9c
9d
10
11


