Difference between revisions of "AY Honors/Paper Maché/Answer Key"
Jomegat bot (talk | contribs) (Bot: Automated import of articles *** existing text overwritten ***) |
m (- Category of AYHAB) |
||
| (4 intermediate revisions by 3 users not shown) | |||
| Line 1: | Line 1: | ||
| − | + | {{HonorSubpage}} | |
| − | |||
| − | |||
| − | {{ | ||
| − | |||
| − | |||
| − | |||
| − | |||
| − | |||
| − | |||
| − | |||
| − | |||
| − | |||
<section begin="Body" /> | <section begin="Body" /> | ||
{{ansreq|page={{#titleparts:{{PAGENAME}}|2|1}}|num=1}} | {{ansreq|page={{#titleparts:{{PAGENAME}}|2|1}}|num=1}} | ||
| − | <noinclude><translate></noinclude> | + | <noinclude><translate><!--T:28--> |
| + | </noinclude> | ||
<!-- 1. Name at least three kinds of bases upon which paper models may be shaped. --> | <!-- 1. Name at least three kinds of bases upon which paper models may be shaped. --> | ||
[[Image:Papier mache.jpg|thumb|right|Papier-mâché around a form such as a balloon to create a pig. The balloon is popped when the glue hardens.]] | [[Image:Papier mache.jpg|thumb|right|Papier-mâché around a form such as a balloon to create a pig. The balloon is popped when the glue hardens.]] | ||
| − | When wet, paper maché has very little form and will not hold its shape. | + | When wet, paper maché has very little form and will not hold its shape. So the first step in making a paper maché project is to make a base onto which the paper maché is applied. Bases can be made from many different items, including: |
| − | #'''Balloons:''' Inflate a balloon and tape other items onto it, such as paper cups, toilet paper rolls, or other items. | + | #'''Balloons:''' Inflate a balloon and tape other items onto it, such as paper cups, toilet paper rolls, or other items. |
#'''Plastic bottles:''' Attach golf tees for legs to turn a plastic bottle into an animal (such as a pig). | #'''Plastic bottles:''' Attach golf tees for legs to turn a plastic bottle into an animal (such as a pig). | ||
| − | #'''Aluminum Foil:''' Press the foil around a person's face to get an image of it. | + | #'''Aluminum Foil:''' Press the foil around a person's face to get an image of it. If the subject wears glasses, leave them on. Carefully remove the foil and place crumpled newspaper into it to help hold the shape. |
#'''Paper Plates:''' These make an excellent base for constructing a mask. | #'''Paper Plates:''' These make an excellent base for constructing a mask. | ||
#'''Cardboard Boxes:''' Use small cardboard boxes such as those in which many food items are packaged. | #'''Cardboard Boxes:''' Use small cardboard boxes such as those in which many food items are packaged. | ||
| − | #'''Wire and Wire Mesh:''' Form wire into the desired shape. | + | #'''Wire and Wire Mesh:''' Form wire into the desired shape. Especially useful for this is fencing wire (such as chicken wire) and gutter guard mesh. Hardware cloth is a little too stiff to work with. |
| + | <!--T:29--> | ||
<noinclude></translate></noinclude> | <noinclude></translate></noinclude> | ||
{{CloseReq}} <!-- 1 --> | {{CloseReq}} <!-- 1 --> | ||
{{ansreq|page={{#titleparts:{{PAGENAME}}|2|1}}|num=2}} | {{ansreq|page={{#titleparts:{{PAGENAME}}|2|1}}|num=2}} | ||
| − | <noinclude><translate></noinclude> | + | <noinclude><translate><!--T:30--> |
| + | </noinclude> | ||
<!-- 2. There are two main types of paper maché: --> | <!-- 2. There are two main types of paper maché: --> | ||
| Line 37: | Line 28: | ||
Before painting any product of papier-mâché, the glue must be fully dried, otherwise mold will form and the product will rot from the inside out. | Before painting any product of papier-mâché, the glue must be fully dried, otherwise mold will form and the product will rot from the inside out. | ||
| + | <!--T:31--> | ||
<noinclude></translate></noinclude> | <noinclude></translate></noinclude> | ||
{{ansreq|page={{#titleparts:{{PAGENAME}}|2|1}}|num=2a}} <!--T:6--> | {{ansreq|page={{#titleparts:{{PAGENAME}}|2|1}}|num=2a}} <!--T:6--> | ||
| − | <noinclude><translate></noinclude> | + | <noinclude><translate><!--T:32--> |
| + | </noinclude> | ||
'''Paper Pulp Method''' | '''Paper Pulp Method''' | ||
<!--T:7--> | <!--T:7--> | ||
| − | #Prepare the paper: tear up your paper into little pieces (newspaper works well and is free) or collect paper from an office shredder. In some instances, this will be good enough, but if you need finer pulp, throw the paper into a blender with some water. | + | #Prepare the paper: tear up your paper into little pieces (newspaper works well and is free) or collect paper from an office shredder. In some instances, this will be good enough, but if you need finer pulp, throw the paper into a blender with some water. |
#Leave the paper in water at least overnight to soak, or boil in abundant water until the paper dissolves in a pulp. | #Leave the paper in water at least overnight to soak, or boil in abundant water until the paper dissolves in a pulp. | ||
#Drain excess water through a fine sieve. Don't plug your sink with pulp. | #Drain excess water through a fine sieve. Don't plug your sink with pulp. | ||
| − | #Add adhesive - which could be white glue or wallpaper paste or any of a variety of other adhesives depending on the desired effect. | + | #Add adhesive - which could be white glue or wallpaper paste or any of a variety of other adhesives depending on the desired effect. Amounts are not given here - you need to experiment to find a consistency that works well for what you are trying to do. |
#Shape the pulp directly over or inside the a form. You can also sculpt directly like clay without a form to guide you, especially for smaller or simpler objects | #Shape the pulp directly over or inside the a form. You can also sculpt directly like clay without a form to guide you, especially for smaller or simpler objects | ||
| + | <!--T:33--> | ||
<noinclude></translate></noinclude> | <noinclude></translate></noinclude> | ||
{{CloseReq}} <!-- 2a --> | {{CloseReq}} <!-- 2a --> | ||
{{ansreq|page={{#titleparts:{{PAGENAME}}|2|1}}|num=2b}} <!--T:8--> | {{ansreq|page={{#titleparts:{{PAGENAME}}|2|1}}|num=2b}} <!--T:8--> | ||
| − | <noinclude><translate></noinclude> | + | <noinclude><translate><!--T:34--> |
| + | </noinclude> | ||
<!--T:9--> | <!--T:9--> | ||
| Line 62: | Line 57: | ||
<!--T:11--> | <!--T:11--> | ||
| − | #Make your glue after you are all ready to use it as it will start drying out. The traditional glue is | + | #Make your glue after you are all ready to use it as it will start drying out. The traditional glue is |
<!--T:12--> | <!--T:12--> | ||
| Line 69: | Line 64: | ||
<!--T:13--> | <!--T:13--> | ||
| − | Mix the flour into the water thoroughly with your hands, being sure to break up all the lumps. | + | Mix the flour into the water thoroughly with your hands, being sure to break up all the lumps. You might try heating the mixture too, but do not let it come to a boil. You can vary the amount of flour or water to make the glue thicker or thinner. Experiment to find what works best for you. |
<!--T:14--> | <!--T:14--> | ||
| Line 83: | Line 78: | ||
The traditional method of making papier-mâché adhesive is to use a mixture of water and flour or other starch, mixed to the consistency of heavy cream. Other adhesives can be used if thinned to a similar texture, such as polyvinyl acetate-based glues (wood glue or, in the United States, white Elmer's glue). Adding oil of cloves or other additives such as salt or a little bleach to the mixture reduces the chances of the product developing mold. | The traditional method of making papier-mâché adhesive is to use a mixture of water and flour or other starch, mixed to the consistency of heavy cream. Other adhesives can be used if thinned to a similar texture, such as polyvinyl acetate-based glues (wood glue or, in the United States, white Elmer's glue). Adding oil of cloves or other additives such as salt or a little bleach to the mixture reduces the chances of the product developing mold. | ||
| + | <!--T:35--> | ||
<noinclude></translate></noinclude> | <noinclude></translate></noinclude> | ||
{{CloseReq}} <!-- 2b --> | {{CloseReq}} <!-- 2b --> | ||
{{CloseReq}} <!-- 2 --> | {{CloseReq}} <!-- 2 --> | ||
{{ansreq|page={{#titleparts:{{PAGENAME}}|2|1}}|num=3}} | {{ansreq|page={{#titleparts:{{PAGENAME}}|2|1}}|num=3}} | ||
| − | <noinclude><translate></noinclude> | + | <noinclude><translate><!--T:36--> |
| + | </noinclude> | ||
<!-- 3. Be familiar with all ingredients and know why they are used. --> | <!-- 3. Be familiar with all ingredients and know why they are used. --> | ||
| Line 96: | Line 93: | ||
:Paper-mâché paste is the substance that holds the paper together. The traditional method of making paper-mâché paste is to add one part water to one part flour. Some artists prefer to boil the paste, saying that it makes the consistency smoother. Water to flour ratio is changed to five parts water to one part flour in this case. Other artists use a three to one or a one to one ratio of water and Polyvinyl acetate (PVA glue). Still others say that starch makes a fine paste. Adding a dash of cinnamon to the mixture gives the paste a pleasant smell; adding a dash of salt reduces the chances of the product developing mold. | :Paper-mâché paste is the substance that holds the paper together. The traditional method of making paper-mâché paste is to add one part water to one part flour. Some artists prefer to boil the paste, saying that it makes the consistency smoother. Water to flour ratio is changed to five parts water to one part flour in this case. Other artists use a three to one or a one to one ratio of water and Polyvinyl acetate (PVA glue). Still others say that starch makes a fine paste. Adding a dash of cinnamon to the mixture gives the paste a pleasant smell; adding a dash of salt reduces the chances of the product developing mold. | ||
| + | <!--T:37--> | ||
<noinclude></translate></noinclude> | <noinclude></translate></noinclude> | ||
{{CloseReq}} <!-- 3 --> | {{CloseReq}} <!-- 3 --> | ||
{{ansreq|page={{#titleparts:{{PAGENAME}}|2|1}}|num=4}} | {{ansreq|page={{#titleparts:{{PAGENAME}}|2|1}}|num=4}} | ||
| − | <noinclude><translate></noinclude> | + | <noinclude><translate><!--T:38--> |
| + | </noinclude> | ||
<!-- 4. Make, paint and varnish at least two articles from pulp. --> | <!-- 4. Make, paint and varnish at least two articles from pulp. --> | ||
| Line 105: | Line 104: | ||
The painting adds the color, while the varnish makes the art more water resistant and gives it a solid surface. Have fun. | The painting adds the color, while the varnish makes the art more water resistant and gives it a solid surface. Have fun. | ||
| − | <!--T: | + | <!--T:39--> |
| − | |||
| − | |||
<noinclude></translate></noinclude> | <noinclude></translate></noinclude> | ||
{{CloseReq}} <!-- 4 --> | {{CloseReq}} <!-- 4 --> | ||
{{ansreq|page={{#titleparts:{{PAGENAME}}|2|1}}|num=5}} | {{ansreq|page={{#titleparts:{{PAGENAME}}|2|1}}|num=5}} | ||
| − | <noinclude><translate></noinclude> | + | <noinclude><translate><!--T:40--> |
| + | </noinclude> | ||
<!-- 5. Make, paint and varnish at least two articles from paste and paper strips. --> | <!-- 5. Make, paint and varnish at least two articles from paste and paper strips. --> | ||
<!--T:24--> | <!--T:24--> | ||
| − | If you need further instruction we suggest searching | + | If you need further instruction we suggest searching YouTube for demonstration videos. Have fun creating. |
| + | <!--T:41--> | ||
<noinclude></translate></noinclude> | <noinclude></translate></noinclude> | ||
{{CloseReq}} <!-- 5 --> | {{CloseReq}} <!-- 5 --> | ||
{{ansreq|page={{#titleparts:{{PAGENAME}}|2|1}}|num=6}} | {{ansreq|page={{#titleparts:{{PAGENAME}}|2|1}}|num=6}} | ||
| − | <noinclude><translate></noinclude> | + | <noinclude><translate><!--T:42--> |
| + | </noinclude> | ||
<!-- 6. Submit articles to examiner and have workmanship approved. --> | <!-- 6. Submit articles to examiner and have workmanship approved. --> | ||
[[Image:Preparazione vendola.jpg|thumb|500px|Building of a papier maché mask in the Carnival of Massafra]] | [[Image:Preparazione vendola.jpg|thumb|500px|Building of a papier maché mask in the Carnival of Massafra]] | ||
| − | As the instructor, you will be responsible for judging the workmanship of the projects. | + | As the instructor, you will be responsible for judging the workmanship of the projects. The most important consideration is that you apply a fair standard and not show favoritism. Pathfinders are quickly able to detect unfairness, as it is an extremely important concept to them. |
<!--T:26--> | <!--T:26--> | ||
<br style="clear:both"> | <br style="clear:both"> | ||
| + | <!--T:43--> | ||
<noinclude></translate></noinclude> | <noinclude></translate></noinclude> | ||
{{CloseReq}} <!-- 6 --> | {{CloseReq}} <!-- 6 --> | ||
| Line 134: | Line 135: | ||
* [http://www.katehodgson.net/pmcindex.html Kate Hodgson's Paper Maché Website] | * [http://www.katehodgson.net/pmcindex.html Kate Hodgson's Paper Maché Website] | ||
<noinclude></translate></noinclude> | <noinclude></translate></noinclude> | ||
| − | + | {{CloseHonorPage}} | |
| − | |||
Latest revision as of 23:34, 18 July 2022
1
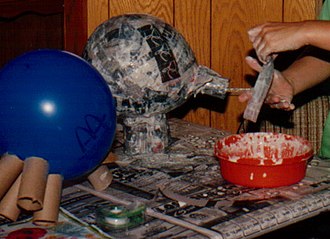
When wet, paper maché has very little form and will not hold its shape. So the first step in making a paper maché project is to make a base onto which the paper maché is applied. Bases can be made from many different items, including:
- Balloons: Inflate a balloon and tape other items onto it, such as paper cups, toilet paper rolls, or other items.
- Plastic bottles: Attach golf tees for legs to turn a plastic bottle into an animal (such as a pig).
- Aluminum Foil: Press the foil around a person's face to get an image of it. If the subject wears glasses, leave them on. Carefully remove the foil and place crumpled newspaper into it to help hold the shape.
- Paper Plates: These make an excellent base for constructing a mask.
- Cardboard Boxes: Use small cardboard boxes such as those in which many food items are packaged.
- Wire and Wire Mesh: Form wire into the desired shape. Especially useful for this is fencing wire (such as chicken wire) and gutter guard mesh. Hardware cloth is a little too stiff to work with.
2
These are the Paper Pulp Method and Paper Strip Method. In both methods, reinforcements with wire, chicken wire, lightweight shapes, balloons or textiles may be needed.
Before painting any product of papier-mâché, the glue must be fully dried, otherwise mold will form and the product will rot from the inside out.
2a
Paper Pulp Method
- Prepare the paper: tear up your paper into little pieces (newspaper works well and is free) or collect paper from an office shredder. In some instances, this will be good enough, but if you need finer pulp, throw the paper into a blender with some water.
- Leave the paper in water at least overnight to soak, or boil in abundant water until the paper dissolves in a pulp.
- Drain excess water through a fine sieve. Don't plug your sink with pulp.
- Add adhesive - which could be white glue or wallpaper paste or any of a variety of other adhesives depending on the desired effect. Amounts are not given here - you need to experiment to find a consistency that works well for what you are trying to do.
- Shape the pulp directly over or inside the a form. You can also sculpt directly like clay without a form to guide you, especially for smaller or simpler objects
2b
The Paper Strip Method uses layers of paper strips glued together with adhesive.
- Tear or cut your paper (newspaper works well) into strips. The width and length of the strips will depend on the size of the object you want to create.
- Create a form for support on which to glue the paper strips. It can be an armature or skeleton, often of wire mesh over a structural frame, or you might use an object to create a cast. Oil or grease can be used as a release agent if needed.
- Make your glue after you are all ready to use it as it will start drying out. The traditional glue is
- 6 cups water
- 1 cup white flour
Mix the flour into the water thoroughly with your hands, being sure to break up all the lumps. You might try heating the mixture too, but do not let it come to a boil. You can vary the amount of flour or water to make the glue thicker or thinner. Experiment to find what works best for you.
You can also add a few tablespoons of bleach to retard the growth of mold, but make sure everyone who is going to use the paste knows that you did this - after all, flour and water are the same ingredients that you use to make bread, and you don't want your Pathfinders performing any taste-tests on a bleach-laden batch of glue!
- Soaked the paper in the paste until saturated
- Layer the saturated pieces allow to dry slowly
- When the glue dries, the paper stays in place and binds together forming a (hopefully) beautiful sculpture.
- Once dried, the sculpture can be cut, sanded and/or painted. Waterproofing with water-repelling paint works well.
The traditional method of making papier-mâché adhesive is to use a mixture of water and flour or other starch, mixed to the consistency of heavy cream. Other adhesives can be used if thinned to a similar texture, such as polyvinyl acetate-based glues (wood glue or, in the United States, white Elmer's glue). Adding oil of cloves or other additives such as salt or a little bleach to the mixture reduces the chances of the product developing mold.
3
- Here are some thoughts on the paste from Wikipedia: Paper Maché
- Paper-mâché paste is the substance that holds the paper together. The traditional method of making paper-mâché paste is to add one part water to one part flour. Some artists prefer to boil the paste, saying that it makes the consistency smoother. Water to flour ratio is changed to five parts water to one part flour in this case. Other artists use a three to one or a one to one ratio of water and Polyvinyl acetate (PVA glue). Still others say that starch makes a fine paste. Adding a dash of cinnamon to the mixture gives the paste a pleasant smell; adding a dash of salt reduces the chances of the product developing mold.
4
The painting adds the color, while the varnish makes the art more water resistant and gives it a solid surface. Have fun.
5
If you need further instruction we suggest searching YouTube for demonstration videos. Have fun creating.
6
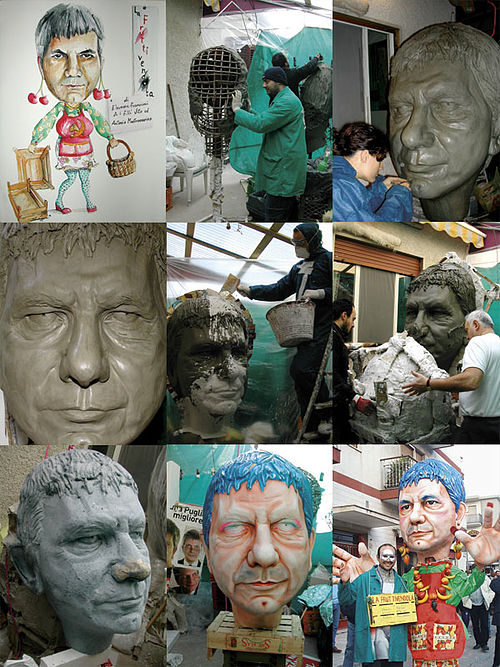
As the instructor, you will be responsible for judging the workmanship of the projects. The most important consideration is that you apply a fair standard and not show favoritism. Pathfinders are quickly able to detect unfairness, as it is an extremely important concept to them.


