|
|
| (172 intermediate revisions by 2 users not shown) |
| Line 1: |
Line 1: |
| − | <languages /><br />
| + | {{HonorSubpage}} |
| − | <noinclude></noinclude>
| + | <!--{{Honor_Master|honor=Sailing|master=Aquatic}}--> |
| − | {{honor_desc/es | |
| − | |stage=00
| |
| − | |honorname=Navegación a vela
| |
| − | |skill=2
| |
| − | |year=1953
| |
| − | |category=Actividades recreacionales
| |
| − | |authority=Asociación General
| |
| − | |insignia=Sailing_Honor.png
| |
| − | }} | |
| − | | |
| − | {{Honor_Master/es|honor=Navegación a vela|master=Acuática}} | |
| − | | |
| − | | |
| − | <noinclude></noinclude>
| |
| | <section begin="Body" /> | | <section begin="Body" /> |
| | {{ansreq|page={{#titleparts:{{PAGENAME}}|2|1}}|num=1}} | | {{ansreq|page={{#titleparts:{{PAGENAME}}|2|1}}|num=1}} |
| | <noinclude></noinclude> | | <noinclude></noinclude> |
| − | <!-- 1. Have the Intermediate Swimming Honor. --> | + | <!-- 1. Tener la especialidad de Natación II. --> |
| − | {{honor_prerequisite|category=Recreation|honor=Swimming - Intermediate}} | + | {{honor_prerequisite|displayname=Natación II|honor=Swimming - Intermediate}} |
| | | | |
| | <noinclude></noinclude> | | <noinclude></noinclude> |
| Line 25: |
Line 11: |
| | {{ansreq|page={{#titleparts:{{PAGENAME}}|2|1}}|num=2}} | | {{ansreq|page={{#titleparts:{{PAGENAME}}|2|1}}|num=2}} |
| | <noinclude></noinclude> | | <noinclude></noinclude> |
| − | <!-- 2. Know the "rules of the road" for boating. --> | + | <!-- 2. Conocer las «reglas generales» para la navegación. --> |
| − | {{:Adventist Youth Honors Answer Book/Recreation/Sailing/Rules of the road}} | + | {{:AY Honors/Sailing/Rules of the road/es}} |
| | | | |
| | <noinclude></noinclude> | | <noinclude></noinclude> |
| Line 32: |
Line 18: |
| | {{ansreq|page={{#titleparts:{{PAGENAME}}|2|1}}|num=3}} | | {{ansreq|page={{#titleparts:{{PAGENAME}}|2|1}}|num=3}} |
| | <noinclude></noinclude> | | <noinclude></noinclude> |
| − | <!-- 3. Know how weather conditions and high wave conditions can affect safety and sailing performance. --> | + | <!-- 3. Saber cómo las condiciones meteorológicas y las condiciones de alto oleaje pueden afectar a la seguridad y el desempeño de la vela. --> |
| | <noinclude></noinclude> | | <noinclude></noinclude> |
| | {{CloseReq}} <!-- 3 --> | | {{CloseReq}} <!-- 3 --> |
| | {{ansreq|page={{#titleparts:{{PAGENAME}}|2|1}}|num=4}} | | {{ansreq|page={{#titleparts:{{PAGENAME}}|2|1}}|num=4}} |
| | <noinclude></noinclude> | | <noinclude></noinclude> |
| − | <!-- 4. What safety precautions should be followed when sailing? --> | + | <!-- 4. ¿Qué precauciones de seguridad deben seguirse cuando se navega a vela? --> |
| | <noinclude></noinclude> | | <noinclude></noinclude> |
| | {{CloseReq}} <!-- 4 --> | | {{CloseReq}} <!-- 4 --> |
| | {{ansreq|page={{#titleparts:{{PAGENAME}}|2|1}}|num=5}} | | {{ansreq|page={{#titleparts:{{PAGENAME}}|2|1}}|num=5}} |
| | <noinclude></noinclude> | | <noinclude></noinclude> |
| − | <!-- 5. With the help of a friend, do the following. --> | + | <!-- 5. Con la ayuda de un amigo, hacer lo siguiente: --> |
| | <noinclude></noinclude> | | <noinclude></noinclude> |
| | {{ansreq|page={{#titleparts:{{PAGENAME}}|2|1}}|num=5a}} | | {{ansreq|page={{#titleparts:{{PAGENAME}}|2|1}}|num=5a}} |
| Line 86: |
Line 72: |
| | {{ansreq|page={{#titleparts:{{PAGENAME}}|2|1}}|num=6}} | | {{ansreq|page={{#titleparts:{{PAGENAME}}|2|1}}|num=6}} |
| | <noinclude></noinclude> | | <noinclude></noinclude> |
| − | <!-- 6. Know how to tie and use the following knots in sailing: --> | + | <!-- 6. Saber cómo amarrar y usar los siguientes nudos: --> |
| | <noinclude></noinclude> | | <noinclude></noinclude> |
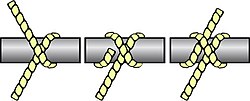
| | {{ansreq|page={{#titleparts:{{PAGENAME}}|2|1}}|num=6a}} | | {{ansreq|page={{#titleparts:{{PAGENAME}}|2|1}}|num=6a}} |
| | <noinclude></noinclude> | | <noinclude></noinclude> |
| − | {{:Adventist Youth Honors Answer Book/Knot/Square}} | + | {{:AY Honors/Knot/Square/es}} |
| | | | |
| | <noinclude></noinclude> | | <noinclude></noinclude> |
| Line 96: |
Line 82: |
| | {{ansreq|page={{#titleparts:{{PAGENAME}}|2|1}}|num=6b}} <!--T:7--> | | {{ansreq|page={{#titleparts:{{PAGENAME}}|2|1}}|num=6b}} <!--T:7--> |
| | <noinclude></noinclude> | | <noinclude></noinclude> |
| − | {{:Adventist Youth Honors Answer Book/Knot/Bowline}} | + | {{:AY Honors/Knot/Bowline/es}} |
| | | | |
| | <noinclude></noinclude> | | <noinclude></noinclude> |
| Line 102: |
Line 88: |
| | {{ansreq|page={{#titleparts:{{PAGENAME}}|2|1}}|num=6c}} <!--T:8--> | | {{ansreq|page={{#titleparts:{{PAGENAME}}|2|1}}|num=6c}} <!--T:8--> |
| | <noinclude></noinclude> | | <noinclude></noinclude> |
| − | {{:Adventist Youth Honors Answer Book/Knot/Clove_hitch}} | + | {{:AY Honors/Knot/Clove_hitch/es}} |
| | | | |
| | <noinclude></noinclude> | | <noinclude></noinclude> |
| Line 108: |
Line 94: |
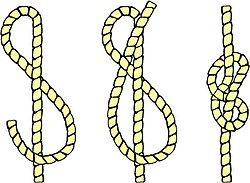
| | {{ansreq|page={{#titleparts:{{PAGENAME}}|2|1}}|num=6d}} <!--T:9--> | | {{ansreq|page={{#titleparts:{{PAGENAME}}|2|1}}|num=6d}} <!--T:9--> |
| | <noinclude></noinclude> | | <noinclude></noinclude> |
| − | {{:Adventist Youth Honors Answer Book/Knot/Figure_8}} | + | {{:AY Honors/Knot/Figure_8/es}} |
| | | | |
| | <noinclude></noinclude> | | <noinclude></noinclude> |
| Line 114: |
Line 100: |
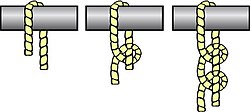
| | {{ansreq|page={{#titleparts:{{PAGENAME}}|2|1}}|num=6e}} <!--T:10--> | | {{ansreq|page={{#titleparts:{{PAGENAME}}|2|1}}|num=6e}} <!--T:10--> |
| | <noinclude></noinclude> | | <noinclude></noinclude> |
| − | {{:Adventist Youth Honors Answer Book/Knot/Two half hitches}} | + | {{:AY Honors/Knot/Two half hitches/es}} |
| | | | |
| | <noinclude></noinclude> | | <noinclude></noinclude> |
| Line 120: |
Line 106: |
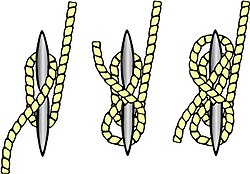
| | {{ansreq|page={{#titleparts:{{PAGENAME}}|2|1}}|num=6f}} <!--T:11--> | | {{ansreq|page={{#titleparts:{{PAGENAME}}|2|1}}|num=6f}} <!--T:11--> |
| | <noinclude></noinclude> | | <noinclude></noinclude> |
| − | {{:Adventist Youth Honors Answer Book/Knot/Mooring_hitch}} | + | {{:AY Honors/Knot/Mooring_hitch/es}} |
| | | | |
| | {{clear}} | | {{clear}} |
| Line 129: |
Line 115: |
| | {{ansreq|page={{#titleparts:{{PAGENAME}}|2|1}}|num=7}} | | {{ansreq|page={{#titleparts:{{PAGENAME}}|2|1}}|num=7}} |
| | <noinclude></noinclude> | | <noinclude></noinclude> |
| − | <!-- 7. List ways to care for your sailing equipment throughout the year. --> | + | <!-- 7. Hacer una lista de diferentes maneras para cuidar por el año el equipaje de navegar a vela. --> |
| | | | |
| − | * Drain and dry the boat. The first thing you should do when your boat is back on shore is to open the portholes and drain bungs. Always leave the boat with the drain bungs open and the portholes open, so the flotation tanks can dry out completely. Prop the boat up if needed to ensure the drain holes are the lowest point. You can place a piece of carpet on the ground under the transom, and raise the bow of the boat onto a sawhorse or support. Remember to close all drain holes before putting the boat back in the water.
| + | {{clear}} |
| | | | |
| − | * Organize your gear. Keep the hatches, drain bungs and other loose gear in one place, so you know they will always be there. After sailing, and after rinsing out or washing, and drying your sailing gear, put it back in a gear bag. It is frustrating to show up at the lake on a gorgeous day, only to discover that you left your sailing boots or some other piece of important gear, at home.
| + | {{clear}} |
| | | | |
| − | * Sail care. You can leave the mainsail on the boom, if you will be sailing the boat again soon. Roll up the main from the head, perpendicular to the luff, so that it ends up in a roll parallel to the boom. Also roll the jib up, put it inside the jib bag, and leave that in the boat. All sails should be removed from the boat if it is to be trailered or stored out of the water for any length of time. All sails should be dried and folded or rolled and placed in sail bags ready for the next launch.
| + | {{clear}} |
| | | | |
| − | * Centerboard care. Leaving the board resting on the trolley or trailer may damage the leading edge, and you want your slot gaskets left flat (in the normal closed position), so they do not take on a permanent bend. If the centerboard up control does not have a shock cord take up, You can put the line into a cleat, so the board is held all the way up, in the centerboard trunk. Remove the dagger board completely from its slot.
| + | {{clear}} |
| | | | |
| − | * Rudder care. Lay the rudder in the boat, or buy or make a rudder bag and put the rudder blade in the bag as one of the first steps in derigging the boat. Also check your rudder fittings. There should be no play in them. Replace them when they are worn.
| + | {{clear}} |
| | | | |
| − | * Rig. If leaving the boat with the mast rigged leave the boat with a little rig tension to support the mast, but not so much as to load up the boat.
| + | {{clear}} |
| | | | |
| − | * Cover. The boat should be covered with a good top cover that shields the boat from UV radiation. If the cover has holes in it, fix it or replace it. Figure out how to support the cover so that water does not collect in it.
| + | {{clear}} |
| | | | |
| − | * Salt. Rinse salt water off the boat, rinsing out blocks, lines and once in awhile, inside the tanks. If the tanks ever leak, you get salt in the tanks, and you will want to rinse that out from time to time.
| + | {{clear}} |
| | | | |
| − | * Turnbuckle grease. If you have adjustable angle spreaders, lubricate the adjusters. Use turnbuckle grease. If you don't lubricate these the stainless steel threaded part will permanently bond to the aluminum, and you will not be able to adjust them ever again.
| + | {{clear}} |
| | | | |
| − | * Inspections. From time to time complete a visual inspection of your boat. There are lots of highly loaded areas on a small sailboat. The chainplates are among them. Check where your shrouds and forestay or jib halyard attach to the hull. Watch for cracks that could let water into wooden reinforcements. Heavily loaded fasteners should be epoxied into the boat. From time to time take your centerboard out of the boat and check both centerboard and rudder for dings, cracks etc. Pay particular attention to the centerboard bolt hole. If the bolt hole has been damaged such that water can get in, wooden cored boards will soak up water, start to rot and will be weakened. Seal all bare wood with epoxy. Anytime you run aground you should check the centerboard. Inspect all lines from time to time, replace worn lines.
| + | {{clear}} |
| | | | |
| | <noinclude></noinclude> | | <noinclude></noinclude> |
| Line 155: |
Line 141: |
| | {{ansreq|page={{#titleparts:{{PAGENAME}}|2|1}}|num=8}} | | {{ansreq|page={{#titleparts:{{PAGENAME}}|2|1}}|num=8}} |
| | <noinclude></noinclude> | | <noinclude></noinclude> |
| − | <!-- 8. Have a knowledge of at least 20 terms used in sailing and their meanings. --> | + | <!-- 8. Conocer la definición de al menos 20 términos utilizados en navegar a vela. --> |
| | + | |
| | + | {{clear}} |
| | | | |
| − | === Sailing Terms. ===
| + | {{clear}} |
| | | | |
| − | ;Abaft: Behind
| + | {{clear}} |
| | | | |
| − | ;Abate: Become less intense or widespread: the storm suddenly abated.
| + | {{clear}} |
| | | | |
| − | ;Abeam: 90° (perpendicular) to the side of the boat.
| + | {{clear}} |
| | | | |
| − | ;Aft: Towards the Stern or rear of the boat.
| + | {{clear}} |
| | | | |
| − | ;Ahead: Towards the front of the boat.
| + | {{clear}} |
| | | | |
| − | ;Aloft: Towards the top of the mast.
| + | {{clear}} |
| | | | |
| − | ;Astern: Actually behind the boat. (Aft can mean on the boat but at the rear)
| + | {{clear}} |
| | | | |
| − | ;Backwinding: Deflect a flow of air into the back of (another sail or vessel).
| + | {{clear}} |
| | | | |
| − | ;Bailer: A bucket or scoop used to remove water from the cockpit.
| + | {{clear}} |
| | | | |
| − | ;Becalmed: Leave (a sailing vessel) unable to move through lack of wind.
| + | {{clear}} |
| | | | |
| − | ;Bend Sail: Is to affix it to its proper yard, mast or stay.
| + | {{clear}} |
| | | | |
| − | ;Block: Nautical word for pulley.
| + | {{clear}} |
| | | | |
| − | ;Centerline: An imaginary line from the bow of the boat, to the center of the stern.
| + | {{clear}} |
| | | | |
| − | ;Draft: The depth of water required to float your boat. On a small sailboat, draft can vary from the length of the centre board (or daggerboard) to a few inches if the boat outfitted with a movable centre board (or removable daggerboard) and a kick-up rudder.
| + | {{clear}} |
| | | | |
| − | ;Displacement: The weight of water displaced by a floating vessel, thus, a boat's weight.
| + | {{clear}} |
| | | | |
| − | ;Ease: To let out the sails.
| + | {{clear}} |
| | | | |
| − | ;Give-Way Vessel: The boat which changes course because it does not have the right of way.
| + | {{clear}} |
| | | | |
| − | ;Go About: Turning a boat
| + | {{clear}} |
| | | | |
| − | ;Heel: The degree of sideways tilt caused by wind on the sails or balance of weight in the boat.
| + | {{clear}} |
| | | | |
| − | ;In Irons: If the boat attempts to tack with a slow initial speed, or otherwise stops forward motion while heading into irons (front of the boat is facing the wind), the boat will coast to a stop and the lack of water flow over the rudder will cause the sailor to lose the ability to steer the boat.
| + | {{clear}} |
| | | | |
| − | ;Leeward: Away from the wind (downwind).
| + | {{clear}} |
| | | | |
| − | ;Lee shore: Shore the wind is blowing toward
| + | {{clear}} |
| | | | |
| − | ;Let Fly: Sails out of control.
| + | {{clear}} |
| − |
| |
| − | ;Luffing: The flapping of the sail when not properly trimmed or when the boat is in irons.
| |
| | | | |
| − | ;Luff Up: To turn the boat's head right into the wind.
| + | {{clear}} |
| − |
| |
| − | ;Reaching: Sailing on a tack with the wind roughly abeam, all sailing points between running and close- hauled.
| |
| | | | |
| − | ;Running Free: To sail with the wind aft and with the sheets eased out.
| + | {{clear}} |
| | | | |
| − | ;Stand-On-Vessel: The boat which does not change course because it has the right of way.
| + | {{clear}} |
| | | | |
| − | ;Trim: To pull the sails in towards the wind.
| + | {{clear}} |
| | | | |
| − | ;Weather Shore: The shore from which the wind is blowing.
| + | {{clear}} |
| − |
| |
| − | ;Windward: Towards the wind (upwind).
| |
| | | | |
| | <noinclude></noinclude> | | <noinclude></noinclude> |
| Line 225: |
Line 207: |
| | {{ansreq|page={{#titleparts:{{PAGENAME}}|2|1}}|num=9}} | | {{ansreq|page={{#titleparts:{{PAGENAME}}|2|1}}|num=9}} |
| | <noinclude></noinclude> | | <noinclude></noinclude> |
| − | <!-- 9. Identify at least 15 parts of a sailboat. --> | + | <!-- 9. Ser capaz de identificar al menos 15 partes de un velero. --> |
| − | The names of the parts of a sailboat can be broken down into three sets of terms:
| |
| − | * Parts of the sail
| |
| − | * Parts of the rigging
| |
| − | * Parts of the boat
| |
| | | | |
| − | === Parts of the sail. ===
| + | {{clear}} |
| | | | |
| − | ;Battens: Plastic or wooden slats inserted in the leech of the mainsail to help stabilize back edge.
| + | {{clear}} |
| | | | |
| − | ;Clew: The lower aft corner of the mainsail. The clew is located where the leech and the foot intersect.
| + | {{clear}} |
| − |
| |
| − | ;Cringle: A grommet or metal ring in a sail though which a line is usually attached.
| |
| | | | |
| − | ;Foot: The bottom edge of a sail. The foot of the sail is between the clew and the tack.
| + | {{clear}} |
| | | | |
| − | ;Grommet: A stainless steel ring within the clew, tack, or head of the mainsail. Used to connect a control line. Also known as cringle.
| + | {{clear}} |
| | | | |
| − | ;Head: Top of the Sail.
| + | {{clear}} |
| | | | |
| − | ;Jib: The sail between the forestay and the mast. Also called the headsail. There are several sizes of Jibs.
| + | {{clear}} |
| | | | |
| − | ;Leech (leach): The aft or back edge of the sail. Lies between the clew and the head.
| + | {{clear}} |
| | | | |
| − | ;Luff: The forward edge of the sail or the flapping of a sail when it is not trimmed properly.
| + | {{clear}} |
| | | | |
| − | ;Mainsail: The sail aft of the mast which is attached to the mast and the boom.
| + | {{clear}} |
| | | | |
| − | ;Roach (or roach line): An imaginary straight line between clew and head of the mainsail. Sail battens extend the leech of the mainsail beyond the roach line.
| + | {{clear}} |
| | | | |
| − | ;Spinnaker: A large balloon sail attached to the mast at the front of the boat. It is used when sailing directly downwind (running with the wind).
| + | {{clear}} |
| | | | |
| − | ;Tack: The front lower corner of the sail (same word used to describe point of sail)
| + | {{clear}} |
| | | | |
| − | === Parts of the rigging. ===
| + | {{clear}} |
| | | | |
| − | ;Backstay: A line or cable which supports the mast from the stern of the boat.
| + | {{clear}} |
| | | | |
| − | ;Bail: A sturdy steel strap on the aft portion of the mast base to which the boom is connected.
| + | {{clear}} |
| | | | |
| − | ;Block: A device used to change a line's direction (nautical term for pulley).
| + | {{clear}} |
| | | | |
| − | ;Boom: The horizontal spar which extends aft (backwards) from the mast to which the foot of the mainsail attaches.
| + | {{clear}} |
| | | | |
| − | ;Boom Topping Lift: A line which extends from the boom to the mast. Supports the boom when the mainsail is taken down.
| + | {{clear}} |
| | | | |
| − | ;Boom Vang: A line which places downward tension on the boom.
| + | {{clear}} |
| | | | |
| − | ;Chain Plate: A metal plate to which a shroud is attached.
| + | {{clear}} |
| | | | |
| − | ;Cleat: A metal or plastic device used to secure a line. There are many types of cleats.
| + | {{clear}} |
| | | | |
| − | ;Cunningham: A line connected to the tack used to extend the luff of the mainsail downward toward the deck.
| + | {{clear}} |
| − | ;Forestay (Headstay): A line or cable which supports the mast from the bow of the boat.
| |
| | | | |
| − | ;Gooseneck: A universal joint between boom and mast. The gooseneck attaches to the bail of the mast.
| + | {{clear}} |
| | | | |
| − | ;Halyard: A line (rope) used to raise a sail. Use a bowline to tie the head of the sail to the halyard
| + | {{clear}} |
| | | | |
| − | ;Mast: The main and highest spar in the center of the boat to which the jib and mainsail are attached.
| + | {{clear}} |
| | | | |
| − | ;Outhaul: Places backward tension on the clew of the mainsail. When tightened it will flatten the lower one-third of the mainsail.
| + | {{clear}} |
| | | | |
| − | ;Painter: A line used in securing your boat dockside or to accept a tow.
| + | {{clear}} |
| | | | |
| − | ;Reefing Line: A line used to shorten the sail.
| + | {{clear}} |
| | | | |
| − | ;Sheet: The chief line which is used to adjust a sail against the force of the wind. The mainsail has one sheet. The jib has two, a working (leeward) sheet and a lazy (windward) sheet.
| + | {{clear}} |
| | | | |
| − | ;Shroud Lines: Lines or cables which give lateral (side to side) stability to the mast.
| + | {{clear}} |
| | | | |
| − | ;Spar: Any pole or mast to secure rigging or sails to.
| + | {{clear}} |
| | | | |
| − | ;Spreaders: Horizontal spars which spread the shrouds from the mast.
| + | {{clear}} |
| | | | |
| − | ;Step: Portion of the hull that the mast rests upon. Also used as a verb to describe mating mast and hull... as in "Could you help me step the mast?"
| + | {{clear}} |
| − |
| |
| − | ;Winch: A device used to tighten a line.
| |
| | | | |
| − | === Parts of the boat. ===
| + | {{clear}} |
| | | | |
| − | ;Autobailer: A mechanism that (when open and boat is underway) drains water from the cockpit.
| + | {{clear}} |
| | | | |
| − | ;Beam: The boat's greatest width.
| + | {{clear}} |
| | | | |
| − | ;Bilge: The part of the hull below the cabin's floor, the lowest part of the boat.
| + | {{clear}} |
| | | | |
| − | ;Bow: Front of the boat.
| + | {{clear}} |
| | | | |
| − | ;Cockpit: The interior of the boat.
| + | {{clear}} |
| | | | |
| − | ;Daggerboard: The removable "keel" of your boat. The daggerboard makes sailing at an angle to the wind direction possible. The blunt edge of the daggerboard faces forward.
| + | {{clear}} |
| | | | |
| − | ;Daggerboard well: Also called the "trunk" or daggerboard slot. Narrow opening that daggerboard is inserted into.
| + | {{clear}} |
| − | ;Deck: Top of the boat which covers the hull.
| |
| | | | |
| − | ;Gudgeon: A stainless steel strip attached to the outer wall of the transom. Mates with the pins (pintels) of the rudderhead.
| + | {{clear}} |
| | | | |
| − | ;Gunwale: Upper surface of a cockpit sidewall.
| + | {{clear}} |
| | | | |
| − | ;Hull: Body of the boat.
| + | {{clear}} |
| | | | |
| − | ;Pintel: A stainless steel pin located on the forward edge of the rudderhead. The rudders pintels are inserted into the transom gudegons to mate transom and rudder assembly.
| + | {{clear}} |
| | | | |
| − | ;Port: The boat's left side.
| + | {{clear}} |
| | | | |
| − | ;Rudder: A control surface located behind the transom. Used to steer your boat. Push the tiller to the left and the rudder goes right.
| + | {{clear}} |
| | | | |
| − | ;Rudderhead: A metal housing that connect rudder, tiller, and transom. A kick-up rudderhead is designed to allow the rudder to "kick-up" or hinge rearward upon striking bottom while sailing.
| + | {{clear}} |
| − |
| |
| − | ;Stern: Back of the boat.
| |
| − |
| |
| − | ;Starboard: The boat's right side.
| |
| | | | |
| − | ;Tiller: A spar attached to the rudder. If you turn the tiller to port the boat will go to starboard.
| + | {{clear}} |
| | | | |
| − | ;Transom: The aft (back) wall of your boat.
| + | {{clear}} |
| | | | |
| − | === This illustration shows a number of parts of a small sail boat.===
| + | {{clear}} |
| | | | |
| − | [[Image:Parts of sailboat.jpg]]
| + | {{clear}} |
| | | | |
| | <noinclude></noinclude> | | <noinclude></noinclude> |
| Line 351: |
Line 319: |
| | {{ansreq|page={{#titleparts:{{PAGENAME}}|2|1}}|num=10}} | | {{ansreq|page={{#titleparts:{{PAGENAME}}|2|1}}|num=10}} |
| | <noinclude></noinclude> | | <noinclude></noinclude> |
| − | <!-- 10. Demonstrate the rescue of a person overboard. --> | + | <!-- 10. Demostrar el rescate de una persona por la borda. --> |
| − | '''Note: This requirement should be done under the supervision of an adult, with a rescue boat, to give assistance if needed.''' | + | '''Nota: Este requisito debe realizarse bajo la supervisión de un adulto, con un bote de rescate, para brindar ayuda si es necesario.''' |
| | | | |
| − | If you see a person fall off a sailing boat, you should ''immediately'' take the following steps.
| + | {{clear}} |
| − | * Shout 'Man Overboard' to alert the captain and anyone else on board.
| |
| − | * Throw a life preserver or personal flotation device near the person in the water.
| |
| − | :(Not directly at him, nearby, but somewhat windward (upwind) of him is best)
| |
| − | * Assign a person (if available) to keep constant visual contact with the man over board (MOB). This person should try their best to keep their eyes on the MOB and know where he is in the water. This person should talk to the MOB constantly during a recovery keeping communications between the boat and the MOB. If sailing with only two people and one should fall over, the remaining person must act as both captain and contact person.
| |
| | | | |
| − | There are two ways generally understood to bring the boat back to pick up the MOB.
| + | {{clear}} |
| − | * Either tack or jibe the boat around as quickly as possible and approach the MOB on a close reach to his leeward (downwind) side. Approaching from the leeward side avoids the danger of having the wind push the boat into or over the MOB.
| |
| − | [[Image:Man Overboard Tack.svg|Tack to recover man overboard.]]
| |
| | | | |
| − | Jibing the boat around can be quicker than tacking, but should only be done when wind conditions make jibing quickly a safe maneuver.
| + | {{clear}} |
| | | | |
| − | [[Image:Man Overboard Jibe.svg|Jibe to recover man overboard.]]
| + | {{clear}} |
| | | | |
| − | * The second method is also known as a "quick stop". Tack immediately after the person has fallen overboard, and keep your jib cleated in place. The jib will turn the boat, and the captain luffs the main to allow the boat to drift toward the MOB. This method keeps the boat close to the MOB, which keeps the boat in contact with the MOB. This should not be attempted in high winds where keeping the jib cleated could cause a capsize.
| + | {{clear}} |
| | | | |
| − | [[Image:Man Overboard Quick Stop.svg|Quick Stop to recover a man overboard.]]
| + | {{clear}} |
| | | | |
| − | In all three cases, if the MOB can't reach the boat as you approach, hold out a paddle for the person to grab.
| + | {{clear}} |
| | | | |
| − | It is a good idea to practice Man Overboard maneuvers. Dropping a filled 5 gallon bucket into the water and using it as a dummy makes a pretty realistic simulation. Lifting the bucket full of water over the transom gives you an idea of how it might feel to help a waterlogged sailer back on board.
| + | {{clear}} |
| | | | |
| | <noinclude></noinclude> | | <noinclude></noinclude> |
| Line 380: |
Line 342: |
| | {{ansreq|page={{#titleparts:{{PAGENAME}}|2|1}}|num=11}} | | {{ansreq|page={{#titleparts:{{PAGENAME}}|2|1}}|num=11}} |
| | <noinclude></noinclude> | | <noinclude></noinclude> |
| − | <!-- 11. Demonstrate what to do when a sailboat capsizes. --> | + | <!-- 11. Demostrar qué hacer cuando un velero se vuelca. --> |
| − | '''Note: This requirement should be done under the supervision of an adult, with a rescue boat, to give assistance if needed.''' | + | '''Nota: Este requisito debe realizarse bajo la supervisión de un adulto, con un bote de rescate, para brindar ayuda si es necesario.''' |
| | | | |
| − | Capsizing is when your boat turns over (some say when the mast is in the water). A capsized boat may be either floating with the mast and sail lying on the water, or may have "turned turtle" lying with the mast pointing downwards. Some sailing schools tie a tether ball or flotation item to the top of the mast, so if a student capsizes the boat cannot turn turle. This is a good idea for beginner sailors.
| + | {{clear}} |
| | | | |
| − | A keel boat with a water tight or self draining cockpit normally rights herself because of the weight of the ballast keel. A small boat on the other hand has to be righted by the crew and there are a couple of methods.
| + | {{clear}} |
| | | | |
| − | Capsizing isn't scary or dangerous on a fair-weather day if you know how to swim. This is the main reason for the swimming requirement before taking the sailing honour.
| + | {{clear}} |
| | | | |
| − | Capsizing usually results from heeling too far or an accidental jibe. If you feel your in real danger of tipping over, '''luff the main sail at once''' (which is to let out the main sheet to allow the air to flow out of the sail). If your boat does go over on its side, stay with it, '''never swim away.''' You must do several things quickly.
| + | {{clear}} |
| | | | |
| − | [[Image:Capsized 001.jpg]]
| + | {{clear}} |
| | | | |
| − | Capsized boat.
| + | {{clear}} |
| | | | |
| − | === Solo method ===
| + | {{clear}} |
| − | ==== Stand on the center board ====
| |
| − | Fall down into the area between the hull and boom and swim out the back QUICKLY, ensuring you are not caught on any ropes. If the boat is very nearly turned upside down on top of you, however, then feel free to go out the side.
| |
| − | As quickly as possible stand on the center board (dagger board) to prevent the boat from turning completely upside down.
| |
| | | | |
| − | [[Image:Capsized 002.jpg]]
| + | {{clear}} |
| | | | |
| − | ==== Free the sheets ====
| + | {{clear}} |
| | | | |
| − | Make sure that the main sheet (line that controls the main sail) is free and not secured tight in any way. Also if the boat has a jib sail, free the jib sheet as well. This will help the sails not fill with water when capsized, and not fill with air as soon as the boat is righted.
| + | {{clear}} |
| | | | |
| − | ==== Point boat into the wind ====
| + | {{clear}} |
| | | | |
| − | If possible, get back into the water and position the boat so that the bow (front) is facing the wind. This will help your righting efforts, by not having to pull the sails up against a wind.
| + | {{clear}} |
| | | | |
| − | ==== Lean and right the boat ====
| + | {{clear}} |
| | | | |
| − | Get back on the center board, and holding on the gunwale or the shrouds, lean back with all of your weight. This leverage should slowly bring the boat back to an upright position.
| + | {{clear}} |
| | | | |
| − | [[Image:Capsized 003.jpg]]
| + | {{clear}} |
| | | | |
| − | === Get back in ===
| + | {{clear}} |
| | | | |
| − | Hang onto the boat as it rights, and crawl or slither back in over the side. The boat will probably be pretty low in the water since the cockpit will be close to full of water.
| + | {{clear}} |
| | | | |
| − | ==== Bail and organize ====
| + | {{clear}} |
| | | | |
| − | Once upright and on board, take some time to bail out some water, untangle lines, and sort out any loose items before getting underway again.
| + | {{clear}} |
| | | | |
| − | On a calm day, in a protected area and with supervision, capsize your boat and right it several times to get confidence. You will be surprised how easy it will become with a little experience
| + | {{clear}} |
| | | | |
| − | === With a crew "Scoop" method ===
| + | {{clear}} |
| − | === Check all people ===
| |
| | | | |
| − | Make sure that no one is trapped under the boat or tangled in the rigging. if they are, help them to get free.
| + | {{clear}} |
| | | | |
| − | [[Image:Capsized 004.jpg]]
| + | {{clear}} |
| | | | |
| − | === Stand on the center board / support mast ===
| + | {{clear}} |
| | | | |
| − | One sailor supports the mast to keep the boat from turtling. The other sailor maneuvers around the boat '''(not under the hull)''' and climbs on the centerboard.
| + | {{clear}} |
| | | | |
| − | [[Image:Capsized 005.jpg]]
| + | {{clear}} |
| | | | |
| − | ==== Point boat into the wind ====
| + | {{clear}} |
| | | | |
| − | If possible, position the boat so that the bow (front) is facing the wind. This will help your righting efforts, by not having to pull the sails up against a wind.
| + | {{clear}} |
| | | | |
| − | === Right the boat and scoop ===
| + | {{clear}} |
| | | | |
| − | The sailor in the water grabs on to a stationary object in the boat's cockpit. The sailor on the centerboard leans back and starts to right the boat.
| + | {{clear}} |
| | | | |
| − | The sailor in the water is scooped into the cockpit and helps stabilize the boat as it is righted.
| + | {{clear}} |
| | | | |
| − | [[Image:Capsized 006.jpg]]
| + | {{clear}} |
| | | | |
| − | === Entering the cockpit ===
| + | {{clear}} |
| | | | |
| − | As the sailors enter the cockpit they should duck to avoid getting hit by the boom. The sheet of the mainsail and jib should be loose and the sails allowed to luff so they will not re-capsize the boat while it is righting.
| + | {{clear}} |
| | | | |
| − | [[Image:Capsized 007.jpg]]
| + | {{clear}} |
| | | | |
| − | === Get back in ===
| + | {{clear}} |
| | | | |
| − | Sailor still in the water will crawl or slither back in over the side. The boat will probably be pretty low in the water since the cockpit will be close to full of water.
| + | {{clear}} |
| | | | |
| − | ==== Bail and organize ====
| + | {{clear}} |
| | | | |
| − | Once upright and on board, take some time to bail out some water, untangle lines, and sort out any loose items before getting underway again.
| + | {{clear}} |
| | | | |
| − | === Remember the following safety rules ===
| + | {{clear}} |
| | | | |
| − | # '''Never swim toward shore.''' It looks closer than it is and you may not make it.
| + | {{clear}} |
| − | # '''Always stay with the boat.'''
| |
| − | # '''Do not swim under the sails or hull.'''
| |
| − | # Upon entering the boat after it has come upright, be sure to '''duck''' to avoid the swinging boom.
| |
| | | | |
| − | === Additional information ===
| + | {{clear}} |
| − | ==== Boat flotation ====
| |
| | | | |
| − | All sailboats can capsize and without adequate flotation they will sink. There should be enough flotation so when the boat is righted it will float high enough to keep it from being swamped with water and allow you to bail it out. Many manufactured boats have built-in watertight flotation compartments. The watertight integrity of these compartments should be inspected before you go sailing. They usually have access holes to allow you to check for leaks and remove any water that may have accumulated.
| + | {{clear}} |
| | | | |
| − | These holes may be small drain holes or large enough to pass your hand through them. Whatever size they are, it is critical that the drain plugs or access covers are securely fastened. If your boat capsizes and the holes are open, water flooding the compartments will deplete their flotation. Air bags or foam in or under the seats may also be used if a boat does not have watertight flotation compartments or the size of the compartments doesn’t provide sufficient flotation.
| + | {{clear}} |
| | | | |
| − | It is important for small boat sailors to know if their boat has sufficient flotation. One sure method of determining this is to capsize it in water that is deep enough for the boat, but shallow enough for you stand. Push down on one side until the boat starts to take on water, and then hand over hand up the shroud to the top of the mast to pull the mast down to the water. After the boat is capsized on its side, bring it upright again. How high does the boat float? How much water is in the cockpit? How long does it take to bail out the water? It shouldn’t take longer than several minutes.
| + | {{clear}} |
| | | | |
| − | ==== Bailing equipment ====
| + | {{clear}} |
| | | | |
| − | Bailing equipment is also part of standard safety gear. While few small boat sailors carry a pump, a small bucket or a large plastic bottle with the bottom cut off works well. Attach the bailer to the boat with a length of cord to prevent it from floating away during a capsize. A large sponge (the kind used to wash cars) can be used to finish the bailing.
| + | {{clear}} |
| | | | |
| − | '''Above all, remember to stay with your boat. As long as its floating you will be safe. Remember the boat does not get tired and it can be visible a long way off. Don't ever think of swimming ashore. '''
| + | {{clear}} |
| | | | |
| | <noinclude></noinclude> | | <noinclude></noinclude> |
| | {{CloseReq}} <!-- 11 --> | | {{CloseReq}} <!-- 11 --> |
| | <noinclude></noinclude> | | <noinclude></noinclude> |
| − | ==References== | + | ==Referencias== |
| | <noinclude></noinclude> | | <noinclude></noinclude> |
| − | [[Category:Adventist Youth Honors Answer Book|{{SUBPAGENAME}}]]
| + | {{CloseHonorPage}} |
| − | <section end="Body" />
| |
