Difference between revisions of "AY Honors/Power Boating/Answer Key/es"
From Pathfinder Wiki
< AY Honors | Power BoatingAY Honors/Power Boating/Answer Key/es
(Created page with "{{clear}}") |
(Updating to match new version of source page) |
||
| (69 intermediate revisions by one other user not shown) | |||
| Line 1: | Line 1: | ||
| − | + | {{HonorSubpage}} | |
| − | + | <!--{{Honor_Master|honor=Power Boating|master=Aquatic}}--> | |
| − | {{ | ||
| − | |||
| − | |||
| − | |||
| − | |||
| − | |||
| − | |||
| − | |||
| − | }} | ||
| − | |||
| − | {{Honor_Master | ||
| − | |||
| − | |||
| − | |||
<section begin="Body" /> | <section begin="Body" /> | ||
{{ansreq|page={{#titleparts:{{PAGENAME}}|2|1}}|num=1}} | {{ansreq|page={{#titleparts:{{PAGENAME}}|2|1}}|num=1}} | ||
<noinclude></noinclude> | <noinclude></noinclude> | ||
| − | <!-- 1. | + | <!-- 1. Tener la especialidad de Natación I, Avanzado. --> |
| − | {{honor_prerequisite| | + | {{honor_prerequisite|honor=Swimming_-_Beginner_-_Advanced|displayname=Natación I - Avanzado}} |
<noinclude></noinclude> | <noinclude></noinclude> | ||
{{CloseReq}} <!-- 1 --> | {{CloseReq}} <!-- 1 --> | ||
{{ansreq|page={{#titleparts:{{PAGENAME}}|2|1}}|num=2}} | {{ansreq|page={{#titleparts:{{PAGENAME}}|2|1}}|num=2}} | ||
<noinclude></noinclude> | <noinclude></noinclude> | ||
| − | <!-- 2. | + | <!-- 2. Conocer las leyes que regulan la navegación recreativa en su estado o provincia. --> |
| − | |||
<noinclude></noinclude> | <noinclude></noinclude> | ||
| Line 31: | Line 16: | ||
{{ansreq|page={{#titleparts:{{PAGENAME}}|2|1}}|num=3}} | {{ansreq|page={{#titleparts:{{PAGENAME}}|2|1}}|num=3}} | ||
<noinclude></noinclude> | <noinclude></noinclude> | ||
| − | <!-- 3. | + | <!-- 3. Saber qué peligros de las condiciones meteorológicas pueden afectar la seguridad en la navegación y el desempeño. --> |
{{clear}} | {{clear}} | ||
| Line 39: | Line 24: | ||
{{ansreq|page={{#titleparts:{{PAGENAME}}|2|1}}|num=4}} | {{ansreq|page={{#titleparts:{{PAGENAME}}|2|1}}|num=4}} | ||
<noinclude></noinclude> | <noinclude></noinclude> | ||
| − | <!-- 4. | + | <!-- 4. Conocer las normas náuticas de la vía y las ayudas a la navegación fluvial. --> |
{{clear}} | {{clear}} | ||
| Line 121: | Line 106: | ||
{{clear}} | {{clear}} | ||
| − | + | {{clear}} | |
| − | |||
| − | |||
| − | |||
| − | |||
| − | |||
| − | + | {{clear}} | |
| − | + | {{clear}} | |
| − | + | {{clear}} | |
| − | |||
| − | |||
| − | |||
| − | |||
| − | |||
| − | |||
| − | |||
| − | |||
| − | |||
| − | |||
| − | + | {{clear}} | |
<noinclude></noinclude> | <noinclude></noinclude> | ||
| Line 150: | Line 120: | ||
{{ansreq|page={{#titleparts:{{PAGENAME}}|2|1}}|num=5}} | {{ansreq|page={{#titleparts:{{PAGENAME}}|2|1}}|num=5}} | ||
<noinclude></noinclude> | <noinclude></noinclude> | ||
| − | <!-- 5. | + | <!-- 5. Saber qué equipo de seguridad, dispositivos de señales y luces son necesarios en los barcos clase A y Clase 1. --> |
| − | |||
| − | + | {{clear}} | |
| − | |||
| − | |||
| − | |||
| − | |||
| − | + | {{clear}} | |
| − | |||
| − | |||
| − | + | {{clear}} | |
| − | |||
| − | |||
| − | + | {{clear}} | |
| − | |||
| − | |||
| − | |||
| − | |||
| − | + | {{clear}} | |
| − | |||
| − | |||
| − | + | {{clear}} | |
| − | |||
| − | + | {{clear}} | |
| − | |||
| − | |||
| − | |||
| − | + | {{clear}} | |
| − | |||
| − | + | {{clear}} | |
| − | |||
| − | + | {{clear}} | |
| − | |||
| − | + | {{clear}} | |
| − | |||
| − | |||
| − | |||
| − | + | {{clear}} | |
| − | + | {{clear}} | |
| − | + | {{clear}} | |
| − | |||
| − | |||
| − | |||
| − | |||
| − | + | {{clear}} | |
| − | + | {{clear}} | |
| − | |||
| − | |||
| − | |||
<noinclude></noinclude> | <noinclude></noinclude> | ||
| Line 220: | Line 158: | ||
{{ansreq|page={{#titleparts:{{PAGENAME}}|2|1}}|num=6}} | {{ansreq|page={{#titleparts:{{PAGENAME}}|2|1}}|num=6}} | ||
<noinclude></noinclude> | <noinclude></noinclude> | ||
| − | <!-- 6. | + | <!-- 6. Conocer y practicar las normas de seguridad de la navegación. --> |
| − | |||
<noinclude></noinclude> | <noinclude></noinclude> | ||
| Line 227: | Line 164: | ||
{{ansreq|page={{#titleparts:{{PAGENAME}}|2|1}}|num=7}} | {{ansreq|page={{#titleparts:{{PAGENAME}}|2|1}}|num=7}} | ||
<noinclude></noinclude> | <noinclude></noinclude> | ||
| − | <!-- 7. | + | <!-- 7. ¿Qué deben hacer los pasajeros del barco si éste zozobra? --> |
| − | + | {{clear}} | |
| − | |||
| − | |||
| − | |||
| − | |||
| − | |||
| − | |||
<noinclude></noinclude> | <noinclude></noinclude> | ||
| Line 241: | Line 172: | ||
{{ansreq|page={{#titleparts:{{PAGENAME}}|2|1}}|num=8}} | {{ansreq|page={{#titleparts:{{PAGENAME}}|2|1}}|num=8}} | ||
<noinclude></noinclude> | <noinclude></noinclude> | ||
| − | <!-- 8. | + | <!-- 8. ¿Cuál es la regla general de prudencia? --> |
| − | |||
| − | + | {{clear}} | |
<noinclude></noinclude> | <noinclude></noinclude> | ||
| Line 250: | Line 180: | ||
{{ansreq|page={{#titleparts:{{PAGENAME}}|2|1}}|num=9}} | {{ansreq|page={{#titleparts:{{PAGENAME}}|2|1}}|num=9}} | ||
<noinclude></noinclude> | <noinclude></noinclude> | ||
| − | <!-- 9. | + | <!-- 9. Conocer el significado de los siguientes términos de navegación: --> |
<noinclude></noinclude> | <noinclude></noinclude> | ||
{{ansreq|page={{#titleparts:{{PAGENAME}}|2|1}}|num=9a}} | {{ansreq|page={{#titleparts:{{PAGENAME}}|2|1}}|num=9a}} | ||
| − | <noinclude></noinclude> | + | <noinclude></noinclude><noinclude></noinclude> |
| − | |||
| − | <noinclude></noinclude> | ||
{{CloseReq}} <!-- 9a --> | {{CloseReq}} <!-- 9a --> | ||
{{ansreq|page={{#titleparts:{{PAGENAME}}|2|1}}|num=9b}} | {{ansreq|page={{#titleparts:{{PAGENAME}}|2|1}}|num=9b}} | ||
| − | <noinclude></noinclude> | + | <noinclude></noinclude><noinclude></noinclude> |
| − | |||
| − | <noinclude></noinclude> | ||
{{CloseReq}} <!-- 9b --> | {{CloseReq}} <!-- 9b --> | ||
{{ansreq|page={{#titleparts:{{PAGENAME}}|2|1}}|num=9c}} | {{ansreq|page={{#titleparts:{{PAGENAME}}|2|1}}|num=9c}} | ||
| − | <noinclude></noinclude> | + | <noinclude></noinclude><noinclude></noinclude> |
| − | |||
| − | <noinclude></noinclude> | ||
{{CloseReq}} <!-- 9c --> | {{CloseReq}} <!-- 9c --> | ||
{{ansreq|page={{#titleparts:{{PAGENAME}}|2|1}}|num=9d}} | {{ansreq|page={{#titleparts:{{PAGENAME}}|2|1}}|num=9d}} | ||
| − | <noinclude></noinclude> | + | <noinclude></noinclude><noinclude></noinclude> |
| − | |||
| − | |||
| − | <noinclude></noinclude> | ||
{{CloseReq}} <!-- 9d --> | {{CloseReq}} <!-- 9d --> | ||
{{ansreq|page={{#titleparts:{{PAGENAME}}|2|1}}|num=9e}} | {{ansreq|page={{#titleparts:{{PAGENAME}}|2|1}}|num=9e}} | ||
| − | <noinclude></noinclude> | + | <noinclude></noinclude><noinclude></noinclude> |
| − | |||
| − | <noinclude></noinclude> | ||
{{CloseReq}} <!-- 9e --> | {{CloseReq}} <!-- 9e --> | ||
{{ansreq|page={{#titleparts:{{PAGENAME}}|2|1}}|num=9f}} | {{ansreq|page={{#titleparts:{{PAGENAME}}|2|1}}|num=9f}} | ||
| − | <noinclude></noinclude> | + | <noinclude></noinclude><noinclude></noinclude> |
| − | |||
| − | |||
| − | <noinclude></noinclude> | ||
{{CloseReq}} <!-- 9f --> | {{CloseReq}} <!-- 9f --> | ||
{{ansreq|page={{#titleparts:{{PAGENAME}}|2|1}}|num=9g}} | {{ansreq|page={{#titleparts:{{PAGENAME}}|2|1}}|num=9g}} | ||
| − | <noinclude></noinclude> | + | <noinclude></noinclude><noinclude></noinclude> |
| − | |||
| − | <noinclude></noinclude> | ||
{{CloseReq}} <!-- 9g --> | {{CloseReq}} <!-- 9g --> | ||
{{ansreq|page={{#titleparts:{{PAGENAME}}|2|1}}|num=9h}} | {{ansreq|page={{#titleparts:{{PAGENAME}}|2|1}}|num=9h}} | ||
| − | <noinclude></noinclude> | + | <noinclude></noinclude><noinclude></noinclude> |
| − | |||
| − | <noinclude></noinclude> | ||
{{CloseReq}} <!-- 9h --> | {{CloseReq}} <!-- 9h --> | ||
{{ansreq|page={{#titleparts:{{PAGENAME}}|2|1}}|num=9i}} | {{ansreq|page={{#titleparts:{{PAGENAME}}|2|1}}|num=9i}} | ||
| − | <noinclude></noinclude> | + | <noinclude></noinclude><noinclude></noinclude> |
| − | |||
| − | <noinclude></noinclude> | ||
{{CloseReq}} <!-- 9i --> | {{CloseReq}} <!-- 9i --> | ||
{{ansreq|page={{#titleparts:{{PAGENAME}}|2|1}}|num=9j}} | {{ansreq|page={{#titleparts:{{PAGENAME}}|2|1}}|num=9j}} | ||
| − | <noinclude></noinclude> | + | <noinclude></noinclude><noinclude></noinclude> |
| − | |||
| − | <noinclude></noinclude> | ||
{{CloseReq}} <!-- 9j --> | {{CloseReq}} <!-- 9j --> | ||
{{ansreq|page={{#titleparts:{{PAGENAME}}|2|1}}|num=9k}} | {{ansreq|page={{#titleparts:{{PAGENAME}}|2|1}}|num=9k}} | ||
| − | <noinclude></noinclude> | + | <noinclude></noinclude><noinclude></noinclude> |
| − | |||
| − | |||
| − | <noinclude></noinclude> | ||
{{CloseReq}} <!-- 9k --> | {{CloseReq}} <!-- 9k --> | ||
{{ansreq|page={{#titleparts:{{PAGENAME}}|2|1}}|num=9l}} | {{ansreq|page={{#titleparts:{{PAGENAME}}|2|1}}|num=9l}} | ||
| − | <noinclude></noinclude> | + | <noinclude></noinclude><noinclude></noinclude> |
| − | |||
| − | <noinclude></noinclude> | ||
{{CloseReq}} <!-- 9l --> | {{CloseReq}} <!-- 9l --> | ||
{{ansreq|page={{#titleparts:{{PAGENAME}}|2|1}}|num=9m}} | {{ansreq|page={{#titleparts:{{PAGENAME}}|2|1}}|num=9m}} | ||
| − | <noinclude></noinclude> | + | <noinclude></noinclude><noinclude></noinclude> |
| − | |||
| − | <noinclude></noinclude> | ||
{{CloseReq}} <!-- 9m --> | {{CloseReq}} <!-- 9m --> | ||
{{ansreq|page={{#titleparts:{{PAGENAME}}|2|1}}|num=9n}} | {{ansreq|page={{#titleparts:{{PAGENAME}}|2|1}}|num=9n}} | ||
| − | <noinclude></noinclude> | + | <noinclude></noinclude><noinclude></noinclude> |
| − | |||
| − | <noinclude></noinclude> | ||
{{CloseReq}} <!-- 9n --> | {{CloseReq}} <!-- 9n --> | ||
{{ansreq|page={{#titleparts:{{PAGENAME}}|2|1}}|num=9o}} | {{ansreq|page={{#titleparts:{{PAGENAME}}|2|1}}|num=9o}} | ||
| − | <noinclude></noinclude> | + | <noinclude></noinclude><noinclude></noinclude> |
| − | |||
| − | <noinclude></noinclude> | ||
{{CloseReq}} <!-- 9o --> | {{CloseReq}} <!-- 9o --> | ||
{{ansreq|page={{#titleparts:{{PAGENAME}}|2|1}}|num=9p}} | {{ansreq|page={{#titleparts:{{PAGENAME}}|2|1}}|num=9p}} | ||
| − | <noinclude></noinclude> | + | <noinclude></noinclude><noinclude></noinclude> |
| − | |||
| − | <noinclude></noinclude> | ||
{{CloseReq}} <!-- 9p --> | {{CloseReq}} <!-- 9p --> | ||
{{ansreq|page={{#titleparts:{{PAGENAME}}|2|1}}|num=9q}} | {{ansreq|page={{#titleparts:{{PAGENAME}}|2|1}}|num=9q}} | ||
| − | <noinclude></noinclude> | + | <noinclude></noinclude><noinclude></noinclude> |
| − | |||
| − | |||
| − | <noinclude></noinclude> | ||
{{CloseReq}} <!-- 9q --> | {{CloseReq}} <!-- 9q --> | ||
{{ansreq|page={{#titleparts:{{PAGENAME}}|2|1}}|num=9r}} | {{ansreq|page={{#titleparts:{{PAGENAME}}|2|1}}|num=9r}} | ||
| − | <noinclude></noinclude> | + | <noinclude></noinclude><noinclude></noinclude> |
| − | |||
| − | <noinclude></noinclude> | ||
{{CloseReq}} <!-- 9r --> | {{CloseReq}} <!-- 9r --> | ||
{{ansreq|page={{#titleparts:{{PAGENAME}}|2|1}}|num=9s}} | {{ansreq|page={{#titleparts:{{PAGENAME}}|2|1}}|num=9s}} | ||
| − | <noinclude></noinclude> | + | <noinclude></noinclude><noinclude></noinclude> |
| − | |||
| − | <noinclude></noinclude> | ||
{{CloseReq}} <!-- 9s --> | {{CloseReq}} <!-- 9s --> | ||
{{ansreq|page={{#titleparts:{{PAGENAME}}|2|1}}|num=9t}} | {{ansreq|page={{#titleparts:{{PAGENAME}}|2|1}}|num=9t}} | ||
| − | <noinclude></noinclude> | + | <noinclude></noinclude><noinclude></noinclude> |
| − | |||
| − | <noinclude></noinclude> | ||
{{CloseReq}} <!-- 9t --> | {{CloseReq}} <!-- 9t --> | ||
{{ansreq|page={{#titleparts:{{PAGENAME}}|2|1}}|num=9u}} | {{ansreq|page={{#titleparts:{{PAGENAME}}|2|1}}|num=9u}} | ||
| − | <noinclude></noinclude> | + | <noinclude></noinclude><noinclude></noinclude> |
| − | |||
| − | <noinclude></noinclude> | ||
{{CloseReq}} <!-- 9u --> | {{CloseReq}} <!-- 9u --> | ||
{{ansreq|page={{#titleparts:{{PAGENAME}}|2|1}}|num=9v}} | {{ansreq|page={{#titleparts:{{PAGENAME}}|2|1}}|num=9v}} | ||
<noinclude></noinclude> | <noinclude></noinclude> | ||
| − | |||
<noinclude></noinclude> | <noinclude></noinclude> | ||
| Line 370: | Line 253: | ||
{{ansreq|page={{#titleparts:{{PAGENAME}}|2|1}}|num=10}} | {{ansreq|page={{#titleparts:{{PAGENAME}}|2|1}}|num=10}} | ||
<noinclude></noinclude> | <noinclude></noinclude> | ||
| − | <!-- 10. | + | <!-- 10. Mostrar la forma de poder operar adecuadamente un barco de motor de la siguiente manera: --> |
<noinclude></noinclude> | <noinclude></noinclude> | ||
{{ansreq|page={{#titleparts:{{PAGENAME}}|2|1}}|num=10a}} | {{ansreq|page={{#titleparts:{{PAGENAME}}|2|1}}|num=10a}} | ||
| − | <noinclude></noinclude> | + | <noinclude></noinclude> |
| − | |||
| − | + | {{clear}} | |
<noinclude></noinclude> | <noinclude></noinclude> | ||
{{CloseReq}} <!-- 10a --> | {{CloseReq}} <!-- 10a --> | ||
{{ansreq|page={{#titleparts:{{PAGENAME}}|2|1}}|num=10b}} <!--T:76--> | {{ansreq|page={{#titleparts:{{PAGENAME}}|2|1}}|num=10b}} <!--T:76--> | ||
| − | <noinclude></noinclude> | + | <noinclude></noinclude><noinclude></noinclude> |
| − | |||
| − | |||
| − | <noinclude></noinclude> | ||
{{CloseReq}} <!-- 10b --> | {{CloseReq}} <!-- 10b --> | ||
{{ansreq|page={{#titleparts:{{PAGENAME}}|2|1}}|num=10c}} | {{ansreq|page={{#titleparts:{{PAGENAME}}|2|1}}|num=10c}} | ||
<noinclude></noinclude> | <noinclude></noinclude> | ||
| − | |||
<noinclude></noinclude> | <noinclude></noinclude> | ||
| Line 394: | Line 272: | ||
{{ansreq|page={{#titleparts:{{PAGENAME}}|2|1}}|num=10d}} <!--T:77--> | {{ansreq|page={{#titleparts:{{PAGENAME}}|2|1}}|num=10d}} <!--T:77--> | ||
<noinclude></noinclude> | <noinclude></noinclude> | ||
| − | |||
<noinclude></noinclude> | <noinclude></noinclude> | ||
| Line 400: | Line 277: | ||
{{ansreq|page={{#titleparts:{{PAGENAME}}|2|1}}|num=10e}} <!--T:78--> | {{ansreq|page={{#titleparts:{{PAGENAME}}|2|1}}|num=10e}} <!--T:78--> | ||
<noinclude></noinclude> | <noinclude></noinclude> | ||
| − | |||
<noinclude></noinclude> | <noinclude></noinclude> | ||
| Line 406: | Line 282: | ||
{{ansreq|page={{#titleparts:{{PAGENAME}}|2|1}}|num=10f}} <!--T:79--> | {{ansreq|page={{#titleparts:{{PAGENAME}}|2|1}}|num=10f}} <!--T:79--> | ||
<noinclude></noinclude> | <noinclude></noinclude> | ||
| − | |||
| − | {{: | + | {{:AY Honors/Knot/Two_half_hitches/es}} |
| − | {{: | + | {{:AY Honors/Knot/Bowline/es}} |
| − | {{: | + | {{:AY Honors/Knot/Double bowline/es}} |
| − | {{: | + | {{:AY Honors/Knot/Stevedore's/es}} |
| − | {{: | + | {{:AY Honors/Knot/Anchor bend/es}} |
| − | {{: | + | {{:AY Honors/Knot/Square/es}} |
| − | {{: | + | {{:AY Honors/Knot/Cleat hitch/es}} |
| − | + | {{clear}} | |
<noinclude></noinclude> | <noinclude></noinclude> | ||
| Line 422: | Line 297: | ||
{{ansreq|page={{#titleparts:{{PAGENAME}}|2|1}}|num=10g}} <!--T:82--> | {{ansreq|page={{#titleparts:{{PAGENAME}}|2|1}}|num=10g}} <!--T:82--> | ||
<noinclude></noinclude> | <noinclude></noinclude> | ||
| − | |||
<noinclude></noinclude> | <noinclude></noinclude> | ||
| Line 429: | Line 303: | ||
{{ansreq|page={{#titleparts:{{PAGENAME}}|2|1}}|num=11}} | {{ansreq|page={{#titleparts:{{PAGENAME}}|2|1}}|num=11}} | ||
<noinclude></noinclude> | <noinclude></noinclude> | ||
| − | <!-- 11. | + | <!-- 11. Conocer cómo preparar y almacenar un barco y el motor en la temporada baja. --> |
<noinclude></noinclude> | <noinclude></noinclude> | ||
{{CloseReq}} <!-- 11 --> | {{CloseReq}} <!-- 11 --> | ||
<noinclude></noinclude> | <noinclude></noinclude> | ||
| − | == | + | ==Referencias== |
| − | |||
<noinclude></noinclude> | <noinclude></noinclude> | ||
| − | + | {{CloseHonorPage}} | |
| − | |||
Latest revision as of 16:44, 14 July 2022
Lancha a motor
Nivel de destreza
2
Año
1975
Version
19.02.2026
Autoridad de aprobación
Asociación General
1
Tener la especialidad de Natación I, Avanzado.
Para consejos e instrucciones, véase Natación I - Avanzado.
2
Conocer las leyes que regulan la navegación recreativa en su estado o provincia.
3
Saber qué peligros de las condiciones meteorológicas pueden afectar la seguridad en la navegación y el desempeño.
4
Conocer las normas náuticas de la vía y las ayudas a la navegación fluvial.
5
Saber qué equipo de seguridad, dispositivos de señales y luces son necesarios en los barcos clase A y Clase 1.
6
Conocer y practicar las normas de seguridad de la navegación.
7
¿Qué deben hacer los pasajeros del barco si éste zozobra?
8
¿Cuál es la regla general de prudencia?
9
Conocer el significado de los siguientes términos de navegación:
9a
Hacia la popa
9b
Al través
9c
A bordo
9d
A popa
9e
En medio del bote
9f
Por la popa
9g
Bao/manga
9h
Bajar el barco
9i
Curva
9j
Sentina
9k
Proa
9l
Mamparo
9m
Abrazadera
9n
Calado
9o
Francobordo
9p
Quilla
9q
Sotavento
9r
Puerto
9s
Estribor
9t
Popa
9u
Equilibrar/centrar
9v
Barlovento
10
Mostrar la forma de poder operar adecuadamente un barco de motor de la siguiente manera:
10a
Ayudar a poner un barco en el agua desde un remolque.
10b
Comprobar los equipos de seguridad. Revisar el combustible y el motor.
10c
Encender el motor y partir de una playa o muelle.
10d
Conducir un barco en línea recta por 400 metros. Hacer un giro de 90 grados a la izquierda y derecha. Hacer un giro de 180 grados.
10e
Detenido, tirar el ancla y recuperarla.
10f
Detenerse en un muelle o una playa con un buen nudo.
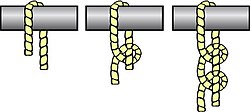
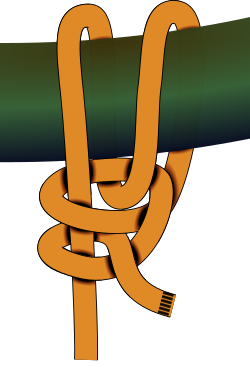
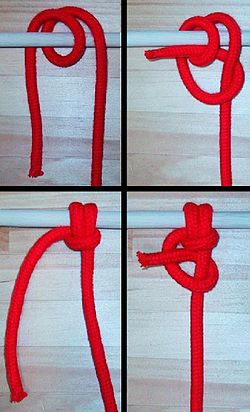
| Dos medio cotes |
|---|
|
Uso: Este nudo fiable está se amarra rápidamente y es el enganche más utilizado en los amarres.
Cómo amarrar:
|
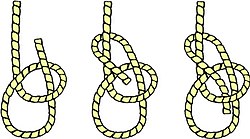
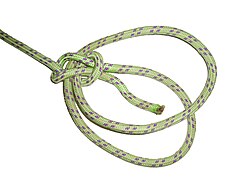
| As de guía |
|---|
|
Uso: Este nudo no se resbala o desata cuando se amarra correctamente. Puede ser amarrado alrededor de la cintura de una persona y se utiliza para levantarla, ya que el seno no se aprieta bajo una carga. En navegación por vela, el as de guía se utiliza para atar una driza a un punto de la vela.
Cómo amarrar:
|
| As de guía por seno (doble) |
|---|
|
Cómo amarrar:
|
| Nudo estibador |
|---|
|
Uso: El nudo estibador es un nudo de tope, usualmente atado cerca del extremo de una cuerda. Es más voluminoso y menos propenso a atascarse que el nudo en forma de ocho relacionado. Este nudo es excelente para anclar una lona. Pase el extremo de la cuerda a través del ojal de una lona, ate un estibador y ancle el otro extremo con un nudo tensor. Su volumen agregado evita que atraviese el ojal.
Cómo amarrar:
|
| Nudo de ancla |
|---|
|
Uso: El nudo de ancla es un nudo utilizado para sujetar una cuerda a un anillo o terminación similar. La vuelta redonda y aplicación apretada ayuda a mantener la cuerda de rozaduras.
Cómo amarrar:
|
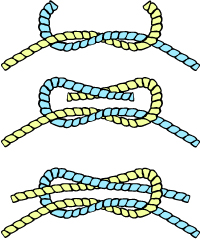
| Nudo llano |
|---|
|
Uso: También conocido como el nudo rizo o cuadrado, el nudo llano se aprende fácilmente y es útil para varias situaciones. Es usualmente utilizado para atar dos cuerdas o sogas juntas en sus extremos. Este nudo se utiliza en el mar en rizos y enrollar velas. Se utiliza en primeros auxilios para atar una venda o un cabestrillo debido a que el nudo queda plano.
Cómo amarrar:
ADVERTENCIA: No confíe en este nudo para soportar el peso en una situación de vida o muerte. Se ha conocido a desamarrarse.
|
10g
Ayudar a sacar un barco del agua a un remolque.
11
Conocer cómo preparar y almacenar un barco y el motor en la temporada baja.
