Difference between revisions of "AY Honors/Carpentry/Answer Key/es"
From Pathfinder Wiki
(Created page with "</noinclude>") |
|||
| (3 intermediate revisions by the same user not shown) | |||
| Line 140: | Line 140: | ||
{{CloseReq}} <!-- 2 --> | {{CloseReq}} <!-- 2 --> | ||
{{ansreq|page={{#titleparts:{{PAGENAME}}|2|1}}|num=3}} | {{ansreq|page={{#titleparts:{{PAGENAME}}|2|1}}|num=3}} | ||
| − | <noinclude> | + | <noinclude></noinclude> |
| − | </noinclude> | + | <!-- 3. Describir para que se utilizan y distinguir entre los siguientes tipos de clavos: --> |
| − | <!-- 3. | ||
| − | |||
{{clear}} | {{clear}} | ||
| Line 166: | Line 164: | ||
{{CloseReq}} <!-- 3 --> | {{CloseReq}} <!-- 3 --> | ||
{{ansreq|page={{#titleparts:{{PAGENAME}}|2|1}}|num=4}} | {{ansreq|page={{#titleparts:{{PAGENAME}}|2|1}}|num=4}} | ||
| − | <noinclude> | + | <noinclude></noinclude> |
| − | </noinclude> | + | <!-- 4. Ayudar en la construcción de un marco de construcción en un terreno de dimensiones de no menos de 6 x 8 pies (1.8 m x 2.4 m), con un techo inclinado y con al menos una puerta y una ventana, demostrar la capacidad de medir y el uso de la herramientas mencionadas en el requisito 2. --> |
| − | <!-- 4. | ||
| − | |||
| − | |||
{{clear}} | {{clear}} | ||
| Line 182: | Line 177: | ||
{{ansreq|page={{#titleparts:{{PAGENAME}}|2|1}}|num=5}} | {{ansreq|page={{#titleparts:{{PAGENAME}}|2|1}}|num=5}} | ||
<noinclude></noinclude> | <noinclude></noinclude> | ||
| − | <!-- 5. | + | <!-- 5. Cuando haga la construcción del proyecto anteriormente mencionado, usar todos estos elementos: --></noinclude> |
{{ansreq|page={{#titleparts:{{PAGENAME}}|2|1}}|num=5a}} | {{ansreq|page={{#titleparts:{{PAGENAME}}|2|1}}|num=5a}} | ||
| − | <noinclude> | + | <noinclude></noinclude> |
| − | </noinclude | ||
| − | |||
| − | |||
| − | + | <noinclude></noinclude> | |
| − | <noinclude | ||
| − | |||
{{CloseReq}} <!-- 5a --> | {{CloseReq}} <!-- 5a --> | ||
{{ansreq|page={{#titleparts:{{PAGENAME}}|2|1}}|num=5b}} <!--T:46--> | {{ansreq|page={{#titleparts:{{PAGENAME}}|2|1}}|num=5b}} <!--T:46--> | ||
| − | <noinclude> | + | <noinclude></noinclude> |
| − | </noinclude | ||
| − | |||
| − | |||
| − | + | <noinclude></noinclude> | |
| − | <noinclude | ||
| − | |||
{{CloseReq}} <!-- 5b --> | {{CloseReq}} <!-- 5b --> | ||
{{ansreq|page={{#titleparts:{{PAGENAME}}|2|1}}|num=5c}} <!--T:47--> | {{ansreq|page={{#titleparts:{{PAGENAME}}|2|1}}|num=5c}} <!--T:47--> | ||
| − | <noinclude> | + | <noinclude></noinclude> |
| − | </noinclude | ||
| − | |||
| − | |||
| − | + | <noinclude></noinclude> | |
| − | <noinclude | ||
| − | |||
{{CloseReq}} <!-- 5c --> | {{CloseReq}} <!-- 5c --> | ||
{{ansreq|page={{#titleparts:{{PAGENAME}}|2|1}}|num=5d}} <!--T:48--> | {{ansreq|page={{#titleparts:{{PAGENAME}}|2|1}}|num=5d}} <!--T:48--> | ||
| − | <noinclude> | + | <noinclude></noinclude> |
| − | </noinclude | ||
| − | |||
| − | |||
| − | + | <noinclude></noinclude> | |
| − | <noinclude | ||
| − | |||
{{CloseReq}} <!-- 5d --> | {{CloseReq}} <!-- 5d --> | ||
{{ansreq|page={{#titleparts:{{PAGENAME}}|2|1}}|num=5e}} <!--T:49--> | {{ansreq|page={{#titleparts:{{PAGENAME}}|2|1}}|num=5e}} <!--T:49--> | ||
| − | <noinclude> | + | <noinclude></noinclude> |
| − | </noinclude | ||
| − | |||
| − | |||
| − | + | <noinclude></noinclude> | |
| − | <noinclude | ||
| − | |||
{{CloseReq}} <!-- 5e --> | {{CloseReq}} <!-- 5e --> | ||
{{ansreq|page={{#titleparts:{{PAGENAME}}|2|1}}|num=5f}} <!--T:50--> | {{ansreq|page={{#titleparts:{{PAGENAME}}|2|1}}|num=5f}} <!--T:50--> | ||
| − | <noinclude> | + | <noinclude></noinclude> |
| − | </noinclude | ||
| − | |||
| − | |||
| − | + | <noinclude></noinclude> | |
| − | <noinclude | ||
| − | |||
{{CloseReq}} <!-- 5f --> | {{CloseReq}} <!-- 5f --> | ||
{{ansreq|page={{#titleparts:{{PAGENAME}}|2|1}}|num=5g}} <!--T:51--> | {{ansreq|page={{#titleparts:{{PAGENAME}}|2|1}}|num=5g}} <!--T:51--> | ||
| − | <noinclude> | + | <noinclude></noinclude> |
| − | </noinclude | ||
| − | |||
| − | |||
| − | + | <noinclude></noinclude> | |
| − | <noinclude | ||
| − | |||
{{CloseReq}} <!-- 5g --> | {{CloseReq}} <!-- 5g --> | ||
{{ansreq|page={{#titleparts:{{PAGENAME}}|2|1}}|num=5h}} <!--T:52--> | {{ansreq|page={{#titleparts:{{PAGENAME}}|2|1}}|num=5h}} <!--T:52--> | ||
| − | <noinclude> | + | <noinclude></noinclude> |
| − | </noinclude | ||
| − | |||
| − | |||
| − | + | <noinclude></noinclude> | |
| − | <noinclude | ||
| − | |||
{{CloseReq}} <!-- 5h --> | {{CloseReq}} <!-- 5h --> | ||
{{ansreq|page={{#titleparts:{{PAGENAME}}|2|1}}|num=5i}} <!--T:53--> | {{ansreq|page={{#titleparts:{{PAGENAME}}|2|1}}|num=5i}} <!--T:53--> | ||
| − | <noinclude> | + | <noinclude></noinclude> |
| − | </noinclude | ||
| − | |||
| − | |||
| − | + | <noinclude></noinclude> | |
| − | <noinclude | ||
| − | |||
{{CloseReq}} <!-- 5i --> | {{CloseReq}} <!-- 5i --> | ||
{{ansreq|page={{#titleparts:{{PAGENAME}}|2|1}}|num=5j}} <!--T:54--> | {{ansreq|page={{#titleparts:{{PAGENAME}}|2|1}}|num=5j}} <!--T:54--> | ||
| − | <noinclude> | + | <noinclude></noinclude> |
| − | </noinclude> | + | <noinclude></noinclude> |
| − | |||
| − | <noinclude | ||
| − | |||
{{CloseReq}} <!-- 5j --> | {{CloseReq}} <!-- 5j --> | ||
{{ansreq|page={{#titleparts:{{PAGENAME}}|2|1}}|num=5k}} | {{ansreq|page={{#titleparts:{{PAGENAME}}|2|1}}|num=5k}} | ||
| − | <noinclude> | + | <noinclude></noinclude> |
| − | </noinclude | ||
| − | |||
| − | |||
| − | + | <noinclude></noinclude> | |
| − | <noinclude | ||
| − | |||
{{CloseReq}} <!-- 5k --> | {{CloseReq}} <!-- 5k --> | ||
{{ansreq|page={{#titleparts:{{PAGENAME}}|2|1}}|num=5l}} <!--T:55--> | {{ansreq|page={{#titleparts:{{PAGENAME}}|2|1}}|num=5l}} <!--T:55--> | ||
| − | <noinclude> | + | <noinclude></noinclude> |
| − | </noinclude | ||
| − | |||
| − | |||
| − | + | <noinclude></noinclude> | |
| − | <noinclude | ||
| − | |||
{{CloseReq}} <!-- 5l --> | {{CloseReq}} <!-- 5l --> | ||
{{CloseReq}} <!-- 5 --> | {{CloseReq}} <!-- 5 --> | ||
{{ansreq|page={{#titleparts:{{PAGENAME}}|2|1}}|num=Note|dispreq={{Localize|Note}}}} | {{ansreq|page={{#titleparts:{{PAGENAME}}|2|1}}|num=Note|dispreq={{Localize|Note}}}} | ||
| − | <noinclude> | + | <noinclude></noinclude> |
| − | </noinclude> | + | <!-- Nota --> |
| − | <!-- | + | Los participantes deben tener 16 años de edad o más para utilizar las herramientas eléctricas. |
| − | |||
| − | |||
| − | + | <noinclude></noinclude> | |
| − | <noinclude | ||
| − | |||
{{CloseReq}} <!-- Note --> | {{CloseReq}} <!-- Note --> | ||
| − | <noinclude> | + | <noinclude></noinclude> |
| − | </noinclude> | + | ==Referencias== |
| − | == | + | <noinclude></noinclude> |
| − | |||
| − | |||
| − | |||
| − | |||
| − | <noinclude | ||
| − | |||
{{CloseHonorPage}} | {{CloseHonorPage}} | ||
Latest revision as of 19:57, 25 July 2022
Carpintería
Nivel de destreza
2
Año
1929
Version
10.07.2026
Autoridad de aprobación
Asociación General

1
Describir la función de las siguientes herramientas:
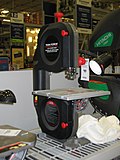
Sierra de cinta 
Lijadora de banda 
Sierra de calar/de vaivén 
Sierra ingletadora (miter) 
Sierra radial fija 
Fresadora/caladora 
Moldeador


1a
Sierra de cinta
1b
Sierra radial fija
1c
Lijadora de banda
1d
Fresadora/caladora
1e
Sierra de calar/de vaivén
1f
Moldeador
1g
Sierra ingletadora (miter)
2
Demostrar cómo utilizar las siguientes herramientas:

Cepillo lijador

Sierra circular (cortar una línea recta)
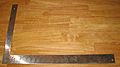
Escuadra
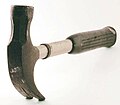
Martillo

Sierra manual (cortar una línea recta)
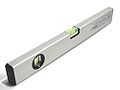
Nivel de burbuja

Cinta métrica

Botador

Plomada
Formón


2a
Cepillo lijador
2b
Sierra circular (cortar una línea recta)
2c
Escuadra
2d
Martillo
2e
Sierra manual (cortar una línea recta)
2f
Nivel de burbuja
2g
Cinta métrica
2h
Botador
2i
Plomada
2j
Formón
3
Describir para que se utilizan y distinguir entre los siguientes tipos de clavos:
4
Ayudar en la construcción de un marco de construcción en un terreno de dimensiones de no menos de 6 x 8 pies (1.8 m x 2.4 m), con un techo inclinado y con al menos una puerta y una ventana, demostrar la capacidad de medir y el uso de la herramientas mencionadas en el requisito 2.
5
Cuando haga la construcción del proyecto anteriormente mencionado, usar todos estos elementos:
5a
Viga del piso
5b
Semi-piso
5c
Madera base
5d
Viga tope
5e
Doble viga
5f
Techo convencional o cerchas
5g
Papel de techo
5h
Tejas
5i
Ventana con cabecera para peso
5j
Puerta con cabecera para peso
5k
Tabla sobre los aleros
5l
Cobertores de vinil
Nota
Los participantes deben tener 16 años de edad o más para utilizar las herramientas eléctricas.
Los participantes deben tener 16 años de edad o más para utilizar las herramientas eléctricas.
