Difference between revisions of "AY Honors/Snowshoeing - Advanced/Answer Key 2"
(Delete Division_variant template, as it is now obsolete) |
|||
| Line 7: | Line 7: | ||
</noinclude> | </noinclude> | ||
<!-- 1. Complete the Snowshoeing honor. --> | <!-- 1. Complete the Snowshoeing honor. --> | ||
| − | {{honor_prerequisite | + | {{honor_prerequisite|honor=Snowshoeing}} |
<!--T:46--> | <!--T:46--> | ||
Revision as of 18:55, 14 September 2021
Skill Level
3
Year
2010
Version
23.11.2024
Approval authority
North American Division
1
For tips and instruction see Snowshoeing.
2
Snowshoes are classified by their intended use.
- Recreational hiking snowshoes are perfect for first-timers. Designed to work best on simple terrain that doesn’t require a lot of steep climbing or descents.
- Snowshoes for aerobic/fitness are good for runners and cross-trainers. This type of snowshoe has a very sleek design and is generally tougher than other designs.
- Hiking/backpacking snowshoes are heavy duty with strong aluminum frame and durable material for flotation. The bindings should support different types of boots.
3
The following resources might prove useful for this requirement:
- History of Snowshoeing by Jim Tucker
- Snowshoe by Angela Woodward
- [1] Wikipedia history of snowshoeing section
3a
An electronic presentation could be a web page, or a PowerPoint presentation. If you cannot afford (or do not have) PowerPoint, which is part of Microsoft Office, you could use OpenOffice.org's Impress instead. It's available free of charge.
3b
A display like this could be shown at a Pathfinder Fair.
For a bulletin board you will need the following items:
- Stapler
- A stapler will be used to mount everything to the bulletin board.
- Push pins
- These can be used to hold larger items to the board.
- Roll of solid paper
- Ideally, one sheet should cover the entire board. Paper is sold in rolls at teacher-supply or office supply stores.
- Bulletin board border
- The border should be themed to match your display. A variety of borders are available at teacher supply or office stores.
- Letters
- Bulletin board letters come in a variety of sizes, colors, and fonts. Again, check teacher supply or office supply stores.
- Illustrations & photographs
- Find photos and illustrations on the Internet, or draw them yourself. Print them out and use scissors to cut out the relevant parts of the photo.
- Other display items
- You could even mount a pair of snowshoes to the bulletin board, but be careful to not damage either the snowshoes or the bulletin board.
Bulletin boards usually start with a layer of solid-colored paper, followed by a border which is stapled around the edges. Before you begin, plan out your bulletin board. Lay the photos and letters out on a table and experiment with different layouts. When you find a combination you like, begin stapling your display to the bulletin board's background.
3c
A verbal presentation would work best if snowshoeing equipment is used as a visual aid. Since this presentation is to cover the origin and history of snowshoeing, it would be a good idea to have both a pair of modern snowshoes and a classic wooden pair.
3d
You can prepare a report using a word processor. If your instructor allows, you could also type it up in an email, or as a blog post.
4
The safety practices are found in requirement 5 of the Snowshoeing honor.
5
5a
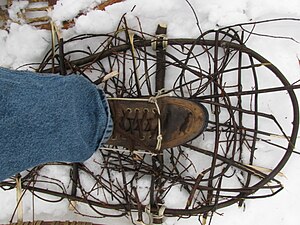
A pair of survival snowshoes can be made from green wood, some sort of cordage (rope, wire, strips of cloth, etc.), and a knife. The first step is to find a living tree 1.5 to 2 meters![]() tall with a trunk roughly 20mm
tall with a trunk roughly 20mm![]() in diameter. Make sure you have permission from the land owner before doing this - it will kill the tree. Alternatively, you can make the snowshoe from a living branch of a much larger tree. Bend the tree into a loop, and bind its top to its trunk with a short length of rope. Diagonal lashing will work great for this (see the Knot Tying honor for instructions on tying a diagonal lash as well as the other knots in these instructions). You could also cut the tree down before working on it, but by saving that as the last step, your work is held at chest-height, so you don't have to kneel in the snow as you work. This also lets you try several trees without damaging them while searching for one that it the proper length.
in diameter. Make sure you have permission from the land owner before doing this - it will kill the tree. Alternatively, you can make the snowshoe from a living branch of a much larger tree. Bend the tree into a loop, and bind its top to its trunk with a short length of rope. Diagonal lashing will work great for this (see the Knot Tying honor for instructions on tying a diagonal lash as well as the other knots in these instructions). You could also cut the tree down before working on it, but by saving that as the last step, your work is held at chest-height, so you don't have to kneel in the snow as you work. This also lets you try several trees without damaging them while searching for one that it the proper length.
The next step is to begin weaving green twigs into the frame. Dead twigs will not work here, as they will snap - if not while you are weaving them in, then when you put your weight on them as you use the snowshoes. Start by using the branches of the tree you bent into a hoop. Then strip small branches from other trees and add them in. These twigs and branches need only be 5mm![]() in diameter or so. Lay some of them in lengthwise, and others in crosswise. Ultimately, you want to form a webbing with 2.5cm
in diameter or so. Lay some of them in lengthwise, and others in crosswise. Ultimately, you want to form a webbing with 2.5cm![]() gaps. Tighter webbing will allow you to walk on fluffier snow, but it will not allow snow to fall through the webbing (and off the deck) when you lift your feet.
gaps. Tighter webbing will allow you to walk on fluffier snow, but it will not allow snow to fall through the webbing (and off the deck) when you lift your feet.
Once the webbing is complete to your satisfaction, you will need to find another branch about 20mm![]() in diameter to form a crossbar. An ideal candidate for this is the lower portion of the tree trunk from which your snowshoe is made. Cut the snowshoe off the tree. Then place it next to the remaining trunk to measure how long the crossbar should be. If you cut it too short, you will have to find another. If you leave it too long, you will have an awkward pair of snowshoes. The crossbar should extend beyond the frame a distance approximately equal to its thickness. Attach both ends of the crossbar to the frame at the frame's widest section using square lashing. If you are short on rope, but have some woodworking skill and plenty of time for construction, you could also carve tenons and the crossbar and cut mortices in each side of the rim. If you opt for this approach, be sure the tenons are long enough that the crossbar will not fall out. Also be sure the mortices do not remove too much wood from the rim.
in diameter to form a crossbar. An ideal candidate for this is the lower portion of the tree trunk from which your snowshoe is made. Cut the snowshoe off the tree. Then place it next to the remaining trunk to measure how long the crossbar should be. If you cut it too short, you will have to find another. If you leave it too long, you will have an awkward pair of snowshoes. The crossbar should extend beyond the frame a distance approximately equal to its thickness. Attach both ends of the crossbar to the frame at the frame's widest section using square lashing. If you are short on rope, but have some woodworking skill and plenty of time for construction, you could also carve tenons and the crossbar and cut mortices in each side of the rim. If you opt for this approach, be sure the tenons are long enough that the crossbar will not fall out. Also be sure the mortices do not remove too much wood from the rim.
Once the crossbar is firmly attached to the frame, get another length of rope to serve as the binding. Tie it to the crossbar next to where the edge of your foot will be placed using two half-hitches. Then place the foot on the snowshoe and run the binding beneath the bottom shoelace on your boots (if your boots have laces).
The next several knots form a "trucker's hitch" which is not shown in the Knot Tying honor, but which is nonetheless, a highly useful knot for securely binding a load. It starts with a slip knot tied above the middle of the foot. This slip knot should be tied such that the loop will tighten when the free end is pulled (rather than when the standing end is pulled). The free end is then run beneath the crossbar on the other side of the foot, opposite the two half hitches previously tied. Then the free end runs into the loop formed by the slip knot. Tie it off with two half hitches. If you have rope leftover, run it behind the heel and tie it to the toe strap with two half hitches.
At this point, your first snowshoe is complete and ready for use. All that remains is to make a second shoe. However, since this will destroy a tree, you should probably skip the second snowshoe unless you are indeed in a survival situation. Instead, try the improvised snowshoe out by using a regular snowshoe with it. This will allow you to compare the performance of your creation with a standard snowshoe. You should find that it performs remarkably well.
5b
Here is a video on making a pair of snowshoes yourself in the bush, and another option on making snowshoes at home inexpensively.
6
Once you've gotten the hang of snowshoeing, you will be ready to tackle more ambitious hikes. For these, you can use regular hiking trails, but in the winter. If you lack snow in your area you may need to visit a ski hill or other snow location.
You can also tow extra gear (or small children) on a sled with little additional effort, meaning you can take equipment (or family members) that you would otherwise have to carry. Such extras could include camera equipment, lunch, camp chairs, and even a grill for cooking your food or warming some apple cider. This is a distinct advantage that snowshoeing holds over hiking.
To get your approximate speed, time yourself as you travel (stop the clock when you stop to rest for an extended period). Take along a GPS receiver so you can track where you've been (and thus, the distance you've covered). Google maps has tools available to measure distance as well, but it's not always easy to tell where you've been by looking at an online map or satellite image. You can also determine distance covered by using a topographical map. Once you know how far you've gone and the amount of time it took you to cover that distance, your speed is simply distance divided by time:
[math]\displaystyle{ speed = \frac{distance}{time} }[/math]
If your distance is measured in miles and time is measured in hours, speed will be in miles per hour. To convert hours and minutes to just hours, divide the minutes by 60 and add it to hours:
[math]\displaystyle{ hours = whole hours + \frac{minutes}{60} }[/math]
Thus, two whole hours plus 18 minutes would be:
[math]\displaystyle{ hours = 2 + \frac{18}{60} = 2 + 0.3 = 2.3 }[/math]
If you covered 4.5 miles in that period of time, that would be
[math]\displaystyle{ speed = \frac{4.5}{2.3} = 1.95 MPH }[/math]
7
Consult a concordance or search for "snow" in an online Bible.
Many Bible references to snow use snow to define a color or appearance ie "white as snow" including the concept of purity. A few refer to actual snow.
Some spiritual dimensions of snow could include:
- Snow is a source of moisture and coolness.
- Snow makes a wonderfully warm building material because of its superior insulating properties. Snow being warm is a "contradiction" just as "love thy neighbor" is a contradiction.
- Snow is very absorbent. Rolling in snow after falling through ice will absorb a lot of water from clothing so that it can by dried (by fire) more quickly.
Read several of these passages and see what sort of spiritual lessons you can take away from them. Also think about the things you experienced on your hikes. Snowshoe hikes are often serene and peaceful and filled with inexpressible beauty. Is that what you experienced?


