Difference between revisions of "AY Honors/Knitting/Answer Key/es"
From Pathfinder Wiki
(Updating to match new version of source page) |
|||
| Line 145: | Line 145: | ||
{{ansreq|page={{#titleparts:{{PAGENAME}}|2|1}}|num=2g}} <!--T:44--> | {{ansreq|page={{#titleparts:{{PAGENAME}}|2|1}}|num=2g}} <!--T:44--> | ||
<noinclude></noinclude> | <noinclude></noinclude> | ||
| + | |||
| + | <div lang="en" dir="ltr" class="mw-content-ltr"> | ||
| + | <gallery> | ||
| + | File:Knitting dropped stitch 1.jpg|This photo shows the dropped stitch. Notice that right in the middle of the picture is a loop that has lost the yarn that is supposed to go through it. The yarn that has pulled out of this loop is lying behind the loop itself. | ||
| + | </div> | ||
| + | |||
| + | <div lang="en" dir="ltr" class="mw-content-ltr"> | ||
| + | File:Knitting dropped stitch 2.jpg|If picking up a knitted stitch, insert the crochet hook through the front of the loop. If picking up a purled stitch, insert the hook through the loop from the back. | ||
| + | </div> | ||
| + | |||
| + | <div lang="en" dir="ltr" class="mw-content-ltr"> | ||
| + | File:Knitting dropped stitch 3.jpg|Catch the dropped stitch with the crochet hook. | ||
| + | </gallery> | ||
| + | </div> | ||
| + | |||
| + | <div lang="en" dir="ltr" class="mw-content-ltr"> | ||
| + | <gallery> | ||
| + | File:Knitting dropped stitch 4.jpg|Pull the dropped stitch through the loop with the crochet hook. You might need to twist the hook so that it will more easily pass through the first loop. | ||
| + | </div> | ||
| + | |||
| + | <div lang="en" dir="ltr" class="mw-content-ltr"> | ||
| + | File:Knitting dropped stitch 5.jpg|The dropped stitch has now been pulled through the loop forming a new loop. In this picture, the crochet hook has been thrust through the newly formed loop so that it won't be dropped again by accident. | ||
| + | </div> | ||
| + | |||
| + | <div lang="en" dir="ltr" class="mw-content-ltr"> | ||
| + | File:Knitting dropped stitch 6.jpg|thumb|250px|center|Finally, transfer the new loop (that is, the formerly dropped stitch) from the crochet hook to the knitting needle. In this photo, it was transferred to the right needle, but it should have been transferred to the left one instead. | ||
| + | </gallery> | ||
| + | </div> | ||
<noinclude></noinclude> | <noinclude></noinclude> | ||
Revision as of 23:33, 14 July 2022
1
Definir los siguientes términos:
1a
T-Tejer
1b
P-Punto
1c
PPS-Pasar puntos
1d
RND-Redondo o en círculo
1e
JUN-Juntos
1f
PPE-Pasar punto encima
1g
INC-Incrementar
1h
DIS-Disminuir
1i
HA-Hilo arriba
2
Demostrar los siguientes puntos:
2a
Montar calzar puntos
2b
Cerrar
2c
Puntadas de torzados o de cadeneta
2d
Nervaduras
2e
Puntada de liga
2f
Puntada stockinette
2g
Recoger una puntada caída
3
Conocer cómo cuidar de esta clase de estambre:
3a
Lana
3b
Pelo
3c
Sintéticas
4
Mostrar cómo unir una nueva bola de estambre.
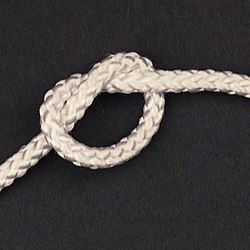
| Nudo simple |
|---|
|
Uso: Uno de los nudos más fundamentales y constituye la base de muchos otros. El nudo simple es muy seguro y se puede atascar, así que úselo solo si desea un nudo permanente. A menudo se usa para evitar que el extremo de una cuerda o soga se desenrede.
|
5
Identificar y conocer el propósito de los siguientes pesos de un hilo:
5a
Media
5b
Deportes
5c
Pesado
Tamaño de aguja: EE.UU. (5.5mm - 8mm)
Tamaño de gancho: EE.UU. (6.5mm - 9mm)
5d
Voluminosos
6
Tejer dos artículos de los siguientes:
- a. Zapatillas
- b. Guantes sin dedos (mitones)
- c. Escarpines de bebé
- d. Sombrero
- e. Bufanda
- f. Suéter sin mangas
- g. Opción razonable


