Difference between revisions of "AY Honors/Metal Craft/Answer Key"
Jomegat bot (talk | contribs) m (fix honor_desc) |
Jomegat bot (talk | contribs) m (add development stage argument to honor_desc) |
||
| Line 1: | Line 1: | ||
{{honor_desc | {{honor_desc | ||
| + | |stage=100 | ||
|honorname=Metal Craft | |honorname=Metal Craft | ||
|skill=2 | |skill=2 | ||
Revision as of 03:16, 3 October 2014
1. Name the various metals that can be used in metal craft.
Metals suitable for use in metal craft include:
- Tin
- Aluminum
- Copper
- Galvanized steel (duct work)
- Brass (an alloy of copper and zinc)
- Bronze (an alloy of copper and tin)
- Silver and gold (especially in foil form)
2. Complete one project using metal foil tooling. Complete the project by antiquing and framing.
Metal foil tooling is done by placing a piece of foil on top of a soft but firm surface and then making impressions with a stylus. The work surface can be a piece of scrap linoleum, leather, or crafting foam. The stylus is often a small wooden stick with a point on it, but you can also use a ballpoint pen or a pencil. A dowel about the same diameter as a pencil can be sharpened with a pencil sharpener to make an effective stylus.
The metal crafter can place a drawing on top of the foil and trace it with the stylus, or draw the design free hand. Once the image has been impressed in the foil, it can be placed in a frame. You can use something as elaborate as a picture frame, or as simple as craft sticks glued together.
Low cost kits are available with all the necessary materials at craft stores, hobby shops, and online retailers.
3. Complete one project using metal punch.
A punch is a hard metal rod with a shaped tip at one end and a blunt butt end at the other that is usually struck by a hammer. A variety of punches are used in engineering, but often the purpose is to form an impression of the tip on a workpiece. You can also use a nail set, a pick, or even a nail (though a nail will make squarish holes) instead of a punch.
Draw out your design on a piece of paper. It should be a simple line drawing with no shading. Then draw dots on the lines indicating where you will punch a hole. Fasten the drawing to a piece of sheet metal with tape. The sheet metal can be copper, tin, or aluminum (such as flashing), all of which are generally available at home improvement centers and hardware stores.
Place a piece of scrap plywood on your work surface to protect it, and then place a piece of scrap linoleum on top of that. Your piece of sheet metal goes on top of the linoleum.
Carefully place the tip of the punch on one of the dots in your drawing and strike the butt end of the punch sharply with a hammer. It should take only one blow. Then move the punch to the next dot and repeat until you have punch a hole (or merely made an indention) on every dot in your drawing. Remove the paper and admire your work.
Punched panels are often used to decorate the doors of a pie safe.
4. Complete one project using drilling, riveting, and bending of metal such as a simple candle holder.
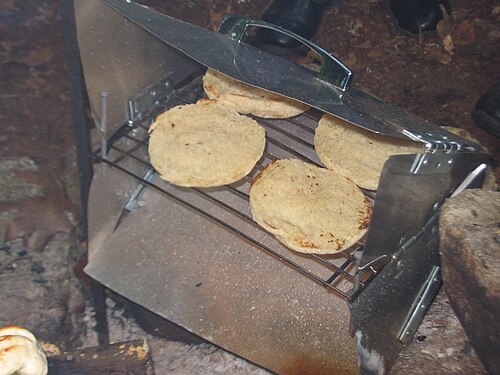
An easy project to make that might be of special interest to a Pathfinder is a reflector oven. Baking with a reflector oven is a requirement of the Fire Building & Camp Cookery and Camping Skills IV honors. This particular design folds flat for easy stowing in a backpack. It can be made from aluminum flashing, eight hinges, a pre-made grill, a drawer handle, some rivets, and a couple of nails.
The first step is to find a grill or a grate that you can use in the oven. The grate can be easily removed and is not modified in any way, so if necessary, it can be "borrowed" from a toaster oven, hibachi, etc. The only requirement is that it be rectangular.
Once you have a grill, you can begin laying out the other pieces which are all sized according to the dimensions of the grill. Cut out the triangles that will form the side panels. These triangles should be the same width as the shortest dimension of the rectangular grill. The triangle's height should equal half this same dimension. Make four of these and punch a hole on the corner where the right angle is formed. You should also trim the sharp corners so that they are rounded (and thus present a smaller hazard to the end-user).
Once the side panels are cut out, use the long dimension of the triangle (the hypotenuse) to set the width of the top and bottom panels. The length of these pieces should be equal to the longest dimension of the grill. Once these pieces are cut out, you need to put a small X crease in them to stiffen them. This can be done by either laying them over a length of upturned angle iron and tapping the crease in with a rubber mallet, or by laying it flat on a floor, and then laying a stiff straight-edge (such as a yardstick) wherever you want the crease. Then work your way under the free end as you hold the straight-edge firmly in place.
Next it is time to drill some holes in the flashing. Clamp all four triangles together and lay a hinge along the bottom edge (the one which is as long as the grill is wide). Mark where the holes should go, and drill through all four pieces at once. This will ensure that the holes are all located identically. Next, clamp the top and bottom panels together and lay one of the triangles on top of them, lining up the matched dimensions. Mark the holes and drill them out. Do this to both sides. Finally, decide where you would like two more hinges along the back of the oven, mark the hinge holes, and drill them out.
The hinges should be secured to the panels with rivits rather than with screws. You can use pop rivets, but you will need to "peen" them over so that the hinges can fold flat. This can be done once the rivets have been attached by the pop-riveter by placing them on the face of an anvil (or on the face of a sledge hammer), and then hammering the unfinished end of the rivet until it is completely flattened.
Pay special attention when attaching the hinges that the hinges will fold in the right direction. It is very easy to put a hinge on backwards. If you do this, simply drill through the rivet to remove it, and try again.
Once all the hinges are in place, you may slip the grill in place. Secure it by running a nail through the holes punched in the right corner of the triangular panels. Pass the nail through the first hole starting on the inside of the oven. Flex the edge the panel inwards so that the nail can pass through the grill (see photo). The nail should next pass through the hole in the lower triangle, back to the inside of the oven. Insert the second nail on the other side.
Once it is assembled, find the balance point for mounting the drawer handle in the top panel. Ideally, the grill should remain level when it is lifted by this handle (you might even want it to tip backwards slightly). Drill holes for the screws. If the screws are too long (after all, they are designed to go through a wooden drawer face, not a thing sheet of aluminum flashing), you will need to cut them shorter with a hacksaw. Then attach them firmly.
To use the oven, load the items you wish to bake onto the grill and place it within the fire ring of a nice bed of hot coals. Prop the back up with a rock (perhaps a rock fro mthe fire ring). Keep an eye on your baked goods and turn them over if necessary.
5. Demonstrate properly the use of the following:
a. Tin Snips
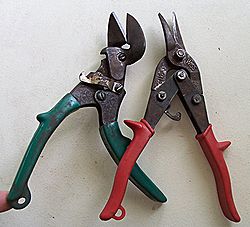
Tin snips are tools used to cut thin sheet metal. They use the same principles as common scissors, but are able to handle thicker and harder material. There are three different types of tin snips; straight cutting, left cutting, and right cutting. Straight cutting in a straight line, left cutting snips (usually red) will cut in a curve to the left, and right cutting snips (usually green) will cut in a curve to the right.
In practical use the red snips pictured will be used in the right hand, for straight or curving cuts, with the base material to the right being cut neatly and the left hand will be pulling away a spiraling offcut. The green snips work in the opposite fashion in the left hand, with the waste being on the right.
b. Pop rivet
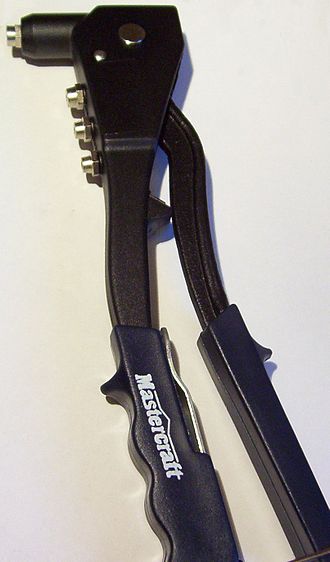
Pop rivets are made from flared aluminum tubes and a stem (or mandrel) through the center. The stem has a small ball at the end which has a diameter great than that of tube. The rivet assembly is inserted into a hole drilled through the parts to be joined and a specially pop riveting tool is used to draw the mandrel into the rivet. The ball at the end of the mandrel expands the end of the rivet and the mandrel snaps.
The rivet is placed in a pre-drilled hole and is set by pulling the mandrel head into the rivet body, expanding the rivet body and causing it to flare against the reverse side. As the head of the mandrel reaches the face of the blind side material, the pulling force is resisted, and at a predetermined force, the mandrel will snap at the break point of the mandrel.
To set a pop rivet, insert the stem into the nozzle of the riveting tool, then place the rivet's tube into a pre-drilled hole. Position the river such that the flared portion is held firmly against the surface of piece to be riveted, and squeeze the handles together. You should be able to squeeze them until the rivet "pops", or the handles have traveled their full distance. If that happens, release the handle and squeeze again. The tool will grip the stem in a different place. You may need to repeat this a few times until the rivet pops. After it pops, release the handle, and let the stem slide out of the tool's nozzle. A successful rivet joint depends on maintaining contact between the rivet's flared face and the material being riveted.
c. Electric drill
An electric drill is used for boring holes in materials - in the case of metal crafting, that material would be the metal being worked. Typically, one would use a twist bit made of high carbon steel, high speed steel, or cobalt steel for drilling holes in metal. Low carbon steel bits are not suited to drilling holes in metal, as they quickly lose their cutting edges. Drills and bits are typically only used for boring small-diameter holes in metal.
To drill a hole in metal, first use a centering punch to make a small indentation in the metal so the bit does not wander. Then clamp the piece of metal securely to a piece of scrap wood. When the bit penetrates to the other side, it will have a tendency to grab the piece and spin it around at high speed. This can be dangerous, especially if it catches a finger, and thus, it is very wise to clamp it securely so that the piece stays put. Once it is clamped, put on a pair of safety goggles and then place the tip of the bit in the indentation made with the centering punch and hold it perpendicular to the piece (that is, if the piece is perfectly horizontal, the bit will be perfectly vertical). If the bit is not perpendicular (straight in), it will have a greater tendency to wander.
Gently squeeze the trigger on the drill - as more pressure is applied to the trigger, the drill will turn the bit faster and faster. If the bit wanders off the mark, stop and recenter it. If it does it again, get out the center punch and knock a deeper indentation in the piece.
As you squeeze the trigger, gently press downward on the drill, but don't overdo it. If you press too hard, you risk breaking the bit (yes, it happens, and that's why safety goggles are important). Continue to hold the bit perpendicular to the piece. When the bit breaks through the other side of the piece, you need to have the bit rotating at a high speed, and you should not let up for a few seconds. If you stop too soon, the hole will not be circular. It is best to drill part way into the scrap wood supporting the piece, as the side flutes on the bit will cut the sides of the hole, and this will help you make a round hole. With the bit still turning, pull the bit out of the hole (it's easier to do when the bit is rotating).
d. Metal file
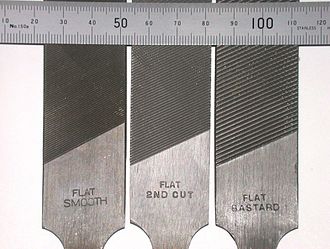
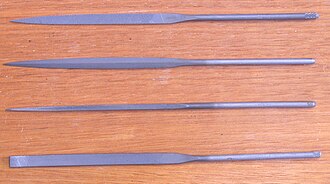
Files have forward-facing cutting teeth, and cuts most effectively when pushed over the workpiece. Drawfiling involves laying the file sideways on the work, and carefully pushing or pulling it across the work. This catches the teeth of the file sideways instead of head on, and a very fine shaving action is produced. There are also varying strokes that produce a combination of the straight ahead stroke and the drawfiling stroke, and very fine work can be attained in this fashion. Using a combination of strokes, and progressively finer files, a skilled operator can attain a surface that is perfectly flat and near mirror finish. The grooves in a file may became clogged during use, causing the file to lose its cutting ability and trapped shavings can scratch the work surface. A file card can be used to clean the file.
Files should always be used with a handle, otherwise the naked tang can injure the operator.
