Difference between revisions of "AY Honors/Masonry"
Jomegat bot (talk | contribs) m (Fix Tab Name transclusion) |
Jomegat bot (talk | contribs) m (Fix Tab Name transclusion) |
||
| Line 27: | Line 27: | ||
<!--Start the Requirements Tab --> | <!--Start the Requirements Tab --> | ||
{{#tag:tab| | {{#tag:tab| | ||
| − | [[{{#titleparts:{{PAGENAME}}|2|1}}/Requirements{{GetLangSuffix}}|{{:Tab Name/Printable Version | + | [[{{#titleparts:{{PAGENAME}}|2|1}}/Requirements{{GetLangSuffix}}|{{:Tab Name/Printable Version{{GetLangSuffix}} }}]] |
{{#lst:{{#titleparts:{{PAGENAME}}|2|1}}/Requirements{{GetLangSuffix}}|Body}} | {{#lst:{{#titleparts:{{PAGENAME}}|2|1}}/Requirements{{GetLangSuffix}}|Body}} | ||
|name={{:Tab Name/Requirements{{GetLangSuffix}} }} }} | |name={{:Tab Name/Requirements{{GetLangSuffix}} }} }} | ||
| Line 34: | Line 34: | ||
{{#tag:tab| | {{#tag:tab| | ||
[[{{#titleparts:{{PAGENAME}}|2|1}}/Answer Key{{GetLangSuffix}}|<translate><!--T:6--> Printable Answer Key</translate>]] | [[{{#titleparts:{{PAGENAME}}|2|1}}/Answer Key{{GetLangSuffix}}|<translate><!--T:6--> Printable Answer Key</translate>]] | ||
| − | [{{fullurl:{{#titleparts:{{PAGENAME}}|2|1}}/Answer Key{{GetLangSuffix}}|action=edit}} {{:Tab Name/Edit Answer Key | + | [{{fullurl:{{#titleparts:{{PAGENAME}}|2|1}}/Answer Key{{GetLangSuffix}}|action=edit}} {{:Tab Name/Edit Answer Key{{GetLangSuffix}} }}] |
{{#lst:{{#titleparts:{{PAGENAME}}|2|1}}/Answer Key{{GetLangSuffix}}|Body}} | {{#lst:{{#titleparts:{{PAGENAME}}|2|1}}/Answer Key{{GetLangSuffix}}|Body}} | ||
| − | |name={{:Tab Name/Answer Key | + | |name={{:Tab Name/Answer Key{{GetLangSuffix}} }} }} |
<!--Start Lesson Plan Tab--> | <!--Start Lesson Plan Tab--> | ||
{{#tag:tab| | {{#tag:tab| | ||
{{#lst:{{#titleparts:{{PAGENAME}}|2|1}}/Lesson Plans{{GetLangSuffix}}|Body}} | {{#lst:{{#titleparts:{{PAGENAME}}|2|1}}/Lesson Plans{{GetLangSuffix}}|Body}} | ||
| − | |name={{:Tab Name/Lesson Plans | + | |name={{:Tab Name/Lesson Plans{{GetLangSuffix}} }} }} |
<!--Start Worksheet Tab--> | <!--Start Worksheet Tab--> | ||
Revision as of 04:44, 13 January 2021
Overview
The Challenging Part
The most challenging requirement of this honor is probably this:
5. Lay a straight stone, brick, or block masonry wall at least four feet (1.2 meters) high and ten feet (3.0 meters) long, including an inside or outside corner (surface must be struck and broomed).
[[AY Honors/Masonry/Requirements|Tab Name/Printable Version]]
1. Name at least six materials commonly used by masons in the erection of walls or buildings.
2. Demonstrate ability to use properly the following:
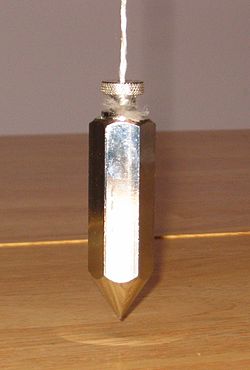
- a. Plumb line
- b. Line stretcher (chicken legs)
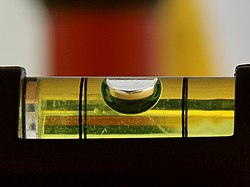
- c. Level
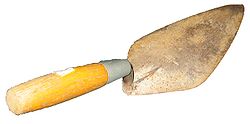
- d. Trowel
- e. S-tool
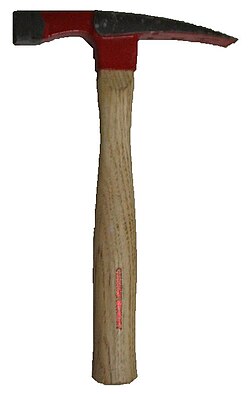
- f. Mason's hammer
3. Demonstrate a knowledge of building cement characteristics (know how to prevent sweating, cracking, shrinking, crumbling, and loss of strength).
4. Make usable mortar and state proper proportions of ingredients (lime, sand, etc.).
5. Lay a straight stone, brick, or block masonry wall at least four feet (1.2 meters) high and ten feet (3.0 meters) long, including an inside or outside corner (surface must be struck and broomed).
6. Pour a level footing, using hand mixed cement and proper reinforcement.
7. Make the forms and lay a piece of concrete walk or floor, using commercially mixed cement. Finish it and rule it.
8. Write a paragraph describing the behavior of cement; that is, its reaction to water, its adhesive qualities, how long it takes to set, etc.
Printable Answer Key Tab Name/Edit Answer Key
1
Primary materials include:
- Brick
- Concrete Block (also known as cinder block)
- Poured Concrete
- Stone
- Glass Block
- Tile
Secondary materials include
- Mortar
- Rebar
- Grout
2
2a
A plumb line is a string with a plumb bob at the end of it. The plumb bob hangs straight down, so the plumb line can be used to make sure that a wall is perfectly vertical and does not lean in any direction. A perfectly vertical line is said to be plumb.
2b
A line stretcher is used for guiding the mason when laying brick or other materials in a straight line. Typically, the mason will build up the corners or ends of a wall first, stretch a line between them, and lay the remaining bricks between them. The line stretcher is often set about a sixteenth of an inch away from the wall so that the bricks do not touch it (otherwise they might push the line out).
2c
A spirit level or bubble level is an instrument designed to indicate whether a surface is level or plumb. Spirit levels feature a slightly curved glass tube which is incompletely filled with a liquid, usually colored 'spirit' (a synonym for ethanol), leaving a bubble in the tube. Ethanol is used because of its low freezing point, −114°C, which prevents it from freezing in cold weather. Most commonly spirit levels are employed to indicate how horizontal (level) or how vertical (plumb) a surface is.
2d
A trowel is used for applying mortar to bricks, blocks, or other material. It is also used for "throwing a mortar line" - that is, laying a line of mortar atop the surface upon which that the bricks will be laid.
2e
An S-Tool is more commonly known as a jointer. The purpose of the S-tool is to place the grooves in the mortar between bricks. The concave grooves seen within the mortar lines of bricks are placed there by scraping the S-tool along the mortar well before it sets.
The S-tool should be used sometime between the time that the mortar is placed, and when it begins to harden. If the S-tool is used too late, then it will result in uneven lines throughout the mortar. The mortar will not have a smooth concave surface, and will look very raggedy.
Sometimes an S-tool is not used, and the mortar is placed on in excess; the slapping of the bricks causes it to drip down over the bricks, and it has a very nice effect when the bricks are painted afterwards.
2f
A Mason's hammer has one flat traditional face and a short or long chisel-shaped blade. It can thus be used to chip off edges or small pieces of stone without using a separate chisel. The chisel blade can also be used to rapidly cut bricks or cinder blocks.
3
Properly mixing and curing concrete will address most of the problems listed here. Adding too much water to concrete will cause it to lose strength. Ideally, you should only add enough water to the dry ingredients to make them all slightly wet. It is sometimes necessary to add more water than this so that the concrete can be poured into a form, and in these cases, only enough water to get the concrete to flow should be added.
Once the concrete is wet, it will begin to cure. It must be kept moist while it cures, and this can be accomplished by slowing the evaporation of the water that was mixed into it. Usually, this is done by covering the concrete with plastic sheeting or by spraying it lightly with water as it cures.
Concrete will shrink and expand with temperature, so large slabs must be fitted with expansion joints. These are most commonly seen as the gaps in roadways and sidewalks, but they are also built into walls and other structures as well.
4
There are two basic types of mortar: type N and type S.
Type N mortar is used for interior work and exterior work that is above grade (that is, not buried). It is made by combining:
- Lime (one part)
- Cement (one part)
- Sand (six parts)
Type S mortar is used for below-grade applications such as retaining walls and basements. It is made by combining:
- Lime (one part)
- Cement (two parts)
- Sand (nine parts)
Water is added to either of these mixtures and worked in with a trowel or a hoe until it reaches the desired consistency. Both types can be purchased pre-mixed so the mason need only add the water. Mixing is done on a hard flat surface, often in a wheelbarrow or on a sheet of plywood, but more properly in a mortar box.
5
Brick
Good bricklaying procedure depends on good workmanship and efficiency. Efficiency involves doing the work with the fewest possible motions. Each motion should have a purpose and should accomplish a definite result. After learning the fundamentals, every builder should develop methods for achieving maximum efficiency. The work must be arranged in such a way that the Builder is continually supplied with brick and mortar. The scaffolding required must be planned before the work begins. It must be built in such a way as to cause the least interference with other crew members.
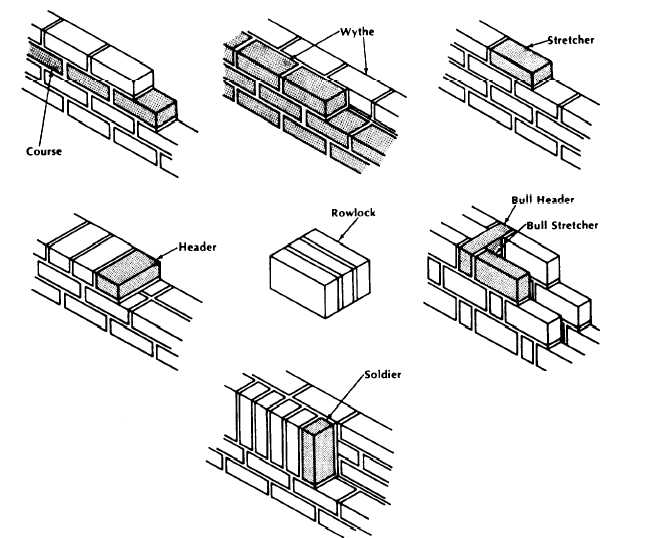
To efficiently and effectively lay bricks, you must be familiar with the terms that identify the position of masonry units and mortar joints in a wall. The following list, which is referenced in Figure 1, provides some of the basic terms you will encounter.
- Course
- One of several continuous, horizontal layers (or rows) of masonry units bonded together.
- Wythe
- Each continuous, vertical section of a wall, one masonry unit thick. Sometimes called a tier.
- Stretcher
- A masonry unit laid flat on its bed along the length of a wall with its face parallel to the face of the wall.
- Header
- A masonry unit laid flat on its bed across the width of a wall with its face perpendicular to the face of the wall. Generally used to bond two wythes.
- Row lock
- A header laid on its face or edge across the width of a wall.
- Bull header
- A rowlock brick laid with its bed perpendicular to the face of the wall.
- Bull stretcher
- A rowlock brick laid with its bed parallel to the face of the wall.
- Soldier
- A brick laid on its end with its face perpendicular to the face of the wall.
Bonds
The term “bond” as used in masonry has three different meanings: structural bond, mortar bond, or pattern bond. Structural bond refers to how the individual masonry units interlock or tie together into a single structural unit. You can achieve structural bonding of brick and tile walls in one of three ways:
- Overlapping (interlocking) the masonry units
- Embedding metal ties in connecting joints
- Using grout to adhere adjacent wythes of masonry.
Mortar bond refers to the adhesion of the joint mortar to the masonry units or to the reinforcing steel. Pattern bond refers to the pattern formed by the masonry units and mortar joints on the face of a wall. The pattern may result from the structural bond, or may be purely decorative and unrelated to the structural bond. Figure 2 shows the six basic pattern bonds in common use today: running, common or American, Flemish, English, stack, and English cross or Dutch bond.
The running bond is the simplest of the six patterns, consisting of all stretchers. Because the bond has no headers, metal ties usually form the structural bond.
The common, or American, bond is a variation of the running bond, having a course of full-length headers at regular intervals that provide the structural bond as well as the pattern. Header courses usually appear at every fifth, sixth, or seventh course, depending on the structural bonding requirements. You can vary the common bond with a Flemish header course. In laying out any bond pattern, be sure to start the corners correctly. In a common bond, use a three-quarter closure at the corner of each header course.
In the Flemish bond, each course consists of alternating headers and stretchers. The headers in every other course center over and under the stretchers in the courses in between. The joints between stretchers in all stretcher courses align vertically. When headers are not required for structural bonding, you can use bricks called blind headers. You can start the corners in two different ways. In the Dutch corner, a three-quarter closure starts each course. In the English corner, a 2-inch or quarter closure starts the course.
The English bond consists of alternating courses of headers and stretchers. The headers center over and under the stretchers. However, the joints between stretchers in all stretcher courses do not align vertically. You can use blind headers in courses that are not structural bonding courses.
The stack bond is purely a pattern bond, with no overlapping units and all vertical joints aligning. You must use dimensionally accurate or carefully rematched units to achieve good vertical joint alignment. You can vary the pattern with combinations and modifications of the basic patterns shown above. This pattern usually bonds to the backing with rigid steel ties or 8-inch-thick stretcher units when available. In large wall areas or load-bearing construction, insert steel pencil rods into the horizontal mortar joints as reinforcement.
The English cross or Dutch bond is a variation of the English bond. It differs only in that the joints between the stretchers in the stretcher courses align vertically. These joints center on the headers in the courses above and below.
When a wall bond has no header courses, use metal ties to bond the exterior wall brick to the backing courses. Figure 3 shows three typical metal ties.
Install flashing at any spot where moisture is likely to enter a brick masonry structure. Flashing diverts the moisture back outside. Always install flashing under horizontal masonry surfaces, such as sills and copings; at intersections between masonry walls and horizontal surfaces, such as a roof and parapet or a roof and chimney; above openings (doors and windows, for example); and frequently at floor lines, depending on the type of construction. The flashing should extend through the exterior wall face and then turn downward against the wall face to form a drop.
You should provide weep holes at intervals of 18 to 24 inches to drain water to the outside that might accumulate on the flashing. Weep holes are even more important when appearance requires the flashing to stop behind the wall face instead of extending through the wall. This type of concealed flashing, when combined with tooled mortar joints, often retains water in the wall for long periods and, by concentrating the moisture at one spot, does more harm than good.
Mortar Joints and Pointing
There is no set rule governing the thickness of a brick masonry mortar joint. Irregularly shaped bricks may require mortar joints up to 1/2 inch thick to compensate for the irregularities. However, mortar joints 1/4 inch thick are the strongest. Use this thickness when the bricks are regular enough in shape to permit it. A slushed joint is made simply by depositing the mortar on top of the head joints and allowing it to run down between the bricks to form a joint. You cannot make solid joints this way. Even if you fill the space between the bricks completely, there is no way you can compact the mortar against the brick faces; consequently a poor bond results. The only effective way to build a good joint is to trowel it. The secret of mortar joint construction and pointing is in how you hold the trowel for spreading mortar.
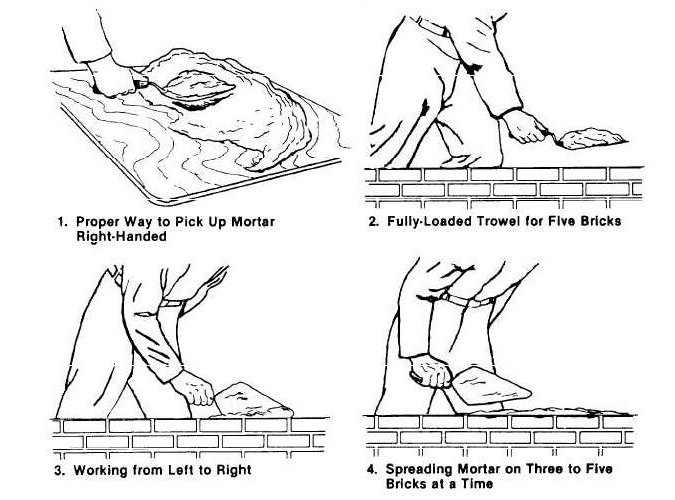
Figure 4 shows the correct way to hold a trowel. Hold it firmly in the grip shown, with your thumb resting on top of the handle, not encircling it. If you are right-handed, pick up mortar from the outside of the mortar board pile with the left edge of your trowel. You can pick up enough to spread one to five bricks, depending on the wall space and your skill. A pickup for one brick forms only a small pile along the left edge of the trowel. A pickup for five bricks is a full load for a large trowel.
If you are right-handed, work from left to right along the wall. Holding the left edge of the trowel directly over the center line of the previous course, tilt the trowel slightly and move it to the right (view 3), spreading an equal amount of mortar on each brick until you either complete the course or the trowel is empty (view 4). Return any mortar left over to the mortar board.
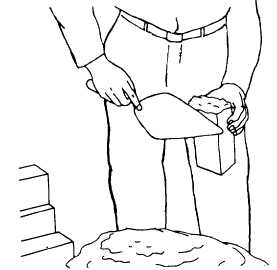
Do not spread the mortar for a bed joint too far ahead of laying - four or five brick lengths is best. Mortar spread out too far ahead dries out before the bricks become bedded and causes a poor bond. The mortar must be soft and plastic so that the brick will bed in it easily. Spread the mortar about 1 inch thick and then make a shallow furrow in it (Figure 7, view 1). A furrow that is too deep leaves a gap between the mortar and the bedded brick. This reduces the resistance of the wall to water penetration. Using a smooth, even stroke, cut off any mortar projecting beyond the wall line with the edge of the trowel (view 2). Retain enough mortar on the trowel to butter the left end of the first brick you will lay in the fresh mortar. Throw the rest back on the mortar board. Pick up the first brick to be laid with your thumb on one side of the brick and your fingers on the other. Apply as much mortar as will stick to the end of the brick and then push it into place (Figure 8). Squeeze out the excess mortar at the head joint and at the sides. Make sure the mortar completely fills the head joint (Figure 9). After bedding the brick, cut off the excess mortar and use it to start the next end joint. Throw any surplus mortar back on the mortar board where it can be restored to workability.
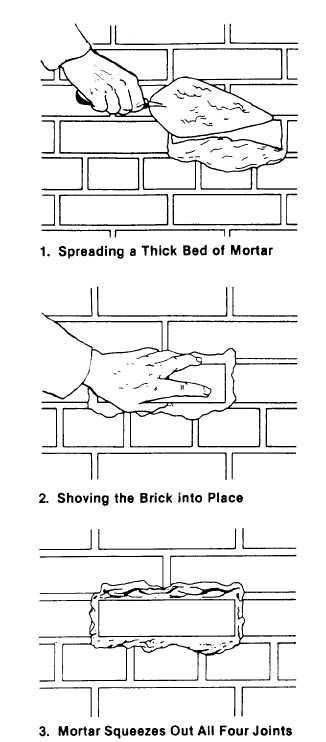
Figure 10 shows how to insert a brick into a space left in a wall. First, spread a thick bed of mortar (view 1), and then shove the brick into the wall space (view 2) until mortar squeezes out of all four joints (view 3). This way, you know that the joints are full of mortar at every point. To make a cross joint in a header course, spread the bed joint mortar several brick widths in advance. Then, spread mortar over the face of the header brick before placing it in the wall (Figure 11, view 1). Next, shove the brick into place, squeezing out mortar at the top of the joint. Finally, cut off the excess mortar as shown in view 2.
Figure 12 shows how to lay a closure brick in a header course. First, spread about 1 inch of mortar on the sides of the brick already in place (view 1), as well as on both sides of the closure brick (view 2). Then, lay the closure brick carefully into position without disturbing the brick already laid (view 3). If you do disturb any adjacent brick, cracks will form between the brick and mortar, allowing moisture to penetrate the wall. You should place a closure brick for a stretcher course using the same techniques as for a header course. As we mentioned earlier, filling exposed joints with mortar immediately after laying a wall is called pointing. You can also fill holes and correct defective mortar joints by pointing, using a pointing trowel.
Block
Planning
The first step in laying a block wall is to carefully plan the project. When using concrete block to build a wall, it is important to select the dimensions of the wall based on the size of the block. Standard concrete blocks are 7 5/8" wide, 7 5/8" deep, and 15 5/8" long. Assuming that the mortar joint is 3/8" thick brings the block plus mortar dimensions to 8x8x16". You will want the outside dimension of the wall to be a multiple of a half-block length (minus one mortar joint) so that you do not have to cut blocks to a custom size. The height of the wall should also be a multiple of the block height (including the mortar joint).
Locate the Corners
The first step in building a concrete masonry wall is to locate the corners of the structure. In locating the corners, you should also make sure the footing or slab formation is level so that each builder starts each section wall on a common plane. This also helps ensure that the bed joints are straight when the sections are connected. If the foundation is badly out of level, the entire first course should be laid before builders begin working on other courses. If this is not possible, a level plane should be established with a transit or engineer’s level.
Chase Out Bond
The second step is to chase out bond, or lay out, by placing the first course of blocks without mortar (Figure 13, view 1).
Snap a chalk line to mark the footing and align the blocks accurately. Then, use a piece of material 3/8 inch thick to properly space the blocks. This helps you get an accurate measurement.
Lay the Mortar Bed
The third step is to replace the loose blocks with a full mortar bed, spreading and furrowing it with a trowel to ensure plenty of mortar under the bottom edges of the first course (figure 13, view 2). Carefully position and align the corner block first (view 3 of figure 14). Lay the remaining first-course blocks with the thicker end up to provide a larger mortar-bedding area. For the vertical joints, apply mortar only to the block ends by placing several blocks on end and buttering them all in one operation (view 4). Make the joints 3/8 inch thick. Then, place each block in its final position, and push the block down vertically into the mortar bed and against the previously laid block. This ensures a well-tilled vertical mortar joint (view 5). After laying three or four blocks, use a mason’s level as a straightedge to check correct block alignment (figure 14, view 1). Then, use the level to bring the blocks to proper grade and plumb by tapping with a trowel handle as shown in view 2. Always lay out the first course of concrete masonry carefully and make sure that you properly align, level, and plumb it. This assures that succeeding courses and the final wall are both straight and true.
Build Up the Corners
The fourth step is to build up the corners of the wall, usually four or five courses high. This is also called laying up a lead. Step back each course one-half block. For the horizontal joints, apply mortar only to the tops of the blocks already laid. For the vertical joints, you can apply mortar either to the ends of the new block or the end of the block previously laid, or both, to ensure well-filled joints (figure 15). As you lay each course at the corner, check the course with a level for alignment (figure 16, view 1), for level (view 2), and for plumb (view 3). Carefully check each block with a level or straightedge to make sure that all the block faces are in the same plane. This ensures true, straight walls.
A story or course pole, which is a board with markings 8 inches apart (figure 17), helps accurately place each masonry course. Also check the horizontal block spacing by placing a level diagonally across the corners of the blocks (figure 18). When filling in the wall between the corners, first stretch a mason’s line along the extensor block edges from corner to corner for each course. Then lay the top outside edge of each new block to this line (figure 19). How you grip a block before laying is important. First, tip it slightly toward you so that you can see the edge of the course below. Then place the lower edge of the new block directly on the edges of the block below (figure 19). Make all position adjustments while the mortar is soft and plastic. Any adjustments you make after the mortar stiffens will break the mortar bond and allow water to penetrate. Level each block and align it to the mason’s line by tapping it lightly with a trowel handle.
Installing the Closure Block
Fifth and last, before installing the closure block, butter both edges of the opening and all four vertical edges of the closure block with mortar. Then, lower the closure block carefully into place (figure 20). If any mortar falls out, leaving an open joint, remove the block and repeat the procedure. To assure a good bond, do not spread mortar too far ahead when actually laying blocks. If you do, the mortar will stiffen and lose its plasticity. The recommended width of mortar joints for concrete masonry units is 3/8 inch. When properly made, these joints produce a weathertight, neat, and durable concrete masonry wall.
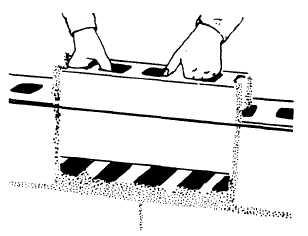
As you lay each block, cut off excess mortar from the joints using a trowel (figure 21) and throw it back on the mortar board to rework into the fresh mortar. Do not, however, rework any mortar dropped on the scaffold or floor. Weathertight joints and the neat appearance of concrete masonry walls depend on proper striking (tooling). After laying a section of the wall, tool the mortar joint when the mortar becomes “thumb print” hard. Tooling compacts the mortar and forces it tightly against the masonry on each side of the joint. Use either concave or V-shaped tooling on all joints (figure 22).
Tool horizontal joints (figure 23, view 1) with a long jointer first, followed by tooling the vertical joints (view 2). Trim off mortar burrs from the tooling flush with the wall face using a trowel, soft bristle brush, or by rubbing with a burlap bag.
A procedure known as pointing may be required after jointing. Pointing is the process of inserting mortar into horizontal and vertical joints after the unit has been laid. Basically, pointing is done to restore or replace deteriorated surface mortar in old work. Pointing of this nature is called tuck pointing. However, even in freshly laid masonry, pointing may be necessary for filling holes or correcting defective joints.
You must prepare in advance for installing wood plates with anchor bolts on top of hollow concrete masonry walls. To do this, place pieces of metal lath in the second horizontal mortar joint from the top of the wall under the cores that will contain the bolts (figure 24, view 1). Use anchor bolts 1/2 inch in diameter and 18 inches long. Space them not more than 4 feet apart. Then, when you complete the top course, insert the bolts into the cores of the top two courses and till the cores with concrete or mortar. The metal lath underneath holds the concrete or mortar filling in place. The threaded end of the bolt should extend above the top of the wall (view 2).
6
A footing is a concrete structure upon which a wall is built. Figure 25 shows a typical footing formwork for a bearing wall, and figure 26 shows bracing methods for a bearing footing. A bearing wall, also called a load-bearing wall, is an exterior wall that serves as an enclosure and also transmits structural loads to the foundation. The form sides are 2-inch lumber whose width equals the footing depth. Stakes hold the sides in place while spreaders maintain the correct distance between them. The short braces at each stake hold the form in line. A keyway is made in the wet concrete by placing a 2-by-2-inch board along the center of the wall footing form. After the concrete is dry, the board is removed. This leaves an indentation, or key, in the concrete. When you pour the foundation wall, the key provides a tie between the footing and wall.
Concrete is strong under compression, but relatively weak under tension. The reverse is true for steel. Therefore, when the two are combined, one makes up for the deficiency of the other. When steel is embedded in concrete in a manner that assists it in carrying imposed loads, the combination is known as reinforced concrete. The steel may consist of welded wire fabric or expanded metal mesh, but, more often, it consists of reinforcing bars, or more commonly "rebar."
Before placing reinforcing steel in forms, use a piece of burlap to clean the bars of rust, scale, grease, mud, or other foreign matter. A light film of rust or mill scale is not objectionable. Rebars must be tied together for the bars to remain in a desired arrangement during pouring. Tying is also a means of keeping laps or splices in place. Laps allow bond stress to transfer the load from one bar, first into the concrete and then into the second bar.
Once the forms are in place and the rebar has been laid, it is time to mix the concrete. You can get the dry ingredients premixed and simply add water to it (follow the directions on the bag). Mixing can be done in a wheelbarrow or in a mixer. Use a hoe to work the water into the cement until it is thoroughly worked in. Do not add more water to the mix than the bag indicates is acceptable. Adding too much water will create a weaker concrete. When the mixing is complete, pour the concrete into the forms. You must then consolidate the concrete.
Consolidation eliminates rock pockets and air bubbles and brings enough fine material both to the surface and against the forms to produce the desired finish. You can use such hand tools as spades, puddling sticks, or tampers, but mechanical vibrators are best. Any compacting device must reach the bottom of the form and be small enough to pass between reinforcing bars. The process involves carefully working around all reinforcing steel with the compacting device to assure proper embedding of reinforcing steel in the concrete. Since the strength of the concrete member depends on proper reinforcement location, be careful not to displace the reinforcing steel.
Manual consolidation methods require spades, puddling sticks, or various types of tampers. To consolidate concrete by spading, insert the spade along the inside surface of the forms, through the layer just placed, and several inches into the layer underneath. Continue spading or puddling until the coarse aggregate disappears into the concrete.
Finishing
The finishing process provides the final concrete surface. There are many ways to finish concrete surfaces, depending on the effect required. Sometimes you only need to correct surface defects, fill bolt holes, or clean the surface. Unformed surfaces may require only screeding to proper contour and elevation, or a broomed, floated, or troweled finish may be specified.
Screeding
The top surface of a floor slab, sidewalk, or pavement is rarely placed at the exact specified elevation. Screeding brings the surface to the required elevation by striking off the excess concrete. Two types of screeds are used in concrete finishing operations: the hand screed and the mechanical screed.
Hand screeding requires a tool called a screed. This is actually a template (usually a 2-by-4) having a straight lower edge to produce a flat surface (or a curved lower edge to produce a curved surface). Move the screed back and forth across the concrete using a sawing motion. With each sawing motion, move the screed forward an inch or so along the forms. This forces the concrete built up against the screed face into the low spots. If the screed tends to tear the surface, as it may on air-entrained concrete due to its sticky nature, either reduce the rate of forward movement or cover the lower edge of the screed with metal. This stops the tearing action in most cases.
7
The interpretation of "commercially mixed" cement is up to interpretation. If you call a concrete company and have them show up with a cement truck, that is certainly "commercial." But if it's a small job, you may wish to use "commercially mixed" cement available in bags (just add water). It's up to you.
To lay a sidewalk or a floor, proceed as described for a footing, but once the screeding is done, there are additional steps in finishing: floating, edging, and troweling:
Floating
If a smoother surface is required than the one obtained by screeding, the surface should be worked sparingly with a wood or aluminum magnesium float. The aluminum float, which is used the same way as the wood float, gives the finished concrete a much smoother surface. To avoid cracking and dusting of the finished concrete, begin aluminum floating when the water sheen disappears from the freshly placed concrete surface. Do not use cement or water as an aid in finishing the surface. Floating has three purposes:
- to embed aggregate particles just beneath the surface;
- to remove slight imperfections (high and low spots); and,
- to compact the concrete at the surface in preparation for other finishing operations.
Begin floating immediately after screeding while the concrete is still plastic and workable. However, do not overwork the concrete while it is still plastic because you may bring an excess of water and paste to the surface. This fine material forms a thin, weak layer that will scale or quickly wear off under use. To remove a coarse texture as the final finish, you usually have to float the surface a second time after it partially hardens.
Edging
As the sheen of water begins to leave the surface, edging should begin. All edges of a slab that do not abut another structure should be finished with an edger. An edger dresses corners and rounds or bevels the concrete edges. Edging the slab helps prevent chipping at the corners and helps give the slab a finished appearance.
Troweling
If a dense, smooth finish is desired, floating must be followed by steel troweling . Troweling should begin after the moisture film or sheen disappears from the floated surface and when the concrete has hardened enough to prevent fine material and water from being worked to the surface. This step should be delayed as long as possible. Troweling too early tends to produce crazing and lack of durability. However, too long a delay in troweling results in a surface too hard to finish properly. The usual tendency is to start to trowel too soon. Troweling should leave the surface smooth, even, and free of marks and ripples. Spreading dry cement on a wet surface to take up excess water is not a good practice where a wear-resistant and durable surface is required. Wet spots must be avoided if possible. When they do occur, however, finishing operations should not be resumed until the water has been absorbed, has evaporated, or has been mopped up.
An unslippery, fine-textured surface can be obtained by troweling lightly over the surface with a circular motion immediately after the first regular troweling. In this process, the trowel is kept flat on the surface of the concrete. Where a hard steel-troweled finish is required, follow the first regular troweling by a second troweling. The second troweling should begin after the concrete has become hard enough so that no mortar adheres to the trowel, and a ringing sound is produced as the trowel passes over the surface. During this final troweling, the trowel should be tilted slightly and heavy pressure exerted to thoroughly compact the surface. Hairline cracks are usually due to a concentration of water and extremely fine aggregates at the surface. This results from overworking the concrete during finishing operations. Such cracking is aggravated by drying and cooling too rapidly. Checks that develop before troweling can usually be closed by pounding the concrete with a hand float.
8
Adding water to Portland cement to form the water-cement paste that holds concrete together starts a chemical reaction that makes the paste into a bonding agent. This reaction, called hydration, produces a stone-like substance — the hardened cement paste. Both the rate and degree of hydration, and the resulting strength of the final concrete, depend on the curing process that follows placing and consolidating the plastic concrete. Hydration continues indefinitely at a decreasing rate as long as the mixture contains water and the temperature conditions are favorable. Once the water is removed, hydration ceases and cannot be restarted. Curing is the period of time from consolidation to the point where the concrete reaches its design strength. During this period, you must take certain steps to keep the concrete moist and as near 73°F (23°C) as practical. The properties of concrete, such as freeze and thaw resistance, strength, watertightness, wear resistance, and volume stability, cure or improve with age as long as you maintain the moisture and temperature conditions favorable to continued hydration. The length of time that you must protect concrete against moisture loss depends on the type of cement used, mix proportions, required strength, size and shape of the concrete mass, weather, and future exposure conditions. The period can vary from a few days to a month or longer. For most structural use, the curing period for cast-in-place concrete is usually 3 days to 2 weeks. This period depends on such conditions as temperature, cement type, mix proportions, and so forth.
Historical Notes
Masonry was introduced in 1937, discontinued in 1956, and revised and reintroduced in 1986.
References
Much of the material for requirements 5 through 8 was taken verbatim from the U.S. Navy's training manual NAVEDTRA 14043. Since this manual is an original work of the U.S. Federal government, it is in the public domain, meaning it is legal (and ethical) to use it for any purpose (including providing the excellent instruction for this difficult requirement).
Content on this wiki is generated by people like you, and no one has created a lesson plan for this honor yet. You could do that and make the world a better place.
See AY Honors/Model Lesson Plan if you need ideas for creating one.
