Difference between revisions of "AY Honors/Archery/Answer Key 2/es"
(Created page with "{{clear}}") |
(Created page with "</noinclude>") |
||
| Line 80: | Line 80: | ||
{{ansreq|page={{#titleparts:{{PAGENAME}}|2|1}}|num=5c}} <!--T:18--> | {{ansreq|page={{#titleparts:{{PAGENAME}}|2|1}}|num=5c}} <!--T:18--> | ||
<noinclude></noinclude> | <noinclude></noinclude> | ||
| − | |||
| − | |||
| − | |||
| − | |||
| − | |||
| − | |||
| − | |||
<noinclude></noinclude> | <noinclude></noinclude> | ||
Revision as of 05:07, 13 January 2021
| Tiro con arco | ||
|---|---|---|
| División Norteamericana
|
Destreza: 1 Año de introducción: 1945 |
|
Requisitos
|
La especialidad de Tiro con arco - Avanzado es un componente de la Maestría Deportista. |
The purpose of a bow sling is to keep you from dropping your bow. There are two types of bow slings: the wrist sling and the finger sling.
A wrist sling is a strap that is connected to your bow for you to put your hand through while gripping your bow.
A finger sling is a 2 inch string with a loop at each end. After gripping your bow the loops go over the thumb and your index finger.
The string "kisser" is a point on the string that touches your lip or corner of your mouth.
If you are using a "center draw" (see, Anchor) the string is in the middle or your chin and the middle of your nose. A "kisser" would be a small disc on the string that would touch your lip. This assures a vertical alignment of your bow.
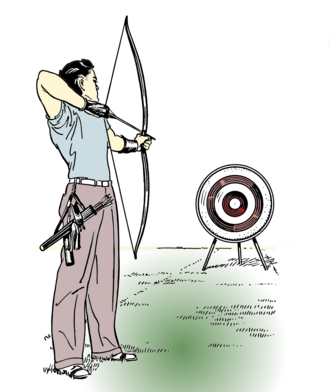
The stance is the position the feet and body assume when addressing the target.
Setting your feet is the first step in setting up a good shot. A good foundation is important in anything, especially in archery.
First, lay an arrow pointing toward your target and perpendicular to the shooting line. Second, place your feet straddling the shooting line with your toes slightly touching the arrow.
Your feet should be placed approximately the same distance apart as your shoulders as a starting point. Once you find a comfortable stance it is important to remember where to put your feet each time you return to the shooting line.
To place an arrow on the bowstring. The attachment to the rear of an arrow which is placed on the bowstring and holds the arrow on the string.
There are two ways to put and arrow on the string. One is right and one is wrong. The index feather or "cock" feather should point away from the bow. This feather is usually a different color than the other two which are also known as "hen" feathers. Doing this allows the hen feathers to gracefully clear the bow. If the "index" feather is pointed toward the bow it will kick out away from the bow as it tries to clear the bow during the shot.
The picture shows the most common way of placing the fingers on the string. The thumb and small finger should not be involved in the shot in any way or fashion. They should be relaxed and folded down as if you were saying "I'm THREE years old".
After nocking the arrow, place three fingers on the string. Two under the arrow and 1 over the arrow then slide them together, lightly touching the arrow. The string should be at the first joint near the end of your fingers. This is a starting point. Competitive archers try to get the string at the very end of their fingers for a quicker release but this takes years of training.
This is the act of pulling the string back. The archer should start with the bow arm pointed directly at the target before pulling the string. Some young archers like to pull the string while raising their bows but this is a waste of energy and creates fatigue while shooting. Be very deliberate with little wasted motion.
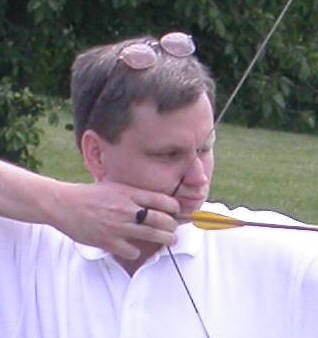
The "anchor" is a combination of points to which the bowstring and/or the index finger of the drawing hand are drawn to on the face and neck. There are multiple ways of "Anchoring" the string after you have drawn the bow. Here are two of the most common ones.
The Side Draw: Hunter or Field Style - Pull the string back so the index finger of your string hand touches the corner of your mouth. This places the arrow directly beneath the eye that you are aiming with. This is recommended for all beginners. As archers continue to progress and put an aiming device on their bow they can progress to the next one.
The Center Draw: Target or Olympic Style - Pull the string hand under your jaw so the string is in the middle and in front of the chin. The string should also touch the nose. The string hand is in line with and directly under the jaw bone.
Remember that anchoring in the same place and the same way every time is critical no matter how you choose to anchor.
To superimpose a sight pin on the center of a target or, when not using a sight, the placement of the tip of the arrow on a particular point for a given distance.
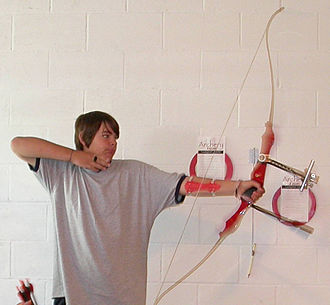
Hold means to get everything locked into place and be sure that you are ready to release the arrow. There should be a straight line from the back elbow right through the arrow to the back of the bow (see photo).
Aim is the process of deciding when to let go of the string. An archer without a sight uses an "instinctive" method or guessing how high or low to aim.
A sight is a reference point for aiming but is only useful if the archers shoots the same way every time.
An archer without a sight can use a sighting method called "point of aim".
The release is the act of allowing the string to leave the fingers.
The release is the most important part of the shot. It is when everything comes together in a fraction of a second. The best way to perform the release is to just relax the fingers. As the arrow goes toward the target, the string hand should go in exactly the opposite direction.
"Follow through" refers to the movement of the drawing hand and arm after the release.
Once the archer has released the arrow, nothing should move. The archer must give the arrow time to clear the bow. To insure this, instruct your archers to wait until the arrow hits the target before moving at all. In the picture you can see that my release hand goes in the exact opposite direction as the arrow. Making sure that your shoulders don't collapse is very important. Also, notice that I am still aiming, long after the arrow is gone.
If the nocking point is too high, the arrow will be pointed "down" and come out of the bow low.
If the nocking point is too low, the arrow will be pointed "up" and come out of the bow high.
Nock rings can be placed on the bow to allow for consistency. A bow square and nock pliers can be used to set the nocking point properly.
A standard "Olympic Bow" is a recurve (not compound) bow with no more than 3 stabilizer extensions, a sight, and a clicker. An archer must use fingers and not a mechanical release and may not have a string peep sight or magnified aiming device.
- Don't shoot straight up.
- Never run on the archery range.
- Approach the target from the side, not the front so you don't get poked by the arrows sticking out of the target.
- Be sure your equipment is in good working order.
- Be aware of who is around you at all times.
- Don't "hide" behind the target.
- Don't walk in front of another archer.
- Don't talk on the shooting line.
- While loading your bow be sure that the arrows are always pointing toward the target.
Referencias
- Categoría: Tiene imagen de insignia
- Adventist Youth Honors Answer Book/Honors/es
- Adventist Youth Honors Answer Book/es
- Adventist Youth Honors Answer Book/Skill Level 1/es
- Categoría: Libro de respuestas de especialidades JA/Especialidades introducidas en 1945
- Adventist Youth Honors Answer Book/North American Division/es
- Adventist Youth Honors Answer Book/Recreation/es
- Adventist Youth Honors Answer Book/Recreation/Primary/es
- Adventist Youth Honors Answer Book/Stage 0/es
- Adventist Youth Honors Answer Book/Sportsman Master Award/es


