Difference between revisions of "AY Honors/Abseiling/Answer Key/es"
(Updating to match new version of source page) |
(Created page with "</noinclude> {{:AY Honors/Knot/Alpine_butterfly/es}} <noinclude>") |
||
| Line 21: | Line 21: | ||
{{ansreq|page={{#titleparts:{{PAGENAME}}|2|1}}|num=One2b|dispreq=b}} | {{ansreq|page={{#titleparts:{{PAGENAME}}|2|1}}|num=One2b|dispreq=b}} | ||
| − | <noinclude> | + | <noinclude></noinclude> |
| − | </noinclude> | + | {{:AY Honors/Knot/Alpine_butterfly/es}} |
| − | {{:AY Honors/Knot/Alpine_butterfly}} | + | <noinclude></noinclude> |
| − | <noinclude | ||
| − | |||
{{CloseReq}}<!-- One2b --> | {{CloseReq}}<!-- One2b --> | ||
{{ansreq|page={{#titleparts:{{PAGENAME}}|2|1}}|num=One2c|dispreq=c}} | {{ansreq|page={{#titleparts:{{PAGENAME}}|2|1}}|num=One2c|dispreq=c}} | ||
| − | <noinclude> | + | <noinclude></noinclude> |
| − | </noinclude> | + | {{:AY Honors/Knot/Figure_8/es}} |
| − | {{:AY Honors/Knot/Figure_8}} | + | <noinclude></noinclude> |
| − | <noinclude | ||
| − | |||
{{CloseReq}}<!-- One2c --> | {{CloseReq}}<!-- One2c --> | ||
Revision as of 01:25, 17 September 2021
1
a
b
2
a
| Nudo de agua (Nudo de cinta) |
|---|
|
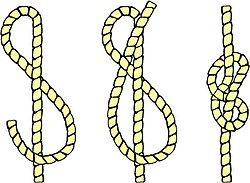
Uso: El nudo de agua (o nudo de cinta) es un nudo de uso frecuente en la escalada para unir dos extremos de correas juntas, por ejemplo, al hacer un cabestrillo.
Los extremos se deben dejar al menos tres pulgadas de largo y el nudo debe ser apretado con el peso del cuerpo. Los extremos pueden ser juntados con cinta adhesiva o ligeramente cosidos para ayudar a evitar que se deslice de nuevo en el nudo. Inspeccione el nudo antes de cada uso.
Cómo amarrar:
|
b
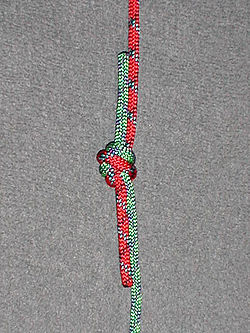
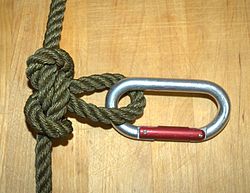
| Mariposa |
|---|
|
Uso: La vuelta de la mariposa tiene una alta resistencia a la rotura y es considerado por los montañeros como uno de los nudos más fuertes para fijar los escaladores a la mitad de una cuerda, de tal manera que tienen espacio para moverse incluso cuando la cuerda principal se aprieta, y que puede ser apoyado en cualquier dirección de la cuerda principal. La vuelta es típicamente unida a un arnés de escalada por mosquetón.
También se puede utilizar para aislar una sección desgastada de la cuerda, donde el nudo se ata tal que la sección desgastada se utiliza para el centro de la vuelta.
|
c
| Figura de Ocho |
|---|
|
Uso: Este nudo es ideal para mantener el extremo de una cuerda y que no se quite de una polea.
Cómo amarrar:
|
d
| Double Fisherman's Knot |
|---|
|
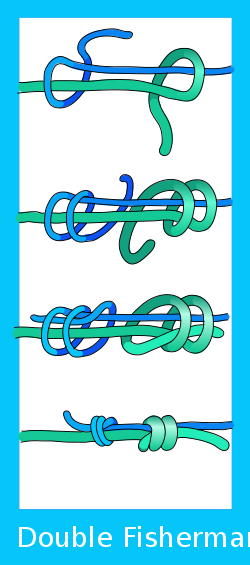
Uso: Joining thin, stiff or slippery lines, backing up critical knots such as the Figure-of-eight loop or Figure-of-eight follow through.
Use the double fisherman's knot to tie together two ropes of unequal sizes. This knot and the triple fisherman's knot are the variations used most often in rock climbing, but other uses include search and rescue. The primary use of this knot in rock climbing is to form high strength loops of cord for connecting pieces of the rock climber's protection system. It is favoured for being compact, and for arranging the line of force in a straight line through the knot. Another common use for this knot is to back up a critical knot, such as a harness tie-in knot or single-line rappel rigs. In this use, the running end is tied around the standing end of the rope, so that it cannot slip back through the knot.Cómo amarrar:
|
e
f
| Bowline |
|---|
|
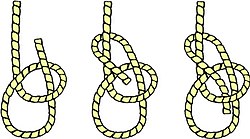
Uso: This knot doesn't jam or slip when tied properly. It can be tied around a person's waist and used to lift him, because the loop will not tighten under load. In sailing, the bowline is used to tie a halyard to a sail head.
Cómo amarrar:
|
3
a
b
4
5
6
a
b
c
7
- a. Keep the rope clean.
- b. Always coil a rope before storing it.
- c. Make sure wet rope is dry before coiling it.
- d. Return rope to its proper place after using it.
8
9
10
11 a.
11 b.
12
a
b
c
Hypothermia is caused by continued exposure to low or rapidly falling temperatures, cold moisture, snow, or ice. Those exposed to low temperatures for extended periods may suffer ill effects, even if they are well protected by clothing, because cold affects the body systems slowly, almost without notice. As the body cools, there are several stages of progressive discomfort and disability. he first symptom is shivering, which is an attempt to generate heat by repeated contractions of surface muscles. This is followed by a feeling of listlessness, indifference, and drowsiness. Unconsciousness can follow quickly. Shock becomes evident as the victim’s eyes assume a glassy stare, respiration becomes slow and shallow, and the pulse is weak or absent. As the body temperature drops even lower, peripheral circulation decreases and the extremities become susceptible to freezing. Finally, death results as the core temperature of the body approaches 80°F (27°C). The steps for treatment of hypothermia are as follows:
- Carefully observe respiratory effort and heart beat; CPR may be required while the warming process is underway.
- Rewarm the victim as soon as possible. It may be necessary to treat other injuries before the victim can be moved to a warmer place. Severe bleeding must be controlled and fractures splinted over clothing before the victim is moved.
- Replace wet or frozen clothing and remove anything that constricts the victim’s arms, legs, or fingers, interfering with circulation.
- If the victim is inside a warm place and is conscious, the most effective method of warming is immersion in a tub of warm (100° to 105°F or 38° to 41°C) water. The water should be warm to the elbow - never hot. Observe closely for signs of respiratory failure and cardiac arrest (rewarming shock). Rewarming shock can be minimized by warming the body trunk before the limbs to prevent vasodilation in the extremities with subsequent shock due to blood volume shifts.
- If a tub is not available, apply external heat to both sides of the victim. Natural body heat (skin to skin) from two rescuers is the best method. This is called “buddy warming.” If this is not practical, use hot water bottles or an electric rewarming blanket. Do not place the blanket or bottles next to bare skin, however, and be careful to monitor the temperature of the artificial heat source, since the victim is very susceptible to burn injury. Because the victim is unable to generate adequate body heat, placement under a blanket or in a sleeping bag is not sufficient treatment.
- If the victim is conscious, give warm liquids to drink. Never give alcoholic beverages or allow the victim to smoke.
- Dry the victim thoroughly if water is used for rewarming.
- As soon as possible, transfer the victim to a definitive care facility. Be alert for the signs of respiratory and cardiac arrest during transfer, and keep the victim warm.
d
Splints
An essential part of the first-aid treatment is immobilizing the injured part with splints so that the sharp ends of broken bones won’t move around and cause further damage to nerves, blood vessels, or vital organs. Splints are also used to immobilize severely injured joints or muscles and to prevent the enlargement of extensive wounds.
Before you can use a splint, you need to have a general understanding of the use of splints. In an emergency, almost any firm object or material can be used as a splint. Such things as umbrellas, canes, tent pegs, sticks, oars, paddles, spars, wire, leather, boards, pillows, heavy clothing, corrugated cardboard, and folded newspapers can be used as splints. A fractured leg may sometimes be splinted by fastening it securely to the uninjured leg. Splints, whether ready-made or improvised, must meet the following requirements:
- Be light in weight, but still be strong and fairly rigid.
- Be long enough to reach the joints above and below the fracture.
- Be wide enough so the bandages used to hold them in place won’t pinch the injured part.
- Be well padded on the sides that touch the body. If they’re not properly padded, they won’t fit well and won’t adequately immobilize the injured part.
- To improvise the padding for a splint, use articles of clothing, bandages, cotton, blankets, or any other soft material.
- If the victim is wearing heavy clothes, apply the splint on the outside, allowing the clothing to serve as at least part of the required padding.
Although splints should be applied snugly, never apply them tight enough to interfere with the circulation of the blood. When applying splints to an arm or a leg, try to leave the fingers or toes exposed. If the tips of the fingers or toes become blue or cold, you will know that the splints or bandages are too tight. You should examine a splinted part approximately every half-hour, and loosen the fastenings if circulation appears to be cut off. Remember that any injured part is likely to swell, and splints or bandages that are all right when applied may be too tight later.
To secure the limb to the splint, belts, neckerchiefs, rope, or any suitable material may be used. If possible, tie the limb at two places above and two places below the break. Leave the treatment of other types of fractures, such as jaw, ribs, and spine, to medical personnel. Never try to move a person who might have a fractured spine or neck. Moving such a person could cause permanent paralysis. Don’t attempt to reset bones.
Antebrazo
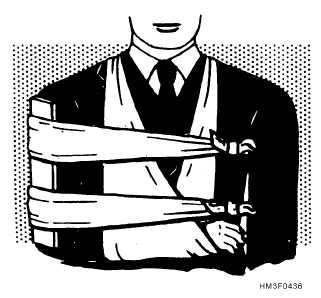
Hay dos huesos largos en el antebrazo, el radio y el cúbito. Cuando ambos están rotos, el brazo por usualmente parece estar deformada. Cuando sólo uno se rompe, el otro actúa como una férula y el brazo conserva una apariencia más o menos natural. Cualquier fractura del antebrazo puede resultar en el dolor, la ternura, la imposibilidad de usar el antebrazo y un movimiento tambaleante en el punto de la lesión. Si la fractura está abierta, el hueso se verá. En este caso, detenga el sangrado y trate a la herida. Aplique un vendaje estéril sobre la herida. Enderece cuidadosamente el antebrazo. (Recuerde que el manejo brusco de una fractura cerrada puede convertirla en una fractura abierta.) Aplique dos férulas bien acolchados en el antebrazo, uno en la parte superior y otra en la inferior. Asegúrese de que las férulas son suficientemente largos para extenderse desde el codo hasta la muñeca. Utilice vendajes para sujetar las férulas en su lugar. Coloque el antebrazo en el pecho. La palma de la mano debe estar con el pulgar apuntando hacia arriba. Apoye el antebrazo en esta posición por medio de un cabestrillo amplio y un vendaje triangular (véase la ilustración). La mano debe estar elevada aproximadamente 10 cm arriba del nivel del codo. Trate a la víctima por el choque y evacúe lo más pronto posible.
Parte Superior del Brazo
Las señales de fractura de la parte superior del brazo incluyen dolor, sensibilidad, hinchazón y un movimiento tambaleante en el punto de fractura. Si la fractura está cerca del codo, es probable que el brazo esté recto, sin estar doblado en el codo. Si la fractura está abierta, detenga el sangrado y trate la herida antes de intentar de tratar la fractura.
- NOTA
- El tratamiento de la fractura depende en parte de la ubicación de la ruptura.
Si la fractura está en la parte superior del brazo cerca del hombro, coloque una almohadilla o una toalla doblada en la axila, venda el brazo firmemente al cuerpo y soporte el antebrazo en un cabestrillo estrecho.
Si la fractura está en el medio de la parte superior del brazo, puede utilizar una férula bien acolchada en la parte exterior del brazo. La férula debe extenderse desde el hombro hasta el codo. Fije el brazo entablillado con firmeza al cuerpo y soporte el antebrazo en un cabestrillo estrecho, como se ilustra.
Otra manera de tratar una fractura en el medio de la parte superior del brazo es sujetar dos férulas anchas (o cuatro que son estrechas) alrededor del brazo y luego apoyar el antebrazo en un cabestrillo estrecho. Si usa una férula entre el brazo y el cuerpo, tenga mucho cuidado de que no se extienda demasiado arriba en la axila; una férula en esta posición puede causar una compresión peligrosa de los vasos sanguíneos y los nervios y puede ser extremadamente doloroso para la víctima. Si la fractura está en o cerca del codo, el brazo puede aparecerse doblado o recto. No importa en qué posición se encuentra el brazo, NO intente enderezar o moverlo DE NINGUNA MANERA. Entablille el brazo lo más cuidadosamente posible en la posición que se encuentra. Esto evitará más daño a los nervios y a los vasos sanguíneos. La única excepción a esto es si no hay pulso en el otro lado de la fractura (en relación con el corazón), en cuyo caso se aplica tracción suave y luego el brazo se entablilla. Trate a la víctima por el choque y llévela bajo el cuidado de un médico profesional lo más pronto posible.
Rótula
Enderezar cuidadosamente la extremidad lesionada. Inmovilizar la fractura mediante la colocación de una tabilla acolchada debajo de la extremidad lesionada. La tabla debe ser de al menos 10 cm de ancho y debe llegar desde la nalga hasta el talón. Coloque más acolchado debajo de la rodilla y justo por encima del talón, como se muestra en la ilustración. Utilice tiras de vendaje para sujetar la pierna a la tabla en cuatro lugares: (1) justo debajo de la rodilla; (2) por encima de la rodilla; (3) en el tobillo; y (4) en el muslo. NO CUBRA LA RODILLA. Es probable que se hinche rápidamente y cualquier vendaje sujetado sobre la rodilla se convertirá rápidamente demasiado apretado. Trate a la víctima por el choque y evacúe lo más pronto posible.
Tobillo
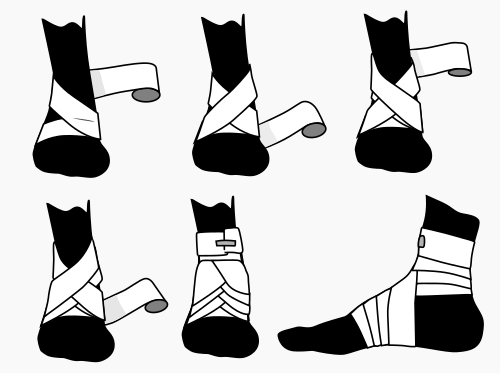
Un vendaje en forma de ocho se utiliza para apósitos del tobillo y para soportar un esguince. Mientras se mantiene el pie a un ángulo recto, empiece a envolver con un vendaje de 7,5 cm alrededor del empeine durante varias vueltas para anclarlo. Lleve la venda hacia arriba sobre el empeine y rodee por detrás del tobillo, hacia adelante, y de nuevo por el empeine y por debajo del arco, completando así una forma de ocho. Continúe las vueltas de figura de ocho, sobreponiendo un tercio o la mitad de la anchura de la venda y con un giro ocasional alrededor del tobillo, hasta que la compresa esté asegurada o hasta que se obtenga un soporte adecuado.
e
Shock is a medical condition where the delivery of oxygen and nutrients is insufficient to meet the body's needs. The main carrier of oxygen and nutrients in the body is the blood, so anytime there is a loss of blood, there is a risk of shock. Shock is a life-threatening emergency.
First aid treatment of shock includes:
- Immediate reassurance and comforting the victim if conscious.
- If alone, go for help. If not, send someone to go for help and someone stay with the victim.
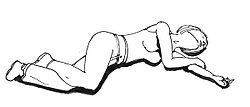
- Ensure that the airway is clear and check for breathing. Place the victim in the recovery position if possible.
- Attempt to stop any obvious bleeding.
- Cover the victim with a blanket or jacket, but not too thick or it may cause a dangerous drop in blood pressure.
- Do not give a drink. Moisten lips if requested.
- Prepare for cardiopulmonary resuscitation (CPR).
- Give as much information as possible when the ambulance arrives.
13
a
b
1
2
a
b
c
d
e
f
g
3
a
b
c
d
e
4
a
b
c
d
e
f
g
h
5
6
