Respuestas para la especialidad JA de Globos aerostáticos
Nivel de destreza
1
Año
2008
Version
15.02.2026
Autoridad de aprobación
Asociación General
1
1a
1b
1c
1d
1e
2
- Archimedes' Principle states: any body fully or partially submerged in a fluid is buoyed up by a force equal to the weight of the fluid displaced.
2a
2b
2c
3
| Gas | Air Percentage | Weight of pure gas |
|---|---|---|
| Nitrogen | 78% | 1.25 g/liter |
| Oxygen | 21% | 1.43 g/liter |
| Argon | .93% | 1.78 g/liter |
| Carbon Dioxide | .03% | 1.96 g/liter |
| Other (including Neon, Helium, Hydrogen, Xenon, & Radon) |
.04% |
4
5
Hydrogen & Helium are both less dense than air and may be used when flying a balloon. Warm air is also used for flying balloons, since it is less dense than cold air.
6
As described by Charles' Law, heat applied to a gas will cause its molecules to move farther apart, reducing it's density. When the air in a balloon is heated above the temperature of the surrounding air, the air in the balloon becomes less dense than the air outside the balloon. Because the balloon is less dense, it will float or rise. The greater the difference in temperature between the air in the balloon and the surrounding air, the greater the difference in density between the air inside and outside the balloon, which increases the lift that the balloon will generate. This explains why balloons are mostly launched in cooler weather.
7
- a. Envelope
- The outer skin of the balloon, forming the container that holds the gas.
- b. Support structure
- The framework of larger balloons.
- c. Throat
- The lower opening through which the hot flame is applied to heat the air.
- d. Fuel source
- The fuel used to heat the air to make the balloon less dense than the surrounding air.
8
- Paper
- Paper may be used for model hot air balloons because of ease of acquisition and low price.
- Plastic
- Plastic may be used for model hot air balloons because it is water resistant, easy to work with, and easy to acquire.
- Fabric
- Fabric is usually used for larger, manned balloons. The fabric is specially treated.
9
9a
9b
10
Early morning is best because the air has cooled over night making the difference of temperature inside & outside greater, thus increasing buoyancy.
11
11a
The pilot controls the vertical movement of a hot air balloon by burning more fuel to make the air in the balloon hotter, causes the air in the balloon to become less dense, making it rise. Conversely, turning off the flame and allowing the air in the balloon to cool renders the air in the balloon more dense with respect to the surrounding atmosphere, causing the balloon to descend. More rapid increases in altitude can be achieved by lessening the weight of the balloon usually by dropping ballast, however this is limited by the amount of ballast available.
11b
Adding more of the lighter than air gas to ascend, and spilling some of the gas in order to descend varies the altitude of a helium or hydrogen filled balloon.
12
Horizontal movement of a gas filled flying balloon is entirely at the mercy of air currents. The pilot can only vary the altitude so as to get into the path of air currents, such as the jet stream. This involves careful study of charts of air currents, close attention to weather data, and a certain element of trial and error. Older airships, like the Hindenburg, had a rudder and propellers to move it so that it did not have to depend on air currents.
13
Materials
- Tissue paper
- Scissors
- Glue Stick(s)
- Sewing pins (optional)
- Thin wire (22 gauge is suggested)
- Needle-nose pliers & wire cutters
- 1 50"x20" piece of Linoleum (for making balloon panel form)
- A spool of string
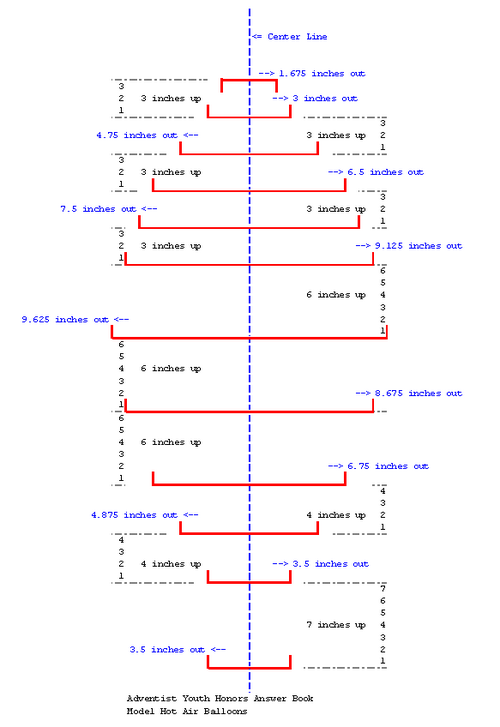
Use a rigid or semi-rigid material such as poster board or a piece of linoleum flooring. I would suggest a piece of linoleum flooring,as it is more rigid and can be used more times. Cut out a piece that is 50 inches long and 20 inches wide. For every other measurement, you will have to measure from the center of the form you are creating. You will need to mark each measurement on the outside edge (furthest from the center of the form).
- The first measurement is the very bottom of the form (and all others will be going from bottom to top) and is 3 1/2 inches each direction from the center.
- Seven inches from the bottom is another measurement of 3 1/2 inches from center.
- Four inches up the center line is a measurement of 4 7/8 inches from center.
- Four more inches up the center line is a measurement of 6 3/4 inches from center.
- Six inches up the center line is a measurement of 8 5/8 inches from center.
- Six more inches up the center line is a measurement of 9 5/8 inches from center (this is the widest measurement).
- Six inches beyond the widest measurement is a smaller measurement of 9 1/8 inches from center.
- Three inches up the line is a measurement of 7 1/2 inches from center.
- Three inches further is a measurement of 6 1/2 inches from center.
- Three inches further is a measurement of 4 3/4 inches from center.
- Three inches further is a measurement of 3 inches from center.
- Finally, 2 3/4 to 3 inches further is your top measurement. The top measurement is 1 5/8 inches from center.
Take the pen you are using to mark the measurements with and draw a line, starting from the bottom measurement, all the way around the outside of the measurement. It will look like a light bulb.
Cut along the line that you just drew to remove the extra material around the "light bulb" shape. That should give you the form needed to create the proper shape for the panels of your balloon.
Directions for making balloon
- Take 2 pieces of tissue paper and glue them end to end (vertically). Continue doing this with each set of tissue paper until you have 6 panels (a panel is 2 pieces of tissue paper glued end to end (vertically). You should only glue about a thumb's width or one straight line with the glue stick.
- Once you have 6 panels, lay them one on top of another, making sure that one end of the stack has an even edge at the bottom of the panels.
- Take the Panel Form and lay it on top of your 6 panels. Line up the bottom of the form with the straight edge of the 6 panels.
- Trace, with a marker, along the edge of the form (making sure not to move the form or the panels). The form will not reach the other end your your panel stack. This is alright. Just keep tracing beyond the form in a diagonal line until you reach the top of your panel stack. Then remove the form from the stack of panels.
- Take scissors and cut on the outside of the lines made earlier with the marker when you traced the panel form. When you are done, you should have two sets of scrap, one on each side of your panels. DO NOT THROW THESE AWAY! You may need to patch some panels that develop holes as well as use some of it to create a top for your balloon.
- Remove two panels from your pile and set the other four aside. Place the two panels one-on-top-of-the-other, and then pull the top panel about one inch to the side of the bottom panel. With scissors, cut flaps along the exposed, curvy edge of the bottom panel, making the cuts two or three inches apart, and about a half inch deep. Do this all the way along one side of the bottom of the two panels. The flaps make it much easier to attach panels together.
- Take a glue stick and apply glue to the top panels, right next to the tabs you just cut on the bottom panel. When applying the glue, you will only need one glue stick width of glue along the edge. Because the glue dries quickly, you may want to apply, at most, enough glue for 2 or 3 flaps at a time. Then you will fold over the flaps on the bottom panel onto the edge of the top panel where the glue was applied. Continue doing this until you have fully attached 2 of the panels together.
- Take a third panel and lay it on top of the two panels that you just glued together. Lay it so that the edge of the top panel, of the 2 attached panels, that has not been glued is exposed about an inch.
- Once again, cut flaps on the inch of exposed panel that are about a half inch deep. The glue and fold over the flaps to attach the third panel to the second panel. Now you should have 3 panels attached together. Continue repeating steps 8 & 9 until all of your panels have been attached. Remember to alternate which side you are cutting the flaps on so that you do not tamper with any of the joints of the other panels.
- Once you have attached all 6 of your panels together, flip them over. Raise the top panel and fold the inner panels back. Do not crease the inner panels. Then replace the top panel.
- Cut the bottom panel just as you have every panel before. Remember to make the cuts only about 1/2 inch deep. Then pull the top panel towards the edge of the bottom panel until you have the same width of the bottom panel as you would have for previous panels.
- Apply glue to the top panel just as you have for every panel before. Remember that it may be easier to apply glue for only 2 or 3 panels at a time and then fold the flaps over before continuing to apply the glue.
- Now. Open up your balloon. You will notice that it does not have a top yet. From the scraps that you saved, when you cut out your panels, pick as large a piece as possible. From this piece, cut as large a circle as you can. (You may fold the piece of paper over once or twice to make cutting out the circle easier.)
- Apply glue to the circle you just cut out (around the outside edges by one or two glue stick widths). Then attach the circle to the top of your balloon to cover the hole.
- Take some wire and cut roughly a 2 foot section off of the spool.
- Take some needle-nose pliers and shape the wire into a rigid circle. (I suggest making a little loop in one end. Turning it slightly. Threading other end of the wire through the loop a little ways and the twisting the threaded wire around the looped end. This keeps the wire circle from expanding or contracting in size.)
- Put the open end of the balloon through the wire circle. Then fold the balloon over the wire and glue the folded over end back to the balloon. (You may cut flaps in the open end of the balloon to make it easier to glue.) There will be more balloon surface than wire. You may have to fold the end of a panel or two over a little to decrease the amount of panel that you have to deal with while gluing the balloon over the wire.
- At this point your balloon is finished. You will want to go over the entire surface of the balloon to make sure there are no holes in the panels, no unglued panel joints, no unglued balloon cap spots, or rips at the bottom where the wire is. If there are any of these issues, take some of your left over scraps (Aren't you glad you saved them?) and patch the balloon by gluing pieces from your scraps over any holes.
14
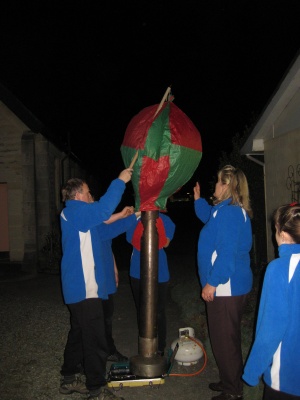
Take a single burner camp stove and use it to heat the air underneath your balloon. Be careful not to get the balloon too close to the flame as it will ignite and burn up.
A more efficient way of getting hot air into your balloon is to take some rigid dryer vent, cut notches that can be slid over the pot stabilizers on your camp stove, and then slide the vent pipe onto the stove. This causes the heated air to be channeled up the vent pipe into the balloon. However, this does not eliminate the possibility of your balloon igniting and burning up. You will have to keep the balloon from touching the vent pipe and also watch the balloon to make sure it doesn't start turning brown nearest the vent pipe.
You will need two (2) people to launch the balloon. One to hold the top end of the balloon up (until enough hot air is within the balloon), and the other to hold the balloon mouth over the stove. Before holding the balloon over the stove, tie a spool of string to the wire that keeps the form of the balloons mouth. Hold the balloon over the stove so that hot air may enter the balloon. Keep the balloon over the stove until it looks/feels as though it is ready to take off (usually anywhere from 30-45 seconds will do). When enough hot air has entered the balloon, release the balloon and let it fly up and away. Let the balloon fly for about twenty (20) seconds. When the balloon has successfully been flown pull on the string that you attached to the balloon to recover the balloon. The string keeps the balloon from being blown away as well as keeping it from flying into trees or other objects.
Please keep safe by using heat resistant gloves such as oven mitts or welders gloves. The metal duct does get hot. The balloon is not over the duct pipe long enough to catch fire. We had to have both gas burners going to get sufficient heat up the pipe. Happy flying. There is a good DVD called Night Crossing about a family who escaped over the Berlin border. They built two balloons and had two attempts to freedom.
