Especialidades JA/Fotografía/Respuestas
1
2
3
4
5
5a
5b
5c
5d
5e
5f
5g
5h
Some ideas for Pathfinders:
- Take a picture of your whole youth group. Be sure there are some standing and some standing/sitting in front of them. Then, get close enough so that there is almost NO "background green space" around them. You'll be impressed with how nice it is to have a photo that shows the expressions on everybody's face.
- Take a picture of your best friend while they're eating at a campout or lockin. Don't try to take a picture of the whole room, but zoom in on their upper body and the top of the table with the plate of food. You'll both laugh when you see the photo that shows how shocked your friend was at your "surprise" picture.
5i
- Roads: take a picture of a windy road that leads to nowwhere; The road that leads to camporee or the road into the campsite you're staying at this weekend may also be a good leading line.
- Trails
- Fence Posts / Fence lines
- Tall buildings or tall trees. Take pictures straight up, and use those tall lines to guide your eyes to a Mountain peak, or to the sun / moon shining overhead.
5j
- The best light conditions are 1 1/2 hours before sunset or the first hour after sunrise. The reason is that the light isn't SO BRIGHT that it washes out the colors in your picture, but at the same time the shadows are long (which makes side lighting pictures look extra special). Also, the sunset or sunrise gives off a kind of "pink" or "orange" light, which makes many nature pictures look very friendly & special. If you want to know when sunrise and sunset are going to be, check out www.adventist.org's sunset calendar!
- Be careful of evening shadows when photographing people. long shadows on faces hide features and expressions!
- Pictures taken during the middle of the day will be "stark" with hard lines and minimal shadows. Buildings & some landscapes such as mountains look especially regal or majestic during the middle of the day. Just remember that if you take a picture during the middle of the day, shade the top of the lens of your camera by placing one of your hands or a piece of paper horizontal about 2" above the lens to form a "shade for the lens. This will keep pink & blue "sparks" from showing up on your photos.
- When there is no sunshine (on a rainy day) don't give up on taking pictures! Zoom in close on flowers and other colorful objects. The color will be extra deep since its not being "washed out" by the sun. Fog which often accompanies soft rain also makes a very nice soft hazy look. Just be sure to protect you lens from specks of rain!
5k
5l
Most flashes should be used no closer to a subject than 6 feet. and more than 20 feet away. Any closer and it will "wash out" your subject, (depending on flash), and any farther away, the light won't even reach. For example: Have you ever seen people use a flash at a football game, or in a large stadium in hopes of getting photos of the people on the field? The flash won't help because its too far away!
Don't try to use a flash when there is a reflective object directly in front of the lens. For example, a mirror or window behind your friends, or the fishtank glass between you and that shark at SeaWorld. Move off to the side diagonally a little, so that the light, when it flashes off the reflective object, won't bounce directly back to your lens, but instead will bounce into empty space beside you!
Use the flash to fill in shadows. If your subject has side-lighting erasing the features on its face that you want to capture on film, use the flash to erase the shadows. BE SURE you're far enough away, or the whole picture will be blotted out!
Some ideas for Pathfinders:
- Try using a flash when your friends are in a dark cave or room. Arrange them 6 feet away from your camera, then take 2 pictures. One with a flash and one without. Notice the difference. Now take one with your friend(s) only 3 feet away. What happened?
- At your next campout, just before sunset grab some friends and have them stand in front of camp, with the sunlight coming from one side, casting shadows on their faces. Take 2 pictures. One with fill-in flash, and one without. What was the difference?
6
6a
Photographic film is a sheet of plastic (polyester, nitrocellulose or cellulose acetate) which is coated with an emulsion containing light-sensitive silver halide salts (bonded by gelatin) with different crystal sizes that determine the sensitivity and resolution of the film. When this emulsion is subjected to sufficient exposure to light, it forms a latent (invisible) image. Chemical processes are then applied to the film to create a visible image, in a process called film developing.
In black-and-white photographic film there is usually one layer of silver salts. When the exposed areas are developed, the silver salts are changed to metallic silver, which block light and appear as the black part of the film negative.
Here is additional information on negatives for a more complete perspective on film & negatives
In photography, a negative may refer to 3 different things, although they are all related.
A negative
Film for common 35mm cameras comes in long narrow strips of chemical coated plastic. As each image is captured by the camera onto the film strip, the film strip advances so that the next image is projected onto unexposed film. When the film is developed it is a long strip of small negative images. This strip is often cut into sections for easier handling. In larger cameras this piece of film may be as large as a full sheet of paper, or even larger, with a single image captured onto one piece. Each of these negative images may be referred to as a negative and the entire strip or set of images may be collectively referred to as negatives. These negative images are the master images, from which all other copies will be made, and they are treated with care and handled with caution.
Negative image
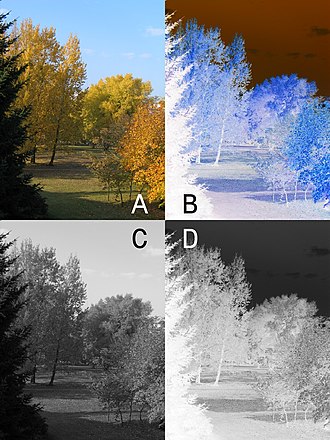
A positive image is a normal image. A negative image is a tonal inversion of a positive image, in which light areas appear dark and vice versa. A negative color image is additionally color reversed, with red areas appearing cyan, greens appearing magenta and blues appearing yellow.
Negative film
Due to happenstance, many photographic processes create negative images: the chemicals involved react when exposed to light, and during developing these exposed chemicals are retained and become opaque while the unexposed chemicals are washed away. However, when a negative image is created from a negative image (just like multiplying two negative numbers in mathematics) a positive image results (see Color print film, C-41 process). This makes most chemical based photography a two step process. These are called negative, films and processes. Special films and development processes have been devised such that positive images can be created directly from film, these are called positive, or slide, or (perhaps confusingly) reversal film (see Transparency, Black and white reversal film, E-6 process).
6b


