Overview
The Challenging Part
The most challenging requirement of this honor is probably this:
3. Perform the following:
- a. Bind a single signature hand binding "manuscript".
- b. Bind a blank book using at least four signatures and a permanent cloth hard board binding, using a "case" method.
- c. The proper way to "break-in" a new binding.
- d. Make a "slip case" for your blank book of at least four signatures.
[[AY Honors/Bookbinding/Requirements|Tab Name/Printable Version]]
1. Be able to identify the following terms:
- a. Foredge
- b. Gutter
- c. Endsheet
- d. Flysheet
- e. Signature
- f. Mull
- g. Backbone
- h. Head
- i. Foot
- j. Deckle edge
- k. Guarding sheets
- l. Headbanding
- m. Casing-in
- n. Buchram
2. Describe the difference between the following binding methods:
- a. Perfect binding
- b. Hard bound
- c. Single signature
- d. Spiral (metal and plastic)
- e. Saddle stitch
3. Perform the following:
- a. Bind a single signature hand binding "manuscript".
- b. Bind a blank book using at least four signatures and a permanent cloth hard board binding, using a "case" method.
- c. The proper way to "break-in" a new binding.
- d. Make a "slip case" for your blank book of at least four signatures.
4. Identify and describe the uses for the following binder's tools:
- a. Bone folder
- b. Kick press
- c. Folding needle
- d. Awls
- e. Sewing frame
- f. Squared card
- g. Punch
5. Define the difference of paper weight in relationship to a ream of paper.
6. Describe the color and properties of three types of adhesives using in the binding process and where they are used:
- a. Hot melt animal glue
- b. Casing-in paste
- c. Resin glues
7. Know and list the five principal stages of hand binding:
- a. Preparing the Signatures
- b. Sewing up the Signatures
- c. Gluing up the Back
- d. Attaching the Boards
- e. Finishing
Printable Answer Key Tab Name/Edit Answer Key
1
1a
The fore edge of a book, that is, the edge opposite the spine.
1b
The inner margin of a pair of facing pages. This would be the right margin of an even-numbered page (which is always found on the left side) and the left margin of an odd-numbered page (which is always found on the right).
1c
A piece of often decorative paper glued to the inside cover of a book. Its purpose is to hide the raw edge of the cloth covering.
1d
The pages at the beginning and end of a book, not glued to the covers.
1e
A large sheet printed with several pages, intended to form four or more leaves in the finished book. The pages are arranged on the sheet so that all of the pages orient the same way and are in proper sequence after the sheet is folded.
1f
A coarse fabric used for lining the spine of a book.
1g
The spine of a book. This is the edge of a book that shows when a book is placed on a shelf.
1h
The top margin of a page.
1i
The bottom margin of a page.
1j
The uncut and slightly irregular edge of a piece of paper.
1k
Pieces of paper placed in a book in front of a plate (picture) to prevent ink from the picture from bleeding onto the facing page.
1l
A strip of material between a book's spine and the pages. It usually protrudes slightly above the top edge of the spine.
1m
The process of attaching the bound pages of a book to the cover by gluing the endsheets to the inside covers.
1n
The cloth used on the outside of a book cover.
2
2a
A paperback or soft cover book consists of a number of signatures or individual leaves between covers of much heavier paper, glued together at the spine with a strong flexible glue; this is sometimes called perfect binding. Mass market paperbacks and pulp paperbacks are small (16mo size), cheaply made and often fall apart after much handling or several years.
2b
A hardbound or hard cover book has rigid covers and is stitched in the spine. Looking from the top of the spine, the book can be seen to consist of a number of signatures bound together. When the book is opened in the middle of a signature, the binding threads are visible. Modern hardcover books are typically of octavo size, though they are often smaller or larger.
2c
A single signature binding is one in which only one signature and the cover are sewn together at the spine.
2d
A spiral-bound book is made of individual sheets, each with a line of holes punched near the bound edge. A metal or plastic spiral wire is fed through the holes to hold the sheets together. Spiral binding allows a book to be disassembled and reassembled by hand without damage.
2e
Stapling through the center fold, also called saddle-stitching, joins a set of nested folios into a single magazine issue. Most American comic books fall into this category.
3
3a
A manuscript is an original copy of an author's work. Manuscripts are often submitted in the form of typewritten (or computer printed) sheets of paper. Sometimes the manuscripts are two-sided, and sometimes they are single-sided.
In order to bind a manuscript, it must be converted into a form suitable for folio binding - that is, the binder needs at least two leaves per sheet. So instead of 8.5" x 11" sheets of paper, the binder needs 11" x 17" sheets. This is accomplished by pasting the sheets together in what will form the gutter. Once the sheets are pasted together, they can be sewn though the overlapping section and bound normally.
In binding a 16-sheet single-sided manuscript, the right edge of sheet 1 is pasted to the left edge of sheet 16. Similarly, sheets 2 and 15 are pasted together, 3 and 14, 4 and 13, etc. An even sheet number is always pasted to an odd so that the middle sheet is not left standing alone. If there are an odd number of sheets, the first sheet should be pasted to a blank sheet.
When a book is opened, the page on the left side always has an even page number, and the page on the right has an odd page number. Care should be taken to observe this convention when pasting double-sided sheet together. Again, for a 16-sheet, 32-page manuscript, page 1 should be laid on the table face down. Page 32 should be laid face down to the right of it, and the bookbinder should then see pages 2 and 31. These are then pasted together.
Once the paste has dried, each sheet is carefully folded along the center of the overlapping sections. The manuscript will resist folding at this seam because the paper is double-thick there. Nonetheless, this is where the fold should be made. A bone folder makes this task easier. The folded sheets are then nested together to form a signature, and the signature is then ready to sew to a cover made of a single sheet of heavier paper.
3b
Follow the steps outlined and illustrated in requirement 7, using four signatures of blank pages.
3c
A new book should be opened first a few pages from the front cover and the pages should be pressed down. Then it should be opened near the back cover and again, the pages should be pressed down. Finally, it should be opened in a few places near the center. If it is opened near the center first, the book's spine may be broken, and if this happens, the book will always want to open to that page.
3d
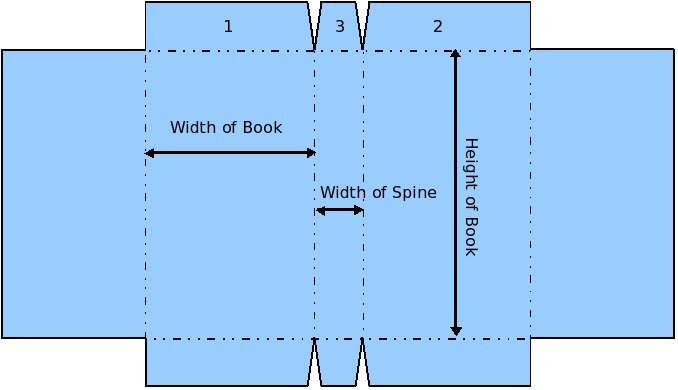
A slip case can be made from a piece of poster board. The first step is to measure the book and then draw the layout on the poster board as shown in the illustration:
You will want to make the slip case slightly larger than the book's dimensions so that it can be easily inserted and removed. Once the layout has been drawn on the poster board, cut it as shown in the drawing. Then carefully make creases where the dotted lines are drawn. You may use a bone folder to help in doing this, or you may use a ruler. The folds must be crisp and accurate.
The design shown here calls for an extra fold-in which makes the slipcase walls double thick. Apply a thin coat of glue to the inside surface of the fold-in, then fold it on top of the slipcase wall. You may wish to let the glue dry at this point.
Next, apply a light coat of white glue to the back side of tab 1, and another thin layer of glue to the back side of tab 3. Do the same for the bottom tabs. Then assemble the slip case by gluing tab 3 to tab 1, and then gluing tabs 1 and 3 to tab 2. Clamp the tabs with clothes pins while the glue drys. Do not insert your book into the slip case until the glue is completely dry, or you may transfer glue to your book!
Once the glue dries, the slip case is finished. You may decorate the slip case using decoupage (see the decoupage chapter for instructions) if you like, or some other method as you see fit.
4
4a
is a tool for folding and creasing paper. They are traditionally made from the leg bone of a cow or deer, but synthetic bone folders are also available. Bone folders resemble letter openers.
4b
a foot operated device used for tightly holding and compressing objects upon which work is being performed. Presses have many uses in bookbinding. A text block (that is, the bound pages that have yet to be attached to a cover), is held in a press when the spine is glued up. It is returned to the press when the cover is attached, and the spine is shaped.
4c
a steel needle with a wooden handle sometimes used for working in tight spaces on book covers, such as on decorative corners made of metal (miters). It is sometimes also used for scoring.
4d
are tools with a sharp point at the end of a long shaft mounted in a handle. They are used for making holes in various materials such as leather (used for book covers) and multiple layers of paper (as in a signature).
4e
a structure upon which books are held while they are being hand-sewn.
4f
a sheet of heavy stock with two cut edges which together make a 90° angle. These are used in the same way a carpenter's square is used, that is, in making right angles.
4g
a device for punching holes in material. These are like sharp tubes driven into the material and removing a usually circular portion. The waste material goes inside the tube and is sometimes ejected out the top when completely filled.
5
In countries that use United States paper sizes, a less direct measure known as basis weight is used in addition to or instead of grammage. The basis weight of paper is the density of paper expressed in terms of the mass of a ream of given dimensions and a sheet count. In the US system, the weight is specified in avoirdupois pounds and the sheet count of a paper ream is usually 500 sheets. However, the mass specified is not the mass of the ream that is sold to the customer. Instead, it is the mass of the uncut "basis ream" in which the sheets have some larger size. Often, this is a size used during the manufacturing process before the paper was cut to the dimensions in which it is sold. So, to compute the mass per area, one must know
- the mass of the basis ream,
- the number of sheets in that ream, and
- the dimensions of an "uncut" sheet in that ream.
The standard dimensions and sheet count of a ream vary according to the type of paper. These "uncut" basis sizes are not normally labeled on the product, are not formally standardized, and therefore have to be guessed or inferred somehow from trading practice. Historically, this convention is the product of pragmatic considerations such as the size of a sheet mold.
By using the same basis sheet size for the same type of paper, consumers can easily compare papers of differing brands. 20 pound bond paper is always lighter and thinner than 32 pound bond, no matter what its cut size. And 20 pound bond letter size and 20 pound bond legal size papers are the same weight paper having different cut size.
However, a sheet of common copy paper that has a basis weight of 20 pounds does not have the same mass as the same size sheet of coarse paper (newsprint). In the former case, the standard ream is 500 sheets of 17 by 22 inch paper, and in the latter, 500 sheets of 24 by 36 inch paper. Here are some basic ream sizes for various types of paper. Units are inches except where noted.
Paper Type Paper Size - Number of sheets Bond, writing, ledger 17 × 22 - 500 sheets Manuscript cover 18 × 31 - 500 sheets Blotting 19 × 24 - 500 sheets Box cover 20 × 24 - 500 sheets Cover 20 × 26 - 500 or 1000 sheets Bristol and tag 22½ × 28½ - 500 sheets Tissue 24 × 36 - 480 sheets Newsprint 24 × 36 - 500 sheets Hanging, waxing, bag, etc. 24 × 36 - 500 sheets Book, Text, Offset 25 × 38 - 500 sheets Index bristol 25½ × 30½ - 500 sheets Paperboard (all types) 12 × 12 - 1000 sheets (1,000 square feet per ream)
Sheets 17 by 22 inches can be cut into four 8½ by 11 inch sheets, a standard for business stationery known conventionally as letter sized paper. So, the 17 by 22 inch ream became commonly used. The 25 by 38 inch book-paper ream developed because such a size can easily be cut into sixteen 6 by 9 inch book-sized sheets without significant waste.
Early newsprint presses printed sheets 2 by 3 feet in size, and so the ream dimensions for newsprint became 24 by 36 inches, with 500 sheets to a ream. Newsprint was made from ground wood pulp, and ground wood hanging paper (wallpaper) was made on newsprint machines. Newsprint was used as wrapping paper, and the first paper bags were made from newsprint. The newsprint ream standard also became the standard for packaging papers, even though in packaging papers kraft pulp rather than ground wood was used for greater strength.
Paper weight is sometimes stated using the "#" symbol. For example, "20#" means "20 pounds per basis ream of 500 sheets".
When the density of a ream of paper is given in pounds, it is often accompanied by its "M weight". The M weight is the weight (in pounds) of 1000 cut sheets. Paper suppliers will often charge by M weight, since it is always consistent within a specific paper size, and because it allows a simple weight calculation for shipping charges.
For example, a 500-sheet ream of 20# copy paper may specify "10 M". Therefore, 1000 sheets (or two reams) will weigh 10 lb (≈4.54 kg).
6
6a
has a brown to amber color range. It is made from animal hide or bones and is often sold as crystallized flakes. These flakes must be dissolved in hot water before they can be used. The mixture must be heated to about 140°F, and will cool quickly. Once the glue is removed from the heat source, it will become unworkable in about one minute. However, animal glue can be reheated even years after its initial application and it will return to a workable state. Thus, a book bound with animal glue can be repaired or rebound years later, as is often done with antique books. Animal glues are often used in gluing up a book's spine.
6b
is also known as PVA, white glue (such as Elmers), or carpenters glue (which is yellow). These glues have a much longer working time than animal glues, but they also have disadvantages as well. If a surface needs to be reglued, PVA must be completely removed from the surface first, because this type of glue will not stick to itself. This type of glue is used to bond a text block to its cover.
6c
also range from dark brown to amber, and are more commonly known as epoxies. Epoxy is a two-part glue consisting of a resin and a hardener. When mixed together in the proper proportions, the two compounds react chemically to form an incredibly strong bond. This bond is often stronger than the materials being glued, and thus the saying, "an epoxy joint is forever." Resin glues can be used to finish the grain side of leather or impregnated in buckram covering materials.
7
7a
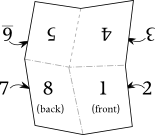
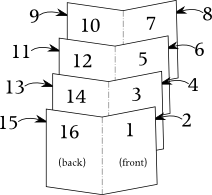
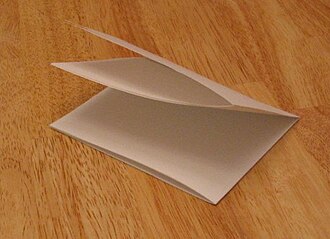
To begin, make up the signatures. This is done by folding the pages into halves, quarters, eighths, or sixteenths. Folding standard 8.5"x11" pages into quarters works well, as does folding 11"x17" into eighths.
If making a non-blank book, you need to print the pages in a certain way so that they appear in the proper order and right-side up. Folding a sheet of paper into quarters will produce eight pages. Try this on a blank sheet of paper first, number the pages, unfold, and look at how the pages orient themselves on the unfolded paper. When making a blank book, this step can obviously be skipped. You can also use the pictures below as a guide. Note that with the quarto folding scheme, some of the pages need to be printed upside-down.
Once the folding is done, the bone folder or a knife can be used to cut the folds apart at the top, bottom, and outer edge of the pages. Do not cut the fold along the spine! The signatures are then ready to be sewn, and the sewing will bind them to a cloth tape. An even number of signatures will place the final stitch on the same end of the book as the initial stitch, and this will help when it comes to tying it off.
7b
Prepare the Tapes
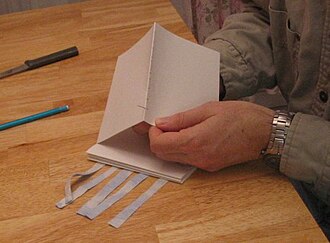
Make three to five cloth strips about a half inch wide. The length of these cloth strips should be a bit less than twice the width of the pages. The cloth itself should be a fine cotton or linen. An old pillowcase has been suggested, but any thin cloth will work. These strips of cloth are called tapes. Fewer tapes will make the sewing process go faster, but more tapes will yield a better book.
Stitching
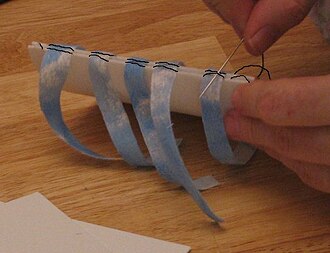
Mark one of the outside signatures to indicate where the tapes will lie as shown in the photograph.
Note that the photographs show a very dark thread being used. This was done to make the thread easier to see for the purpose of illustrating the techniques. When binding your book, you will want to use white thread so that it won't be easy to see in the finished book. Begin stitching by passing the needle and thread through the fold from the outside to the inside. It will be easier to make the hole from the inside of the fold with either an awl or the needle, but the thread should pass from the outside to the inside. This stitch should be made near the edge of the page, but not too near the edge. Leave a couple of inches of thread so you can tie it off when all the sewing is done. Then pass the needle back through the fold so that it comes out on the other side of the cloth tape. Do not run the thread through the tape. Pass the thread over the tape and back into the fold again. Repeat this process until all the tapes are sewn to the signature. Then slip the next signature between the tape and the first signature. Catch the previous stitch as shown in the photograph, and begin stitching the second signature.
Use the same technique for it as for the first signature. Stitch in the rest of the signatures, tighten the thread, and tie it off.
7c
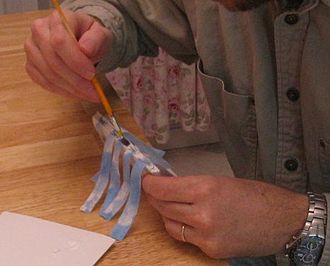
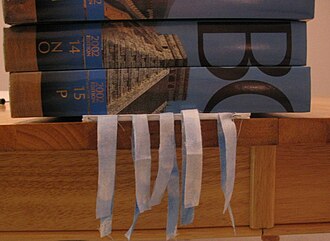
Once the signatures have been sewn together, pull the tapes tight and apply a thin layer of glue to the spine. You can use a small artist's paint brush for this. Work the glue into the cracks between the signatures, but do not let it go too deep or the pages will stick together when you try to open the finished book. The book is then placed in a press, but you can use a heavy weight, two wooden boards and a few C-clamps, or a shop vise to get the same effect.
If you use weights to compress the signatures, be careful not to glue the weights to the book's pages. The idea is to squeeze the pages together as tight as possible while the glue sets.
If you use wooden boards and C-clamps, sandwich the pages between the two boards and clamp them together with the C-clamps.
If using a shop vise, be sure to pad the vise's jaws so you do not damage the pages. The glue will strengthen the spine and adhere the threads to the pages.
The finished product from this stage is called a text block.
7d
Make the Boards
The "boards" are the book's covers. Use either a very stiff non-corrugated cardboard or eighth-inch mason board (available at most lumber yards). Guide Magazine is usually shipped with cardboard liners, so if your church subscribes to it, ask your Junior Sabbath School teacher to save them for you. Cut the boards such that they are slightly larger (about an eighth inch) than the text block on three sides. Make sure the boards are square.
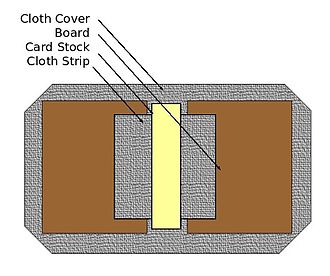
Next, get some heavy cloth or heavy paper - whatever you want to use as the outside surface of the book cover. The remainder of this discussion assumes a cloth cover. Lay the boards on the cloth with a gap between them. The width of this gap should be equal to the width of the text block's spine plus triple the thickness of the boards (three eighths of an inch). Mark the cloth around the boards leaving about a one-inch border. Cut the cloth, and then clip the corners to within a quarter inch of the corners of the boards:
Coat the outside surface of the boards with a thin, even layer of glue, lay them on the cloth, and stretch the cloth smooth. Be sure the gap between the boards is as wide as the text block's spine plus three times the thickness of the boards. Glue a strip of cloth across the spine, bridging the two boards. You may also glue a piece of card stock on top of this strip of cloth to further strengthen the spine. If you do not have card stock, a manila folder or an index card can be pressed into service instead. This strip of card stock should be as long as the text block's spine. Be careful not to glue the cover to your worktable. Ideally, you do not want any of the glue to penetrate the cloth cover, but just in case, you may wish to place a large piece of plastic beneath the cloth when doing this (use the lid from a large plastic storage tub, a plastic bag, or cellophane wrap). Now place as much weight on the boards as you can muster and leave it there until the glue dries.
Attach the Covers
When the glue dries from the previous step, remove it from the press (or remove the weights from the cover) and apply another thin layer of glue to the inside of the book cover. Then fold the top of the cloth cover over and glue it in place. Do the same for the bottom, and then fold over the left and right sides.
Get some wax paper or some plastic and insert two layers of it beneath the first page of the text block. Apply a thin layer of glue around the edge of the paper using a small paint brush. It's OK to brush the glue onto the wax paper. Cover all four edges of the text block, and then add a little more glue to hold down the tapes. Spread out some more wax paper and turn the text block over onto it. Repeat the processes for the back of the book, adding glue to the edges of the page. When you have coated the edges of the back page with glue, remove the layer of waxpaper that the glue was brushed onto, but leave the first layer of waxpaper in place. This layer will prevent the glue from bonding to the next page and keep moisture out of the rest of the book.
Now carefully lift the text block and place it on the back cover. Be sure to center it well. If you misalign it, carefully lift it off and make another attempt. Now fold the front cover closed onto the front page and make sure the text block is well centered. Finally, place the book back in the press again (or under a heavy weight) and shape the spine as best you can. Then let the glue dry. Don't be impatient at this point. If the book still smells like glue when you're ready to remove it, it is still too soon, and removing it will cause the pages to wrinkle and curl.
7e
The "finishing" step in bookbinding pertains to books with leather covers. The first step in finishing a leather-bound book is to go over the covers with a polishing tool to smooth out any irregularities. The book can then be placed in a finishing press with a set of embossing plates which will embed a pattern in the cover. (Alternately, the cover can be tooled by hand in the same way that a leather worker decorates leather.) When the book comes out of the finishing press, it may be gilded - that is, have a design tooled into it with gold leaf. Finally, the leather may be varnished.
Historical Notes
The Bookbinding honor was introduced in 1935, and discontinued in 1951. It was reintroduced as an Antique Honor in 1986. It was revised and returned to the Vocational category in 2002.
References
Content on this wiki is generated by people like you, and no one has created a lesson plan for this honor yet. You could do that and make the world a better place.
See AY Honors/Model Lesson Plan if you need ideas for creating one.
