Overview
The Challenging Part
The most challenging requirement of this honor is probably this:
2. Submit two pieces of iron pipe that you have threaded and connected with proper fitting.
[[AY Honors/Plumbing/Requirements|Tab Name/Printable Version]]
1. Make a diagram showing the plumbing system of a four-room house which includes fixtures for the kitchen, bathroom, and laundry.
2. Submit two pieces of iron pipe that you have threaded and connected with proper fitting.
3. Submit a repaired plastic (PVC), iron, or copper pipe, and tell how to repair all three.
4. Demonstrate ability to repair a leaky sink faucet and replace or repair toilet flush mechanisms.
5. Describe the proper drainage system of the house in #1 and explain the use of traps and vents.
6. Have a knowledge of the ordinary hot and cold water system of a house and explain how to make the system safe from freezing if the house has to be left without heat during the winter.
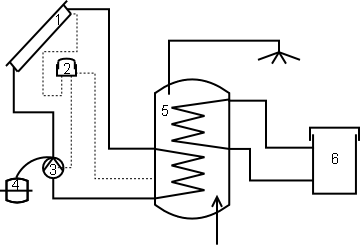
7. Diagram at least one type of passive water heating system, such as the use of solar energy.
Printable Answer Key Tab Name/Edit Answer Key
1
2

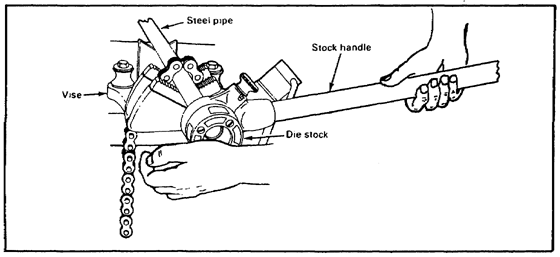
Insert the correct size die into the die stock. Slide the die stock over the pipe and apply pressure with one hand. With the other hand, turn the stock handle slowly clockwise until the die has taken a bite on the pipe. Apply cutting oil to the die as the stock handle is given one complete clockwise turn and backed off a quarter turn. Repeat this action until 1/4 inch of the pipe is beyond the die stock. The pipe is now threaded properly. Turn the handle in a counterclockwise direction to remove the pipe.
3
PVC
Turn off the water, then cut out the damaged section of pipe using a hacksaw or a handsaw. Then clean the two ends of the existing pipe thoroughly and let it dry. Cut a new piece of PVC pipe the same length as the damaged and removed piece and make sure it is clean too. Apply PVC primer and cement to the ends of the replacement pipe and slide couplings over them, one on each side. Then apply PVC primer and cement to the existing pipes, and join them together. Let the cement cure for the amount of time indicated on the can. Finally, turn the water back on and check for leaks.
Iron
In galvanized pipe installations, where the fittings on either side of the leak are not readily available, the leaking section may be cut out. In this operation, one person holds the pipe with a wrench to keep it from turning in the next fitting, and another person cuts a thread on it while it is in place using a hand type of pipe threader. The cutout section is then replaced with a coupling, a pipe section of the required length, and a union.
Copper
If a copper pipe leaks, cut out the damaged section and replace it with a new section, using either soldered or compression-type joints. Soldering requires quite a bit of skill, and there is always the risk of setting a house on fire with a soldering torch. Watch where the flame goes at all times. It is easy to get absorbed in watching the solder joint and not notice that the flame is licking a joist behind the pipe. Pay attention!
4
Leaky Faucet
There are many different types of faucets used in plumbing installations. If you can repair the compression washer faucet, you should have no trouble in repairing other types of faucets. A cutaway view of a compression faucet is shown in the figure to the right. This faucet, with a disc washer and a solid or removable seat, requires frequent attention to maintain tight closure against water pressure.
When a faucet is turned off, the washer on the end of the stem rubs against the seat. Frequent use wears down the washer and eventually causes the faucet to drip. A small, steady leak in a faucet wastes water. The remedy for a dripping faucet is simply to replace the washer. Be sure to replace flat or beveled washers with washers of the same design.
To repair a standard washer faucet, follow the steps below.
- First, shut off the water supply to the faucet and open the faucet all the way.
- Now, remove the faucet handle, bonnet, and stem.
- Next, remove the brass screw holding the washer to the bottom of the spindle. Replace the washer with a new one which is flat on one side and slightly rounded on the other, so it can get both horizontal and vertical pressure and provide a firm seat. Use a good quality hard-composition washer because leather or soft washers do not give long service, particularly in hot-water lines.
- If the brass screw is in poor condition, replace it with a new one.
- Examine the valve seat and repair or replace it with a new one, if necessary, before replacing the spindle; otherwise, a new washer provides adequate service for only a short time.
- Reface or ream solid seats with a standard reseating tool consisting of a cutter, a stem, and a handle. Rotate the tool with the cutter centered and held firmly on the worn or scored seat. Take care to prevent excessive reaming. Remove all grinding residue before reassembly. A solid seat can be replaced with a renewable seat by tapping a standard thread into the old solid seat and inserting a renewable seat.
- Remove renewable seats with a regular seat- removing tool or Allen wrench. When the seat is frozen to the body, apply penetrating oil to loosen it. Faucet seats can usually be tapped, reseated, or replaced without removing the faucet from its fixture.
- To stop leakage at the bonnet, replace the stem packing and the bib gasket.
Toilet Flush Mechanism
Before a person can repair anything, he or she must understand how that item is supposed to work. The illustration below shows the steps in a toilet flush mechanism:
2: Stopper ball is lifted, opening tank drain
3: Water level in tank begins to drop
4: Float ball lowers
5: Valve opens allowing fresh water in
6: Water is sprayed into bowl from the top
7: Water enters tank
8: Water level continues to drop
9: Water exits tank and fills bowl
10: Stopper ball reseats
11: Water level rises
12: Float ball rises
13: Valve closes
To repair a toilet flush mechanism, remove the tank lid, flush the toilet and observe. See which of the thirteen steps listed above is not happening, try to determine why it is not happening, and address the problem. In some cases it is easier to replace the flush mechanism rather than repair an existing one. The replacement parts are sold in a single package and comes with instructions geared toward a typical homeowner. Since Pathfinders tackling the Plumbing honor are not "typical," this should present no problems!
5
Drainage systems generally work by gravity. The waste pipes are installed so that they drop at least a quarter of an inch per foot (or 2 cm per meter). Any drains below a building's waste exit point must be drained into a tank equipped with an effluent pump to move the waste out of the building.
Each drain is equipped with a trap. A trap is an S-shaped curve below the drain designed to trap a little water in the drain pipe. Having this water in the drain pipe prevents sewer gases from entering the building.
Drain systems are also vented by running a pipe from the waste pipe through the roof. This is to allow air to enter the drain system so that waste water rushing out of the pipes does not create a siphon and empty the traps. As water rushes through a pipe, it pushes air out in front of it. Air needs to be able to enter the system behind the water or it will pull a vacuum, sucking water out of the traps. A vent supplies this "replacement" air to prevent this from happening.
6
Hot and Cold Water systems
Fresh water enters a house at the main, going through a master shutoff valve. The pipe then hits a tee, with one side feeding the water heater and the other side feeding the cold water taps, toilets, dishwashers, etc. A water heater has two lines coming to it. One is the cold water supply already mentioned. The other is the heated water outlet which feeds all the hot water taps in the house.
Winterizing
If a house is to be left unheated over the winter, the plumbing system must be treated beforehand so that the pipes do not freeze and break. One approach to this problem is to shut off the water main and then drain the system by opening all the taps. The problem with this approach is that it can leave water in low spots, and if that water freezes, it can burst the pipe.
Another method is to inject RV antifreeze into the plumbing system. Unlike regular vehicle coolant, RV anti-freeze is rated for use in potable water systems. Thus, it is safe to introduce it into the fresh water supply of a plumbing system. RV antifreeze has a freezing point of -58 °F. To do this, you first shut off the water main. Then put two gallons of RV antifreeze in a five gallon bucket near the washing machine. Disconnect the washing machine's cold water feed, and connect a pony pump's outlet to the faucet. Submerge the pony pump's intake hose in the bucket of antifreeze and turn on the pump. Then go to all the other cold water taps and turn them on. Run them until the pink antifreeze comes out. Lift the lid from the toilet tanks and press the ball cock down until antifreeze enters the tank. Do not flush the toilets yet. Cycle the dishwasher until antifreeze shows up there, cycle it until it pumps the water out. Go back to the basement and open the main valve's waste nut until antifreeze comes out. Now go back to the washing machine, turn off the pony pump, move it to the hot water side, and repeat the procedure with all the hot water taps. Turn off the pump when finished.
Finally, it is time to treat the traps and toilets. Add regular car antifreeze to the toilet tanks and flush, holding down the handle draining out as much of the water from the tank as possible. Pour a cup of antifreeze down each sink drain too so that the traps are treated. Finally, open the water heater's drain valve and all hot water taps which will allow water to drain out of the heater.
7
References
Content on this wiki is generated by people like you, and no one has created a lesson plan for this honor yet. You could do that and make the world a better place.
See AY Honors/Model Lesson Plan if you need ideas for creating one.


