Especialidades JA/Tradición maorí/Respuestas 2
Nivel de destreza
1
Año
Desconocido
Version
13.02.2026
Autoridad de aprobación
División Norteamericana
Waiata is the Māori word for song.
In the Māori language, Tāne means "man".
Tukutuku
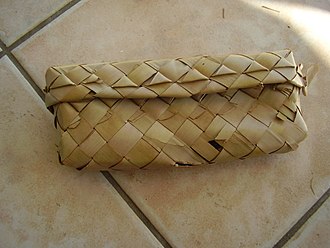
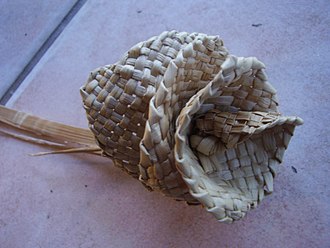
A tukutuku is a woven wall hanging traditionally made from flax. New Zealand flax describes common New Zealand perennial plants Phormium tenax and Phormium cookianum, known by the Māori names harakeke and wharariki respectively. They are quite distinct from Linum usitatissimum, the Northern Hemisphere plant known as flax (and also known as linseed). The genus was given the common name 'flax' by Anglophone Europeans as it too could be used for its fibres.
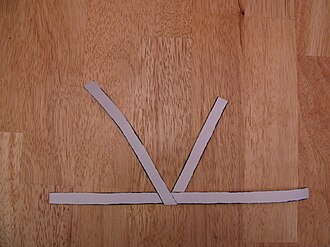
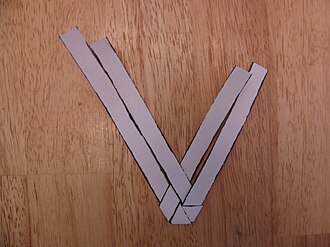
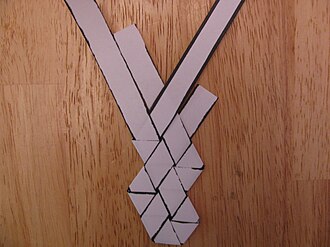
| Mark a 60° angle on one strip, not in the center, but off to either side. Fold the strip into a V along the 60° line with the left side over the right. This angle is critical, so make it as close to 60° as you can. Place a second strip in the bottom of the V as shown, but do not center it in the notch of the V. If you make the V fold in the center or center the second strip on the notch, the two ends of the strip will run out at the same time and you will have two splices in the same vicinity. Offsetting them from the center avoids this problem. |
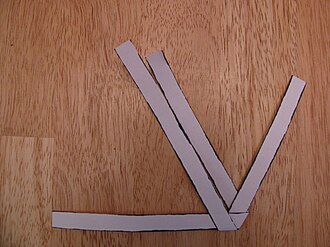
| Fold the right side of the horizontal strip behind the right leg of the V so that it lies parallel to the left leg of the V. If the 60° angle was folded properly, the second strip should fall right into place. If it does not, check the angle of that first fold again. |
|
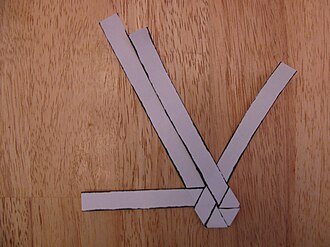
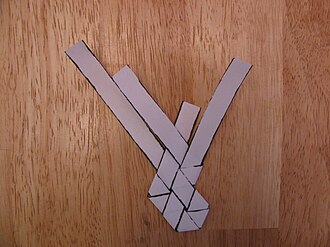
Fold the other horizontal strip over the left leg of the V so that it runs along and parallel to the right leg of the V. Tuck it beneath the second strip it crosses. You should end up with a double-V, consisting of two outer legs and two inner. The rest of the weaving process will always begin with one of the outer legs. Choosing which is perhaps the most difficult part of making a tipare, but for now, choose the one on the right and fold it behind the V as shown on the right. Make sure that it goes behind two strips and over the third. |
| Now take that same strip and fold it around the back of the strip it was just tucked in front of. Weave it in front of the adjacent strip. |
| Fold the strip farthest to the left behind the tipare, and weave it in front of the strip farthest to the right. |
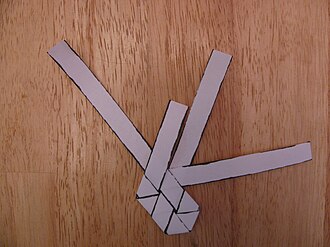
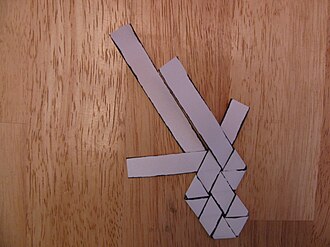
| Fold that same strip behind the right-most strip and weave it in front of the next. The next step is to take one of the outer strips and fold it into a horizontal position, but which strip? As you make a tipare, this will be the question that vexes you after every fold, and if you get it wrong, the tipare will come out wrong as well. Look at the photo to the left. If you fold the strip on the left, you will continue the edge made along the left side. If you fold the strip on the right, you will form a point on the right side. Always choose the strip that will form a point. |
| There — we have chosen the strip that will form a point and have folded it horizontally. It was woven over the front of the outer strip on the other side and then folded around it and woven again. |
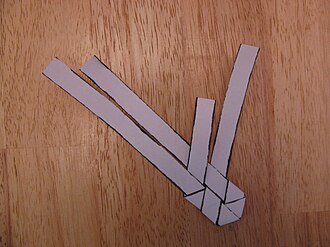
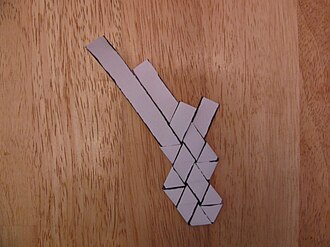
| But now we've run out of strip. Cut the strip along the edge of the tipare, and cut the tip of a new strip off at the same angle. The ends of these two strips are positioned next to the pieces from which they were cut. Discard them. |
| Now tuck the new strip into the weave, pushing it in until it stops. You should be able to push it in pretty far. There is no need for glue or any other sort of adhesive. The weave itself will hold the strip in place. Continue weaving until you have a long enough piece of tipare to wrap around the head of the intended tipare wearer. |
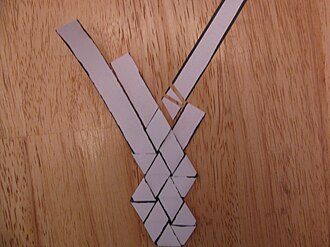
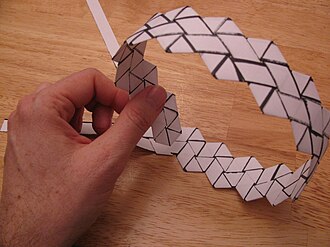
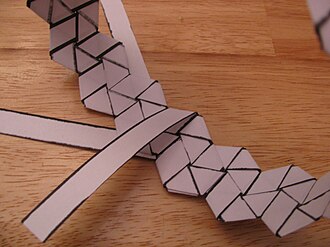
| Bend the tipare around forming a loop. Line up the beginning of the tipare with the points on the unwoven end (photo on the left). Fold the next strip on the unwoven end around the beginning, cut it to length, and tuck it into the weave (photo on the right). |
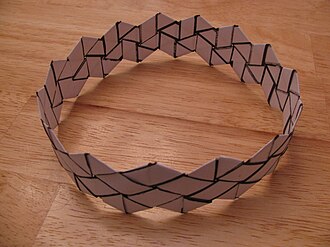
| Continue weaving the loose ends into the tipare, cutting them off at the proper length and tucking them into the weave. When the last strip is woven into place, the tipare is finished. Crown the recipient. |
Preparations
- Harvesting
Flax should be cut in a certain way. Traditional weavers were conservationists — they looked after the flax plant from its growth, after harvesting, and through the whole process of usage. Māori treasure the flax plant, presumably because it was a major resource for them for many things. Never cut the center (baby blade), nor the two on either side - (mother and father). Cutting these blades will kill the plant. Return all unused flax (harekeke) and wastage to the plant cut up as mulch. Don't harvest in the rain or the flax will shrink too much after use. When cutting the flax make sure you cut on an angle. This is to make sure that rain and debris does not settle in the roots and spoil the plant. Keep the flax usable for a few days by placing ends in a bucket of water as soon as you return home. Keep it out of the direct sun. To keep it longer boil it as described in the Dying Flax section below.
- Tools
A steel bar or using the back or blunt side of a butter knife is used to soften the strips. Traditionally a mussel shell was used. The shell or blunt edge is pulled along the dull side of the flax blade and this also helps release the moisture content. Flax woven articles do shrink to a beautiful golden colour as they dry. Flax is used green or is softened by boiling as described below. Using boiled flax reduces the shrinkage in the finished article.
- Dying Flax
Bring a pot of water to a boil, and add your flax, prepared as above in the Tools section. Boil the flax for 5 minutes and then dry it. This can be kept for later use or dyed whenever you are ready. Fill a sink or bucket with warm water and put the boiled, dry flax in the water to soften it. You can now weave with it or dye it. Use a large pot and fill two thirds with water and then add the dye to the boiling water. The amount used is up to the weaver. Return it to a boil. Finally, place your softened flax into the dye - use rubber gloves. Once the right colour is obtained, add a good handful of salt. This will set the dye or fix it to the flax fibres. Allow the dyed flax to dry, but not in the direct sun. Once it is dry you can then go through the process to soften it and weave it. If you use it straight after dying you will need to wear disposable gloves unless you want your hands to be dyed as well. But once it has dryed it will set the dye. Some people use vinegar to fix the dye. For the dye itself you can use cordial drink concentrates (Thriftee and Koolaid are brands available in New Zealand and they don't need a fixer as the citric acid in the drink concentrate and set the dye). You can mix these colours to get the one you want.
In the Māori language, speakers distinguish correct use of the number of people referred to in all aspects of the language. For example, everyday greetings take different forms depending on the number of people greeted:
- Tēnā koe: hello (to one person)
- Tēnā kōrua: hello (to two people)
- Tēnā koutou: hello (to more than two people
A Hongi is a traditional Māori greeting in New Zealand. It is done by pressing one's nose to another person at an encounter.
It is still used at traditional meetings among members of the Māori people and on major ceremonies.
In the hongi, the ha or breath of life is exchanged and intermingled.
Through the exchange of this physical greeting, you are no longer considered manuhiri (visitor) but rather tangata whenua, one of the people of the land. For the remainder of your stay you are obliged to share in all the duties and responsibilities of the home people. In earlier times, this may have meant bearing arms in times of war, or tending crops of kumara (sweet potato).
When Māori greet one another by pressing noses, the tradition of sharing the breath of life is considered to have come directly from the gods.
In Māori folklore, woman was created by the god Tane moulding her shape out of the earth. Then Tane (meaning male) embraced the figure and breathed into her nostrils. She then sneezed and came to life. Her name was Hineahuone (earth formed woman). Tane later had a child with her and when she found out he was her father she fled to the underworld where she was believed to look after the spirits of the dead.
Māori Stick Game
In the Māori stick game, the participants sit in a circle and each person holds two sticks. Music begins, and the sticks are then rhythmically rapped on the floor or tapped together in beat with the music. See http://www.uen.org/Lessonplan/preview.cgi?LPid=13919 for more details.
Poi
Poi is a form of juggling or object manipulation employing a ball suspended from a length of rope which is held in hand and swung in circular patterns, comparable to club-twirling. Poi spinning originated with the Māori people of New Zealand (the word poi means "ball" in Māori) as a means of promoting increased flexibility, strength, and coordination -in particular, the dexterity of the wrist- and as an exercise of movements central to the use of hand weapons, including the patu, mere, and kotiate.
Some popular poi tricks include: reels, weaves, fountains, crossers, windmills, butterflies, stalls, and wraps. Split time and split direction moves are possible, and some of the more difficult moves require a considerable amount of manual dexterity, coordination and forearm strength to accomplish.
There are several basic classes of trick. The two poi are usually spun in parallel planes, and can be spun in the same direction (weaves) or opposite directions (butterflies). Moves such as stalls and wraps can change direction of one (or both poi) to change between these two classes.
Flying Kites
Māori people were experts a building and flying kites. Kites were made from the flower stalks of toetoe grass (Cortaderia fulvida) and decorated with shells (such as the abalone), feathers, and foliage. Some kites were big enough to carry a person, and these were sometimes used to lift warriors over the walls of enemy defences.
Puppetry
The Māori made Karetao (puppets) to use in story-telling. The Karetao were carved figures featuring a handle at the bottom (and held by one hand) and movable arms attached to strings (operated by the other hand).
Other Games
Other games include
- Spinning Tops
- Wrestling
- Throwing Darts
- Memorization Games
String Figures
String figures are designs made on the hands and fingers using a piece of string tied into a circle. In the west, an example of this would be the cat in the cradle.
For instruction on making several Māori string figures, see http://www.tki.org.nz/r/hpe/exploring_te_ao_kori/stringgames/index_e.php
Stilts
Stilts are long poles with foot pegs mounted to them. The stilt-walker stands on the pegs, and the poles extend upwards past the shoulders. The walker wraps his arms around the poles and as he lifts his left foot, uses his left hand to lift the pole. The foot pegs are often movable, and it is best to learn to walk with stilts with the pegs set low to the ground. As the Pathfinder develops skill, the foot pegs can be raised.
The word pā (pronounced pah) refers to a Māori village, generally one from the 19th century or earlier that was fortified for defense. In Māori society, a great pā represented the mana of a tribal group, as personified by a chief or rangatira.
Nearly all pā were built in defensible locations to protect dwelling sites or gardens, almost always on prominent, raised ground which was then terraced; as for example in the Auckland region, where dormant volcanic cones were used. While built for defense, many were also primarily residential, and often quite extensive.
Māori pā played a significant role in the New Zealand Land Wars, though they are known from earlier periods of Māori history. They were mostly absent, however, until around 500 years ago, suggesting scarcity of resources through environmental damage and population pressure began to bring about warfare, leading to a period of pā building.
Fortification
Their main defense was the use of earth ramparts (or terraced hillsides), topped with stakes or wicker barriers. The historically later versions were constructed by people who were fighting with muskets and hand weapons (such as spear, taiaha and mere) against the British Army and armed constabulary, who were armed with swords, rifles, and heavy weapons such as howitzers and rocket artillery.
Pā were often put in place in very limited time scales, sometimes less than two days, and resisted attack for many hours and, sometimes, weeks. Military historians like John Keegan have noted that Māori recognition of the strong resistance of earth fortifications against modern weapons (especially artillery) predates the successful defensive use of trenches and sloped earth ramparts in World War I by many decades.
Warrior chiefs like Te Ruki Kawiti realised these properties as a good counter to the greater firepower of the British. With that in mind, they sometimes built pā purposefully to resist the British Empire's forces, like at Ruapekapeka, which was constructed specifically to draw the enemy, instead of protecting a specific site or place of habitation like more traditional pās. At the Battle of Ruapekapeka, the British suffered 45 casualties, against only 30 amongst the Māori. Afterwards, British engineers twice surveyed the fortifications, produced a scale model and tabled the plans in the House of Commons.
The fortifications of such a purpose-built pa included palisades of puriri trunks and split timber, with bundles of protective flax padding, the two lines of palisade covering a firing trench with individual pits, while more defenders could use the second palisade to fire over the heads of the first below. Simple communication trenches or tunnels were also built to connect the various parts, as found at Ohaeawai Pā or Ruapekapeka. The forts could even include underground bunkers, protected by a thick layer of earth over wooden beams, which sheltered the inhabitants during periods of heavy shelling by artillery.
A limiting factor of the Māori fortifications that were not built as set pieces, however, was the need for the people inhabiting them to leave frequently to cultivate areas for food, or to gather it from the wilderness. Consequently, pā would often be abandoned for 4 to 6 months of each year.
Examples
The old pā remains found on Maungakiekie/One Tree Hill, New Zealand, close to the center of Auckland, represent one of the largest known sites as well as one of the largest pre-historic earthworks fortifications known worldwide.
The word pā can refer to any Māori village or defensive settlement, but often refers to hill forts – fortified settlements with palisades and defensive terraces – and also to fortified villages. Pā are mainly in the North Island of New Zealand, north of Lake Taupo. Over 5000 sites have been located, photographed and examined although few have been subject to detailed analysis.
For more details, start with article.
References
- Māori Kites
- Tangihanga procedures
- Maori Symbolism
- Tikanga Māori, by Sidney M. Mead, Hirini Moko Mead
- Adventist Connect - Education History
- May the People Live, by Raeburn Lange.
