AY Honor Canyoning Answer Key
This material has been gathered from various sources including those listed above. First aid notes are extracted from ABC to Advanced First Aid 5th Edition. Abseiling calls are those used by Greater Sydney Conference AO Team.
1
Canyoning is the adventure sport where you follow ancient water courses down through deep rocky slots. It can involve a mix of sliding, jumping, swimming, walking and even abseiling over waterfalls.
2
The most familiar type of canyon is probably the river canyon. The water pressure of a river can cut deep into a river bed. Sediments from the river bed are carried downstream, creating a deep, narrow channel.
Rivers that lie at the bottom of deep canyons are known as entrenched rivers. They are entrenched because, unlike rivers in wide, flat flood plains, they do not meander and change their course.
Weathering and erosion also contribute to the formation of canyons. In winter, water seeps into cracks in the rock. This water freezes. As water freezes, it expands and turns into ice. Ice forces the cracks to become larger and larger, eroding bits of stone in the process. During brief, heavy rains, water rushes down the cracks, eroding even more rocks and stone. As more rocks crumble and fall, the canyon grows wider at the top than at the bottom.
When this process happens in soft rock, such as sandstone, it can lead to the development of slot canyons. Slot canyons are very narrow and deep. Sometimes, a slot canyon can be less than a metre (3 feet) wide, but hundreds of metres deep. Slot canyons can be dangerous. Their sides are usually very smooth and difficult to climb.
Some canyons with hard, underlying rock may develop cliffs and ledges after their softer, surface rock erodes. These ledges look like giant steps.
Canyons are also formed by tectonic activity. As tectonic plates beneath the earth’s crust shift and collide, their movement can change the area’s landscape. Sometimes, tectonic activity causes an area of the earth’s crust to rise higher than the surrounding land. This process is called tectonic uplift. Tectonic uplift can create plateaus and mountains. Rivers and glaciers that cut through these elevated areas of land create deep canyons. The Grand Canyon, in the U.S. state of Arizona, is a product of tectonic uplift.
3
- Keep your group to a small and manageable size (4-8).
- Don’t place bolts or alter rock surfaces in any way.
- Avoid leaving unnecessary slings and remove old slings.
- Keep to creek channels to avoid sensitive creek banks and soft vegetation.
- Avoid establishing new abseil routes or footpads – keep to existing paths or spread out in trackless terrain.
- Walk carefully in rocky pagoda areas – flaky rocks and thin ledges can break easily.
- Avoid marking tracks (signs, cairns, broken branches). Each group should have at least one competent navigator.
- Don’t publicise ‘new’ canyons or those in wilderness areas to preserve opportunities for discovery and to minimise impacts.
- Use fuel stoves – fires scars are unsightly, attract rubbish and encourage vegetation damage.
- Avoid camping in canyon environments.
- Dispose of human waste away from canyons.
- Leave the crayfish and other wildlife alone.
- Carry out any rubbish.
4
For tips and instruction see Abseiling.
Good technique means you abseil at a steady speed. The belay device moves gently and steadily, with your legs at roughly right angles to the rock face, knees slight bent, feet shoulder width apart. Descend gently by walking backwards using the friction of the rope through the belay device to control the speed.
PLAN AND CONTROL the points where the rope will touch the rock. Look for smooth areas and use your body so the rope lies on those areas. Avoid sharp edges. Once the rope is touching the rock, go straight down. No right, no left, no swinging, as this causes rubbing between rope and rock. When the rope is weighted, it’s very easy to cut it on sharp edges.
| Call | Response | Call | Response |
|---|---|---|---|
| "On Rope" | Called to by the abseiler to advise the belayer that the abseiler is attached to the rope and has a positive brake. | "On Belay" | Called by the belayer to let the participant know they’re on the end of the rope with a positive brake. |
| “Descend When Ready” | Called by the belay to advise the abseiler that the belayer is aware the abseiler is descending and that the belayer is ready to arrest a fall if necessary. | “Descending” | Called by the abseiler when the abseiler is about to begin descent. |
| “Safe” | Called by abseiler to let the belayer know they are on the ground. | ||
| “Off Rope” | Called by abseiler when the abseiler has completed the descent and all the abseiler’s equipment has been removed from the rope. | “Off Belay” | Called by the belayer when they are no longer safeguarding the participant. |
| “Rocks” | Used when a object is dislodged or falls over the edge. It is to warn personnel below that they should seek shelter. | “Up Rope” | Called by abseiler when they want less slack in the belay. |
5
Well-maintained equipment is safe and lasts longer. Therefore, take good care of your equipment and inspect it regularly or have it inspected by a qualified professional.
What causes damage?
- Wear with normal use
- A fall (tearing or stretching of stitching and webbings)
- Prolonged exposure to UV radiation
- Contact with chemical products (acids, oil, fuel)
- Storage in damp or insufficiently ventilated areas
- Contact with heat sources (welding shards, gas burners, cigarette butts)
- Rough handling (scuffing along walls or against other material; an aluminium carabiner used on a steel lanyard wears very quickly)
- Use in dirty conditions. A rope that has been used in a grit environment, such as a canyon can develop micro abrasion of internal fibres weakening the rope. Dirty ropes also abrade other equipment faster.
Washing Ropes and Soft Components:
DON'T
Use a pressure washer, degreaser, stain remover or solvent. Do not dry material in the sun or near a heat source such as a radiator or stove.
DO
Rinse with cold water or wash with lukewarm water (max. 30 degrees) and PH neutral soap or rope/PPE cleaner. If necessary, use a small brush to remove dirt. Rinse material with clean water after washing. Hang to dry in a wellventilated area out of direct sunlight.
A dirty rope can damage other material, accelerate wear (greatly) and reduce the braking effect of devices. That’s why keeping your rope clean is important. For example, use a rope bag to prevent unnecessary soiling.
Metal components: Rinse or wash with water at a maximum temperature of 30 degrees and a suitable PPE cleaner or PH neutral soap. Be careful with high pressure: you can blow away the necessary oil/lubrication. Oil moving components with a light weight oil such as sewing machine oil or use graphite for lubrication.
6
6a
6b
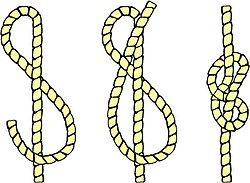
| Figure Eight |
|---|
|
Use: This knot is ideal for keeping the end of a rope from running out of tackle or pulley.
How to tie:
|
6c
6d
6e
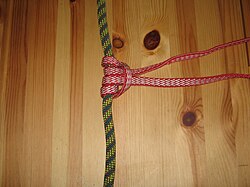
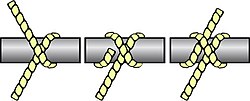
| Clove hitch |
|---|
|
Use: This knot is the "general utility" hitch for when you need a quick, simple method of fastening a rope around a post, spar or stake (like tying wicks to sticks in Candle Making) or another rope (as in Macramé)
How to tie:
|
6f
7
7a
Sprain: RICE
- Rest - Avoid activities that cause pain, swelling or discomfort. But don’t avoid all physical activity.
- Ice - Even if you’re seeking medical help, ice the area immediately. Use an ice pack or slush bath of ice and water for 15 to 20 minutes each time and repeat every two to three hours while you’re awake for the first few days after the injury.
- Compression - To help stop swelling, compress the area with an elastic bandage until the swelling stops. Don’t wrap it too tightly or you may hinder circulation. Begin wrapping at the end farthest from your heart. Loosen the wrap if the pain increases, the area becomes numb or swelling is occurring below the wrapped area.
- Elevation - Elevate the injured area above the level of your heart, especially at night, which allows gravity to help reduce swelling.
7b
Hypothermia
- Move the person out of the cold. Move the person to a warm, dry location if possible. If you’re unable to move the person out of the cold, shield him or her from the cold and wind as much as possible. Keep him or her in a horizontal position if possible.
- Remove wet clothing. If the person is wearing wet clothing, remove it. Cut away clothing if necessary to avoid excessive movement.
- Cover the person with blankets. Use layers of dry blankets or coats to warm the person. Cover the person’s head, leaving only the face exposed.
- Insulate the person’s body from the cold ground. If you’re outside, lay the person on his or her back on a blanket or other warm surface.
- Monitor breathing. A person with severe hypothermia may appear unconscious, with no apparent signs of a pulse or breathing. If the person’s breathing has stopped or appears dangerously low or shallow, begin CPR immediately if you’re trained.
- Provide warm beverages. If the affected person is alert and able to swallow, provide a warm, sweet, nonalcoholic, non-caffeinated beverage to help warm the body.
- Use warm, dry compresses. Use a first-aid warm compress (a plastic fluid-filled bag that warms up when squeezed) or a makeshift compress of warm water in a plastic bottle or a dryer-warmed towel. Apply a compress only to the neck, chest wall or groin.
- Don’t apply a warm compress to the arms or legs. Heat applied to the arms and legs forces cold blood back toward the heart, lungs and brain, causing the core body temperature to drop. This can be fatal.
- Don’t apply direct heat. Don’t use hot water, a heating pad or a heating lamp to warm the person. The extreme heat can damage the skin or, even worse, cause irregular heartbeats so severe that they can cause the heart to stop.
7c
Shock
- Lay the person down and elevate the legs and feet slightly, unless you think this may cause pain or further injury.
- Keep the person still and don’t move the person unless necessary.
- Begin CPR if the person shows no signs of life, such as not breathing, coughing or moving.
- Loosen tight clothing and, if needed, cover the person with a blanket to prevent chilling.
- Don’t let the person eat or drink anything.
- If the person vomits or is bleeding from the mouth, and no spinal injury is suspected, turn the person into the recovery position.
7d
Broken Bone
- Stop any bleeding. Apply pressure to the wound with a sterile bandage, a clean cloth or a clean piece of clothing.
- Immobilize the injured area. Don’t try to realign the bone or push a bone that’s sticking out back in. If you’ve been trained in how to splint and professional help isn’t readily available, apply a splint to the area above and below the fracture sites. Padding the splints can help reduce discomfort.
- Apply ice packs to limit swelling and help relieve pain. Don’t apply ice directly to the skin. Wrap the ice in a towel, piece of cloth or some other material.
- Treat for shock. If the person feels faint or is breathing in short, rapid breaths, lay the person down with the head slightly lower than the trunk and, if possible, elevate the legs.
7e
Concussion
- Keep the person still. The injured person should lie down with the head and shoulders slightly elevated. Don’t move the person unless necessary. Avoid moving the person’s neck. If the person is wearing a helmet, don’t remove it.
- Stop any bleeding. Apply firm pressure to the wound with sterile gauze or a clean cloth. But don’t apply direct pressure to the wound if you suspect a skull fracture.
- Watch for changes in breathing and alertness. If the person shows no signs of circulation — no breathing, coughing or movement — begin CPR.
- Head trauma that results in concussion symptoms need to be evaluated by a medical professional. Concussion symptoms include nausea, unsteadiness, headaches or difficulty concentrating.
8
- Take responsibility for your own safety.
- Avoid canyoning if rain is forecast or if the weather looks changeable.
- Be self-reliant – know the route, have adequate food, maps, clothing, and safety and first aid gear, know how to swim.
- Teach beginner abseilers prior to canyon trips rather than in canyons.
- Hypothermia is a real risk – wetsuits and spare warm clothes are advisable.
- Give way to faster groups.
- Avoid peak use times in well-known canyons if possible.
- Leave details of your group, route and expected return time with a responsible person.
9
