Difference between revisions of "AY Honors/Braiding/Answer Key"
From Pathfinder Wiki
| Line 19: | Line 19: | ||
==4. Make a four-strand round braid lanyard. == | ==4. Make a four-strand round braid lanyard. == | ||
==5. Know how to start and end all projects. == | ==5. Know how to start and end all projects. == | ||
| − | How to start depends on what you're starting with. | + | How to start or end depends on what you're starting with. |
| + | ===Starting=== | ||
;Rope, string, or lace: Lay the ropes (or strings or laces) parallel to one another with the ends even and tie an overhand knot in the entire bundle. | ;Rope, string, or lace: Lay the ropes (or strings or laces) parallel to one another with the ends even and tie an overhand knot in the entire bundle. | ||
;Hair: Divide tresses of the hair into the desired number of equal-diameter strands. | ;Hair: Divide tresses of the hair into the desired number of equal-diameter strands. | ||
;Leather: A wide leather strap can be cut into strips, but left intact near one end. | ;Leather: A wide leather strap can be cut into strips, but left intact near one end. | ||
| + | ===Ending=== | ||
| + | ;Rope, string, or lace: Tie the bundle into an overhand knot. | ||
| + | ;Hair: Bind the braid with a rubber band or a decorative hair elastic. | ||
| + | ;Leather: Glue the strands in place, rivet them to another piece, or firmly sandwich them between two other pieces of leather. | ||
==References== | ==References== | ||
[[Category:Adventist Youth Honors Answer Book|{{SUBPAGENAME}}]] | [[Category:Adventist Youth Honors Answer Book|{{SUBPAGENAME}}]] | ||
Revision as of 01:25, 24 July 2009
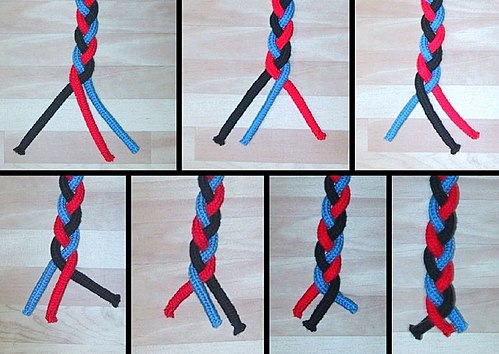
1. Make a three-strand braid, using hair, rope, or cord.
To make a three strand braid we start with the picture on the upper left, and proceed clockwise.
- Move the blue strand from the right to the center, bringing us to the second picture.
- Move the black strand from the left to the center, bringing us to the third picture.
- Move the red strand from the right to the center, bringing us to the fourth picture.
- Move the blue strand from the left to the center, bringing us to the fifth picture.
- Move the black strand from the right to the center, bringing us to the sixth picture.
- Move the red strand from the left to the center, bringing us to the seventh picture which has the strands in the same order as the first.
The sequence of left-to-center, right-to-center, left-to-center, right-to-center repeats until the braider reaches the end of the strands or decides to quit.
2. Make a zipper pull or a key chain using the four-strand round or square braid.
3. Make a four-strand hanger cover.
4. Make a four-strand round braid lanyard.
5. Know how to start and end all projects.
How to start or end depends on what you're starting with.
Starting
- Rope, string, or lace
- Lay the ropes (or strings or laces) parallel to one another with the ends even and tie an overhand knot in the entire bundle.
- Hair
- Divide tresses of the hair into the desired number of equal-diameter strands.
- Leather
- A wide leather strap can be cut into strips, but left intact near one end.
Ending
- Rope, string, or lace
- Tie the bundle into an overhand knot.
- Hair
- Bind the braid with a rubber band or a decorative hair elastic.
- Leather
- Glue the strands in place, rivet them to another piece, or firmly sandwich them between two other pieces of leather.

