Especialidades JA/Trabajos en madera/Respuestas
Nivel de destreza
2
Año
1934
Version
20.05.2024
Autoridad de aprobación
Asociación General
1
1a
1b
1c
1d
1e
1f
2
Pine is the most commonly available wood in North America. Its primary advantage is that it is relatively cheap. This is because it grows rather quickly. Another characteristic of pine is that it is soft. This can be both an advantage and a disadvantage. The advantage of a soft wood is that it is easy to work. The disadvantage is that it can break easily; delicate joinery that works fine in hardwoods will not hold up in pine. Most dimensional lumber (i.e., 2x4's) is made from pine.
3
Furniture clamps (also called bar clamps) often have padded clamping surfaces, so making unwanted impressions on the wood is avoided. These are used for clamping large boards together, usually edge-to-edge.
Clamps can be periodically wiped down with a cloth and oil to keep rust at bay.
Drills, Bits, and Braces
Drills, Bits, and Braces are used for boring holes in wood. A brace and bit is the "old-style" cordless drill. It is hand-powered. The brace holds the bit, and the woodworker's hand cranks it, inducing a rotation in the bit. To drill a clean hole with either a brace and bit or a drill and bit, hold the bit perpendicular to the board and start drilling. You can start a pilot hole with a nail or a punch first to keep the bit from wandering. There are two ways to prevent tear-out when boring a hole. The first method is to support the board and drill into the supporting material. For this to work, the board and its support must be firmly clamped together. The second method can be used if you have a bit with a point that is much narrower than the hole's diameter (such as a spade bit, a brad-point bit, or a bit with a screw-lead). Using such a bit, drill through the material until the tip comes through the other side. Then turn the board over and place the bit in this hole. Continue drilling toward the center.
4
4a
4b
4c
4d
4e
4f
4g
4h
5
5a
5b
5c
6
7
The first rule of gluing wood joints is that glue does not stick to end-grain. Most woodworking joints were in fact designed to avoid the application of glue to an end-grain surface. Evaluate your joint first, and find two non end-grain surfaces that will come into contact. After making a test fit, apply glue to one of these surfaces. Spread the glue in a thin layer, being careful to not use too much glue. Then clamp the two pieces together. Use enough clamping pressure so that the pieces are held firmly together, but do not use so much force that all the glue is squeezed out of the joint. Once clamped, the pieces should be left alone until the glue sets. Setting times vary from one glue to the next, so read the instructions on the glue container.
8
There are thousands of plans available on the Internet, and many of them can be downloaded for free. Others are offered for a fee. You can also find plans in books and in woodworking magazines (although the magazines tend to have more complex plans). Choose plans that are simple. Although the instructor may be an experienced woodworker, the student is often not. Avoid complicated joints such as dovetails and mortise and tenons. Butt joints, dados, and lap joints are within the reach of a 12 year-old, so steer your Pathfinders to projects that use them. Use lots of pine. Pine is relatively inexpensive, and using it makes it a lot easier to start over. It can be heartbreaking to watch a youngster destroy an expensive piece of wood, and the temptation to salvage it (and thus ruin the project) can be overwhelming. Save complicated projects and expensive hardwoods for after the Pathfinder develops some skill.
9
The first step in finishing a wood project is to make sure all the surfaces are smooth. This is most commonly done by sanding the surfaces with sandpaper, starting with rougher paper (80-100 grit) and then progressing though successively finer grits (often to 220 grit). Sanding is only necessary if the surface is not already smooth, and some tools (notably planes and cabinet scrapers) will leave a sufficiently smooth surface so that sanding is unnecessary. In fact, sandpaper was patented in the United States in 1834, and woodworking had been going on for millennia prior to that!
10
10a
10b
One way to do this is to create a 1:20th scale model that looks much as a real house does before it has siding and a roof put on it. Use balsa wood, a sharp razor blade, and balsa glue.
Create a house plan (keep it simple). You may use typical houseplans that are available in Houseplan magazines and books or create your own.
In order to achieve greatest accuracy, it is recommended that you draw out the scale model to full size grid-paper. Make sure to mark all doorways, windows, entries, and stairs.
Determine what balsa wood sizes will represent each of the standard stud sizes.
Another option is to build a doll house out of wood. These are usually 1:12 scale models, and make a great gifts! Doll House kits are available for sale online.
Purchasing the kit or the balsa wood can be rather expensive. Talk with the hobby shop in your town before beginning! They'll probably help you make the wisest financial decisions. This would be a great project to work on as a class or unit!
10c
Any toys you make can be included in the packages that are often delivered to needy families during the Pathfinder's Can Collecting activity.
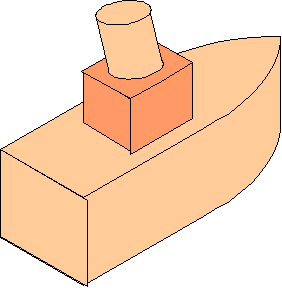
Tugboat
An easy toy to make is a small tug boat. This can be made from two pieces of scrap wood and a dowel - dimensional lumber (2x4's) works great for this. The bottom piece makes the boat's hull and deck, and the top layer makes the cabin. Cut the hull to shape with a coping saw and smooth with a rasp. Before cutting the cabin to its final dimensions, drill the hole for the smokestack. It's a lot easier to drill into a large piece of wood than it is to drill into a small piece. You could also clamp the cabin in a vise for drilling. If desired, bore the hole at a slight angle (about 5°) so the smokestack tilts back. Glue the smokestack dowel into the cabin, and glue the cabin onto the hull. If you use a waterproof glue such as epoxy, the glue joint will be strong enough to not require further reinforcement. Otherwise, reinforce the cabin/hull joint with screws through the bottom of the hull into the cabin. Make sure the screw is well recessed so that it does not scratch the floor (or table) when the tug is dragged around. Optionally, you can drill a small hole straight down through the deck near the front of the boat, and drill a larger hole into the hull from the bottom so that it meets the small hole. Pass a rope through the hole and tie a knot in it to keep it from pulling through the smaller of the two holes. It would be easier to use an eye screw, but this may present a choking hazard to small children. Sand well, and finish with colorful paint.
Car
Another option is to make Pinewood Derby cars. See the instructions in the Pinewood Derby section of the Arts and Crafts chapter of this book.
10d
10e


