AY Honors/Map and Compass/Answer Key
|
Investiture Achievement Connection: This Honor is related to the Investiture Achievement requirements for FRONTIER VOYAGER Outdoor Living which require completion of this Honor or one of 4 other Honors, not previously earned. This connection is based on the similarity between this Honor and the Orienteering Honor which is called out in the IA requirements. |
This honour is similar to the General Conference's Orienteering Honour, and in fact, has the same insignia. This page will mainly show the answers to the different questions or where a different answer is needed. The Honour is equivalent to the New Zealand NZQA 431 Navigation in Good visibility.
Section One – The Map
Please note. This honour has had alterations (including a new name) as the South Pacific Division has reviewed the honour and made changes in 2010
1.1 Know the following
a. What is a topographical map?
Basically a view from on top. Symbols and colours to represent true features on the land.
b. What is found on a topographical map?
Key, contour lines, scale, grid system, trigs, G-MA information, map series and name
c. Give three uses of a topographical map.
Navigation, route planning. Identifying physical land features. In emergency situations when visibility is reduced.
- Description of land surface showing the shape of the land.
- Shows positions of roads, fences, and other man made objects.
- Indicates a pictorial view from above
1.2 What is an orthophoto map?
An orthophoto map uses aerial photos as the background with symbols and other information overlaid. Find a picture of one using Google.
1.3 Be able to recognize twenty signs and symbols found on a topographical map, giving some in each of the following categories:
a. man made
b. water feature
c. vegetation feature
Most good tramping (hiking) maps will have a key showing lots of different symbols representing various features.
Man made:
Roads: Highways, sealed roads, gravel roads, 4wd tracks (Dryweather roads), walking tracks. Bridges, cuttings, emabankment.
Railway: single track, multi track, stations, cuttings, bridges.
Miscellaneous: buildings, churches, schools, structures, cemetery,light house, ship wreek, electricity lines and poles, fences, mines open & underground.
Relief features: contour lines, permanent ice, rock outcrops, boulders, banks, trig station, alpine scree, glacier.
Water feature: marsh, river, lake, sea, small stream, ditch, spring, mangrove, getty, break water, gravel, sand, mud, dam, waterfall, sink hole.
Vegetation features: native forest, exotic coniferous (and non coniferous) forest, orchard, vineyard, shelter belt.
1.4 Know and explain the following as they relate to elevation:
a. Elevation.
b. Contour interval.
Coloured orange. Points of same altitude In the NZ old inch to a mile series 1:63360 the difference in height between contours was 100 feet. In the new (2005) metric series 260. the interval is 20 metres.
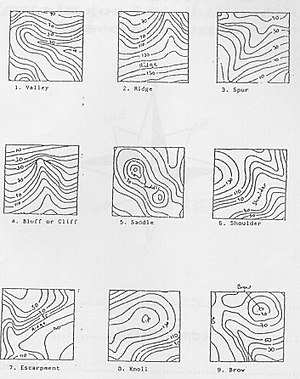
c. Ground formations (Valey, Ridge, Spur, Bluff or Cliff, Saddle, Sholder, Escarpment, Knoll, Brow) defined by their contour lines
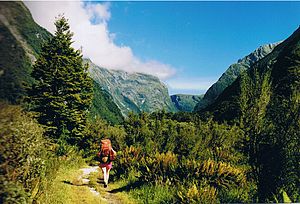
This picture of part of the Milford Track gives some idea of the contour lines on the Hollyford Map. These are glacier-formed valleys, U-shaped with steep sides. The Milford, Routeburn and Hollyford tracks are in the same area in Fiordland.
1.5.Know and explain the following as they relate to distance
This is a horizontal distance as the crow flies. It is not always a very accurate estimation of the amount of land between two points (land distance). Land distance depends on terrain. Land distance = horizontal distance + (contour interval x number of contour lines).
a. How is distance defined.
b. The map scale
Relationship of the horizontal distance between two points on the map and the horizontal distance on the ground in real life. This is shown as a ratio
c. How to measure linear distance
Look at the map scale to calculate the real distance
d. How to estimate land distance.
1.6. Know and explain the following as they relate to a map grid system.
a. What is the grid system?
To accurately locate reference points on a map using a set of 6 numbers.
b. What is a six figure grid reference?
Grid numbers are a two digit number at the end of each grid line. However a grid reference must contain 6 numbers. 3 from the horizontal and 3 from the vertical. The third digit is the approximate distance in tenths between the two nearest grid lines. Always give the longitude first then latitude.
c. Rules for reading grid references.
A typical grid reference would look like 355884. Most topo maps would explain how to do this on the borders.
1.7. Know and explain the following in relation to map reading
a. Grid North
The direction of the North Grid lines run vertically on the map so the top op the map would be grid north.
b. True North
Usually grid north and true north are the same on topo maps, but in some instances this is not the case, especially as the maps get closer to the arctic regions. Check the map do NOT guess or assume or you will be geographically embarrassed (i.e. lost). Check the magnetic delineation on the map.
c. Magnetic North
The direction to which the red pointer needle on the compass nearly always points. The difference between true North and magnetic North is called the magnetic declination or G-MA (Grid Magnetic Angle)
d. Declination
The compass needle aligns itself with the Earth's magnetic flux (lines)of force passing through the place you are standing. The difference between true north and magnetic north is the G-MA angle. This changes with the Earth's magnetic field variations. The G-MA must be considered when using a compass to orientate a map. The map will give a value and time calculation so you can work the value of the angle.
e. Grid Magnetic Angle (G-MA or GMA)
Section Two – The Compass
2.1. What are the eight major points of the compass and their bearings?
| 1 | N | 0°/360° |
| 2 | NE | 45° |
| 3 | E | 90° |
| 4 | SE | 135° |
| 5 | S | 180° |
| 6 | SW | 225° |
| 7 | W | 270° |
| 8 | NW | 315° |
2.2. Identify the type of compass most popular with bushwalkers.
I have come to understand that there is a difference between Northern Hemisphere compasses and Southern Hemisphere compasses. I am free to be corrected on this point. It may pay to check if you are country hopping. Most people I know use a Silva brand or similar. Plastic transparent base. Scales, glow in the dark dots. Some are good for Orienteering as they have triangles and circles cut out of base for marking controls on your map.
2.3. Know the parts of an orienteering compass.
The Silva compass is a very good one to use on map work. It has a plastic see through base. To get a good picture with a label of what each part is called cheek out Google images.
1. Scales. Inches and mm
2. Transparent base plate
3. North on dial
4. Magnetic needle north end
5. Liquid filed housing with graduated dial and orienting line
6. Direction of travel arrow
7. Magnifying lens
8. Index pointer (for setting bearings and reading
9. Orienting arrow
10. Dial graduations 360 deg
2.4. Know and explain the following as they relate to Grid Bearings and Magnetic Bearings:
a. What are Bearings?
b. How to calculate Grid Bearings from the map
i. Place long edge of compass along the bearing desired.
ii. Hold compass base on the map and turn compass housing until orienting arrow is parallel to grid lines.
iii. Correct for G-MA
iv. Hold compass at waist and turn until needle aligns with orienting arrow. Travel in the direction of travel arrow.
c. How to convert a Grid Bearing to a Magnetic Bearing
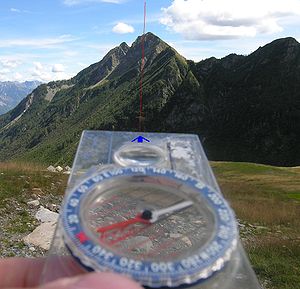
Point the travel arrow towards where you want to go. Rotate compass housing until the orienting arrow is directly below the magnetic needle. This will give the magnetic bearing.
d. How to convert a Magnetic Bearing to a Grid Bearing
e. How to take and march on a Magnetic Bearing
Set the compass to the required magnetic bearing. Follow the travel arrow. It is good practice to look in the direction of travel and find a notable feature in the distance then the compass can go back in your pocket. If visibility poor or nil use a rope and a runner to go ahead and caste about till the runner on the desired bearing. Then move to the stationary runner following the tight rope. If no rope use same method but go by sight, not letting the runner out of your sight you position him in line with the travel arrow.
f. What is Slipping and how to correct for it?
g. How to take a back bearing
Used to check back where you have come from. The bearing should be 180 deg different or the compass can be turned around so that the white end of needle aligns with the orienting arrow. (Check for slipping)
2.5. Know and explain the following in relation to Resection.
a. What is resection?
Used to locate your position on a map by locating major recognisable land features and working out where you are.
b. The two-bearing method of Resection.
Take two back bearings from known features. Remember to transfer backward for G-MA. The point where the two or more bearings cross is your location. Of course is accuracy is not an issue you could look at the features around you and find them on the map and work out where you are in relation to the sighted features.
c. The three-bearing method of Resection.
The same as above but using three features. The more apart they are the better.
2.6. Know and explain how to Orient your map by:
a. inspection and
b. by compass.
Section Three – Direction without the aid of a Compass
3.1 Demonstrate how to find directions without a compass using the Southern Cross (ie. Crux) method
I have also included a couple other methods as well for daytime and night as extra bonus material.
a. Watch.
Southern Hemisphere method only.Point the 12 to the sun. Halfway between the hour hand and the 12 is North. You still have to use your intelligence for this as early morning time and evening time care must be taken as to which half you use. E.g. 8am sun is rising in the East; point 12 to the sun North is halfway between the 8 and the 12 at the 10. BUT late evening the sun is heading to set in the west say time is 8pm you point the 12 at the sun. North is halfway between the 8 and the 12 at the other side of watch at the 4. This should be used only as a guide as in some countries the real time has been adjusted and sometimes there is daylight saving time etc.
b. Southern Cross.
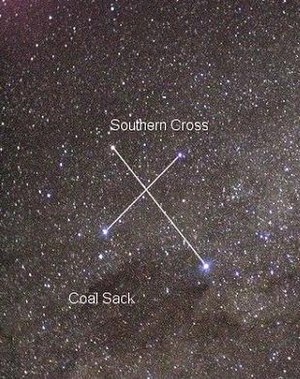
With the lack of a significant pole star in the southern sky (Sigma Octantis is closest to the pole, but is too faint to be useful for the purpose), two of the stars of Crux (Alpha and Gamma, Acrux and Gacrux respectively) are commonly used to mark south. Following the line defined by the two stars for approximately 4.5 times the distance between them leads to a point close to the Southern Celestial Pole.
Alternatively, if a line is constructed perpendicularly between Alpha Centauri and Beta Centauri, the point where the above line and this line intersect marks the Southern Celestial Pole. The two stars are often referred to as the "Pointer Stars" or "White Pointers", allowing people to easily find the top of Crux.
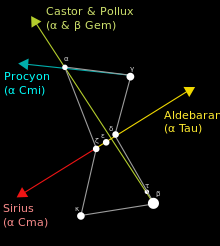
The junction of these two lines is the SCP Southern Celestial Pole. If you were at the South Pole this would be directly above you. This is the point where the night sky revolves around. Point to this spot then lower your arm to the horizon. Where you are pointing is South.
c. Orion
Orion is not visible all year in the southern hemisphere
To find south we need to look to Orion one hour after sunset (in South New Zealand in Summer the sun set can be at 9.45pm so this may influence where Orion on is at sunset) As the earth revolves the constelations 'move' across the sky so the time you observe Orion to find South is important. Late at night the constelation will be too far to the left nearer the horizon so where South is will be confused. The sword in Orion (the Pot handle) points towards South. South is now directly behind you.
d. Shadow Stick.
This method can be a waste of time. We all know the sun rises in the East and sets in the West. The stick shadow shows you this. Also when the sun is at its zenith the highest it gets in the Southern Hemisphere look at the sun and it is towards the North the opposite in the Northern Hemisphere. So we learn that at mid day is the best time to find North (or South).
But if you must... place a stick in the ground on an open area. Mark the shadows at times through out the day. From this you can find North or South (depending what side of the equator you are on) from the shortest shadow and also East and West by drawing a line from the ends of the longest shadows assuming you had an early morning and late evening marking with equal time from mid-day. But for this you have to be lucky to have sunshine for most of the day, which usually is not the case if you are lost. Anyhow it is something to know if you do not have a watch to know when real time mid-day is.
Section Four – Practical
4.1. Demonstrate how to:
a. Read six figure Grid Refences. Refer to Requirement 1.6c.
b. Calculate a Grid Bearing from the map. Refer to Requirement 2.4b.
c. Convert Grid Bearing to a Magnetic Bearing. Refer to Requirement 2.4c.
d. Take a Magnetic Bearing. Refer to Requirement 2.4c
e. Locate a position using Resection. Refer to Requirement 2.5
4.3.Prove your ability in the use of a map and compass by following a cross-country course with at least ten given readings or control points.
Keep a log detailing
*Grid refernce
*Grid and Magnetic Bearings
*Records of actual course taken
The exercise is not the ability to travel exactly on a bearing between the two points, this is usually impossible in rough wilderness areas. Following an established trail or not so established between the two points would be permissible.
Have lots of fun and save lots of memories.
