AY Honor Lashing Answer Key used by North American Division
1
A lashing is an arrangement of rope wire or webbing with linking device used to secure and fasten two or more items together in a somewhat rigid manner. Lashings are most commonly applied to timber poles, and are commonly associated with cargo, containerisation, the Scouting movement, and sailing.
2
Lashing can be used to build useful items in a camp setting. If in an area where gathering timber is allowed, the camper with proper skills can build the needed items rather than pack them in.
Three categories of items that lend themselves to lash construction include:
- Furniture
- Table, chair, and even beds.
- Shelter
- Lean-to, super shelter, tree cot, baker's tent (frame), etc.
- Tools & Utensils
- ladder, tripod for cooking, coat hangers, etc.
3
3a
3b
The imperfections inherent in natural materials allows for greater amounts of friction to develop between the work pieces (spars and ropes). In contrast dimensional lumber pieces will require higher amounts of tension in wraps to achieve similar holding power.
4
4a
| Timber hitch |
|---|
|
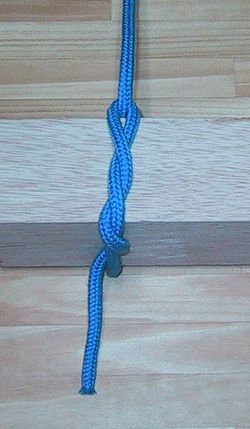
Use: The timber hitch is a knot used to attach a single length of rope to a piece of wood. This knot is easily undone after use.
How to tie:
|
4b
| Clove hitch |
|---|
|
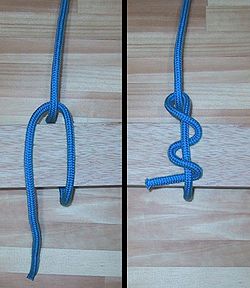
Use: This knot is the "general utility" hitch for when you need a quick, simple method of fastening a rope around a post, spar or stake (like tying wicks to sticks in Candle Making) or another rope (as in Macramé)
How to tie:
|
4c
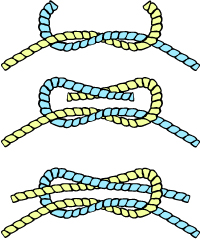
| Square Knot |
|---|
|
Use: Also known as a Reef knot, the Square Knot is easily learned and useful for many situations. It is most commonly used to tie two lines together at the ends. This knot is used at sea in reefing and furling sails. It is used in first aid to tie off a bandage or a sling because the knot lies flat.
How to tie:
WARNING: Do not rely on this knot to hold weight in a life or death situation. It has been known to fail.
|
5
5a
Start with a timber hitch (can substitute clove hitch for smaller work pieces) and end with two half hitches backed by a clove hitch.
5b
Start with a clove hitch and end with a clove hitch.
5c
5d
5e
6
To estimate the length of rope you will need, add the diameters of all the spars in the joint and multiply that sum by 36. The length of rope needed will be in the same units as the diameter (meaning if the diameter was in inches, the length will also be in inches).
If the combined diameter of the spars is less than 6", you can use 1/4" diameter manila rope. If the combined diameter of the spares is greater than 6", use 3/8" instead. You can use half that diameter if using nylon or polypropylene rope.
7
- Wrap
- A wrap is a turn made around the two spars to hold the spars tightly together. Usually, three wraps are made to form a Square Lashing. Some other lashings require more wraps.
- Frap
- A frap is a turn made between the spars. It goes around the wraps to pull the wraps tighter. Usually two frapping turns are made on a lashing.
8
8a
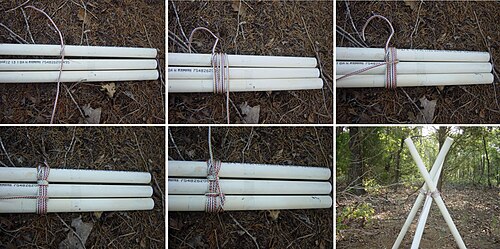
Square lashing is a type of lashing knot used to bind poles together. Large structures can be built with a combination of square and diagonal lashing, with square lashing generally used on load bearing members and diagonal lashing usually applied to cross bracing. If any gap exists between the poles then diagonal lashing should be used.
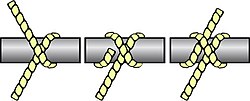
Square lashing steps (see image at right);
- Begin with a timber hitch on the vertical pole beneath the horizontal pole and tuck the loose end under the wrapping.
- Wrap in a square fashion about three times around the poles.
- Frap between the poles two or three times, pulling often to work the joint as tight as possible.
- Tie two half hitches around the horizontal pole
- Cinch the half hitches into a clove hitch, an additional clove hitch may be added if desired.
When the turns are taken around the vertical pole they should be inside the previous turns. The ones around the cross pole should be on the outside of the previous turns. This makes sure that the turns remain parallel and hence the maximum contact between the rope and wood is maintained.
Strength is improved if care is taken to lay the rope wraps and fraps in parallel with a minimum of crossing.
An alternative method is known as the Japanese square lashing. The Japanese square lashing is similar to the standard square lashing in appearance, but in fact is much faster and easier to use. One drawback to consider is that it is difficult to estimate how much rope is needed, which can lead to needlessly long working ends.
- Begin by placing the middle of the rope under the bottom pole
- Lay both ends over the top pole, and cross under the bottom pole. Do this about three times. Take care to keep the wrappings as tight as possible.
- After the last wrap, cross the ropes again over the bottom pole and frap around the wrappings. Do this enough times (at least 3) to finish with a square knot.
A properly executed lashing is very strong and will last as long as the twine or rope maintains its integrity. A lashing stick can be used to safely tighten the joint.
8b
Shear lashing uses two or three spars or poles, 15 - 20 feet of rope.
To tie a shear lashing, lay the two poles side-by-side and parallel to one another. Tie a clove hitch around one spar. Then wrap the free end of the rope around both spars about seven or eight times. Pull them as tight as you can. Then make three fraps around the lashing, and again, pull the rope as tight as you can. Finally, tie a clove hitch on the second spar.
To use sheaer lashing around with three poles, lay all three poles side by side and parallel to one another. Tie a clove hitch on one pole, and wrap the rope around all three seven or eight times. Pull the rope tight. Make three fraps between two of the poles, then cross over and make three more between the other two poles. Pull the frapping as tight as you can and finish it off with a clove hitch.
8c
8d
Diagonal lashing is a type of lashing used to bind spars or poles together, to prevent racking. It is usually applied to cross-bracing where the poles do not initially touch, but may by used on any poles that cross each other at a 45° to 90° angle. Large, semipermanent structures may be built with a combination of square lashing, which is stronger, and diagonal lashing.
Bailing twine has sufficient strength for some lashing applications but rope should be used for joining larger poles and where supporting people sized weights.
Diagonal lashing steps (see image at right);
- Begin with a timber hitch around the juncture of the two poles.
- Make three turns in each direction - tightening steadily as you go.
- Make two frapping turns, tightening the joint as much a possible.
- To end, make two half hitches
- Cinch the half hitches into a clove hitch
A lashing stick can be used to safely tighten the joint. Strength will be improved if the first turn is 90° to the timber hitch and if care is taken to lay the rope turns parallel with no crossings.
8e
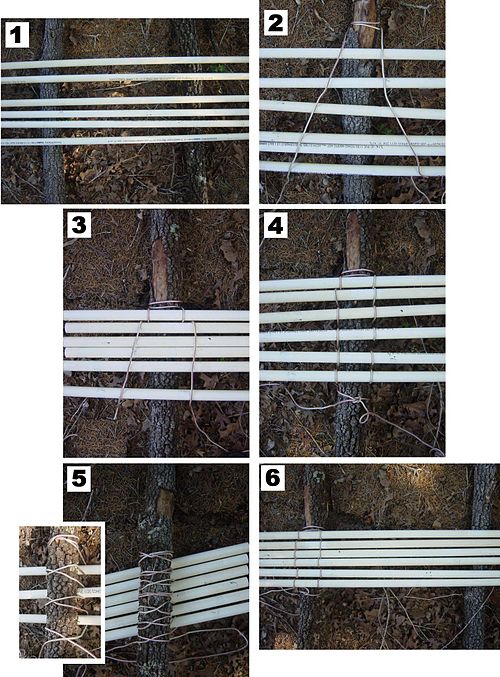
Continuous Lashing is a fun technique. It is used to create shelves, tables, and other structures.
Comments on the pictures on the right'
- Support poles under the 'surface' poles.
- Attach string to the support pole using a clove hitch.
- Clove hitch, up over surface pole, back down & cross under below support pole, and up over the second surface pole.
- Detail of lashing as seen from top.
- Detail of lashing as seen from bottom. Inset shows details of clove hitch, and cross-under below support pole.
- View from the top.
- Start with a string/rope that is 4 or 5 times longer than the length of your project.
- Find the middle/center of the string and attach it to one of the support poles.
- Put one of the surface sticks on top of the support pole and bring both ends of the string over this surface stick.
- Continue back down below the support pole.
- Cross the string under the support pole.
- Bring it back up and over the next surface stick and then back down and cross under the support pole.
- Repeat for the remaining surface sticks.
- End off with a square knot when all the surface sticks are attached.
9
Natural Ropes
- Manila
- Made from the leaves of the Musa textillis tree in the Philippine Islands.
- Sisal
- Made from the leaves of the Agave sisalaua plant that is native to central America. Sisal and Manila are the strongest natural material ropes with a 10% stretch factor.
- Hemp
- Made from an annual herbaceous plant native to west and central Asia. Hemp is 2/3 as strong as Manila and Sisal rope.
- Cotton
- Made from the white, downy, fibrous substance that covers the seeds of the cotton plant.
- Coir
- Made from coconut husks.
Synthetic Ropes
Synthetic ropes are all man-made from different types of plastics. They have unique names that reflect their different properties. The strength of the synthetic rope is at least twice that of Manila or Sisal rope. The main types of synthetic ropes are:
- Polypropylene and polyethylene
- These are plastic ropes which stay afloat and are not affected by water. They are designed for marine purposes; they are tough and have good abrasion resistance. However, they have low stretch and heat resistance.
- Terylene or polyester
- These ropes stay afloat and are not affected by water. They have high heat resistance, but have low stretch.
- Nylon
- These have a high level of strength, do not float and are affected by wet conditions.
They have good stretch and moderate heat resistance. Nylon 6 is used in rock climbing and nylon 66 is used in abseiling. Nylon is resistant to abrasions, bacteria and most organic solvents. It is sensitive to strong acids, alkalinity and long exposure to sunlight.
10
Rope should be Coiled up and hung up in a dry place, or put in a box or bucket. The box or bucket should have holes to let the rope breathe. This will help against rot and odors.
The wood should be bundled up and racked off the ground in a dry place, like on a wall or hung from the ceiling. If outside, the wood should be wrapped in a tarp or oiled canvas to keep out water.
11
11a
11b
11c
11d
11e

