AY Honor Tarp Camping Answer Key
1
Objective: Understand tarp camping fundamentals and compare it to traditional tent camping.
Trainer Talking Points:
- What is tarp camping? It involves using a tarp as your main shelter instead of a tent. It requires setup using trees, poles, and rope, and provides minimal coverage.
1a
Advantages:
- Lightweight: Tarps weigh less than tents and are easier to carry.
- Versatile: Configurable in many ways to suit weather and terrain.
- Cost-effective: Typically cheaper than tents.
1b
Challenges:
- Exposure to elements: Less enclosed, can be colder or wetter.
- Requires skill: Needs knot-tying and setup knowledge.
1c
Types of tarps:
- Nylon (lightweight, affordable)
- Silnylon (silicone-nylon, waterproof, durable)
- Canvas (heavy-duty, breathable)
Common sizes: 3x3m, 4x4m (suitable for solo or duo shelter)
Care tips:
- Dry before storage to prevent mildew.
- Avoid sharp objects or rough surfaces to reduce tearing.
2
I M P O R T A N T
—PLEASE READ BEFORE COMMENCING REQUIREMENT 2—
This requirement may invite personal sharing about times of hardship, fear, or vulnerability. Be sensitive to emotional responses. Respect all privacy, and redirect if needed. Know your responsibilities for safeguarding and pastoral care and have clear referral pathways ready.
A referral pathway (where to go next if someone needs help):
- Chaplain or trusted spiritual leader
- School or club pastoral care
- Local counsellor or youth mental health resource (e.g., Kids Helpline in Australia 1800 55 1800, Kids Help Line)
Ways to Deliver This Requirement Safely
- Make it optional to share personal stories in front of the group
- Consider using:
- Written journalling, with an opt-out
- Pair-sharing, with careful matching
- Generic scenario prompts (e.g., “Imagine being stuck in a storm…”)
- Affirm all contributions gently. Avoid over-spiritualising trauma or offering platitudes.
Suggested Statement to Read Before Activity: “In this activity, we’re thinking about what it means to trust God when life feels uncertain or scary. Some of us may have stories to share. You’re welcome to speak from personal experience—but only if you’re comfortable. You can also reflect using an imaginary or symbolic example. If anything we talk about brings up hard feelings, please let your leader know—we’re here to support you.”
Activity Suggestions for Trainers
- Shelter Meditation: After setting up a tarp shelter, have kids lie inside quietly and reflect on one verse. Ask them to write or draw how it feels to be “sheltered” by God.
- Roleplay Prayer: Ask campers to write or act out a short prayer from someone caught in a storm, trusting God even when scared.
- Visual Comparison: Show pictures of flimsy tarp setups vs. strong fortresses — then ask: “Is God more like a fortress or a tarp? Why?”
2a
| VERSE | THEME | NOTES |
|---|---|---|
| Psalm 91:1-2 | Refuge and Fortress | “He who dwells in the shelter of the Most High...” Classic verse about finding peace under God’s protection. |
| Isaiah 25:4 | Shelter from the storm | God protects like a tarp or shelter from intense wind and heat. |
| Psalm 61:4 | Shelter under His wings | Poetic image of God like a mother bird – protection, comfort, closeness. |
| Psalm 27:5 | Hidden in His shelter | Even in the day of trouble, God hides and lifts us up. |
| Proverbs 18:10 | Strong tower | God is a safe place; the righteous run to Him and are safe. |
| Matthew 8:24–27 | Jesus calms the storm | Even when overwhelmed by wind and waves, Jesus brings peace. |
| Deuteronomy 33:27 | Everlasting arms | “The eternal God is your refuge, and underneath are the everlasting arms.” |
| Psalm 46:1–3 | Refuge in trouble | Even when the earth gives way, God is our safe place. |
| 2 Corinthians 12:9 | Grace is sufficient | God’s strength covers us when we feel weak and exposed. |
| Hebrews 13:5–6 | Never leaves us | God is with us even when our surroundings are fragile. |
2b
Trainer Talking Points: Tarp Camping vs. Trust
Tarp camping often leaves us more exposed than a tent — there are no zippers, no walls, no floor. Just a thin sheet between you and wind, rain, or bugs. That physical exposure mirrors the emotional or spiritual vulnerability we sometimes feel in life.
Just like trusting a tarp to hold through the night, we sometimes have to trust God when everything feels shaky — not because everything is “comfortable,” but because God is constant.
Discussion Prompt:
“Can you think of a time you felt ‘barely covered’? Maybe life was hard, and all you had was prayer or a promise? What helped you trust God through that storm?”
Reflection Questions Use one or more of these in group discussion or journalling:
- Guide students to see the symbolic link between physical vulnerability and spiritual trust. Sometimes, we don’t have much, but God remains faithful.
2c
- This could be a real camping moment — or a metaphor for life. Let kids share moments of fear, challenge, or need. Reflect how God showed up.
2d
- Students may reflect on emotional support, spiritual assurance, peace in chaos — and how these are more valuable than material things.
2e
I will abide in Your tabernacle forever; I will trust in the shelter of Your wings. Selah
- Encourage creative answers: like a chick under a hen’s wings, or like a blanket on a cold night. Ask: “Is that image comforting or confronting?”
2f
- Comfort can fail. Even a tent can rip or leak. But trust in God’s character (His promises, presence, and plan) goes deeper than comfort.
3
Objective: Prioritise safety and awareness in tarp camping.
Four Safety Considerations:
- Site Selection: Avoid flood-prone, rocky, or sloped areas.
- Tree Safety: Check for widowmakers (dead branches).
- Ground Safety: Check surrounds for ant nests.
- Guyline Placement: Mark lines with flags or tape to prevent tripping.
- Fire Safety: Keep shelter away from campfires or sparks.
Demonstration Suggestions:
- Inspect a mock campsite and highlight risks.
4
| KNOT | USE |
|---|---|
| Taut-line Hitch | Adjustable tension for guylines (e.g., adjust tightness of tarp corners) |
| Bowline | Fixed loop for ridgeline or hammock end |
| Clove Hitch | Fast attach to pole/tree (good for cross beams) |
| Two Half Hitches | Secure line to stake or tree |
| Prusik Knot | Slide-and-hold loop on ridgeline (moveable attachment) |
| Truckie's Hitch | High-tension line setup – great for tarps needing tight pull |
| Alpine Butterfly | Mid-line loop – use for branch-off line or tension control in middle of rope |
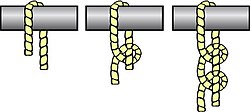
Taut-Line Hitch
Use: Adjustable tension for guylines (e.g., adjusting tarp corners or ridgelines)
How to Tie:
- Wrap the rope around a tent stake or tree.
- Take the working end and wrap it twice around the standing line, moving toward the stake.
- Then wrap it once around the standing line on the opposite side (away from the stake).
- Pull tight — it should slide but hold under tension.
When to Use:
Perfect for guylines where you want to slide and tighten the rope without retying the knot.
| Taut-line hitch |
|---|
|
Use: The Taut-Line Hitch is an adjustable loop knot for use on lines under tension. It is useful when the length of a line will need to be periodically adjusted in order to maintain tension. It is made by tying a Rolling hitch around the standing part after passing around an anchor object. Tension is maintained by sliding the hitch to adjust size of the loop, thus changing the effective length of the standing part without retying the knot. When under tension, however, the knot will grip the cord and will be difficult to cause to slip.
It is typically used for securing tent lines in outdoor activities involving camping, by arborists when climbing trees, for creating adjustable moorings in tidal areas, and to secure loads on vehicles. A versatile knot, the Taut-line hitch was even used by astronauts during STS-82, the second Space Shuttle mission to repair the Hubble Space Telescope. How to tie:
|
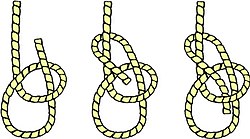
Bowline
Use: Secure fixed loop at the end of a rope (e.g., ridgeline attachment, hammock end loop)
How to Tie:
- Make a small loop (the “rabbit hole”) near the end of the rope.
- Take the tail (the “rabbit”) and go up through the hole, around the tree (standing line), then back down the hole.
- Hold the loop and pull tight.
When to Use:
A non-slipping loop that’s easy to untie — great for fixed anchor points on tarp ridgelines or hammock ends.
| Bowline |
|---|
|
Use: This knot doesn't jam or slip when tied properly. It can be tied around a person's waist and used to lift him, because the loop will not tighten under load. In sailing, the bowline is used to tie a halyard to a sail head.
How to tie:
|
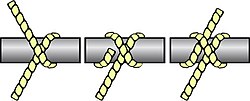
Clove Hitch
Use: Quick attachment to poles or trees (e.g., attaching cross-beams or securing tarp corners)
How to Tie Around a Pole:
- Wrap the rope around the pole once.
- Cross over the rope and wrap around the pole again above the first wrap.
- Tuck the working end under the second wrap and pull tight.
When to Use:
Fast and simple – great for temporary fixes or when you need adjustable length. Use with a toggle or for lightweight loads.
| Clove hitch |
|---|
|
Use: This knot is the "general utility" hitch for when you need a quick, simple method of fastening a rope around a post, spar or stake (like tying wicks to sticks in Candle Making) or another rope (as in Macramé)
How to tie:
|
Two Half Hitches
Use: Lock a rope to a stake, pole, or tree
How to Tie:
- Pass the rope around a stake or tree.
- Take the tail and form the first half hitch by looping it around the standing line.
- Repeat the same move to create a second half hitch.
- Pull snug – the knot slides into place and holds.
When to Use:
A strong, easy-to-tie knot for securing the end of a rope. Excellent for static corners of tarp setups.
| Two half hitches |
|---|
|
Use: This reliable knot is quickly tied and is the hitch most often used in mooring.
How to tie:
|
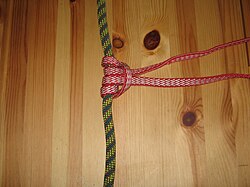
Prusik Knot
Use: Slide-and-grip knot on a ridgeline (for attaching tarp loops or gear)
How to Tie (requires a short loop of cord):
- Wrap the loop around the ridgeline.
- Pass the loop through itself at least three times (creating coils around the main line).
- Dress the knot so it’s neat and even, then pull tight.
When to Use:
Slides when pulled gently, but grips when loaded. Use for tarp tie-outs that can be adjusted and locked in place.
Truckie’s Hitch
Use: High-tension setup – ideal for taut tarps or ridgelines
How to Tie:
- Anchor one end of your rope to a fixed point (e.g., tree).
- A few feet down the line, make a loop (slip knot or alpine butterfly) in the rope.
- Run the working end around the second anchor point (e.g., another tree or stake).
- Thread the working end through the loop, creating a pulley system.
- Pull tight for mechanical advantage, then tie off with two half hitches.
When to Use:
Provides tension that’s hard to match. Use when you want drum-tight lines — especially in wind or rain.
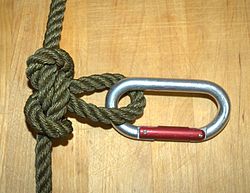
Alpine Butterfly Loop
Use: Create a strong fixed loop in the middle of a rope (e.g., add a guyline off the centre)
How to Tie:
- Wrap the rope around your palm three times.
- Take the middle loop, pass it over the front loop, under the back loop, and pull it through the centre.
- Dress the knot and pull tight.
When to Use:
Unlike other loop knots, this works in the middle of the rope and handles tension in multiple directions. Great for branching off guylines or adding mid-line tension.
| Alpine butterfly |
|---|
|
Use: The Butterfly Loop has a high breaking strength and is regarded by mountaineers as one of the strongest knots to attach climbers to the middle of a rope, such that they have room to move around even when the main rope goes tight, and they can be supported in either direction from the main rope. The loop is typically attached to a climbing harness by carabiner.
It can also be used to isolate a worn section of rope, where the knot is tied such that the worn section is used for the center of the loop.
|
Tips for Teaching Knots
- Practice with thicker rope first before moving to paracord.
- Use colour-coded lines to show working vs standing ends.
- Create a knot board with each tied knot labelled for review.
- Use story mnemonics (e.g., “The rabbit comes out of the hole” for bowline).
5
- A-frame – Simple, best for rain and privacy.
- Lean-to – Fast sun/wind block.
- Diamond – Minimalist, ideal over hammock or in tight space.
Explain when each is ideal and any drawbacks.
Objective: Teach foundational tarp configurations and their ideal use.
| SHELTER | DESCRIPTION | IDEAL FOR | DRAWBACK |
|---|---|---|---|
| A-frame | Suspended like a tent ridge | Rainy weather, privacy | Needs good ridgeline |
| Lean-to | Slanted open shelter | Blocking wind or sun | No floor, less rain cover |
| Diamond fly | Corner-tied tarp over point | Hammocks or solo tight spots | Exposed sides |
| Demonstrate: Use real trees, poles and allow Pathfinders to rotate through. | |||
See online resources for pitching instructions.
6
- C-fly – Sloped walls for rain/snow.
- Holden Tent – Enclosed, but open front for ventilation.
- Adirondack Windbreak – Great for fire-facing camp setup.
Use real or improvised materials — branches, hiking poles, etc.
Objective: Expose Pathfinders to advanced tarp setups.
Shelter Descriptions:
- C-fly: Like a wedge tent, wind and rain-resistant with angled pitch
- Half Cone Shelter: Floorless enclosed design with a centre rope support and front opening
- Adirondack Windbreak: Rear slope, open front for fire reflection
Use Real or Improvised Materials: Allow for creativity, even use bush materials.
See online resources for pitching instructions.
7
Objective: Combine hammock camping and tarp shelter techniques.
Steps:
- Choose safe tree distance (~4m)
- Use straps (not rope) to protect bark
- Hang hammock with ~30-degree angle
- Use ridgeline above hammock and suspend tarp
- Diamond tarp for coverage, drain angles
Discussion: Tarp keeps you dry; airflow prevents condensation; bug net optional
8
- Tarp (3x3 or 4x4m).
- Paracord or lines (at least 10–15m total).
- Stakes (or natural pegs).
- Pole(s), hiking sticks, or trees.
- Optional: hammock, bug net, groundsheet.
Set up your shelter in real or simulated conditions and spend at least 1 hour inside. Afterwards, evaluate stability, comfort, ventilation, and weatherproofing.
Objective: Test a complete tarp setup in a real-world or simulated environment.
Kit List:
- Tarp
- 10–15m paracord (multiple sections)
- 4+ pegs
- Groundsheet or mat
- Optional: hammock, poles, bug net
Evaluation Points:
- Is tarp taut?
- Water flow off roof?
- Comfortable and dry?
- Ventilation?
9
- Guide them step-by-step.
- Encourage experimentation.
- Check tension and staking.
- Share one personal tip or mistake you’ve learned from (e.g., stake direction matters, ridgeline sag, wet ground issues).
Objective: Encourage leadership and mentoring.
Teaching Tips:
- Let the younger Pathfinder do the hands-on work
- Correct gently
- Use questions: “What do you notice about the tension?”
- Share your tip: e.g., “I used to tie ridgelines too low and ended up in a puddle
References
