AY Honor Wood Carving Answer Key
1
The hard woods are oak, beech, birch, maple, walnut, ash, hickory, all of which belong to the broad leaf variety of trees. The soft woods are pine, spruce, hemlock, cedar, cypress, which belong to the "coniferous" or cone-bearing family. The hard woods are on an average two or three times as hard as the others, but some of the so-called hard woods are really quite soft, and vice versa.
Softwoods are easier to carve, but hardwoods hold detail better and are stronger. If you can manage it, hardwoods are therefore a better choice, but softwoods are very good for beginners. Some of the best carving woods, in order of hardness are basswood,tupelo (power carving), butternut, hounduras mohagony, and walnut.
2
Knife
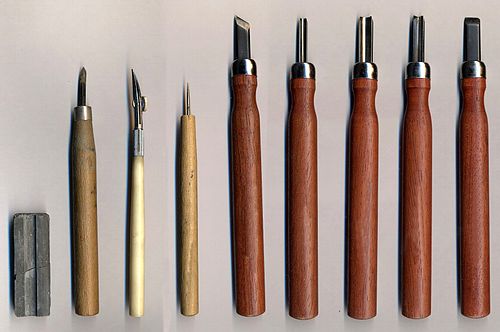
The primary tool for wood carving is a carving knife. You can use a pocket knife as well, and many people do. To sharpen a knife, hold the blade at about a 15° angle and scrape it along a whetstone as if you were trying to shave off a thin layer of the stone. Be sure to sharpen both sides.
Chisel
A chisel is best used with a mallet. Chisels can be used for removing great quantities of wood. They can cut across the grain or slice along its length. Chisels are sharpened much the same way as knives, but the angle is a bit steeper, ranging from 20° to 35°. Often, they are sharpened at two angles, such as 25° for most of the length of the blade, and 35° near the edge. This allows the blade to be resharpened by only honing a small portion near the cutting edge.
Gouge
A gouge is a chisel with a curved blade. If pushed along a piece of wood, it would plow out a U-shaped channel. Gouges are sharpened with a slipstone, which is a whetstone with a curved edge.
Coping saw
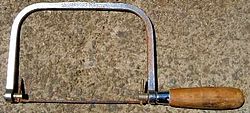
Coping saws are very useful for removing bulk. A carving can often be roughed in with a coping saw, and once the shape is cut out, knives, chisels, and gouges can be used to clean it up and do the final shaping. Coping saw blades can be sharpened with a triangle file, though they are cheap enough that they ore more frequently replaced when dull.
The blade can be installed on the coping saw so that it cuts on either the pull stroke or the push stroke. Experiment to see which you like better. To make a cut, clamp the piece to a bench or hold it firmly with your free hand or knee. Align the blade with the pencil mark you have made which will guide the cut. Gently work the saw up and down to make the cut. You may have difficulty at first, and this does take a little practice to master. But once you have it down, it is not all that difficult. Follow the line until the cut is complete.
3
Wood is very much like a bundle of straws glued together with a weak adhesive. It is easy to separate the straws from one another, but more difficult to break the straws. The woodcarver needs to keep this in mind as the piece is designed. For instance, if carving an animal, the grain (or "straws" in our analogy) needs to run in the same direction as the legs. Otherwise, the legs will easily break off.
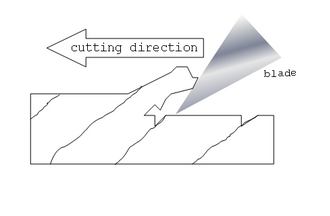
Another aspect of grain that needs careful consideration is how to work a blade along the wood with respect to it. If the grain dives into the piece, the blade must cut in the direction in which the grain runs out of the piece rather than in the direction in which the grain runs in. See the illustration.
4
Low relief, also known as Bas (pronounced bah)-relief is a method of sculpture which entails carving away the surface of a flat piece of wood creating a picture.
The portrayed image is raised above the background flat surface so that for a piece of wood one inch thick the non-image (background) area may be a half inch thick when the art work has been completed, and the image area will vary from one half to one inch.
As simple tool can be constructed to help smooth out the background. It consists of a handle made from a piece of wood about 3/4"x3/4"x10" with a wood screw set into its center, but not fully seated. If the background is a quarter inch lower than the foreground, the screw would be set one quarter inch above the surface of the handle. The top of the screw is then filed so that the edges of the screwhead are sharpened. Then the carver removes the wood covering the background in the carving, but it is best to leave a border around the edges. Then the tool is used to smooth out the background with the handle riding along the raised border. Once the background is smoothed, the carver can turn his or her attention to the foreground, shaping and smoothing it as desired.
5
5a
To make a whistle, you will need a block of softwood, a dowel, and a drill bit that is the same diameter as the dowel. Drill a hole into the end of the block of wood. The hole can go all the way through, or it can stop before it exits the other side. Then cut a notch (C in the diagram) in the top of this piece such that it exposes the hole that was just bored. This notch should be about 4 cm![]() from the end. It needs to be vertical nearest the mouth end and slanted on the other side.
from the end. It needs to be vertical nearest the mouth end and slanted on the other side.
Shave one edge of the dowel (A) flat to make the airway (B), and cut off a section of the dowel such that its length is the same as the distance from the notch to the mouth end. Insert the dowel into the bored hole with the airway towards the notch to test the fit. At this point blowing into the whistle should produce a tone (try it). If it does not produce a tone, review the diagram and try to figure out what went wrong. One possibility is that the pitch is too high for the human ear. You can adjust the tone by making the hole go deeper into the wood (unless it already goes all the way through). When the tone is satisfactory, remove the dowel, apply some glue, and reinsert. When the glue dries shape the mouthpiece as desired and carve your design on the outside.
5b
A letter opener is really nothing more than a wooden knife. Make it as fancy as you like.
5c
A tray can be made by joining four narrow pieces of wood at the ends using box joints or dovetail joints. A slot should be milled near the bottom edge of these boards so that it can receive a tray bottom. The tray bottom can be cut from eighth-inch luan or some other thin plywood or mason board. The bottom piece should not be glued - allow it to float in the joint so that the tray does not crack when it contracts and expands as the temperature and humidity vary. Assemble three of the sides, then slip the bottom into the slots and add the fourth side. Glue the corner joints. Once the tray is assembled, you can carve the sides as you please.
5d
Bookends can be carved from two short sections of 4"x4" lumber, but make sure it is not pressure treated. Cut off two sections 4 to 6 inches long, making sure the cut is square. The end grain of this cut will be the bottom of the bookend. Most commercial 4x4 lumber will be softwood, so if you want hardwood, you will have to look a little harder. If you cannot find a hardwood 4x4, you can make one from smaller pieces of stock by laminating them (that is, gluing several pieces together). Make it interesting by laminating both dark and light-colored species of wood. You can also use chunks of firewood. If you use firewood, you will need to plane one surface and saw another flat. The sawn surface will serve as the bottom, and the planed surface will support the books.
Once you have two flat surfaces that form a 90° angle, sketch your design on the wood and rough it out with a saw, chisels, gouges or all of the above. As the carving takes shape, use finer tools until the piece is ready to take a finish such as paint or varnish. If your tools are sharp, you should not need to sand the piece before finishing. Sanding poses the danger of removing detail from the carving and should be considered carefully before attempting.
5e
A clock case need not be any more than a board with a clock movement attached. Carve your design into the face of the board in low-relief. Clock movements can be bought at most hobby and craft stores. Buy the clock movement, drill any necessary holes, and make sure the movement fits before you start carving though. It would be a shame to destroy a work of art by accidentally drilling a hole in the wrong place, or finding that you must remove part of the artwork to fit the clock in place. Once the movement has been mounted on the blank case and you see that it fits, remove it and set it aside. You don't need the hassle of carving around the clock hands.
5f
As an honor instructor, it will be your responsibility to vet alternative designs proposed by your Pathfinders. Be on the lookout for over-ambitious designs, but be careful not to quash your Pathfinder's spirit. Offer suggestions to make the project attainable.
