Difference between revisions of "AY Honors/Woodworking/Answer Key"
m (→Dovetail) |
|||
| Line 122: | Line 122: | ||
=== Mortise and Tenon === | === Mortise and Tenon === | ||
| − | [[Image: | + | [[Image:Mortise_and_tenon.png|right|Mortise and Tenon]] |
From Wikipedia, the free encyclopedia. | From Wikipedia, the free encyclopedia. | ||
Revision as of 21:32, 23 November 2005
Woodworking
Growing Trees
Harvesting of Trees
Milling
Curing
Seasoning
Grading
Sizing
Collect and label five different kinds of wood used in woodworking. Tell the advantages and disadvantages of each.
Pine Pine is the most commonly available wood in North America. Its primary advantage is that it is relatively cheap. This is because is grows rather quickly. Another characteristic of pine is that it is soft. This can be both an advantage and a disadvantage. The advantage of a soft wood is that it is easy to work. The disadvantage is that it can break easily; delicate joinery that works fine in hardwoods will not hold up in pine.
Oak Oak is a very common hardwood. It is a tough wood that holds up well when stressed. It was often used in shipbuilding because of this touchness. Additionally, oak is fairly workable up until it is seasoned. Seasoned oak is very hard, which makes it difficult to cut, bore, plane or drive a nail through. This is an advantage in the finished product, but a disadvantage when trying to make something. When using oak, it is best to use unseasoned wood, and let it season once the object has been made.
Maple Maple is a light colored wood that can be found with highly figured grain. Figured grain is difficult to work with, but makes for a beautiful piece of furniture. Maple is also great for toy making because it does not easily splinter and stands up well to the abuse of even the most destructive of children. Maple is also commonly available, and thus, is relatively cheap for a hardwood.
Walnut Walnut is a dark hardwood. Its color is one of its chief advantages, and is probably wood most often "copied" by staining lighter, cheaper woods. Walnut also has figured grain and is fairly hard. It holds detail well, so it can be used in making intricate joints. It is also relatively expensive for a native hardwood.
Cherry Cherry is another hardwood that is commonly used in furniture making. Its color starts off as a medium brown and then slowly turns to a dark, beautiful reddish hue over time. It takes a nice finish, and has no need for stain. It is a little cheaper than walnut, but still fairly expensive.
Poplar Poplar is classfied as a hardwood, but it is relatively soft (though still harder than pine). Because of its softness, it is easy to work.
Elm Elm is a hardwood that is highly resistant to splitting. Because if this, it was the only wood used to make the hubs of wooden wagon wheels. It has a highly figured grain that entwines, and tangles itself in all directions - this is what makes it so difficult to split, but it also makes it difficult to plane.
List the basic hand and power tools necessary to do woodworking. Know how to safely use each tool and how to keep it in proper working order, including sharpening, if applicable.
Technically, no power tools are necessary for woodworking - everything can be done with handtools. Power tools can certainly make the job easier, but they are a relatively recent tool to arrive on the woodworking scene.
Handsaws
Handsaws come in many varieties, including the crosscut saw, rip saw, coping saw, tenon saw, backsaw, and dovetail saw. Each has its own special use. A crosscut saw is used for cutting across the grain of a piece of lumber. A rip saw is used for cutting along the grain. A coping saw is used for making curved cuts. A tenon saw is used for cutting tenons and other fine work. A backsaw is commonly used with a miter box and for small cutting jobs. A dovetail saw is used for cutting dovetail joints.
To use a crosscut or a rip saw, place the board on a supported surface at thigh-height (between the knee and hips). Grip the saw with the right hand (assuming right-handedness) and use the left knee to hold the board in place. Align the right shoulder, arm, and hand so that they are in line with the cut to be made. Begin with light strokes, noting that the saw cuts on the push stroke. As the cut progresses, keep an eye on the line, pulling the blade toward it. If this is to be a "finished" cut, you can score a "V" along the line first with a carton knife, and let the blade ride in the V groove. Score another line along the bottom of the board to prevent tear-out.
A saw is sharpened with a triangle file. The teeth of a rip saw (which cuts along the grain) are sharpened perpendicular to the blade. The teeth of crosscut saw are sharpened at an angle. Try to match the angle already ground into the teeth.
Maintain your saws by keeping them dry and sharp. Many tools (including saws) can be kept in great condition by wiping them down with a cloth and oil (or WD40) after each use. Coping saw blades can be obtained cheaply enough that it is easier to replace them than it is to sharpen them.
Chisels
Chisels can be used for making a variety of cuts in wood, from mortice and tenon joints to dovetail joints. They are often struck with a mallet or a hammer, but sometimes they are pushed by hand (watch for fingers!) to pare a joint or to smooth it.
To cut a mortice, choose a chisel that is as wide as the desired mortice. Motices should only be cut so that they are parallel to the grain of the wood. Mark the mortice out, and then place the chisel perpendicular to the grain, such that it covers the width of the mortice. Strike it with the mallet. Then move the chisel about an eight of an inch farther down the mortice and repeat. Each "bite" of the chisel will go a little deeper. When you get to the end of the mortice, reverse the chisel and take bits in the other direction (still perpendicular to the grain, but heading back toward the other end of the mortice). Continue until the mortice reaches the desired depth. Always cut the mortice first, and then size the tenon to fit.
To sharpen a chisel, hold it at a steady angle and drag it along a whet stone. If you use a grinder, be careful to not overheat the tip of the chisel as this will cause it to lose its tempering. It is better to sharpen them by hand with a whet stone, as it is very easy to overheat the blade with a grinder.
Store chisels in a way that will protect the cutting edge, either by covering them, or placing the edge where it will not come into contact with anything of equal (or greater) hardness than the blade. Like saws, chisels can be wiped down with cloth and oil to keep rust away.
Hand Planes
(Some material taken from the Wikipedia)
A hand plane is a tool for shaping wood. Planes are used to flatten, reduce the thickness of, and impart a smooth surface to a rough piece of lumber.
Hand Planes are one of the most satisfying tools to operate. Clamp the wood securely to a bench, and then push the plane along the grain. The blade should be adjusted so that it takes a thin shaving off the plank. The goal is to remove a continuous shaving the entire length of the board. Pay attention to how the grain runs - if it dives into the board, make sure the plane's blade does not try to pull it out. Doing so can ruin a board.
Once the blade has been removed from a plane, it can be sharpened in the same fashion as a chisel. It should be sharpened frequently, as this will greatly improve its performance.
A plane should be stored on its side to respect the blade.
Clamps
Clamps come in many varieties, from C-clamps to furniture clamps to bench dogs. Some say that it is nearly impossible to own too many C-clamps. When using a C-clamp in wood working be careful to not overtighten it. The clamping surface can easily leave a circular impression on the wood. If you need to get it really tight, place a piece of scrap between the clamping surface and your piece.
Furniture clamps (also called bar clamps) often have padded clamping surfaces, so making unwanted impressions on the wood is avoided. These are used for clamping large boards together, usually edge-to-edge.
Bench dogs are pieces of iron shaped like the number 7. The vertical portion of the clamp is inserted into a hole in a woodworker's bench, while the horizontal part is positioned over the piece. Then the top of the clamp is struck with a mallet. The clamp gets wedged into the hole, and the board will be held firmly in place for cutting or planing.
All clamps can be periodically wiped down with a cloth and oil to keep rust at bay.
Drills, Bits, and Braces
Drills, Bits, and Braces are used for boring holes in wood. A brace and bit is the "old-style" cordless drill. It is hand-powered. The brace holds the bit, and the woodworker's hand cranks it, inducing a rotation in the bit. To drill a clean hole with either a brace and bit or a drill and bit, hold the bit perpendicular to the board and start drilling. You can start a pilot hole with a nail or a punch first to keep the bit from wandering. There are two ways to prevent tear-out when boring a hole. The first method is to support the board and drill into the supporting material. For this to work, the board and its support must be firmly clamped together. The second method can be used if you have a bit with a point that is much narrower than the hole's diameter (such as a spade bit, a brad-point bit, or a bit with a screw-lead). Using such a bit, drill through the material until the tip comes through the other side. Then turn the board over and place the bit in this hole. Continue drilling toward the center.
Power Tools
Power Tools should be used with much care. It is difficult to cut a finger off with a hand saw, but a power saw can do this in an instant, and before the careless operator even feels any pain, a severed finger can drop to the floor. Power tools can greatly speed production of wood projects though, so it's certainly worth having them around. Read the owner's manual carefully before operating any piece of power equipment. Pay special attention to safety features, and do not try to defeat them! Pathfinders below the age of 16 should not use power tools. Remember, power tools are not required for woodworking, they only speed it along.
Explain the following joints:
Butt
A butt joint is the simplest of all joints, formed by butting two peices of wood and then joining them. But because glue will not hold to end grain, it is a joint that must be held together by mechanical fasteners such as nails or screws.
Dado and groove
A dado and groove joint is formed by milling a slot (or dado) in one board, and inserting another board into that slot. The width of the dado should be equal to the width of the board that will be inserted into it. The dado is an excellent joint for joining plywood shelves to the upright sides of a bookcase. In this case, the dado should be cut into the side, and the shelf should be inserted into the dado. Such a shelf will support a lot of weight without relying on the strength of a mechanical fastener. A butt joint would likely fail in this situation, with the nail or screw splitting out the top of the shelf.
The dado can also be used in regular lumber as long as the dado runs along the grain - otherwise, any glue used to secure the joint would have to adhere to the endgrain. Plywood presents alternating layers of endgrain and straight grain to all three surfaces of the dado, and there is generally enough straight grain in the joint that gluing it works well. Dado and groove joints can be held together with mechanical fasteners (nails or screws), or without them (assuming enough non-endgrain surfaces in the joint).
Dovetail
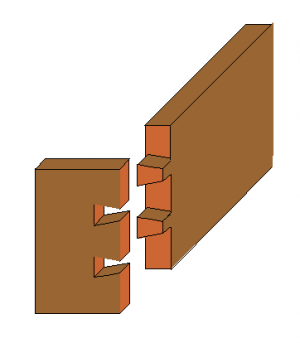
A dovetail joint is made by making "tails" in one peice of wood, and "pins" in the other. In the diagram here, the tails are made in the board on the left, and the pins are made in the board on the right. This joint is very strong and will only pull apart in one direction. It is often used for making drawers and boxes. When making a drawer, the pins are cut in the drawer front, and the tails are cut into the drawer sides. This will prevent the joint from pulling apart when the drawer is opened. A drawer facing is then glued to the front to hide the joint, or the joint can be modified to hide them inherently (these are called "blind dovetails").
To make the joint, cut the tails first. Lay them out with a bevel guage, and saw from the edge to the line. Remove the waste with a chisel. Then lay this board on top of the board that will have the pins and line them up. Mark the pins with a knife. Then saw the pins with a dovetail saw (or a backsaw). The waste on either side of the pins can be removed with a saw. The waste between the pins can be removed with a chisel or with a coping saw. Assemble the joint to test it for fit, and pare the joint with a chisle if necessary.
In the illustration, the endgrain is colored orange. When gluing a dovetail joint, don't bother applying any glue to the endgrain surfaces. Note that the top surface of the pins (brown) are not endgrain, nor are the surfaces they mate to on the tails.
Dowel
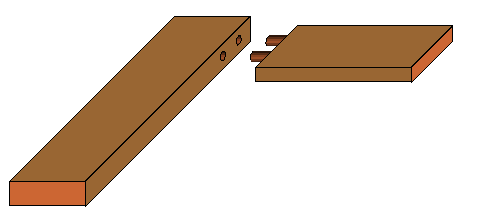
A dowel joint is formed by drilling holes in the two pieces to be joined, and inserting dowels (small wooden rods) into these holes. The dowels are coated with glue prior to insertion. This is most commonly done with butt joints and miter joints, as the addition of the dowel greatly increases their strength by providing gluable surfaces to the joint.
The most difficult aspect of making a dowel joint is lining the holes up on the two pieces of wood and making sure that the holes go in at a 90 degree angle. This can be done more easily with the aid of a dowelling jig. A dowelling jig resembles a clamp with a guide hole drilled into it. It is clamped to the board which will eventually accept the dowel, and the hole is drilled by inserting the bit into the guide. A dowelling jig will ensure that the hole is drilled at a consistent distance from the board's facing edge and that it is made at a 90 degree angle. The woodworker is still requried to ensure that when multiple holes are used (recommened to prevent the joint from twisting), they are drilled the same distance apart.
Lap
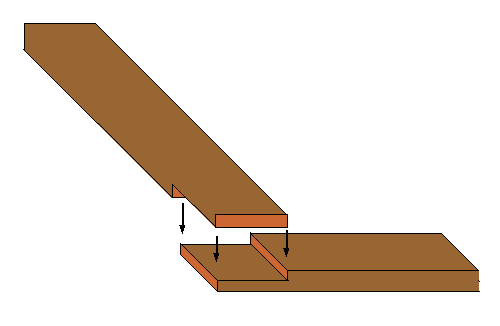
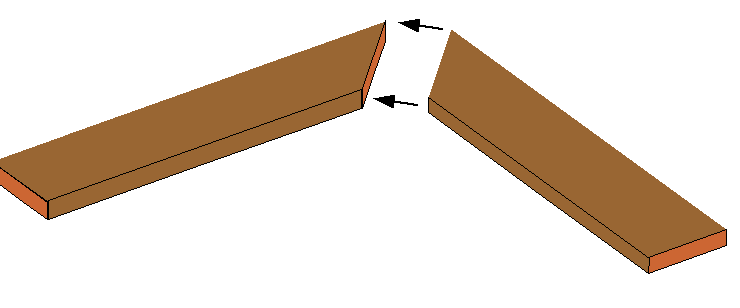
A lap joint is made by overlapping two boards. Wood is removed from the joint so that each board contributes about half of the wood in the joint. Lap joints can be made to join boards at a 90 degree angle (as shown), no angle at all (that is, splice two boards into a longer one), or the two boards can form a cross. This joint is ideal when you need to bring two boards together but keep them in the same plane. It is very strong even without mechanical fasteners as there is a lot of gluable surface area in the joint.
The laps can be cut with either a saw, or a with a saw and a chisel. Large lap joints should be cut with only a saw, but they can be trimmed with a chisel. A dovetail saw or a backsaw works well for both cuts.
Miter
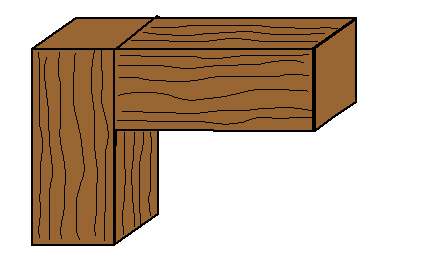
A 90 degree miter joint is formed by cutting the two boards at a 45 degree angle and joining them. The choice of a miter joint is purely asthetic. Miter joints are easy to cut with a power miter saw, but difficult to cut by hand. A miter box can help, but the angle of the cut must be very nearly perfect, or the joint will either not be 90 degrees, or it will show a gap. The gap can be eliminated by "kerfing in" the joint. Kerfing in a joint is done by clamping the two pieces together and then running a fine-toothed handsaw down the joint. Ideally, the saw should remove wood from both pieces. This procedure can be repeated until the woodworker is happy with the fit, but keep in mind that every time this procedure is performed, the board gets a little shorter. For this reason, it is best to cut the miter joint first, and then cut the piece to length. If both ends of the board are to be mitered, the board should be cut a little long and then tuned to length by kerfing it in.
Miter joints must be reinforced or they will not hold (once again, endgrain comes into play). Usually the pieces are fastened to some underlying structure so that the miter joint is not subjected to stress, nor is it relied upon for structural integrity. In other cases, the joint itself can be reinforced using dowels (as in a dowel joint) or some similar mechanism.
Mortise and Tenon
From Wikipedia, the free encyclopedia.
Simple and strong, the mortise and tenon joint (also called the mortice and tenon) has been used for millennia by woodworkers around the world to join two pieces of wood, most often at an angle close to 90°. Although there are many variations on the theme, the basic idea is that end of one of the members is inserted into a hole cut in the other member. The end of the first member is called the tenon, and it is usually narrowed with respect to the rest of the piece. The hole in the second member is called the mortise. The joint may be glued, pinned, or wedged to lock it in place.
The mortise is usually cut first, and its width is equal to the width of the chisel used to cut it (see the section on chisels). The tenon is then sized to fit the mortise, and it is cut with a tenon saw, dovetail saw, or backsaw. The first cuts are made along the grain and are called the cheek cuts. The final cuts are made across the grain and are called the shoulder cuts. The tenon can be trimmed with a chisel to tune the fit.
Rabbet
Know the characterstics of and how to work with the following:
Hardboard
Particle Board
Plywood
Know at least two ways to finish the edges of plywood.
Plywood is made by gluing multiple, thin sheets of wood together to form a thicker piece. The grain in each layer is alternated, so that it changes direction on every layer. This gives the wood much greater stability. Normally, wood will expand across the grain when subjected to different temperatures and especially humidities. By alternating the direction of grain, plywood does not suffer from uneven expansion to the same extent that regular lumber does.
Unfortunately, some layers often have knots in them, and the knots fall out before the layers are glued together. This leaves a void. In furniture-grade plywood these voids will be confined to the inner layers. In order to finish the edge of plywood, you can either fill these voids with a wood putty, or you can cover the edges with a band of material - typically, a veneer or a thin strip of wood. Some veneers are made expressly for this purpopse, and they come with an adhesive on one side. By heating the veneer, the adhesive is activated. When it cools, the adhesive bonds to the edge of the plywood. If you plan to use a natural finish, banding works best, because wood putties and wood tend to take natural finished unevenly. Either method can be used if you plan to finish with paint.
Demonstrate the proper technique of gluing and clamping wood.
The first rule of gluing wood joints is that glue does not stick to end-grain. Most woodworking joints were in fact designed to avoid the application of glue to an end-grain surface. Evaluate your joint first, and find two non end-grain surfaces that will come into contact. After making a test fit, apply glue to one of these surfaces. Spread the glue in a thin layer, being careful to not use too much glue. Then clamp the two peices together. Use enough clamping pressure so that the peices are held firmly together, but do not use so much force that all the glue is squeezed out of the joint. Once clamped, the pieces should be left alone until the glue sets. Setting times vary from one glue to the next, so read the instructions on the glue container.
