Difference between revisions of "AY Honors/Metal Craft/Answer Key"
| Line 11: | Line 11: | ||
==2. Complete one project using metal foil tooling. Complete the project by antiquing and framing. == | ==2. Complete one project using metal foil tooling. Complete the project by antiquing and framing. == | ||
| + | Metal foil tooling is done by placing a piece of foil on top of a soft but firm surface and then making impressions with a stylus. The work surface can be a piece of scrap linoleum, leather, or crafting foam. The stylus is often a small wooden stick with a point on it, but you can also use a ballpoint pen or a pencil. A dowel about the same diameter as a pencil can be sharpened with a pencil sharpener to make an effective stylus. | ||
| + | |||
| + | The metal crafter can place a drawing on top of the foil and trace it with the stylus, or draw the design free hand. Once the image has been impressed in the foil, it can be placed in a frame. You can use something as elaborate as a picture frame, or as simple as craft sticks glued together. | ||
| + | |||
| + | Low cost kits are available with all the necessary materials at craft stores, hobby shops, and online retailers. | ||
| + | |||
==3. Complete one project using metal punch. == | ==3. Complete one project using metal punch. == | ||
==4. Complete one project using drilling, riveting, and bending of metal such as a simple candle holder. == | ==4. Complete one project using drilling, riveting, and bending of metal such as a simple candle holder. == | ||
Revision as of 03:25, 7 December 2007
1. Name the various metals that can be used in metal craft.
Metals suitable for use in metal craft include:
- Tin
- Aluminum
- Copper
- Galvanized steel (duct work)
- Brass (an alloy of copper and zinc)
- Bronze (an alloy of copper and tin)
- Silver and gold (especially in foil form)
2. Complete one project using metal foil tooling. Complete the project by antiquing and framing.
Metal foil tooling is done by placing a piece of foil on top of a soft but firm surface and then making impressions with a stylus. The work surface can be a piece of scrap linoleum, leather, or crafting foam. The stylus is often a small wooden stick with a point on it, but you can also use a ballpoint pen or a pencil. A dowel about the same diameter as a pencil can be sharpened with a pencil sharpener to make an effective stylus.
The metal crafter can place a drawing on top of the foil and trace it with the stylus, or draw the design free hand. Once the image has been impressed in the foil, it can be placed in a frame. You can use something as elaborate as a picture frame, or as simple as craft sticks glued together.
Low cost kits are available with all the necessary materials at craft stores, hobby shops, and online retailers.
3. Complete one project using metal punch.
4. Complete one project using drilling, riveting, and bending of metal such as a simple candle holder.
5. Demonstrate properly the use of the following:
a. Tin Snips
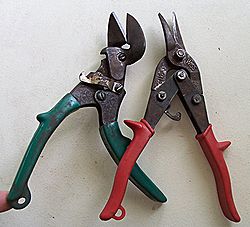
Tin snips are tools used to cut thin sheet metal. They use the same principles as common scissors, but are able to handle thicker and harder material. There are three different types of tin snips; straight cutting, left cutting, and right cutting. Straight cutting in a straight line, left cutting snips (usually red) will cut in a curve to the left, and right cutting snips (usually green) will cut in a curve to the right.
In practical use the red snips pictured will be used in the right hand, for straight or curving cuts, with the base material to the right being cut neatly and the left hand will be pulling away a spiraling offcut. The green snips work in the opposite fashion in the left hand, with the waste being on the right.

