Difference between revisions of "AY Honors/Carpentry/Answer Key"
(→Siding) |
|||
| Line 61: | Line 61: | ||
=== Circular Saw (cut a straight line) === | === Circular Saw (cut a straight line) === | ||
'''Note: Participants must be at least 16 years old to use power tools''' | '''Note: Participants must be at least 16 years old to use power tools''' | ||
| + | It is vitally important that you describe the dangers involved in using a circular saw before you turn them loose on one. It is very easy to cut off a finger or cause an even more serious injury with one of these. If your Pathfinders are a little scared (not pertified) of this tool, that's a good thing. One should ''never'' get too comfortable with dangerous equipment. | ||
| + | |||
| + | Make sure the lumber is well supported before attempting to cut it, and make sure that you closely supervise the use of this tool. | ||
=== Framing Square === | === Framing Square === | ||
Revision as of 04:20, 13 July 2006
Carpentry
1. Describe the function of the following tools:
- Bandsaw.jpg
Heavy Duty Bandsaw
Band Saw
A band saw is a saw that can be used for woodworking, metal working, and a variety of other materials. It gets its name from its blade, consisting of a narrow band of toothed metal. This band rides on two large wheels stacked vertically with a space between them. Band saws are particularly useful for cutting irregular shapes. The radius of a curve that can be cut on a particular saw is determined by the width of the band.
Belt Sander
A belt sander is a machine used to quickly sand down wood and other materials for finishing purposes. It consists of a motor that turns a pair of drums on which a seamless loop of sandpaper is mounted. Belt sanders can be either hand-held, where the sander is moved over the material, or stationary (fixed), where the material is moved to the sanding belt. Stationary belt sanders are often combined with a disc sander.
Belt sanders can have a very aggressive action on wood and are normally used only for the beginning stages of the sanding process, or used to rapidly remove material.
Jig Saw
A jigsaw (also called saber saw or sabre saw) is a type of saw used for cutting arbitrary curves, such as stenciled designs or other custom shapes, into a piece of wood or similar material. It is usually used in a more artistic fashion than other saws, which only cut in straight lines and exist mainly to chop pieces of wood to length for building structure. The first jigsaw puzzles were made using this kind of saw.
Traditional jigsaws are hand saws, consisting of a handle attached to a small, thin blade. More modern jigsaws are power tools, made up f a motor and a reciprocating saw blade.
Miter Saw
Today, a miter saw (also called a chop saw or drop saw) usually refers to a power tool used to make a quick, accurate crosscut in a workpiece. It is most frequently used to cut wood, although some plastics and light metals can also be cut with the tool. Common uses include framing operations and the cutting moulding. Most miter saws are relatively small and portable, with common blade sizes ranging from eight to 12 inches.
The miter saw makes cuts by pulling a spinning circular saw blade down onto a workpiece in a short, controlled motion. The workpiece is typically held against a fence, which provides a precise cutting angle between the blade and the longest workpiece edge. In standard position, this angle is fixed at 90°.
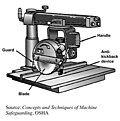
Radial Arm Saw
A radial arm saw is a machine intended for cutting materials to length. It is primarily a woodworking machine, although it is sometimes used for cutting metals, such as angle iron or aluminum extrusions. Before the advent of the radial arm saw, table saws and hand saws were most commonly used for crosscutting lumber. Table saws are ideal for ripping stock, but it is awkward to push a long piece of stock widthwise through a table saw blade. When a radial arm saw is used, the stock remains stationary on the saw's table and the blade is pulled through the stock.
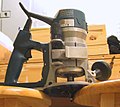
Router
A router is a woodworking tool used to route out (hollow out) an area in the face of a piece of wood. It was a tool particularly used by pattern makers and consisted of a broad-based wooden hand plane with a narrow blade projecting well beyond its base plate. Since about 1960, it has been replaced by the modern spindle router, which was designed for the same work. Further refinement has produced the even more recent plunging spindle router, which is even better adapted for many types of work.
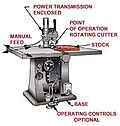
Shaper
A wood shaper is a stationary woodworking machine in which a spindle spins at moderately high speeds. Specially shaped bits are mounted on the spindle. As the workpiece is fed into the machine, the bit cuts a profile into it. On some shapers, router bits can also be used using a special mounting adapter.
Wood shapers do essentially the same job as the router table, with the main difference being that a wood shaper is a stationary machine designed for larger volume work while a router table is a hand tool for lighter duty work. Routers can also be mounted on a router table, and used as a stationary tool. However, routers run at considerably higher speeds than shapers, and the use of large bits can be dangerous. Also, shapers can be used to cut much larger profiles than routers and custom-made shaper bits can be readily ordered or fabricated.
2. Demonstrate how to use the following tools:
- PlumbBob.jpg
Plumb Bob
Block Plane
A block plane is designed to cut end grain and is typically small enough to be used with one hand. To use it, securely clamp the piece to be planed to a solid object (ideally, a work bench). Then pass the plane's sole across the endgrain you are trying to smooth. The blade can be adjusted, and it is best to set it such that the blade barely protrudes out of the bottom of the plane. Adjust it so that it takes very thin shavings. If no wood is removed, let the blade out a little more.
Circular Saw (cut a straight line)
Note: Participants must be at least 16 years old to use power tools It is vitally important that you describe the dangers involved in using a circular saw before you turn them loose on one. It is very easy to cut off a finger or cause an even more serious injury with one of these. If your Pathfinders are a little scared (not pertified) of this tool, that's a good thing. One should never get too comfortable with dangerous equipment.
Make sure the lumber is well supported before attempting to cut it, and make sure that you closely supervise the use of this tool.
Framing Square
A framing square is used to make sure that an angle is 90°. Place the corner of the square next to the angle you wish to check, and adjust the angle until it lines up with the square. To check that the square itself is square, mark a straight line and place one edge of the square along this line. Then mark another line along the other edge of the square, intersecting the first line near the center of its length. Finally flip the square and see if the other side of the first line and the second line form also a 90° angle.
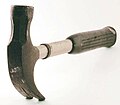
Hammer
Grip the hammer near the end of the handle opposite the hammer's head. Many people grip the handle near the hammer's head, but this is incorrect. When driving a nail, the hammer must be maneuvered so that its flat face strikes the nail's head at a right angle to the nail's axis, with the head moving parallel to that axis. Failure to achieve either condition will result in a sideways force on the nail's head, that may bend it. Also, one should relax the muscles of the hand and arm momentarily when the hammer strikes.
Hand Saw (cut a straight line)
Handsaws are tools used for cutting wood. Handsaws come in many varieties, including the crosscut saw, rip saw, coping saw, tenon saw, backsaw, and dovetail saw. Each has its own special use. A crosscut saw is used for cutting across the grain of a piece of lumber. A rip saw is used for cutting along the grain. A coping saw is used for making curved cuts. A tenon saw is used for cutting tenons and other fine work. A backsaw is commonly used with a miter box and for small cutting jobs. A dovetail saw is used for cutting dovetail joints.
To use a crosscut or a rip saw, place the board on a supported surface at thigh-height (between the knee and hips). Grip the saw with the right hand (assuming right-handedness) and use the left knee to hold the board in place. Align the right shoulder, arm, and hand so that they are in line with the cut to be made. Begin with light strokes, noting that the saw cuts on the push stroke. As the cut progresses, keep an eye on the line, pulling the blade toward it. If this is to be a "finished" cut, you can score a "V" along the line first with a carton knife, and let the blade ride in the V groove. Score another line along the bottom of the board to prevent tear-out.
Maintain your saws by keeping them dry and sharp. Many tools (including saws) can be kept in great condition by wiping them down with a cloth and oil (or WD40) after each use.
Level
A level is a tool designed to indicate whether a surface is level or plumb. A level surface has no tilt to it, so that liquid would pool up on the surface rather than run off. A plumb surface is straight up and down. Ideally, you want your floors to be level and your walls to be plumb.
Most levels have two bubbles on them - one for checking levelness, and the other for checking plumbness. To use the level, lay its edge on the surface you wish the check. Embedded in the middle of the level is a small window where the bubble and the tube is mounted. Two rings designate where the bubble would be if the surface were level (or plumb). If the bubble is not centered between these two rings, the surface is not level. Lift one edge of the level off the surface to see how far you have to move it in order to move the bubble between the lines. This will give you an indicator of how much correction is required to make the surface level. Adjust and remeasure, repeating until the surface is level.
Measuring Tape
A measuring tape is more commonly known as a "tape measure." It is used for measuring the length of an item. There is a metal tape curled into a spiral inside the enclosure, and attached to a spring. When the tape is pulled out of the enclosure, the spiral unwinds and the spring is tensed. When the tape is released, the spring draws it back into the enclosure. A hook on the end of the tape prevents it from being completely drawn inside, and this hook can also be used for hooking the end of the tape to the edge of a board. The tape itself is marked with inches, and these can be read off to measure a board or to mark a line for a cut. Between each inch mark are smaller tick marks. The largest of these is halfway between each inch marking, and indicates the half-inch measure. Slightly smaller tick marks lie between the half-inch mark and the inch marks, and these mark off the quarter-inch increments. Between each of the quarter inch marks are smaller marks to indicate eighths. Some tapes also mark off sixteenths (sometimes only for the first several inches). See the illustration to see how to read the markings.
Most tape measures also show 1 foot increments (often with a black square) as well as showing 16-inch increments (often with a red square). The 16-inch increments are useful because studs, joists, and rafters are commonly 16 inches apart.
Nail Set
A nail set is used in finish carpentry to drive a nail below the surface of a board. First the nail is driven with a hammer until it is very near the surface of the board. Then the tip of the nail set is placed on the nail head. Finish nails have a small divit in the head to accept the nail set. The head of the nail set is then struck with the hammer until the nail is driven below (or flush with) the surface of the board.
Plumb Bob
A plumb bob is a weight on the end of a string. The weight will hang straight down and is used as a reference for a perfectly vertical line. It can be used in some places where a level cannot - such as in a place where there is no vertical surface to place the level against. For example, a carpenter may wish to find a place on the floor just below a point on a ceiling joist so he can construct an interior non-weight bearing wall there and then be able to tie it into the ceiling joist. In this case, the wall does not yet exist, so there is nothing to place a level against to measure for plumbness.
Wood Chisel
Wood chisels are most commonly used in carpentry for installing recessed hinges. To do this, the hinge is laid on the board to which it will be attached, and then it is traced. The hinge is then removed, and a sharp knife is used to score around the hinge's outline. A chisel is then used to remove wood to a depth equal to the hinge's thickness.
3. Describe the use of and distinguish between the following types of nails: 20 Penny, 16 Penny, 12 Penny, 8 Penny, 6 Penny, Finish, Brad, Roofing, Screw Nail, Sinker, Common, and Galvenized
- Penny
- The penny size is written with a number and the abbreviation d for penny (e.g. - 10d). D is an abbreviation for denarius, a Roman coin similar to a penny; this was the abbreviation for a penny in the UK before decimalisation. A smaller number indicates a shorter nail and a larger number indicates a longer nail. Nails under 1-1/4 in., often called brads, are sold mostly in small packages with only a length designation (e.g. 1/2" (12 mm), 1-1/8" (28 mm), etc.).
| 6d | 2" (~50 mm) |
| 8d | 2-1/2" (~65 mm) |
| 10d | 3" (~75 mm) |
| 12d | 3-1/4" (~80 mm) |
| 16d | 3-1/2" (~90 mm) |
| 20d | 4" (~100 mm) |
- Finish nail
- A finish nail is used for interior woodworking. Size varies, but the head of the nail is only slightly larger than the nail's shaft. A finish nail is set by driving its head below the surface of the wood using a nail set. The head can then be covered with putty (for a natural finish) or with caulk (for a painted finish). If done well, this makes the nail effectively invisible.
- Brad
- Brad nails are small and often made of brass. They are often used to hold small pieces of trim in place. Rather than attempting to hide the nail, brads sometimes have decorative heads, so that the nail head becomes part of the decor.
- Roofing nail
- A roofing nail is short with a large, flat head. It is also coated with zinc to prevent rusting. Roofing nails are used for attaching shingles to a roof.
- Screw nail
- A screw nail has a twisted shank for extra holding power.
- Sinker
- A Sinker nail's head is tapered on the underside, so that the nail can be driven flush with the surface of the board. These are used in general construction.
- Common
- A Common nail has a flat head and is used for general construction, carpentry, and framing.
- Galvanized
- A Galvenized nail is a nail that has been coated with zinc to inhibit corrosion. Galvenized nails are often used in work that will be exposed to weather.
4. Assist in erecting a building not less than 6x8 feet in ground dimensions with a gable roof and at least one door and one window, demonstrating ability to measure and use tools from requirement 2.
This requirement is just begging you to build a shed, though other options are certainly possible as well. Many Pathfinders go on mission trips to help build churches or schools, and if your group is planning to do this, you have the perfect opportunity to earn this honor.
In the United States (and in most developed countries) the local goverment will require a building permit for a shed, even one as small as this. Check with the local government and review the building codes before starting this project. They will usually want a drawing showing what you plan to build before issuing a permit.
If building a small shed, you may be able to use a "floating" foundation - that is special concrete blocks in the shape of a trapeziod (wider at the base than on top). The blocks sit on the ground, and beams are placed in notches on top of these. The floor joists and headers (which join to the end of the joists) are built on top of the beams. Once the floor is built, the walls can be framed (including openings for the doors and windows). At this point, the walls can be sheathed and the roof can be framed, sheathed, and shingled as well. Then the doors and windows are installed, the siding is put on, and the finish carpentry begins on the inside (though this step can be skipped on a shed).
Be sure that your Pathfinders each use all the tools called out in requirement 2. It might be a good idea to make a checklist for each Pathfinder, and have them compare their activities to it as the day progresses to be sure they use all the tools required.
5. When building the above project, use all of these features:
Floor Joist
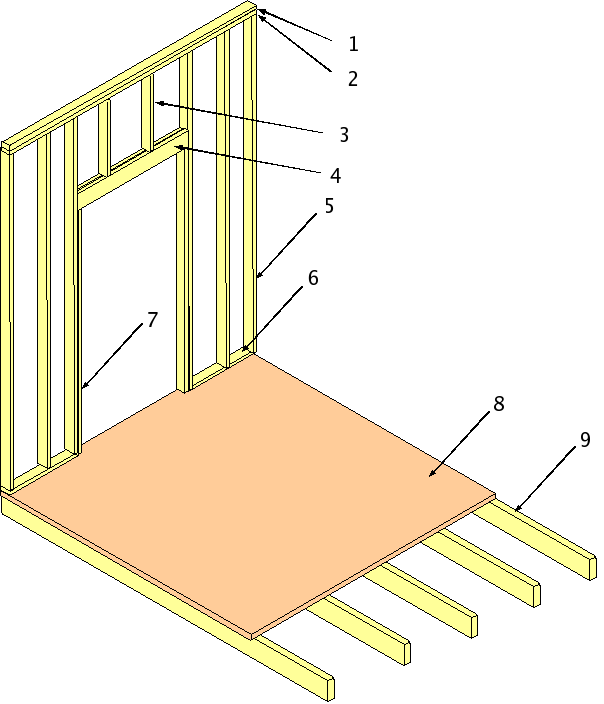
A floor joist is a board that supports the floor. Depending on how large an area the floor covers, and how far the joists span, the floor joist can be anywhere from a 2x6 to a 2x12, or even bigger. Floor joists are installed edgewise, and they are attached to headers which attach to the foundation of the building.
Sub Floor
The sub floor is usually made from plywood, particle board, or oriented strand board (OSB), and is nailed (or screwed) to the floor joists. The finished floor (carpeting, hardwood floor, laminate floor, linoleum, vinyl, tile, etc) is then laid atop the sub floor.
Shoe Plate
More commonly known as a bottom plate or a sole plate, a shoe plate is the bottom board in a framed wall. Studs are nailed into this board, and it is nailed to the floor. Some local building codes require that the shoe plate be made of pressure treated lumber to resist rot if water pools on the floor (for whatever reason).
Top Plate
The top plate is the board running along the top of a framed wall. Like the shoe plate, the studs are nailed to this board, and it is attached to the ceiling.
Double Plate
For added strength, two top plates are used, most commonly on a weight-bearing wall. The upper top plate is called the cap plate.
Conventional Roof or Trusses
A conventional roof is made from rafters which are beams that run from the roof's ridge to the ceiling joists. A truss is an engineered, pre-built structure consisting of triangles. Trusses are lighter, stronger, and cheaper than rafters, but they form a web of lumber inside the roof rendering the attic space unusable. Rafters are positioned in line with the studs in a wall and are fastened to both the top plate and the ceiling joists. A pair of rafters (joined to the opposite sides of the ridge board) are sometimes tied together with a collar beam which is a horizontal member.
Felt Roof
Felt roofing material is not like the felt sets used in the children's Sabbath School classes. Rather, "felt roofing" is just another name for tar paper. Before installing the felt roofing, you should first nail a drip strip to the edges of the roof. Then the felt paper is rolled out over the entire horizontal length of the roof (not top to bottom!) and stapled onto the sheathing. If the felt is not wide enought to cover the roof from the eaves to the peak, you will need another layer. The first layer should be along the eaves, and subsequent layers should overlap previous ones by a couple of inches. If the roof has a ridge vent, do not cover it. The purpose if a ridge vent is to allow heat to escape from the attic. Covering it with tar paper defeats this feature completely. The roof is now ready to shingle.
Shingles
Shingles are laid on top of the felt roofing, starting with the bottom row. Use roofing nails to attach asphalt shingles directly to the felt roofing. The next row of shingles should be offset from the first so that the boundary between two shingles and the notches that make up the tabs in one shingle are completely covered by the tab of another - not by another boundary or by a notch. The shingles should overlap such that only the tabs show, and not the solid portion on the upper part of the shingle. It helps tremendously to mark parallel lines on the tar paper with a chalk line so that the shingles do not creep uphill. You want the line to be level.
Window with Weight-bearing Header
A window opening must have a weight-bearing header. The header is a pair of 2x4's which are turned on their edges and nailed to a stud. A pair of studs (called jack studs) run from the bottom of the header to the floor to help support the weight. Short studs (called cripple studs then run from the header to the top plate. The criple studs supply a support for the wall's sheating.
Door with Weight-bearing Header
As with windows, doors also require a weight-bearing header. It is built exactly the same way a window opening is made.
Fascia on Eaves
Fascia is a "finish" board that covers the ends of the rafters.
Siding
The purpose of siding is to keep water out of the building. Vinyl siding is, in general, easier to work with than aluminum siding, but there are other options too, including asphalt, weather boards, and plain old plywood with felt paper beneath and with furring strips covering the joints.
Note
Participants must be 16 years old or older to use power tools.
References
- Much of the material in this section was taken from the Wikipedia articles on the various tools presented here.
- Redbrand.com - description of various nails.
- Hammerzone.com - roofing.


