Difference between revisions of "AY Honors/Lashing/Continuous"
From Pathfinder Wiki
m (+trans) |
(Marked this version for translation) |
||
| (4 intermediate revisions by 2 users not shown) | |||
| Line 1: | Line 1: | ||
| − | <noinclude><translate></noinclude> | + | <noinclude><translate><!--T:6--> |
| − | + | </noinclude> | |
[[Image:Continuous-lashing.jpg|thumb|right|500px|Continuous Lashing]] | [[Image:Continuous-lashing.jpg|thumb|right|500px|Continuous Lashing]] | ||
| + | <!--T:2--> | ||
'''Continuous Lashing''' is a fun technique. It is used to create shelves, tables, and other structures. | '''Continuous Lashing''' is a fun technique. It is used to create shelves, tables, and other structures. | ||
| + | <!--T:3--> | ||
''Comments on the pictures on the right''' | ''Comments on the pictures on the right''' | ||
# Support poles under the 'surface' poles. | # Support poles under the 'surface' poles. | ||
| Line 14: | Line 16: | ||
| + | <!--T:4--> | ||
<hr> | <hr> | ||
| + | <!--T:5--> | ||
* Start with a string/rope that is 4 or 5 times longer than the length of your project. | * Start with a string/rope that is 4 or 5 times longer than the length of your project. | ||
* Find the middle/center of the string and attach it to one of the support poles. | * Find the middle/center of the string and attach it to one of the support poles. | ||
| Line 25: | Line 29: | ||
* Repeat for the remaining surface sticks. | * Repeat for the remaining surface sticks. | ||
* End off with a square knot when all the surface sticks are attached. | * End off with a square knot when all the surface sticks are attached. | ||
| − | |||
<noinclude></translate></noinclude> | <noinclude></translate></noinclude> | ||
Latest revision as of 12:17, 8 September 2021
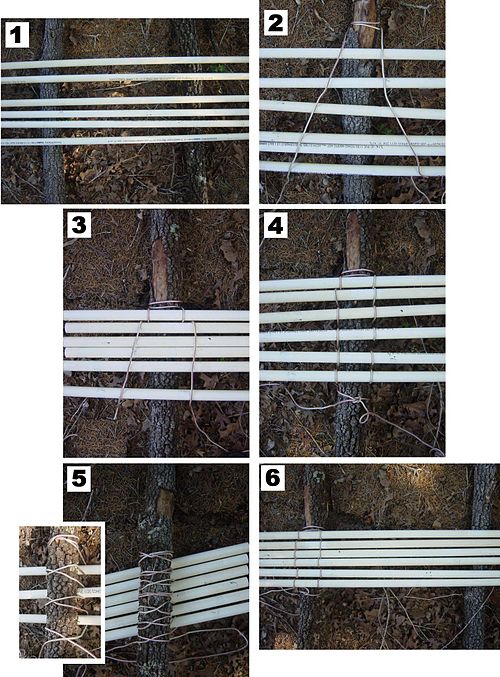
Continuous Lashing is a fun technique. It is used to create shelves, tables, and other structures.
Comments on the pictures on the right'
- Support poles under the 'surface' poles.
- Attach string to the support pole using a clove hitch.
- Clove hitch, up over surface pole, back down & cross under below support pole, and up over the second surface pole.
- Detail of lashing as seen from top.
- Detail of lashing as seen from bottom. Inset shows details of clove hitch, and cross-under below support pole.
- View from the top.
- Start with a string/rope that is 4 or 5 times longer than the length of your project.
- Find the middle/center of the string and attach it to one of the support poles.
- Put one of the surface sticks on top of the support pole and bring both ends of the string over this surface stick.
- Continue back down below the support pole.
- Cross the string under the support pole.
- Bring it back up and over the next surface stick and then back down and cross under the support pole.
- Repeat for the remaining surface sticks.
- End off with a square knot when all the surface sticks are attached.

