Difference between revisions of "Investiture Achievement/Friend/Outdoor Living"
(Marked this version for translation) |
(AYHAB->AYH for knots.) |
||
| (One intermediate revision by the same user not shown) | |||
| Line 8: | Line 8: | ||
}} | }} | ||
{{/requirement 1}} | {{/requirement 1}} | ||
| − | There are many more than 10 knots listed in the {{ | + | There are many more than 10 knots listed in the {{honor_prerequisite|honor=Knot Tying|linkonly=true}} Honor answers, and the Friend candidate is free to tie any ten of them. Below we present ten selected knots based on how easy they are to tie as well as how useful they are. |
<!--T:2--> | <!--T:2--> | ||
| Line 28: | Line 28: | ||
<!--T:4--> | <!--T:4--> | ||
And here are the knots: | And here are the knots: | ||
| − | {{: | + | {{:AY Honors/Knot/Figure_8}} |
| − | {{: | + | {{:AY Honors/Knot/Stevedore's}} |
| − | {{: | + | {{:AY Honors/Knot/Square}} |
| − | {{: | + | {{:AY Honors/Knot/Surgeons}} |
| − | {{: | + | {{:AY Honors/Knot/Sheetbend}} |
| − | {{: | + | {{:AY Honors/Knot/Double sheet bend}} |
| − | {{: | + | {{:AY Honors/Knot/Slipped sheet bend}} |
| − | {{: | + | {{:AY Honors/Knot/Bowline}} |
| − | {{: | + | {{:AY Honors/Knot/Clove hitch}} |
| − | {{: | + | {{:AY Honors/Knot/Taut-line hitch}} |
== == <!--T:5--> | == == <!--T:5--> | ||
Latest revision as of 18:00, 30 October 2021
| Friend/Outdoor Living |
|---|
|
Requirement 1 |
|
Tie and know the practical use of 10 knots. |
There are many more than 10 knots listed in the Knot Tying Honor answers, and the Friend candidate is free to tie any ten of them. Below we present ten selected knots based on how easy they are to tie as well as how useful they are.
Knot tying is an important part of Pathfindering with tie ins to Investiture Achievement and many other honors such as the various Camping Honors, Rock Climbing, Pioneering and others.
- Friends are required to tie and know the practical use of 10 knots
- Companions are required to tie and know the practical use of 20 knots
- Explorers must earn the Knot Tying Honor
- Guides must, under the guidance of an adult staff member, teach the Knot Tying Honor
- Master Guides are required to earn or hold the Knot Tying Honor.
An effective way to teach knots in a club setting is to have the staff and the older Pathfinders (the ones who already have the Knot Tying Honor) each teach a single knot at a knot tying station. The Pathfinders who are learning the knots will rotate through the stations. After a set time, ring a bell to signal that it's time to rotate, and do not allow the students to rotate until the bell rings (otherwise, they will all gravitate to the same table).
Using this approach, each of the teachers need only learn a single knot well enough to teach it, and the students will have a chance to receive one-on-one instruction for every knot. Allow at least seven or eight minutes per station. You can do this over more than one meeting if necessary, and you can involve the entire club at once rather than only a single unit.
Prior to the meeting, the rope may be cut to the proper length. Some instructors consider cutting rope during a meeting a waste of valuable teaching time, while others use it as an opportunity to teach proper binding of the rope. To prevent the cut rope from unravelling, wrap a small piece of duct tape around it before you make the cut - then cut the tape in half. This will save time, as it binds both ends of the cut in one shot.
The length of each rope should be suited to the knot it will be used for. Note that a figure eight knot does not require as much rope as a timber hitch, and that it is impossible to tie a knot on a rope that it too short to hold it. Conversely, using too much rope for small knots is a waste of good rope (and money!). Remember that the amount of rope wasted on each knot will be multiplied by the number of students.
A good way to determine proper rope length is to tie the desired knot using a long piece of rope, cut it, and then untie it. That's how long it needs to be. Cut as many of that length as you will have students, put them in a plastic baggie, and label the bag. You may have the knot instructors cut their own ropes, or you may have a squad of TLT's do this. Or you could do it yourself (but that would be depriving your TLT's and/or instructors of a valuable experience).
Two knot tying stations can easily share an eight foot table and a hot-melt glue gun - assuming the students will be mounting the knots on a board as they tie them. If you are organized and have the space, you can store their knot boards from year to year and let them add to it each year. By the time they are in the Ranger class, they will appreciate not having to tie 25 knots all at once.
A good knot board can be made from a length of lumber - 24"x12"x3/4" makes a good sized board if you are using quarter-inch diameter rope. A stick can be fastened along the edge of the board to make a convenient place to tie the hitches.
For a professional-looking knot board, prepare labels for the knots using a label maker. Again, this is something that should be done prior to the meeting, as making labels and distributing them is not an effective use of instruction time. You should also make labels with each student's name (or have students label their boards neatly) so that they will be able to find their knot boards in the future and to prevent disputes over knot board ownership. You might also consider labeling the knot boards before they are given to the students (and before the knots are tied), as this makes it easy to figure out which knots the student still needs to learn.
Here's the list:
- Figure Eight - A stopper knot that is easy to untie.
- Stevedore - A bigger stopper knot that is even easier to untie.
- Square - Useful in first aid, and widely known by many.
- Surgeon's - A variation on the square knot, but can be held tighter when tying.
- Sheet bend - An easy knot that is the first choice for joining two ropes.
- Double sheet bend - A more secure version of the sheet bend.
- Slipped sheet bend - An easily untied version of the sheet bend.
- Bowline - A very hand loop, useful in rescue situations.
- Clove hitch - The first knot used when lashing.
- Taut-line hitch - Very useful for anchoring a tent.
And here are the knots:
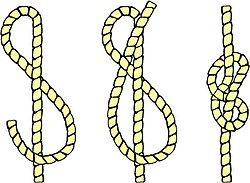
| Figure Eight |
|---|
|
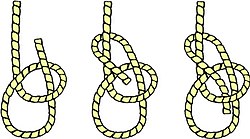
Use: This knot is ideal for keeping the end of a rope from running out of tackle or pulley.
How to tie:
|
| Stevedore knot |
|---|
|
Use: The Stevedore knot is a stopper knot, often tied near the end of a rope. It is more bulky and less prone to jamming than the closely related figure-eight knot. This knot is excellent for anchoring a tarp. Pass the end of the rope through a tarp's grommet, tie a stevedore, and anchor the other end with a taut-line hitch. Its added bulk prevents it from pulling through the grommet.
How to tie:
|
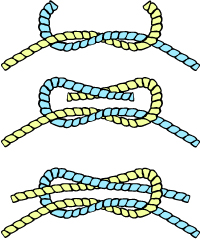
| Square Knot |
|---|
|
Use: Also known as a Reef knot, the Square Knot is easily learned and useful for many situations. It is most commonly used to tie two lines together at the ends. This knot is used at sea in reefing and furling sails. It is used in first aid to tie off a bandage or a sling because the knot lies flat.
How to tie:
WARNING: Do not rely on this knot to hold weight in a life or death situation. It has been known to fail.
|
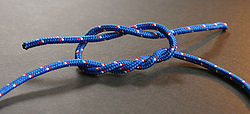
| Surgeon's knot |
|---|
|
Use: The surgeon's knot is similar to a square knot, except that the first stage is doubled. This helps the knot stay tight while it is being tied.
|
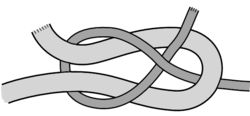
| Sheetbend |
|---|
|
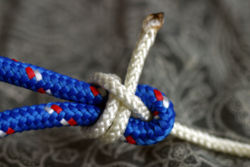
Use: The sheet bend knot is excellent for joining two ropes together, especially if the two ropes are not the same size. When tied properly, it will not come undone, and it is easy to untie. It is very similar to the bowline.
How to tie:
|
| Double sheet bend |
|---|
|
Use: The double sheet bend or double becket bend is a strong knot used to tie two ropes (usually of different thicknesses or rigidity) together. It is a doubled version of the sheet bend.
How to tie:
WARNING: As with the standard sheet bend, the two free ends should end up on the same side of the knot. If they do not, a left-handed double sheet bend results, which is much weaker.
|
| Slipped sheet bend |
|---|
|
Use: The slipped sheet bend is used in non-critical situations for temporarily joining two ropes.
How to tie:
WARNING: The slightest tug on the running end will untie this knot instantly - even if the knot is under load.
|
| Bowline |
|---|
|
Use: This knot doesn't jam or slip when tied properly. It can be tied around a person's waist and used to lift him, because the loop will not tighten under load. In sailing, the bowline is used to tie a halyard to a sail head.
How to tie:
|
| Clove hitch |
|---|
|
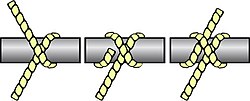
Use: This knot is the "general utility" hitch for when you need a quick, simple method of fastening a rope around a post, spar or stake (like tying wicks to sticks in Candle Making) or another rope (as in Macramé)
How to tie:
|
| Taut-line hitch |
|---|
|
Use: The Taut-Line Hitch is an adjustable loop knot for use on lines under tension. It is useful when the length of a line will need to be periodically adjusted in order to maintain tension. It is made by tying a Rolling hitch around the standing part after passing around an anchor object. Tension is maintained by sliding the hitch to adjust size of the loop, thus changing the effective length of the standing part without retying the knot. When under tension, however, the knot will grip the cord and will be difficult to cause to slip.
It is typically used for securing tent lines in outdoor activities involving camping, by arborists when climbing trees, for creating adjustable moorings in tidal areas, and to secure loads on vehicles. A versatile knot, the Taut-line hitch was even used by astronauts during STS-82, the second Space Shuttle mission to repair the Hubble Space Telescope. How to tie:
|
|
Requirement 2 |
|
Earn the Camping Skills I Honor. |
For tips and instruction see Camping Skills I.
Trail Friend 
There are no additional requirements in this section for the Advanced Ribbon.

