Difference between revisions of "Investiture Achievement/Companion/Outdoor Living"
m (+ translate tags) |
(AYHAB->AY) |
||
| (2 intermediate revisions by 2 users not shown) | |||
| Line 1: | Line 1: | ||
<languages /><br /> | <languages /><br /> | ||
| − | <noinclude><translate></noinclude> | + | <noinclude><translate><!--T:1--> |
| + | </noinclude> | ||
__NOTOC__ | __NOTOC__ | ||
{{IA desc | {{IA desc | ||
| Line 10: | Line 11: | ||
{{IA/Effective Knot Teaching}} | {{IA/Effective Knot Teaching}} | ||
| − | There are many more than 20 knots listed in the {{ | + | <!--T:2--> |
| + | There are many more than 20 knots listed in the {{honor_prerequisite|honor=Knot Tying|linkonly=true}} Honor answers, and the Companion candidate is free to tie any twenty of them. | ||
| + | <!--T:3--> | ||
Assuming that the Companion has already tied the ten knots listed under the [[../../Friend/Outdoor Living|Friend - Outdoor Living]] section, here are ten more. | Assuming that the Companion has already tied the ten knots listed under the [[../../Friend/Outdoor Living|Friend - Outdoor Living]] section, here are ten more. | ||
| + | <!--T:4--> | ||
# Constrictor knot - great for making a rope ladder | # Constrictor knot - great for making a rope ladder | ||
# Cat's Paw - good for tying onto a horizontal bar | # Cat's Paw - good for tying onto a horizontal bar | ||
| Line 25: | Line 29: | ||
# Two Half Hitches - useful for tying to a pole | # Two Half Hitches - useful for tying to a pole | ||
| + | <!--T:5--> | ||
And here are the knots | And here are the knots | ||
| − | {{: | + | {{:AY Honors/Knot/Constrictor}} |
| − | {{: | + | {{:AY Honors/Knot/Cat's paw}} |
| − | {{: | + | {{:AY Honors/Knot/Timber hitch}} |
| − | {{: | + | {{:AY Honors/Knot/Pipe hitch}} |
| − | {{: | + | {{:AY Honors/Knot/Fisherman's bend}} |
| − | {{: | + | {{:AY Honors/Knot/Alpine butterfly}} |
| − | {{: | + | {{:AY Honors/Knot/Prusik}} |
| − | {{: | + | {{:AY Honors/Knot/Double bowline}} |
| − | {{: | + | {{:AY Honors/Knot/Bowline on a bight}} |
| − | {{: | + | {{:AY Honors/Knot/Two_half_hitches}} |
{{clear}} | {{clear}} | ||
| − | == == | + | == == <!--T:6--> |
{{/requirement 2}} | {{/requirement 2}} | ||
| − | {{honor_prerequisite | + | <!--T:7--> |
| + | {{honor_prerequisite|honor=Camping Skills II}} | ||
| − | =Trail Companion [[File:Companion Ribbon.jpeg|150px]]= | + | =Trail Companion [[File:Companion Ribbon.jpeg|150px]]= <!--T:8--> |
{{:Investiture Achievement/noadvanced}} | {{:Investiture Achievement/noadvanced}} | ||
<noinclude></translate></noinclude> | <noinclude></translate></noinclude> | ||
Latest revision as of 15:33, 31 October 2021
| Companion/Outdoor Living |
|---|
|
Requirement 1 |
|
Tie and know the practical use of 20 knots. |
Knot tying is an important part of Pathfindering with tie ins to Investiture Achievement and many other honors such as the various Camping Honors, Rock Climbing, Pioneering and others.
- Friends are required to tie and know the practical use of 10 knots
- Companions are required to tie and know the practical use of 20 knots
- Explorers must earn the Knot Tying Honor
- Guides must, under the guidance of an adult staff member, teach the Knot Tying Honor
- Master Guides are required to earn or hold the Knot Tying Honor.
An effective way to teach knots in a club setting is to have the staff and the older Pathfinders (the ones who already have the Knot Tying Honor) each teach a single knot at a knot tying station. The Pathfinders who are learning the knots will rotate through the stations. After a set time, ring a bell to signal that it's time to rotate, and do not allow the students to rotate until the bell rings (otherwise, they will all gravitate to the same table).
Using this approach, each of the teachers need only learn a single knot well enough to teach it, and the students will have a chance to receive one-on-one instruction for every knot. Allow at least seven or eight minutes per station. You can do this over more than one meeting if necessary, and you can involve the entire club at once rather than only a single unit.
Prior to the meeting, the rope may be cut to the proper length. Some instructors consider cutting rope during a meeting a waste of valuable teaching time, while others use it as an opportunity to teach proper binding of the rope. To prevent the cut rope from unravelling, wrap a small piece of duct tape around it before you make the cut - then cut the tape in half. This will save time, as it binds both ends of the cut in one shot.
The length of each rope should be suited to the knot it will be used for. Note that a figure eight knot does not require as much rope as a timber hitch, and that it is impossible to tie a knot on a rope that it too short to hold it. Conversely, using too much rope for small knots is a waste of good rope (and money!). Remember that the amount of rope wasted on each knot will be multiplied by the number of students.
A good way to determine proper rope length is to tie the desired knot using a long piece of rope, cut it, and then untie it. That's how long it needs to be. Cut as many of that length as you will have students, put them in a plastic baggie, and label the bag. You may have the knot instructors cut their own ropes, or you may have a squad of TLT's do this. Or you could do it yourself (but that would be depriving your TLT's and/or instructors of a valuable experience).
Two knot tying stations can easily share an eight foot table and a hot-melt glue gun - assuming the students will be mounting the knots on a board as they tie them. If you are organized and have the space, you can store their knot boards from year to year and let them add to it each year. By the time they are in the Ranger class, they will appreciate not having to tie 25 knots all at once.
A good knot board can be made from a length of lumber - 24"x12"x3/4" makes a good sized board if you are using quarter-inch diameter rope. A stick can be fastened along the edge of the board to make a convenient place to tie the hitches.
For a professional-looking knot board, prepare labels for the knots using a label maker. Again, this is something that should be done prior to the meeting, as making labels and distributing them is not an effective use of instruction time. You should also make labels with each student's name (or have students label their boards neatly) so that they will be able to find their knot boards in the future and to prevent disputes over knot board ownership. You might also consider labeling the knot boards before they are given to the students (and before the knots are tied), as this makes it easy to figure out which knots the student still needs to learn.
There are many more than 20 knots listed in the
Knot Tying Honor answers, and the Companion candidate is free to tie any twenty of them.
Assuming that the Companion has already tied the ten knots listed under the Friend - Outdoor Living section, here are ten more.
- Constrictor knot - great for making a rope ladder
- Cat's Paw - good for tying onto a horizontal bar
- Timber Hitch - another good way to start a lashing.
- Pipe Hitch - good for lifting pipes (or poles) into the air (or lowering them)
- Fisherman's Bend - good for joining two ropes.
- Alpine Butterfly - good for climbing.
- Prusik - another climbing knot
- Double bowline - a bowline with two loops.
- Bowline on a Bight - a two-looped bowline tied in the middle of a rope
- Two Half Hitches - useful for tying to a pole
And here are the knots
| Constrictor Knot |
|---|
|
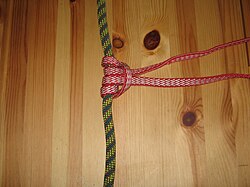
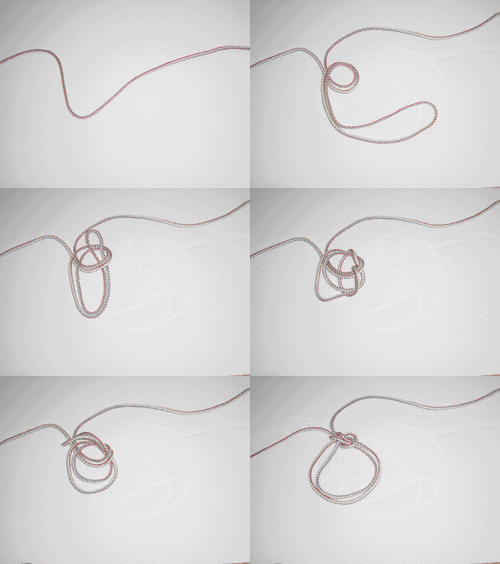
Use: The Constrictor knot is one of the most effective binding knots. Simple and secure, it is a harsh knot which can be difficult or impossible to untie once tightened. It is made similarly to a clove hitch but with one end passed under the other, forming an overhand knot under a riding turn. Because this knot will not slip when tied around a stick, it is an excellent knot for making a rope ladder.
How to tie:
WARNING: The Constrictor knot's severe bite, which makes it so effective, can damage or disfigure items it is tied around.
|
| Cat's paw |
|---|
|
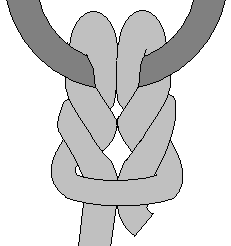
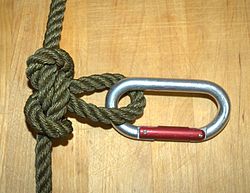
Use: The Cat's paw is used for connecting a rope to an object.
How to tie:
Form a bight in the middle of the line, and pull it back over itself like a girth hitch. This forms two loops, turned in opposite directions. Give each loop one more full turn in the direction that will tend to tighten it (the wrong direction will undo the loop completely). Pass both loops over the hook, rail or post and pull tight, taking care to push the bight up snugly against the turns.
If working end of the line has an eye in it, and the standing end is accessible, the knot can be tied to a closed ring, another eye, or a rail with inaccessible ends, as follows. Pass the eye around the ring or rail, then pass the standing end through its own eye (this effectively forms a girth hitch). Then pass the standing end through the eye again, and pull up tight, taking care to push the bight up snugly against the turns. When using the cat's paw to join two eyes, this process may be repeated several times to give several turns - as many as five in a fine fishing monofilament. Then when tightened, instead of pulling the bight up against the turns, both eyes are pulled equally, to make neat coils of turns in both eyes, meeting halfway between them. |
| Timber hitch |
|---|
|
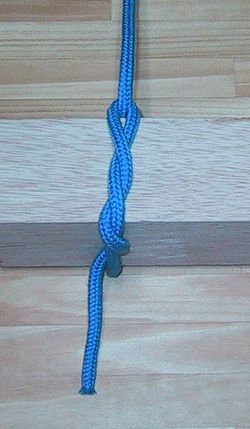
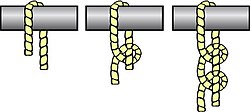
Use: The timber hitch is a knot used to attach a single length of rope to a piece of wood. This knot is easily undone after use.
How to tie:
|
| Pipe hitch |
|---|
|
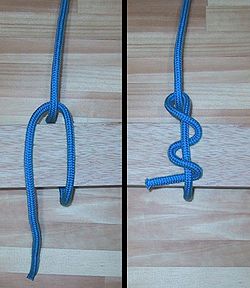
Use: The pipe hitch is used for hoisting tubular objects (such as pipes).
How to tie:
|
| Fisherman's knot |
|---|
|
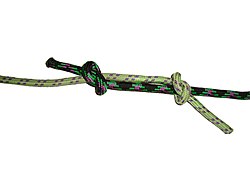
Use: The Fisherman's knot is a specialized bend. It consists of two overhand knots wrapped around each other. It works well for joining thin, stiff, or slippery lines.
It requires little dexterity to tie, so is often used in stubborn materials. When tightened, it becomes fairly compact, and the free ends can be cropped very close to the knot. These qualities make it very useful for fishing line--it is less likely to jam a fishing rod than many other bends, and is easier to tie with cold, wet hands.
How to tie:
|
| Alpine butterfly |
|---|
|
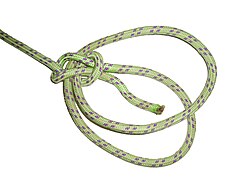
Use: The Butterfly Loop has a high breaking strength and is regarded by mountaineers as one of the strongest knots to attach climbers to the middle of a rope, such that they have room to move around even when the main rope goes tight, and they can be supported in either direction from the main rope. The loop is typically attached to a climbing harness by carabiner.
It can also be used to isolate a worn section of rope, where the knot is tied such that the worn section is used for the center of the loop.
|
| Double bowline |
|---|
|
How to tie:
|
| Bowline on a bight |
|---|
|
Use: This makes a secure loop in the middle of a rope which does not slip.
How to tie:
|
| Two half hitches |
|---|
|
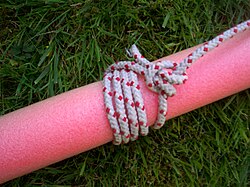
Use: This reliable knot is quickly tied and is the hitch most often used in mooring.
How to tie:
|
|
Requirement 2 |
|
Earn the Camping Skills II Honor, if not previously earned. |
For tips and instruction see Camping Skills II.
Trail Companion 
There are no additional requirements in this section for the Advanced Ribbon.


