Difference between revisions of "AY Honors/Abseiling/Answer Key"
m (Jomegat moved page AY Honor Abseiling to AY Honor Abseiling Answer Key without leaving a redirect: Part of translatable page "Adventist Youth Honors Answer Book/Recreation/Abseiling") |
|||
| (28 intermediate revisions by 4 users not shown) | |||
| Line 1: | Line 1: | ||
| − | < | + | {{HonorSubpage}} |
| − | <noinclude><translate><!--T: | + | |
| + | <section begin=Body /> | ||
| + | |||
| + | {{ansreq|page={{#titleparts:{{PAGENAME}}|2|1}}|num=One|dispreq= }} | ||
| + | {{ansreq|page={{#titleparts:{{PAGENAME}}|2|1}}|num=One1Header1|dispreq= }} | ||
| + | {{ansreq|page={{#titleparts:{{PAGENAME}}|2|1}}|num=One1|dispreq=1}} | ||
| + | {{ansreq|page={{#titleparts:{{PAGENAME}}|2|1}}|num=One1a|dispreq=a}} | ||
| + | {{CloseReq}}<!--reqOne1a--> | ||
| + | |||
| + | {{ansreq|page={{#titleparts:{{PAGENAME}}|2|1}}|num=One1b|dispreq=b}} | ||
| + | {{CloseReq}}<!--reqOne1b--> | ||
| + | {{CloseReq}}<!-- One1 --> | ||
| + | |||
| + | {{ansreq|page={{#titleparts:{{PAGENAME}}|2|1}}|num=One2|dispreq=2}} | ||
| + | {{ansreq|page={{#titleparts:{{PAGENAME}}|2|1}}|num=One2a|dispreq=a}} | ||
| + | <noinclude><translate><!--T:84--> | ||
</noinclude> | </noinclude> | ||
| − | {{ | + | {{:AY Honors/Knot/Ring_Bend_Knot}} |
| − | + | <noinclude></translate></noinclude> | |
| − | + | {{CloseReq}}<!-- One2a --> | |
| − | |||
| − | |||
| − | |||
| − | |||
| − | |||
| − | |||
| − | + | {{ansreq|page={{#titleparts:{{PAGENAME}}|2|1}}|num=One2b|dispreq=b}} | |
| − | + | <noinclude><translate><!--T:85--> | |
| + | </noinclude> | ||
| + | {{:AY Honors/Knot/Alpine_butterfly}} | ||
| + | <noinclude></translate></noinclude> | ||
| + | {{CloseReq}}<!-- One2b --> | ||
| − | == | + | {{ansreq|page={{#titleparts:{{PAGENAME}}|2|1}}|num=One2c|dispreq=c}} |
| − | + | <noinclude><translate><!--T:86--> | |
| − | + | </noinclude> | |
| + | {{:AY Honors/Knot/Figure_8}} | ||
| + | <noinclude></translate></noinclude> | ||
| + | {{CloseReq}}<!-- One2c --> | ||
| − | === | + | {{ansreq|page={{#titleparts:{{PAGENAME}}|2|1}}|num=One2d|dispreq=d}} |
| + | <noinclude><translate><!--T:87--> | ||
| + | </noinclude> | ||
| + | {{:AY Honors/Knot/Double_Fishermans_Knot}} | ||
| + | <noinclude></translate></noinclude> | ||
| − | + | {{CloseReq}}<!-- One2d --> | |
| − | |||
| − | {{ | ||
| − | ==== | + | {{ansreq|page={{#titleparts:{{PAGENAME}}|2|1}}|num=One2e|dispreq=e}} |
| − | {{: | + | <noinclude><translate><!--T:88--> |
| + | </noinclude> | ||
| + | {{:AY Honors/Knot/Prusik}} | ||
| + | <noinclude></translate></noinclude> | ||
| + | |||
| + | {{CloseReq}}<!-- One2e --> | ||
| + | |||
| + | {{ansreq|page={{#titleparts:{{PAGENAME}}|2|1}}|num=One2f|dispreq=f}} | ||
| + | <noinclude><translate><!--T:89--> | ||
| + | </noinclude> | ||
| + | {{:AY Honors/Knot/Bowline}} | ||
| + | <noinclude></translate></noinclude> | ||
| − | + | {{CloseReq}}<!-- One2f --> | |
| − | {{ | + | {{CloseReq}}<!-- One2 --> |
| + | {{CloseReq}}<!--One1Header1--> | ||
| − | ==== | + | {{ansreq|page={{#titleparts:{{PAGENAME}}|2|1}}|num=One1Header2|dispreq= }} |
| − | {{ | + | {{ansreq|page={{#titleparts:{{PAGENAME}}|2|1}}|num=One3|dispreq=3}} |
| + | {{ansreq|page={{#titleparts:{{PAGENAME}}|2|1}}|num=One3a|dispreq=a}} | ||
| − | + | {{CloseReq}} <!--reqOne3a--> | |
| − | {{: | + | {{ansreq|page={{#titleparts:{{PAGENAME}}|2|1}}|num=One3b|dispreq=b}} |
| − | ==== | + | {{CloseReq}} <!--reqOne3b--> |
| − | {{: | + | {{CloseReq}} <!--reqOne3--> |
| + | |||
| + | {{ansreq|page={{#titleparts:{{PAGENAME}}|2|1}}|num=One4|dispreq=4}} | ||
| + | |||
| + | {{CloseReq}} <!--reqOne4--> | ||
| + | {{CloseReq}}<!--One1Header2--> | ||
| + | |||
| + | {{ansreq|page={{#titleparts:{{PAGENAME}}|2|1}}|num=One1Header3|dispreq= }} | ||
| + | {{ansreq|page={{#titleparts:{{PAGENAME}}|2|1}}|num=One5|dispreq=5}} | ||
| + | |||
| + | {{CloseReq}} <!--reqOne5--> | ||
| + | |||
| + | {{ansreq|page={{#titleparts:{{PAGENAME}}|2|1}}|num=One6|dispreq=6}} | ||
| + | {{ansreq|page={{#titleparts:{{PAGENAME}}|2|1}}|num=One6a|dispreq=a}} | ||
| + | |||
| + | {{CloseReq}} <!--reqOne6a--> | ||
| + | |||
| + | {{ansreq|page={{#titleparts:{{PAGENAME}}|2|1}}|num=One6b|dispreq=b}} | ||
| + | |||
| + | {{CloseReq}} <!--reqOne6b--> | ||
| + | |||
| + | {{ansreq|page={{#titleparts:{{PAGENAME}}|2|1}}|num=One6c|dispreq=c}} | ||
| + | |||
| + | {{CloseReq}} <!--reqOne6c--> | ||
| + | {{CloseReq}} <!--reqOne6--> | ||
| + | {{CloseReq}} <!--reqOne1Header3--> | ||
| + | |||
| + | {{ansreq|page={{#titleparts:{{PAGENAME}}|2|1}}|num=One1Header4|dispreq= }} | ||
| + | {{ansreq|page={{#titleparts:{{PAGENAME}}|2|1}}|num=One7|dispreq=7}} | ||
| + | <noinclude><translate><!--T:90--> | ||
| + | </noinclude> | ||
| + | {{:AY Honors/Knot/Care_Of_Rope}} | ||
| + | <noinclude></translate></noinclude> | ||
| + | |||
| + | {{CloseReq}} <!--reqOne7--> | ||
| + | |||
| + | {{ansreq|page={{#titleparts:{{PAGENAME}}|2|1}}|num=One8|dispreq=8}} | ||
| + | |||
| + | {{CloseReq}} <!--reqOne8--> | ||
| + | {{ansreq|page={{#titleparts:{{PAGENAME}}|2|1}}|num=One9|dispreq=9}} | ||
| + | |||
| + | {{CloseReq}} <!--reqOne9--> | ||
| + | |||
| + | {{ansreq|page={{#titleparts:{{PAGENAME}}|2|1}}|num=One10|dispreq=10}} | ||
| + | |||
| + | {{CloseReq}} <!--reqOne10--> | ||
| + | {{CloseReq}} <!--reqOne1Header4--> | ||
| + | |||
| + | {{ansreq|page={{#titleparts:{{PAGENAME}}|2|1}}|num=One1Header5|dispreq= }} | ||
| + | <!-- There is no reqOne11 - just 11a and 11b --> | ||
| + | {{ansreq|page={{#titleparts:{{PAGENAME}}|2|1}}|num=One11a|dispreq=11 a.}} | ||
| + | <!-- 11 a. Know which descending device to use in different abseils. --> | ||
| + | {{CloseReq}} <!--reqOne11a--> | ||
| + | |||
| + | {{ansreq|page={{#titleparts:{{PAGENAME}}|2|1}}|num=One11b|dispreq=11 b.}} | ||
| + | <!-- 11 b. Give reasons why you chose that device, e.g. on/off time, security, heat, versatility, etc. --> | ||
| + | {{CloseReq}} <!--reqOne11b--> | ||
| + | {{CloseReq}} <!--reqOne1Header5--> | ||
| + | |||
| + | {{ansreq|page={{#titleparts:{{PAGENAME}}|2|1}}|num=One1Header6|dispreq= }} | ||
| + | {{ansreq|page={{#titleparts:{{PAGENAME}}|2|1}}|num=One12|dispreq=12}} | ||
| + | <!-- 12. Know about how to treat a patient for the following injuries: --> | ||
| + | |||
| + | {{ansreq|page={{#titleparts:{{PAGENAME}}|2|1}}|num=One12a|dispreq=a}} | ||
| + | <!-- a. Sprains --> | ||
| + | <noinclude><translate><!--T:91--> | ||
| + | </noinclude> | ||
| + | {{:AY Honors/First aid/Sprains}} | ||
| + | <noinclude></translate></noinclude> | ||
| + | {{CloseReq}} <!--reqOne12a--> | ||
| − | == | + | {{ansreq|page={{#titleparts:{{PAGENAME}}|2|1}}|num=One12b|dispreq=b}} |
| − | + | <!-- b. Concussion --> | |
| − | + | <noinclude><translate><!--T:92--> | |
| − | + | </noinclude> | |
| − | + | {{:AY Honors/First aid/Concussion}} | |
| − | + | <noinclude></translate></noinclude> | |
| − | + | {{CloseReq}} <!--reqOne12b--> | |
| − | |||
| − | |||
| − | |||
| − | |||
| − | |||
| − | {{: | ||
| − | === | + | {{ansreq|page={{#titleparts:{{PAGENAME}}|2|1}}|num=One12c|dispreq=c}} |
| − | + | <!--c. Hypothermia --> | |
| − | + | <noinclude><translate><!--T:93--> | |
| − | + | </noinclude> | |
| − | + | {{:AY Honors/First aid/Hypothermia}} | |
| − | + | <noinclude></translate></noinclude> | |
| + | {{CloseReq}} <!--reqOne12c--> | ||
| − | = | + | {{ansreq|page={{#titleparts:{{PAGENAME}}|2|1}}|num=One12d|dispreq=d}} |
| − | + | <!--d. Broken bone --> | |
| − | + | <noinclude><translate><!--T:94--> | |
| − | {{ | + | </noinclude> |
| − | |||
| − | |||
| − | == | ||
| − | |||
| − | |||
'''Splints''' | '''Splints''' | ||
| − | {{: | + | {{:AY Honors/First aid/Splints}} |
<!--T:12--> | <!--T:12--> | ||
| Line 77: | Line 167: | ||
<!--T:13--> | <!--T:13--> | ||
| − | {{: | + | {{:AY Honors/First aid/Forearm_splint}} |
<!--T:14--> | <!--T:14--> | ||
| Line 83: | Line 173: | ||
<!--T:15--> | <!--T:15--> | ||
| − | {{: | + | {{:AY Honors/First aid/Upper_arm_splint}} |
<!--T:16--> | <!--T:16--> | ||
| Line 89: | Line 179: | ||
<!--T:17--> | <!--T:17--> | ||
| − | {{: | + | {{:AY Honors/First aid/Kneecap_splint}} |
<!--T:18--> | <!--T:18--> | ||
| Line 95: | Line 185: | ||
<!--T:19--> | <!--T:19--> | ||
| − | {{: | + | {{:AY Honors/First aid/Ankle_splint}} |
| + | <noinclude></translate></noinclude> | ||
| + | |||
| + | {{CloseReq}} <!--reqOne12d--> | ||
| + | |||
| + | {{ansreq|page={{#titleparts:{{PAGENAME}}|2|1}}|num=One12e|dispreq=e}} | ||
| + | <!--e. Shock --> | ||
| + | <noinclude><translate><!--T:95--> | ||
| + | </noinclude> | ||
| + | {{:AY Honors/First aid/Shock}} | ||
| + | <noinclude></translate></noinclude> | ||
| + | |||
| + | {{CloseReq}} <!--reqOne12e--> | ||
| + | {{CloseReq}} <!--reqOne12--> | ||
| + | {{CloseReq}} <!--reqOne1Header5--> | ||
| + | |||
| + | {{ansreq|page={{#titleparts:{{PAGENAME}}|2|1}}|num=One1Header7|dispreq= }} | ||
| + | |||
| + | {{ansreq|page={{#titleparts:{{PAGENAME}}|2|1}}|num=One13|dispreq=13}} | ||
| + | <!--13. Explain how to perform the following rescues: --> | ||
| + | |||
| + | {{ansreq|page={{#titleparts:{{PAGENAME}}|2|1}}|num=One13a|dispreq=a}} | ||
| + | <!--a. The pulley system --> | ||
| + | |||
| + | {{CloseReq}} <!--reqOne13a--> | ||
| + | {{ansreq|page={{#titleparts:{{PAGENAME}}|2|1}}|num=One13b|dispreq=b}} | ||
| + | <!--b. The change-over method --> | ||
| + | |||
| + | {{CloseReq}} <!--reqOne13b--> | ||
| + | {{CloseReq}} <!--reqOne13--> | ||
| + | {{CloseReq}} <!--reqOne1Header7--> | ||
| + | {{CloseReq}} <!--reqOne--> | ||
| + | |||
| + | {{ansreq|page={{#titleparts:{{PAGENAME}}|2|1}}|num=Two|dispreq= }} | ||
| + | <!--Section Two - PRACTICAL --> | ||
| + | |||
| + | {{ansreq|page={{#titleparts:{{PAGENAME}}|2|1}}|num=Two1|dispreq=1}} | ||
| + | <!--1. Pass the abseiling exam with a pass mark of 60%. The exam is available from the conference youth ministries office, or through the instructor. --> | ||
| + | |||
| + | {{CloseReq}} <!--Two1 --> | ||
| + | |||
| + | {{ansreq|page={{#titleparts:{{PAGENAME}}|2|1}}|num=Two1Header1|dispreq= }} | ||
| + | <!--Verbal Testing --> | ||
| + | |||
| + | {{ansreq|page={{#titleparts:{{PAGENAME}}|2|1}}|num=Two2|dispreq=2}} | ||
| + | <!--2. Answer the questions on the following topics:--> | ||
| + | {{ansreq|page={{#titleparts:{{PAGENAME}}|2|1}}|num=Two2a|dispreq=a}} | ||
| + | <!--a. Uses of the six abseiling knots --> | ||
| + | |||
| + | {{CloseReq}} <!--Two2a --> | ||
| + | {{ansreq|page={{#titleparts:{{PAGENAME}}|2|1}}|num=Two2b|dispreq=b}} | ||
| + | <!--b. What are, and give the meaning of the standard climbing calls --> | ||
| + | |||
| + | {{CloseReq}} <!--Two2b --> | ||
| + | {{ansreq|page={{#titleparts:{{PAGENAME}}|2|1}}|num=Two2c|dispreq=c}} | ||
| + | <!--c. Uses of various descenders --> | ||
| + | |||
| + | {{CloseReq}} <!--Two2c --> | ||
| + | {{ansreq|page={{#titleparts:{{PAGENAME}}|2|1}}|num=Two2d|dispreq=d}} | ||
| + | <!--d. Give seven rules for care of rope --> | ||
| + | |||
| + | {{CloseReq}} <!--Two2d --> | ||
| + | {{ansreq|page={{#titleparts:{{PAGENAME}}|2|1}}|num=Two2e|dispreq=e}} | ||
| + | <!--e. Give seven rules for safety --> | ||
| + | |||
| + | {{CloseReq}} <!--Two2e --> | ||
| + | {{ansreq|page={{#titleparts:{{PAGENAME}}|2|1}}|num=Two2f|dispreq=f}} | ||
| + | <!--f. Know about first aid and how to treat patients --> | ||
| + | |||
| + | {{CloseReq}} <!--Two2f --> | ||
| + | {{ansreq|page={{#titleparts:{{PAGENAME}}|2|1}}|num=Two2g|dispreq=g}} | ||
| + | <!--g. Give five ways to detect faults of ropes --> | ||
| + | |||
| + | {{CloseReq}} <!--Two2g --> | ||
| + | {{CloseReq}} <!--Two2 --> | ||
| + | {{CloseReq}} <!--Two1Header1 --> | ||
| + | |||
| + | {{ansreq|page={{#titleparts:{{PAGENAME}}|2|1}}|num=Two1Header2|dispreq= }} | ||
| + | <!--Practical Testing--> | ||
| + | {{ansreq|page={{#titleparts:{{PAGENAME}}|2|1}}|num=Two3|dispreq=3}} | ||
| + | <!--3. Perform the following tasks: --> | ||
| + | |||
| + | {{ansreq|page={{#titleparts:{{PAGENAME}}|2|1}}|num=Two3a|dispreq=a}} | ||
| + | <!--a. Tie the six knots --> | ||
| + | |||
| + | {{CloseReq}} <!--Two3a --> | ||
| + | {{ansreq|page={{#titleparts:{{PAGENAME}}|2|1}}|num=Two3b|dispreq=b}} | ||
| + | <!--b. Set up the single rope setup and canyoning setup --> | ||
| + | |||
| + | {{CloseReq}} <!--Two3b --> | ||
| + | {{ansreq|page={{#titleparts:{{PAGENAME}}|2|1}}|num=Two3c|dispreq=c}} | ||
| + | <!--c. Witness a cliff rescue demonstrated by the instructor --> | ||
| + | |||
| + | {{CloseReq}} <!--Two3c --> | ||
| + | {{ansreq|page={{#titleparts:{{PAGENAME}}|2|1}}|num=Two3d|dispreq=d}} | ||
| + | <!--d. Coil and chain a rope --> | ||
| + | |||
| + | {{CloseReq}} <!--Two3d --> | ||
| + | {{ansreq|page={{#titleparts:{{PAGENAME}}|2|1}}|num=Two3e|dispreq=e}} | ||
| + | <!--e. Set up the belay methods --> | ||
| + | |||
| + | {{CloseReq}} <!--Two3e --> | ||
| + | {{CloseReq}} <!--Two3 --> | ||
| + | {{CloseReq}} <!--Two1Header2 --> | ||
| + | {{ansreq|page={{#titleparts:{{PAGENAME}}|2|1}}|num=Two1Header3|dispreq= }} | ||
| + | <!--Abseiling--> | ||
| + | {{ansreq|page={{#titleparts:{{PAGENAME}}|2|1}}|num=Two4|dispreq=4}} | ||
| + | <!--4. From a minimum height of 10 meters, complete two abseils on each of the following devices, and know how to attach them to the rope: --> | ||
| + | |||
| + | {{ansreq|page={{#titleparts:{{PAGENAME}}|2|1}}|num=Two4a|dispreq=a}} | ||
| + | <!--a. Whale tail --> | ||
| + | |||
| + | {{CloseReq}} <!--Two4a --> | ||
| + | {{ansreq|page={{#titleparts:{{PAGENAME}}|2|1}}|num=Two4b|dispreq=b}} | ||
| + | <!--b. Robot --> | ||
| + | |||
| + | {{CloseReq}} <!--Two4b --> | ||
| + | {{ansreq|page={{#titleparts:{{PAGENAME}}|2|1}}|num=Two4c|dispreq=c}} | ||
| + | <!--c. Harpoon (easy access) --> | ||
| + | |||
| + | {{CloseReq}} <!--Two4c --> | ||
| + | {{ansreq|page={{#titleparts:{{PAGENAME}}|2|1}}|num=Two4d|dispreq=d}} | ||
| + | <!--d. Figure of eight --> | ||
| + | |||
| + | {{CloseReq}} <!--Two4d --> | ||
| + | {{ansreq|page={{#titleparts:{{PAGENAME}}|2|1}}|num=Two4e|dispreq=e}} | ||
| + | <!--e. Piton-brake bar --> | ||
| − | + | {{CloseReq}} <!--Two4e --> | |
| − | {{: | + | {{ansreq|page={{#titleparts:{{PAGENAME}}|2|1}}|num=Two4f|dispreq=f}} |
| + | <!--f. Rappel-rack --> | ||
| − | + | {{CloseReq}} <!--Two4f --> | |
| − | = | + | {{ansreq|page={{#titleparts:{{PAGENAME}}|2|1}}|num=Two4g|dispreq=g}} |
| − | + | <!--g. Harpoon (conventional) --> | |
| − | |||
| − | + | {{CloseReq}} <!--Two4g --> | |
| − | = | + | {{ansreq|page={{#titleparts:{{PAGENAME}}|2|1}}|num=Two4h|dispreq=h}} |
| − | + | <!--h. Cross karabiner --> | |
| − | |||
| − | |||
| − | |||
| − | |||
| − | |||
| − | + | {{CloseReq}} <!--Two4h --> | |
| − | === | + | {{CloseReq}} <!--Two4 --> |
| − | + | {{ansreq|page={{#titleparts:{{PAGENAME}}|2|1}}|num=Two5|dispreq=5}} | |
| − | + | <!--5. Explain how to do the classic abseil, and over the shoulder abseil, for emergency use.--> | |
| − | + | {{CloseReq}} <!--Two5 --> | |
| − | === | + | {{ansreq|page={{#titleparts:{{PAGENAME}}|2|1}}|num=Two6|dispreq=6}} |
| − | + | <!--6. Be able to Prusik a ten-meter cliff. --> | |
| − | |||
| − | |||
| − | |||
| − | |||
| − | + | {{CloseReq}} <!--Two5 --> | |
| − | + | {{CloseReq}} <!--Two1Header3 --> | |
| − | + | {{CloseReq}} <!--reqTwo--> | |
| − | |||
| − | |||
| − | |||
| − | |||
| − | |||
| − | |||
| − | |||
| − | |||
| − | ==See Also== | + | <noinclude><translate></noinclude> |
| − | [[ | + | ==See Also== <!--T:96--> |
| + | [[AY Honors/Abseiling_-_Instructor|Abseiling - Instructor]] | ||
==References== | ==References== | ||
| − | |||
<noinclude></translate></noinclude> | <noinclude></translate></noinclude> | ||
| − | + | <section end=Body /> | |
| + | {{CloseHonorPage}} | ||
Latest revision as of 01:27, 17 September 2021
1
a
b
2
a
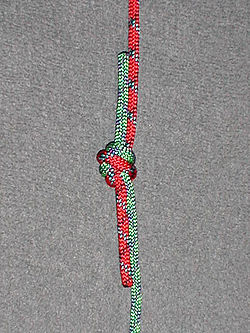
| Ring Bend (Water Knot, Tape Knot) |
|---|
|
Use: The water knot (or tape knot) is a knot frequently used in climbing for joining two ends of webbing together, for instance when making a sling.
The ends should be left at least three inches long and the knot should be "set" by tightening it with full body weight. The ends can be taped or lightly sewn to the standing parts to help prevent them from creeping back into the knot. Inspect the knot before each use.
How to tie:
|
b
| Alpine butterfly |
|---|
|
Use: The Butterfly Loop has a high breaking strength and is regarded by mountaineers as one of the strongest knots to attach climbers to the middle of a rope, such that they have room to move around even when the main rope goes tight, and they can be supported in either direction from the main rope. The loop is typically attached to a climbing harness by carabiner.
It can also be used to isolate a worn section of rope, where the knot is tied such that the worn section is used for the center of the loop.
|
c
| Figure Eight |
|---|
|
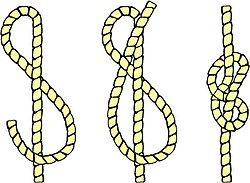
Use: This knot is ideal for keeping the end of a rope from running out of tackle or pulley.
How to tie:
|
d
| Double Fisherman's Knot |
|---|
|
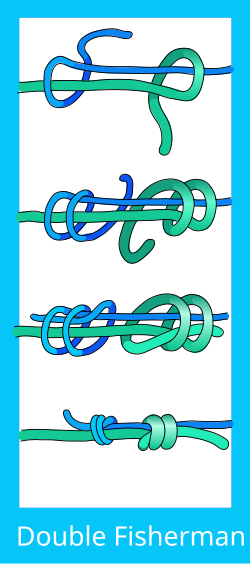
Use: Joining thin, stiff or slippery lines, backing up critical knots such as the Figure-of-eight loop or Figure-of-eight follow through.
Use the double fisherman's knot to tie together two ropes of unequal sizes. This knot and the triple fisherman's knot are the variations used most often in rock climbing, but other uses include search and rescue. The primary use of this knot in rock climbing is to form high strength loops of cord for connecting pieces of the rock climber's protection system. It is favoured for being compact, and for arranging the line of force in a straight line through the knot. Another common use for this knot is to back up a critical knot, such as a harness tie-in knot or single-line rappel rigs. In this use, the running end is tied around the standing end of the rope, so that it cannot slip back through the knot.How to tie:
|
e
f
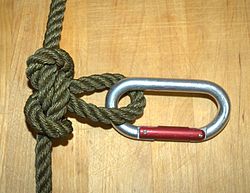
| Bowline |
|---|
|
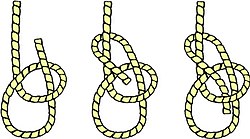
Use: This knot doesn't jam or slip when tied properly. It can be tied around a person's waist and used to lift him, because the loop will not tighten under load. In sailing, the bowline is used to tie a halyard to a sail head.
How to tie:
|
3
a
b
4
5
6
a
b
c
7
- a. Keep the rope clean.
- b. Always coil a rope before storing it.
- c. Make sure wet rope is dry before coiling it.
- d. Return rope to its proper place after using it.
8
9
10
11 a.
11 b.
12
a
b
c
Hypothermia is caused by continued exposure to low or rapidly falling temperatures, cold moisture, snow, or ice. Those exposed to low temperatures for extended periods may suffer ill effects, even if they are well protected by clothing, because cold affects the body systems slowly, almost without notice. As the body cools, there are several stages of progressive discomfort and disability. he first symptom is shivering, which is an attempt to generate heat by repeated contractions of surface muscles. This is followed by a feeling of listlessness, indifference, and drowsiness. Unconsciousness can follow quickly. Shock becomes evident as the victim’s eyes assume a glassy stare, respiration becomes slow and shallow, and the pulse is weak or absent. As the body temperature drops even lower, peripheral circulation decreases and the extremities become susceptible to freezing. Finally, death results as the core temperature of the body approaches 80°F (27°C). The steps for treatment of hypothermia are as follows:
- Carefully observe respiratory effort and heart beat; CPR may be required while the warming process is underway.
- Rewarm the victim as soon as possible. It may be necessary to treat other injuries before the victim can be moved to a warmer place. Severe bleeding must be controlled and fractures splinted over clothing before the victim is moved.
- Replace wet or frozen clothing and remove anything that constricts the victim’s arms, legs, or fingers, interfering with circulation.
- If the victim is inside a warm place and is conscious, the most effective method of warming is immersion in a tub of warm (100° to 105°F or 38° to 41°C) water. The water should be warm to the elbow - never hot. Observe closely for signs of respiratory failure and cardiac arrest (rewarming shock). Rewarming shock can be minimized by warming the body trunk before the limbs to prevent vasodilation in the extremities with subsequent shock due to blood volume shifts.
- If a tub is not available, apply external heat to both sides of the victim. Natural body heat (skin to skin) from two rescuers is the best method. This is called “buddy warming.” If this is not practical, use hot water bottles or an electric rewarming blanket. Do not place the blanket or bottles next to bare skin, however, and be careful to monitor the temperature of the artificial heat source, since the victim is very susceptible to burn injury. Because the victim is unable to generate adequate body heat, placement under a blanket or in a sleeping bag is not sufficient treatment.
- If the victim is conscious, give warm liquids to drink. Never give alcoholic beverages or allow the victim to smoke.
- Dry the victim thoroughly if water is used for rewarming.
- As soon as possible, transfer the victim to a definitive care facility. Be alert for the signs of respiratory and cardiac arrest during transfer, and keep the victim warm.
d
Splints
An essential part of the first-aid treatment is immobilizing the injured part with splints so that the sharp ends of broken bones won’t move around and cause further damage to nerves, blood vessels, or vital organs. Splints are also used to immobilize severely injured joints or muscles and to prevent the enlargement of extensive wounds.
Before you can use a splint, you need to have a general understanding of the use of splints. In an emergency, almost any firm object or material can be used as a splint. Such things as umbrellas, canes, tent pegs, sticks, oars, paddles, spars, wire, leather, boards, pillows, heavy clothing, corrugated cardboard, and folded newspapers can be used as splints. A fractured leg may sometimes be splinted by fastening it securely to the uninjured leg. Splints, whether ready-made or improvised, must meet the following requirements:
- Be light in weight, but still be strong and fairly rigid.
- Be long enough to reach the joints above and below the fracture.
- Be wide enough so the bandages used to hold them in place won’t pinch the injured part.
- Be well padded on the sides that touch the body. If they’re not properly padded, they won’t fit well and won’t adequately immobilize the injured part.
- To improvise the padding for a splint, use articles of clothing, bandages, cotton, blankets, or any other soft material.
- If the victim is wearing heavy clothes, apply the splint on the outside, allowing the clothing to serve as at least part of the required padding.
Although splints should be applied snugly, never apply them tight enough to interfere with the circulation of the blood. When applying splints to an arm or a leg, try to leave the fingers or toes exposed. If the tips of the fingers or toes become blue or cold, you will know that the splints or bandages are too tight. You should examine a splinted part approximately every half-hour, and loosen the fastenings if circulation appears to be cut off. Remember that any injured part is likely to swell, and splints or bandages that are all right when applied may be too tight later.
To secure the limb to the splint, belts, neckerchiefs, rope, or any suitable material may be used. If possible, tie the limb at two places above and two places below the break. Leave the treatment of other types of fractures, such as jaw, ribs, and spine, to medical personnel. Never try to move a person who might have a fractured spine or neck. Moving such a person could cause permanent paralysis. Don’t attempt to reset bones.
Forearm
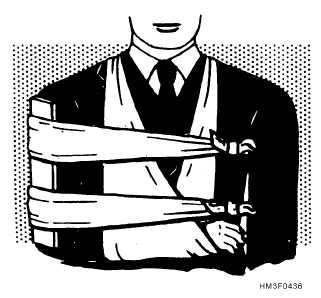
There are two long bones in the forearm, the radius and the ulna. When both are broken, the arm usually appears to be deformed. When only one is broken, the other acts as a splint and the arm retains a more or less natural appearance. Any fracture of the forearm is likely to result in pain, tenderness, inability to use the forearm, and a kind of wobbly motion at the point of injury. If the fracture is open, a bone will show through. If the fracture is open, stop the bleeding and treat the wound. Apply a sterile dressing over the wound. Carefully straighten the forearm. (Remember that rough handling of a closed fracture may turn it into an open fracture.) Apply two well-padded splints to the forearm, one on the top and one on the bottom. Be sure that the splints are long enough to extend from the elbow to the wrist. Use bandages to hold the splints in place. Put the forearm across the chest. The palm of the hand should be turned in, with the thumb pointing upward. Support the forearm in this position by means of a wide sling and a cravat bandage (see illustration). The hand should be raised about 4 inches above the level of the elbow. Treat the victim for shock and evacuate as soon as possible.
Upper Arm
The signs of fracture of the upper arm include pain, tenderness, swelling, and a wobbly motion at the point of fracture. If the fracture is near the elbow, the arm is likely to be straight with no bend at the elbow. If the fracture is open, stop the bleeding and treat the wound before attempting to treat the fracture.
- NOTE
- Treatment of the fracture depends partly upon the location of the break.
If the fracture is in the upper part of the arm near the shoulder, place a pad or folded towel in the armpit, bandage the arm securely to the body, and support the forearm in a narrow sling.
If the fracture is in the middle of the upper arm, you can use one well-padded splint on the outside of the arm. The splint should extend from the shoulder to the elbow. Fasten the splinted arm firmly to the body and support the forearm in a narrow sling, as illustrated.
Another way of treating a fracture in the middle of the upper arm is to fasten two wide splints (or four narrow ones) about the arm and then support the forearm in a narrow sling. If you use a splint between the arm and the body, be very careful that it does not extend too far up into the armpit; a splint in this position can cause a dangerous compression of the blood vessels and nerves and may be extremely painful to the victim. If the fracture is at or near the elbow, the arm may be either bent or straight. No matter in what position you find the arm, DO NOT ATTEMPT TO STRAIGHTEN IT OR MOVE IT IN ANY WAY. Splint the arm as carefully as possible in the position in which you find it. This will prevent further nerve and blood vessel damage. The only exception to this is if there is no pulse on the other side of the fracture (relative to the heart), in which case gentle traction is applied and then the arm is splinted. Treat the victim for shock and get him under the care of a medical professional as soon as possible.
Kneecap
Carefully straighten the injured limb. Immobilize the fracture by placing a padded board under the injured limb. The board should be at least 4 inches wide and should reach from the buttock to the heel. Place extra padding under the knee and just above the heel, as shown in the illustration. Use strips of bandage to fasten the leg to the board in four places: (1) just below the knee; (2) just above the knee; (3) at the ankle; and (4) at the thigh. DO NOT COVER THE KNEE ITSELF. Swelling is likely to occur very rapidly, and any bandage or tie fastened over the knee would quickly become too tight. Treat the victim for shock and evacuate as
Ankle
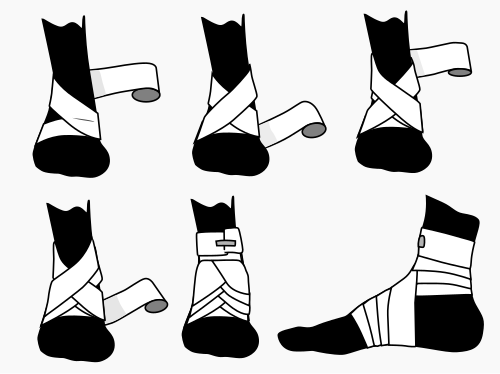
The figure-eight bandage is used for dressings of the ankle, as well as for supporting a sprain. While keeping the foot at a right angle, start a 3-inch bandage around the instep for several turns to anchor it. Carry the bandage upward over the instep and around behind the ankle, forward, and again across the instep and down under the arch, thus completing one figure-eight. Continue the figure-eight turns, overlapping one-third to one-half the width of the bandage and with an occasional turn around the ankle, until the compress is secured or until adequate support is obtained.
e
Shock is a medical condition where the delivery of oxygen and nutrients is insufficient to meet the body's needs. The main carrier of oxygen and nutrients in the body is the blood, so anytime there is a loss of blood, there is a risk of shock. Shock is a life-threatening emergency.
First aid treatment of shock includes:
- Immediate reassurance and comforting the victim if conscious.
- If alone, go for help. If not, send someone to go for help and someone stay with the victim.
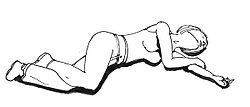
- Ensure that the airway is clear and check for breathing. Place the victim in the recovery position if possible.
- Attempt to stop any obvious bleeding.
- Cover the victim with a blanket or jacket, but not too thick or it may cause a dangerous drop in blood pressure.
- Do not give a drink. Moisten lips if requested.
- Prepare for cardiopulmonary resuscitation (CPR).
- Give as much information as possible when the ambulance arrives.
13
a
b
1
2
a
b
c
d
e
f
g
3
a
b
c
d
e
4
a
b
c
d
e
f
g
h
5
6
