Difference between revisions of "AY Honors/Pioneering/Answer Key/es"
(Created page with "{{clear}}") |
(Updating to match new version of source page) |
||
| (123 intermediate revisions by 2 users not shown) | |||
| Line 1: | Line 1: | ||
| − | + | {{HonorSubpage}} | |
| − | |||
| − | {{ | ||
| − | |||
| − | |||
| − | |||
| − | |||
| − | |||
| − | |||
| − | |||
| − | }} | ||
| − | |||
| − | |||
| − | |||
| − | |||
| − | |||
| − | |||
| − | |||
<section begin="Body" /> | <section begin="Body" /> | ||
{{ansreq|page={{#titleparts:{{PAGENAME}}|2|1}}|num=1}} | {{ansreq|page={{#titleparts:{{PAGENAME}}|2|1}}|num=1}} | ||
| Line 23: | Line 6: | ||
<noinclude></noinclude> | <noinclude></noinclude> | ||
{{ansreq|page={{#titleparts:{{PAGENAME}}|2|1}}|num=1a}} | {{ansreq|page={{#titleparts:{{PAGENAME}}|2|1}}|num=1a}} | ||
| − | <noinclude></noinclude> | + | <noinclude> |
| + | </noinclude> | ||
{{clear}} | {{clear}} | ||
| Line 32: | Line 16: | ||
{{clear}} | {{clear}} | ||
| − | {{clear}} | + | {{clear}} |
{{clear}} | {{clear}} | ||
| Line 45: | Line 29: | ||
{{clear}} | {{clear}} | ||
| − | {{clear}} | + | {{clear}} |
{{clear}} | {{clear}} | ||
| − | + | {{clear}} | |
| − | + | {{clear}} | |
| − | + | {{clear}} | |
<noinclude></noinclude> | <noinclude></noinclude> | ||
| Line 59: | Line 43: | ||
{{ansreq|page={{#titleparts:{{PAGENAME}}|2|1}}|num=1c}} <!--T:17--> | {{ansreq|page={{#titleparts:{{PAGENAME}}|2|1}}|num=1c}} <!--T:17--> | ||
<noinclude></noinclude> | <noinclude></noinclude> | ||
| − | |||
| − | + | {{clear}} | |
<noinclude></noinclude> | <noinclude></noinclude> | ||
| Line 67: | Line 50: | ||
{{ansreq|page={{#titleparts:{{PAGENAME}}|2|1}}|num=1d}} <!--T:19--> | {{ansreq|page={{#titleparts:{{PAGENAME}}|2|1}}|num=1d}} <!--T:19--> | ||
<noinclude></noinclude> | <noinclude></noinclude> | ||
| − | |||
<noinclude></noinclude> | <noinclude></noinclude> | ||
| Line 73: | Line 55: | ||
{{ansreq|page={{#titleparts:{{PAGENAME}}|2|1}}|num=1e}} <!--T:20--> | {{ansreq|page={{#titleparts:{{PAGENAME}}|2|1}}|num=1e}} <!--T:20--> | ||
<noinclude></noinclude> | <noinclude></noinclude> | ||
| − | |||
| − | + | {{clear}} | |
| − | + | {{clear}} | |
| − | + | {{clear}} | |
| − | + | {{clear}} | |
| − | + | {{clear}} | |
| − | + | {{clear}} | |
<noinclude></noinclude> | <noinclude></noinclude> | ||
| Line 91: | Line 72: | ||
{{ansreq|page={{#titleparts:{{PAGENAME}}|2|1}}|num=1f}} <!--T:27--> | {{ansreq|page={{#titleparts:{{PAGENAME}}|2|1}}|num=1f}} <!--T:27--> | ||
<noinclude></noinclude> | <noinclude></noinclude> | ||
| − | |||
<noinclude></noinclude> | <noinclude></noinclude> | ||
| Line 97: | Line 77: | ||
{{ansreq|page={{#titleparts:{{PAGENAME}}|2|1}}|num=1g}} <!--T:28--> | {{ansreq|page={{#titleparts:{{PAGENAME}}|2|1}}|num=1g}} <!--T:28--> | ||
<noinclude></noinclude> | <noinclude></noinclude> | ||
| − | |||
| − | + | {{clear}} | |
| − | + | {{clear}} | |
| − | |||
<noinclude></noinclude> | <noinclude></noinclude> | ||
| Line 108: | Line 86: | ||
{{ansreq|page={{#titleparts:{{PAGENAME}}|2|1}}|num=1h}} <!--T:31--> | {{ansreq|page={{#titleparts:{{PAGENAME}}|2|1}}|num=1h}} <!--T:31--> | ||
<noinclude></noinclude> | <noinclude></noinclude> | ||
| − | |||
| − | + | {{clear}} | |
| − | |||
| − | + | {{clear}} | |
| − | |||
| − | + | {{clear}} | |
| − | + | {{clear}} | |
| − | + | {{clear}} | |
| − | + | {{clear}} | |
<noinclude></noinclude> | <noinclude></noinclude> | ||
| Line 129: | Line 104: | ||
{{ansreq|page={{#titleparts:{{PAGENAME}}|2|1}}|num=2}} | {{ansreq|page={{#titleparts:{{PAGENAME}}|2|1}}|num=2}} | ||
<noinclude></noinclude> | <noinclude></noinclude> | ||
| − | <!-- 2. | + | <!-- 2. Construir una pieza de mobiliario útil con amarres. Aprender los siguientes amarres: --> |
<noinclude></noinclude> | <noinclude></noinclude> | ||
{{ansreq|page={{#titleparts:{{PAGENAME}}|2|1}}|num=2a}} | {{ansreq|page={{#titleparts:{{PAGENAME}}|2|1}}|num=2a}} | ||
<noinclude></noinclude> | <noinclude></noinclude> | ||
| − | {{: | + | {{:AY Honors/Lashing/Square/es}} |
<br style="clear:both"> | <br style="clear:both"> | ||
<noinclude></noinclude> | <noinclude></noinclude> | ||
| Line 139: | Line 114: | ||
{{ansreq|page={{#titleparts:{{PAGENAME}}|2|1}}|num=2b}} | {{ansreq|page={{#titleparts:{{PAGENAME}}|2|1}}|num=2b}} | ||
<noinclude></noinclude> | <noinclude></noinclude> | ||
| − | {{: | + | {{:AY Honors/Lashing/Diagonal/es}} |
<br style="clear:both"> | <br style="clear:both"> | ||
<noinclude></noinclude> | <noinclude></noinclude> | ||
| Line 145: | Line 120: | ||
{{ansreq|page={{#titleparts:{{PAGENAME}}|2|1}}|num=2c}} | {{ansreq|page={{#titleparts:{{PAGENAME}}|2|1}}|num=2c}} | ||
<noinclude></noinclude> | <noinclude></noinclude> | ||
| − | {{: | + | {{:AY Honors/Lashing/Shear/es}} |
<br style="clear:both"> | <br style="clear:both"> | ||
<noinclude></noinclude> | <noinclude></noinclude> | ||
| Line 151: | Line 126: | ||
{{ansreq|page={{#titleparts:{{PAGENAME}}|2|1}}|num=2d}} | {{ansreq|page={{#titleparts:{{PAGENAME}}|2|1}}|num=2d}} | ||
<noinclude></noinclude> | <noinclude></noinclude> | ||
| − | {{: | + | {{:AY Honors/Lashing/Continuous/es}} |
<br style="clear:both"> | <br style="clear:both"> | ||
| Line 159: | Line 134: | ||
{{ansreq|page={{#titleparts:{{PAGENAME}}|2|1}}|num=3}} | {{ansreq|page={{#titleparts:{{PAGENAME}}|2|1}}|num=3}} | ||
<noinclude></noinclude> | <noinclude></noinclude> | ||
| − | <!-- 3. | + | <!-- 3. Realizar una de las siguientes actividades: --> |
<noinclude></noinclude> | <noinclude></noinclude> | ||
{{ansreq|page={{#titleparts:{{PAGENAME}}|2|1}}|num=3a}} | {{ansreq|page={{#titleparts:{{PAGENAME}}|2|1}}|num=3a}} | ||
| − | <noinclude> | + | <noinclude>Véase la especialidad de [[AY Honors/Basketry/es|Cestería]] para más instrucción. |
| − | |||
<noinclude></noinclude> | <noinclude></noinclude> | ||
| Line 169: | Line 143: | ||
{{ansreq|page={{#titleparts:{{PAGENAME}}|2|1}}|num=3b}} <!--T:40--> | {{ansreq|page={{#titleparts:{{PAGENAME}}|2|1}}|num=3b}} <!--T:40--> | ||
<noinclude></noinclude> | <noinclude></noinclude> | ||
| − | {{: | + | {{:AY Honors/Make moccasins/es}} |
<noinclude></noinclude> | <noinclude></noinclude> | ||
| Line 175: | Line 149: | ||
{{ansreq|page={{#titleparts:{{PAGENAME}}|2|1}}|num=3c}} <!--T:41--> | {{ansreq|page={{#titleparts:{{PAGENAME}}|2|1}}|num=3c}} <!--T:41--> | ||
<noinclude></noinclude> | <noinclude></noinclude> | ||
| − | |||
| − | |||
<noinclude></noinclude> | <noinclude></noinclude> | ||
| Line 182: | Line 154: | ||
{{ansreq|page={{#titleparts:{{PAGENAME}}|2|1}}|num=3d}} <!--T:42--> | {{ansreq|page={{#titleparts:{{PAGENAME}}|2|1}}|num=3d}} <!--T:42--> | ||
<noinclude></noinclude> | <noinclude></noinclude> | ||
| − | |||
| − | + | {{clear}} | |
| − | |||
| − | |||
| − | + | {{clear}} | |
| − | |||
| − | |||
| − | |||
| − | |||
| − | |||
| − | |||
| − | |||
| − | {{clear}} | ||
<noinclude></noinclude> | <noinclude></noinclude> | ||
| Line 203: | Line 164: | ||
{{ansreq|page={{#titleparts:{{PAGENAME}}|2|1}}|num=4}} | {{ansreq|page={{#titleparts:{{PAGENAME}}|2|1}}|num=4}} | ||
<noinclude></noinclude> | <noinclude></noinclude> | ||
| − | <!-- 4. | + | <!-- 4. Saber cómo hacer harina de al menos una planta silvestre para ser utilizada en la cocción al horno. --> |
| − | |||
| − | + | {{clear}} | |
<noinclude></noinclude> | <noinclude></noinclude> | ||
| Line 212: | Line 172: | ||
{{ansreq|page={{#titleparts:{{PAGENAME}}|2|1}}|num=5}} | {{ansreq|page={{#titleparts:{{PAGENAME}}|2|1}}|num=5}} | ||
<noinclude></noinclude> | <noinclude></noinclude> | ||
| − | <!-- 5. | + | <!-- 5. Construir una fogata sin fósforos. Usar materiales naturales de construcción de fogatas. Mantener la fogata durante cinco minutos. Se puede utilizar los siguientes artículos para iniciar el fuego: --> |
<noinclude></noinclude> | <noinclude></noinclude> | ||
{{ansreq|page={{#titleparts:{{PAGENAME}}|2|1}}|num=5a}} | {{ansreq|page={{#titleparts:{{PAGENAME}}|2|1}}|num=5a}} | ||
<noinclude></noinclude> | <noinclude></noinclude> | ||
| − | {{: | + | {{:AY Honors/Camping/Fire/Flint and steel/es}} |
<noinclude></noinclude> | <noinclude></noinclude> | ||
{{CloseReq}} <!-- 5a --> | {{CloseReq}} <!-- 5a --> | ||
{{ansreq|page={{#titleparts:{{PAGENAME}}|2|1}}|num=5b}} | {{ansreq|page={{#titleparts:{{PAGENAME}}|2|1}}|num=5b}} | ||
<noinclude></noinclude> | <noinclude></noinclude> | ||
| − | {{: | + | {{:AY Honors/Camping/Fire/Friction/es}} |
<noinclude></noinclude> | <noinclude></noinclude> | ||
{{CloseReq}} <!-- 5b --> | {{CloseReq}} <!-- 5b --> | ||
| Line 228: | Line 188: | ||
{| border=1 cellpadding=5 cellspacing=5 style="background:#ffff80" | {| border=1 cellpadding=5 cellspacing=5 style="background:#ffff80" | ||
|[[Image:Stop hand.svg|40px|left]] | |[[Image:Stop hand.svg|40px|left]] | ||
| − | ''' | + | '''Nota:''' Esta técnica, aunque aparece como una opción en los requisitos oficiales, no estaba disponible para los pioneros. Por lo tanto, recomendamos que no se utilice para enseñar esta especialidad. |
|} | |} | ||
| − | {{: | + | {{:AY Honors/Camping/Fire/Electric spark/es}} |
<noinclude></noinclude> | <noinclude></noinclude> | ||
{{CloseReq}} <!-- 5c --> | {{CloseReq}} <!-- 5c --> | ||
{{ansreq|page={{#titleparts:{{PAGENAME}}|2|1}}|num=5d}} | {{ansreq|page={{#titleparts:{{PAGENAME}}|2|1}}|num=5d}} | ||
<noinclude></noinclude> | <noinclude></noinclude> | ||
| − | {{: | + | {{:AY Honors/Camping/Fire/Curved glass/es}} |
<noinclude></noinclude> | <noinclude></noinclude> | ||
{{CloseReq}} <!-- 5d --> | {{CloseReq}} <!-- 5d --> | ||
{{ansreq|page={{#titleparts:{{PAGENAME}}|2|1}}|num=5e}} | {{ansreq|page={{#titleparts:{{PAGENAME}}|2|1}}|num=5e}} | ||
<noinclude></noinclude> | <noinclude></noinclude> | ||
| − | {{: | + | {{:AY Honors/Camping/Fire/Metal match/es}} |
<noinclude></noinclude> | <noinclude></noinclude> | ||
{{CloseReq}} <!-- 5e --> | {{CloseReq}} <!-- 5e --> | ||
| Line 247: | Line 207: | ||
{| border=1 cellpadding=5 cellspacing=5 style="background:#ffff80" | {| border=1 cellpadding=5 cellspacing=5 style="background:#ffff80" | ||
|[[Image:Stop hand.svg|40px|left]] | |[[Image:Stop hand.svg|40px|left]] | ||
| − | ''' | + | '''Nota:''' Al igual que con la técnica de la «chispa eléctrica», los pioneros desconocían este método de encender fuego. Nuevamente, recomendamos no usar esta opción para cumplir con el requisito. |
|} | |} | ||
| − | {{: | + | {{:AY Honors/Camping/Fire/Compressed air/es}} |
<noinclude></noinclude> | <noinclude></noinclude> | ||
| Line 256: | Line 216: | ||
{{ansreq|page={{#titleparts:{{PAGENAME}}|2|1}}|num=6}} | {{ansreq|page={{#titleparts:{{PAGENAME}}|2|1}}|num=6}} | ||
<noinclude></noinclude> | <noinclude></noinclude> | ||
| − | <!-- 6. | + | <!-- 6. Mostrar los siguientes conocimientos en las habilidades con el hacha: --> |
| − | |||
<noinclude></noinclude> | <noinclude></noinclude> | ||
{{ansreq|page={{#titleparts:{{PAGENAME}}|2|1}}|num=6a}} | {{ansreq|page={{#titleparts:{{PAGENAME}}|2|1}}|num=6a}} | ||
<noinclude></noinclude> | <noinclude></noinclude> | ||
| − | |||
| − | |||
| − | |||
| − | |||
<noinclude></noinclude> | <noinclude></noinclude> | ||
{{CloseReq}} <!-- 6a --> | {{CloseReq}} <!-- 6a --> | ||
{{ansreq|page={{#titleparts:{{PAGENAME}}|2|1}}|num=6b}} | {{ansreq|page={{#titleparts:{{PAGENAME}}|2|1}}|num=6b}} | ||
| − | <noinclude></noinclude> | + | <noinclude> |
| − | + | </noinclude> | |
<noinclude></noinclude> | <noinclude></noinclude> | ||
{{CloseReq}} <!-- 6b --> | {{CloseReq}} <!-- 6b --> | ||
{{ansreq|page={{#titleparts:{{PAGENAME}}|2|1}}|num=6c}} <!--T:49--> | {{ansreq|page={{#titleparts:{{PAGENAME}}|2|1}}|num=6c}} <!--T:49--> | ||
| − | <noinclude></noinclude> | + | <noinclude></noinclude> |
| − | |||
| − | + | {{clear}} | |
| − | + | {{clear}} | |
| − | + | {{clear}} | |
<noinclude></noinclude> | <noinclude></noinclude> | ||
| Line 287: | Line 241: | ||
{{ansreq|page={{#titleparts:{{PAGENAME}}|2|1}}|num=6d}} <!--T:53--> | {{ansreq|page={{#titleparts:{{PAGENAME}}|2|1}}|num=6d}} <!--T:53--> | ||
<noinclude></noinclude> | <noinclude></noinclude> | ||
| − | |||
<noinclude></noinclude> | <noinclude></noinclude> | ||
| Line 293: | Line 246: | ||
{{ansreq|page={{#titleparts:{{PAGENAME}}|2|1}}|num=6e}} <!--T:54--> | {{ansreq|page={{#titleparts:{{PAGENAME}}|2|1}}|num=6e}} <!--T:54--> | ||
<noinclude></noinclude> | <noinclude></noinclude> | ||
| − | |||
| − | |||
<noinclude></noinclude> | <noinclude></noinclude> | ||
{{CloseReq}} <!-- 6e --> | {{CloseReq}} <!-- 6e --> | ||
{{ansreq|page={{#titleparts:{{PAGENAME}}|2|1}}|num=6f}} | {{ansreq|page={{#titleparts:{{PAGENAME}}|2|1}}|num=6f}} | ||
<noinclude></noinclude> | <noinclude></noinclude> | ||
| − | {{: | + | {{:AY Honors/Camping/Splitting firewood/es}} |
<noinclude></noinclude> | <noinclude></noinclude> | ||
| Line 306: | Line 257: | ||
{{ansreq|page={{#titleparts:{{PAGENAME}}|2|1}}|num=7}} | {{ansreq|page={{#titleparts:{{PAGENAME}}|2|1}}|num=7}} | ||
<noinclude></noinclude> | <noinclude></noinclude> | ||
| − | <!-- 7. | + | <!-- 7. Hacer dos de las siguientes actividades: --> |
<noinclude></noinclude> | <noinclude></noinclude> | ||
{{ansreq|page={{#titleparts:{{PAGENAME}}|2|1}}|num=7a}} | {{ansreq|page={{#titleparts:{{PAGENAME}}|2|1}}|num=7a}} | ||
<noinclude></noinclude> | <noinclude></noinclude> | ||
| − | {{: | + | {{:AY Honors/Knot/Making rope/es}} |
<noinclude></noinclude> | <noinclude></noinclude> | ||
| Line 316: | Line 267: | ||
{{ansreq|page={{#titleparts:{{PAGENAME}}|2|1}}|num=7b}} <!--T:56--> | {{ansreq|page={{#titleparts:{{PAGENAME}}|2|1}}|num=7b}} <!--T:56--> | ||
<noinclude></noinclude> | <noinclude></noinclude> | ||
| − | {{: | + | {{:AY Honors/Knot/Bowline/es}} |
| − | {{: | + | {{:AY Honors/Knot/Bowline on a bight/es}} |
| − | {{: | + | {{:AY Honors/Knot/Clove hitch/es}} |
| − | {{: | + | {{:AY Honors/Knot/Double fishermans/es}} |
| − | {{: | + | {{:AY Honors/Knot/Figure 8/es}} |
| − | {{: | + | {{:AY Honors/Knot/Prusik/es}} |
| − | {{: | + | {{:AY Honors/Knot/Sheepshank/es}} |
| − | {{: | + | {{:AY Honors/Knot/Square/es}} |
| − | {{: | + | {{:AY Honors/Knot/Taut-line hitch/es}} |
| − | {{: | + | {{:AY Honors/Knot/Two half hitches/es}} |
<noinclude></noinclude> | <noinclude></noinclude> | ||
| Line 340: | Line 291: | ||
{{ansreq|page={{#titleparts:{{PAGENAME}}|2|1}}|num=7c}} <!--T:66--> | {{ansreq|page={{#titleparts:{{PAGENAME}}|2|1}}|num=7c}} <!--T:66--> | ||
<noinclude></noinclude> | <noinclude></noinclude> | ||
| − | |||
| − | + | {{clear}} | |
| − | + | {{clear}} | |
<noinclude></noinclude> | <noinclude></noinclude> | ||
| Line 350: | Line 300: | ||
{{ansreq|page={{#titleparts:{{PAGENAME}}|2|1}}|num=7d}} <!--T:69--> | {{ansreq|page={{#titleparts:{{PAGENAME}}|2|1}}|num=7d}} <!--T:69--> | ||
<noinclude></noinclude> | <noinclude></noinclude> | ||
| − | {{: | + | {{:AY Honors/Camping/Latrine/es}} |
<noinclude></noinclude> | <noinclude></noinclude> | ||
| Line 357: | Line 307: | ||
{{ansreq|page={{#titleparts:{{PAGENAME}}|2|1}}|num=8}} | {{ansreq|page={{#titleparts:{{PAGENAME}}|2|1}}|num=8}} | ||
<noinclude></noinclude> | <noinclude></noinclude> | ||
| − | <!-- 8. | + | <!-- 8. Explicar la necesidad de un saneamiento adecuado en relación con los desechos sólidos humanos y el lavado del agua, del cuerpo, la ropa y los platos. --> |
| − | |||
| − | + | {{clear}} | |
| − | + | {{clear}} | |
| − | + | {{clear}} | |
<noinclude></noinclude> | <noinclude></noinclude> | ||
| Line 370: | Line 319: | ||
{{ansreq|page={{#titleparts:{{PAGENAME}}|2|1}}|num=9}} | {{ansreq|page={{#titleparts:{{PAGENAME}}|2|1}}|num=9}} | ||
<noinclude></noinclude> | <noinclude></noinclude> | ||
| − | <!-- 9. | + | <!-- 9. Ayudar en la construcción de un puente de troncos o cuerda de 10 pies (3 metros) de largo utilizando amarres. --> |
| − | |||
| − | |||
| − | + | {{clear}} | |
<noinclude></noinclude> | <noinclude></noinclude> | ||
| Line 380: | Line 327: | ||
{{ansreq|page={{#titleparts:{{PAGENAME}}|2|1}}|num=10}} | {{ansreq|page={{#titleparts:{{PAGENAME}}|2|1}}|num=10}} | ||
<noinclude></noinclude> | <noinclude></noinclude> | ||
| − | <!-- | + | <!-- Conocer cuatro maneras de mantener bello los lugares al aire libre. --> |
| − | |||
| − | |||
| − | |||
| − | |||
| − | |||
| − | |||
| − | |||
<noinclude></noinclude> | <noinclude></noinclude> | ||
| Line 393: | Line 333: | ||
{{ansreq|page={{#titleparts:{{PAGENAME}}|2|1}}|num=11}} | {{ansreq|page={{#titleparts:{{PAGENAME}}|2|1}}|num=11}} | ||
<noinclude></noinclude> | <noinclude></noinclude> | ||
| − | <!-- 11. | + | <!-- 11. Hacer dos de las siguientes actividades: --> |
<noinclude></noinclude> | <noinclude></noinclude> | ||
{{ansreq|page={{#titleparts:{{PAGENAME}}|2|1}}|num=11a}} | {{ansreq|page={{#titleparts:{{PAGENAME}}|2|1}}|num=11a}} | ||
<noinclude></noinclude> | <noinclude></noinclude> | ||
| − | + | Véase la especialidad de [[AY Honors/Candle Making/es|Arte de Hacer Velas]] para más instrucción. ¿Por qué no desarrollarla de una vez? | |
<noinclude></noinclude> | <noinclude></noinclude> | ||
{{CloseReq}} <!-- 11a --> | {{CloseReq}} <!-- 11a --> | ||
{{ansreq|page={{#titleparts:{{PAGENAME}}|2|1}}|num=11b}} <!--T:78--> | {{ansreq|page={{#titleparts:{{PAGENAME}}|2|1}}|num=11b}} <!--T:78--> | ||
| − | <noinclude> | + | <noinclude>Note que esto es también un requisito para la especialidad de [[AY Honors/Soap Craft - Advanced/es|Trabajos en jabón - Avanzado]]. |
| − | Note | ||
| − | + | {{clear}} | |
<noinclude></noinclude> | <noinclude></noinclude> | ||
| Line 411: | Line 350: | ||
{{ansreq|page={{#titleparts:{{PAGENAME}}|2|1}}|num=11c}} <!--T:80--> | {{ansreq|page={{#titleparts:{{PAGENAME}}|2|1}}|num=11c}} <!--T:80--> | ||
<noinclude></noinclude> | <noinclude></noinclude> | ||
| − | {{: | + | {{:AY Honors/Milk a cow/es}} |
<noinclude></noinclude> | <noinclude></noinclude> | ||
| Line 417: | Line 356: | ||
{{ansreq|page={{#titleparts:{{PAGENAME}}|2|1}}|num=11d}} <!--T:81--> | {{ansreq|page={{#titleparts:{{PAGENAME}}|2|1}}|num=11d}} <!--T:81--> | ||
<noinclude></noinclude> | <noinclude></noinclude> | ||
| − | |||
<noinclude></noinclude> | <noinclude></noinclude> | ||
| Line 423: | Line 361: | ||
{{ansreq|page={{#titleparts:{{PAGENAME}}|2|1}}|num=11e}} <!--T:82--> | {{ansreq|page={{#titleparts:{{PAGENAME}}|2|1}}|num=11e}} <!--T:82--> | ||
<noinclude></noinclude> | <noinclude></noinclude> | ||
| − | |||
| − | |||
| − | + | {{clear}} | |
| − | {{ | + | {{clear}} |
| − | + | {{clear}} | |
| − | |||
<noinclude></noinclude> | <noinclude></noinclude> | ||
| Line 437: | Line 372: | ||
{{ansreq|page={{#titleparts:{{PAGENAME}}|2|1}}|num=11f}} <!--T:86--> | {{ansreq|page={{#titleparts:{{PAGENAME}}|2|1}}|num=11f}} <!--T:86--> | ||
<noinclude></noinclude> | <noinclude></noinclude> | ||
| − | |||
| − | + | {{clear}} | |
<noinclude></noinclude> | <noinclude></noinclude> | ||
| Line 445: | Line 379: | ||
{{ansreq|page={{#titleparts:{{PAGENAME}}|2|1}}|num=11g}} <!--T:88--> | {{ansreq|page={{#titleparts:{{PAGENAME}}|2|1}}|num=11g}} <!--T:88--> | ||
<noinclude></noinclude> | <noinclude></noinclude> | ||
| − | + | Véase la especialidad de [[AY Honors/Quilting/es|Acolchado]] para más información. | |
<noinclude></noinclude> | <noinclude></noinclude> | ||
| Line 452: | Line 386: | ||
{{ansreq|page={{#titleparts:{{PAGENAME}}|2|1}}|num=12}} | {{ansreq|page={{#titleparts:{{PAGENAME}}|2|1}}|num=12}} | ||
<noinclude></noinclude> | <noinclude></noinclude> | ||
| − | <!-- 12. | + | <!-- 12. Conocer cinco remedios caseros de plantas silvestres y explicar sus usos. --> |
| − | |||
| − | |||
| − | |||
| − | |||
| − | |||
| − | |||
| − | |||
| − | |||
| − | |||
| − | |||
| − | |||
<noinclude></noinclude> | <noinclude></noinclude> | ||
| Line 469: | Line 392: | ||
{{ansreq|page={{#titleparts:{{PAGENAME}}|2|1}}|num=13}} | {{ansreq|page={{#titleparts:{{PAGENAME}}|2|1}}|num=13}} | ||
<noinclude></noinclude> | <noinclude></noinclude> | ||
| − | <!-- 13. | + | <!-- 13. Realizar una de las siguientes actividades: --> |
<noinclude></noinclude> | <noinclude></noinclude> | ||
{{ansreq|page={{#titleparts:{{PAGENAME}}|2|1}}|num=13a}} | {{ansreq|page={{#titleparts:{{PAGENAME}}|2|1}}|num=13a}} | ||
<noinclude></noinclude> | <noinclude></noinclude> | ||
| − | |||
| − | + | {{clear}} | |
| + | |||
| − | + | {{clear}} | |
| − | + | {{clear}} | |
| − | {{ | + | {{clear}} |
| − | + | {{clear}} | |
| − | + | {{clear}} | |
| − | + | {{clear}} | |
| − | + | {{clear}} | |
<noinclude></noinclude> | <noinclude></noinclude> | ||
| Line 495: | Line 418: | ||
{{ansreq|page={{#titleparts:{{PAGENAME}}|2|1}}|num=13b}} <!--T:93--> | {{ansreq|page={{#titleparts:{{PAGENAME}}|2|1}}|num=13b}} <!--T:93--> | ||
<noinclude></noinclude> | <noinclude></noinclude> | ||
| − | {{: | + | {{:AY Honors/Horseback Trip/es}} |
<noinclude></noinclude> | <noinclude></noinclude> | ||
| Line 501: | Line 424: | ||
{{ansreq|page={{#titleparts:{{PAGENAME}}|2|1}}|num=13c}} <!--T:94--> | {{ansreq|page={{#titleparts:{{PAGENAME}}|2|1}}|num=13c}} <!--T:94--> | ||
<noinclude></noinclude> | <noinclude></noinclude> | ||
| − | {{: | + | {{:AY Honors/Canoe trip/es}} |
<noinclude></noinclude> | <noinclude></noinclude> | ||
| Line 507: | Line 430: | ||
{{ansreq|page={{#titleparts:{{PAGENAME}}|2|1}}|num=13d}} <!--T:95--> | {{ansreq|page={{#titleparts:{{PAGENAME}}|2|1}}|num=13d}} <!--T:95--> | ||
<noinclude></noinclude> | <noinclude></noinclude> | ||
| − | {{: | + | {{:AY Honors/Backpack trip/es}} |
<noinclude></noinclude> | <noinclude></noinclude> | ||
| Line 513: | Line 436: | ||
{{CloseReq}} <!-- 13 --> | {{CloseReq}} <!-- 13 --> | ||
<noinclude></noinclude> | <noinclude></noinclude> | ||
| − | == | + | ==Referencias== |
| − | |||
<noinclude></noinclude> | <noinclude></noinclude> | ||
| − | + | {{CloseHonorPage}} | |
Latest revision as of 21:31, 14 July 2022
1
1a
1b
1c
1d
1e
1f
1g
1h
2
2a
El amarre cuadrado es una clase de amarre que se usa para unir palos. Las estructuras grandes pueden ser construidas con una combinación de amarres cuadrados y diagonales, con los amarres cuadrados usados generalmente en los miembros de carga y los amarres diagonales usualmente aplicados a los amarres cruzados. Si existe alguna separación entre los palos, se debe usar el amarre diagonal.
Pasos para el amarre cuadrado (vea la imagen a la derecha);
- Empiece con una vuelta de braza en el palo vertical debajo del palo horizontal y coloque el extremo suelto debajo del envoltorio.
- Envuelva en una forma cuadrada alrededor de tres veces alrededor de los palos.
- Amarre entre los palos dos o tres veces, jalando a menudo para mantenerlo lo más apretado posible.
- Amarre dos medio cotes alrededor del palo horizontal
- Sujete los medio cotes en un ballestrinque, un ballestrinque adicional se puede agregar si se desea.
Cuando las vueltas se llevan alrededor del palo vertical deben estar dentro de las vueltas anteriores. Los que están alrededor del palo horizontal deben estar en el exterior de las vueltas anteriores. Esto asegura que las vueltas permanezcan paralelas y así se mantiene el contacto máximo entre la cuerda y la madera.
Se mejora la resistencia si se toma el cuidado de colocar las cuerdas envueltas y amarres en paralelo con un mínimo de cruce.
Un amarre correctamente ejecutado es muy fuerte y durará mientras el cordel o cuerda mantenga su integridad. Un palo de amarrar se puede usar para apretar con seguridad.
2b
El amarre diagonal es un tipo de amarre usado para amarrar palos juntos, para evitar que se caigan juntos. Generalmente, se aplica a los palos cruzados donde los palos no tocan inicialmente, pero pueden ser usados en cualquier palo que se cruza entre sí a un ángulo de 45° a 90°. Las estructuras grandes y semipermanentes pueden ser construidas con una combinación de amarres cuadrados, que son más fuertes, y los amarres diagonales.
Hilo de empacar tiene suficiente resistencia para algunas aplicaciones de amarre, pero soga se debe utilizar para unir palos más grandes y donde apoya el peso de las personas.
Pasos del amarre diagonal (vea la imagen a la derecha);
- Comience con una vuelta de braza alrededor de la unión de los dos palos.
- Haga tres vueltas en cada dirección - apretando constantemente.
- Haga dos vueltas de amarrar, apretando donde están juntados lo más posible.
- Para terminar, haga dos medio cotes.
- Apriete los dos medio cotes a un ballestrinque.
Se puede utilizar un palillo de amarre para apretar con seguridad. Se mejorará la resistencia si el primer giro es de 90° respecto al nudo de leñador y si se toma el cuidado de colocar las vueltas de la cuerda paralelas sin que se crucen.
2c
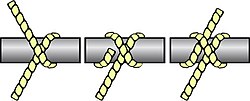
Amarre en ocho

El amarre en ocho usa dos o tres palos o postes, 15 - 20 pies de cuerda.
Para hacer el amarre en ocho, coloque los dos palos uno al lado del otro y paralelos entre sí. Amarre un ballestrinque alrededor de un palo. Luego, envuelva el extremo libre de la cuerda alrededor de ambos palos alrededor de siete u ocho veces. Apriételos lo más posible. Entonces, haga tres vueltas alrededor del amarre, y otra vez, jale de la cuerda fuertemente. Finalmente, amarre un ballestrinque en el segundo palo.
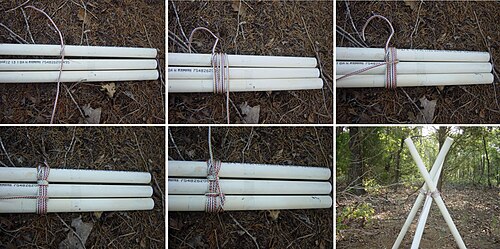
Para usar el amarre en ocho con tres palos, coloque los tres polos uno al lado del otro y paralelos entre sí. Amarre un ballestrinque alrededor de un palo y envuelva la cuerda alrededor de los tres palos siete u ocho veces. Apriételos lo más posible. Entonces, haga tres vueltas entre dos de los palos y después cruce y haga tres más entre los otros dos palos. Apriete las vueltas fuertemente y termine con un ballestrinque.
2d
3
3a
Véase la especialidad de Cestería para más instrucción.
3b
Los patrones para hacer mocasines se pueden encontrar por internet, incluyendo:
3c
3d
4
5
5a
El uso de pedernal y acero para encender un fuego es algo difícil. Para utilizar un pedernal y acero, se toma una roca dura y afilada en una mano y el acero en la otra. El «pedernal» puede ser cualquiera roca afilada y dura, como el pedernal, jaspe o cuarzo. El otro puede ser cualquier pieza de acero de alto carbono, como una hoja de cuchillo, aunque los pedazps de acero hechos específicamente para este propósito trabajan mucho mejor.
El otro elemento esencial que se necesita para iniciar un fuego con pedernal y acero es un paño de carbón. Un paño de carbón es un pedazo de tela de algodón parcialmente quemado. Se puede hacer cortando trozos de algodón en cuadrados de 2.5 cm, colocándolos en un recipiente pequeño de metal (tal como una lata de Altoids), y colocándolo en el fuego. Si el algodón no puede obtener sificiente oxígeno, se chamusca en vez de quemarse. Quite la lata del fuego cuando deja sacar humo.
Antes de empezar, ponga el fuego para que cuando enceinda la yesca con el pedernal y el acero, se puede colocar en el fuego y ponerlo en marcha. Una vez que la yesca se enciende, ya es demasiado tarde para poner al fuego, como la yesca arderá por sólo medio minuto más o menos.
Coloque la tela de carbón en el pedernal, incluso con un borde afilado, pero no la cubra. Sostenga el acero ligeramente en la mano derecha (suponiendo que usted es diestro) y golpee contra la piedra (en la otra mano) como si estuviera tratando de afeitar el acero con la roca. El pedernal es más duro que el acero, entonce sí afeitará una pieza de acero. Cuando esta pieza de acero caliente se quita, volará y con suerte llegará a la tela de carbón. Es posible que tenga que repetir esto varias veces antes de que una chispa sí llegue al paño de carbón, pero cuando lo haga, el paño de carbón comenzará a brillar. Tome el paño de carbón y póngala encima de la yesca. El algodón y estopa especialmente sirven bien como yesca. Sople con suavidad hasta obtener una llama. Si no sopla lo suficiente, la brasa no encenderá la yesca. Si sopla con demasiada fuerza, quemará la yesca sin encenderla. Una vez que haya llamas, colóquelo en el fuego que ya ha establecido.
5b
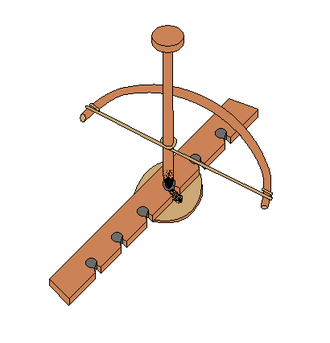
El método de «arco y taladro» es bien conocido y es un montón de trabajo. El arco es similar al que se usa para la arquería. Para hacer tal arco, encuentre una cuerda delgada o pedacito flexible pero robusto del cordaje, y un palillo robusto 60-120 cm de largo. Ate la cuerda a un extremo del palo y haga otro nudo en el otro extremo del palo, con la cuerda entre los extremos no tan tensa.
El taladro (o huso) es otro palo recto, delgado y fuerte, preferiblemente pelado de corteza, afilado en el extremo inferior y redondeado en la parte superior. El centro de la cuerda de arco se envuelve alrededor del taladro, con el arco y el huso en ángulo recto el uno al otro. El extremo del huso se coloca sobre un tablero de fuego.
El tablero de fuego es un pedazo de madera dura y seca (el cedro es excelente), con una impresión cónica en la superficie superior (tal como pudo ser hecha con un taladro avellanado). Esta impresión se perfora cerca de la orilla del tablero de fuego y una muesca se corta en él. El vértice de la muesca debe estar en el centro de la impresión. Coloque un pedazo de corteza por debajo de la muesca para atrapar la madera caliente que el huso molerá del tablero de fuego.
La parte superior del husillo es redondeada y suavizada, y colocada en un hueco de madera dura, hueso, piedra o algo similar. El hueco debe ser alisado y engrasado para reducir la fricción - usted no quiere generar calor en el hueco.
También debe tener un pedazo de tela de carbón, que es útil para encender cualquier tipo de fuego primitivo. Una tela de carbón es un pedazo de algodón carbonizado. Puede hacer varios cortando un viejo par de pantalones vaqueros en rectángulos de 2 x 1.5 pulgadas. Colóquelos en una lata (como una lata Altoid) con un agujero taladrado en la parte superior (o inferior). Ponga la lata (con la tela dentro) en una fogata y sáquela cuidadosamente después de unos 30 minutos. El estaño evitará que la tela se queme completamente porque limita el suministro de oxígeno. Retire los pedazos de tela y tráigalos cuando esté listo para encender un fuego.
Una vez que el equipo está listo, recoja algo de yesca. Esta yesca debe ser fácilmente encendido. La hierba seca, las agujas del pino y la pelusa del secador funcionan bien todos para esto. Forme la pila de yesca en la forma de un nido de pájaro. Luego, asegúrese que tenga suficiente madera en la mano y un fuego fácilmente encendido con combustible listo. Cuando la yesca saca llamas, no es el momento adecuado para empezar a buscar la leña y el combustible. Haga esto antes de tiempo.
Una vez que el husillo está en su lugar con su punta inferior en la impresión en el tablero de fuego, la parte superior sostenido firmemente por el hueco, y el cable envuelto alrededor de su centro, la persona moverá el arco hacia adelante y hacia atrás rápidamente para girar el huso. Los movimientos largos son mejores que los movimientos cortos.
Si el hueco es demasiado duro, el huso no girará. Si no se presiona con suficiente fuerza, el huso se desprenderá.
Después de unos pocos segundos de girar el huso, el tablero de fuego debe comenzar a sacar humo. Siga moviendo el arco. Después de un minuto de humo, busque un montón de polvo de madera caliente para acumularse en el hueco, atrapado en la corteza colocada debajo de ella. Deje de mover el arco y vea si el polvo de madera sigue sacando humo. Si no lo hace, vuelva a mover el arco.
Cuando el polvo de madera continúe sacando humo después de que el huso se detenga, recoja cuidadosamente la corteza, deslice el polvo de madera hacia el centro de la tela de carbón y sople suavemente sobre el polvo de madera. Aumente lentamente la fuerza de la corriente de aire soplada en la yesca. Debe brillar rojo mientras más aire se sopla. En otras palabras, la brasa debe encender la tela de carbón. Cuando lo hace, deslice la tela de carbón en la yesca y continúe soplando. Eventualmente, cuando tome su siguiente respiración, la pila de yesca sacará llamas. Coloque la yesca ardiente debajo de la leña y cuide el fuego como lo haría con cualquier fuego recién encendido.
5c
|
Nota: Esta técnica, aunque aparece como una opción en los requisitos oficiales, no estaba disponible para los pioneros. Por lo tanto, recomendamos que no se utilice para enseñar esta especialidad. |
Hacer fuego de una chispa eléctrica puede ser peligroso y sólo debe ser hacerse en casos de emergencia. Tendrá que tener yesca antes de tiempo y luego prepararse para usar una chispa eléctrica. Esto se puede hacer con cables de arranque de un automóvil mediante la conexión de uno de los extremos de los terminales de la batería, y entonces tocar rápidamente los otros extremos juntos cerca de la yesca. No sostenga las terminales juntas por más de un instante o se agotará la batería.
5d
Un pedazo de vidrio curvado a veces se puede utilizar para enfocar los rayos del sol y encender la yesca. El vidrio debe ser lo suficientemente suave para no distorsionar excesivamente el punto de luz. Una lupa es lo típico utilizado para esto, pero hay otras posibilidades en caso de apuro.
Es posible, por ejemplo, utilizar un trozo de hielo en forma de una esfera para hacer el mismo trabajo. Hacer el pedazo de hielo suficientemente redondo y suficientemente claro y suficientemente suave para encender un fuego, sin embargo, puede ser difícil.
Otros han tenido éxito en pulir la parte inferior de una lata de refresco y usarla como un espejo para reflejar los rayos del sol en un punto. Una vez más, se necesita mucha paciencia para pulir la lata lo suficientemente bien para ser capaz de encender un fuego de esta manera, pero se ha hecho. El material para pulirlo puede ser cualquier sustancia áspera, como el barro. ¡Lo sorprendente de esta técnica en particular es que una barra de chocolate se ha utilizado como el compuesto de pulido!
5e
Pedernales artificiales son barras metálicas de diferentes tamaños compuestas de ferrocerio, una aleación de hierro y mechones. El metal de Misch es una aleación principalmente de cerio que generará chispas cuando se golpea. Se agrega hierro para mejorar la resistencia de las varillas. Las virutas pequeñas se arrancan de la barra con un raspador de metal suministrado, un trozo de hoja de sierra de arco o, comúnmente, la parte posterior de un cuchillo con el ángulo adecuado. Estas virutas se encienden a altas temperaturas y son mucho más efectivas que su equivalente histórico.
Aunque toma práctica y yesca preparada adecuadamente para crear un fuego sostenido, el pedernal artificial moderno es considerado por los instructores de supervivencia ser una de las formas más confiables de hacer fuego en condiciones severas. Dos buenos ejemplos de pedernales artificiales son hechas por Light My Fire y Blastmatch. Las chispas producidas por estos productos son extremadamente calientes, 3000° C, y fácilmente enciende papel higiénico o pequeños trozos de madera o productos comerciales de yesca.
Tradicionalmente se usaba un pedernal y acero; sin embargo, la piedra no era la parte más importante. Con un encendedor adecuado, puede conseguir las chispas usando cualquier roca dura, no porosa que tiene una orilla afilada, hasta la luso madera petrificada. La chispa se produce cuando se pica pequeñas piezas de acero del encendedor; metales finamente divididos se encienden en el aire inmediatamente, con el acero quemándose de un color amarillo-blanco.
Tela de carbón se puede utilizar como un paso intermedio entre el encendedor y la yesca. Tela de carbón es tradicionalmente hecha de algodón que ha sido procesado en carbón vegetal. Puede hacer tela de carbón tomando varios parches de mezclilla de algodón (de un viejo par de pantalones vaqueros/mahones/jeans, por ejemplo) y amontonándolos uno encima del otro dentro de una lata pequeña. Perfore un hoyo de 3 mm de diámetro en la tapa de la lata y tírelo en la fogata. Debe salir humo pero no se encenderá porque no puede entrar suficiente oxígeno en la lata. Una vez que no sale más humo, puede quitarlo con cuidado del fuego y dejar que se enfríe. Debe tener varias telas de carbón dentro la lata listas para la próxima fogata que encenderá.
Cuando una chispa entra en contacto con la tela de carbón, hace que la tela brille pero no encenderá. Después de que brilla, lo pone la yesca y sopla. Esto funciona mucho mejor que intenta de obtener una chispa para permanecer en la yesca. Encender la yesca con papel de carbón toma práctica. Demasiado oxígeno y la yesca se consume sin causar llamas; muy poco oxígeno y simplemente no se enciende. Pero si lo hace exacto, causará llamas rápidamente. Esté preparado para esto, ya que llevará yesca ardiente en sus manos. Colóquelo en su fuego inmediatamente.
5f
|
Nota: Al igual que con la técnica de la «chispa eléctrica», los pioneros desconocían este método de encender fuego. Nuevamente, recomendamos no usar esta opción para cumplir con el requisito. |
En las islas del Pacífico cerca de las Filipinas, hay una técnica de construcción de fogata que utiliza aire comprimido para encender un pequeño pedazo de yesca. La tecnología para hacer esto es similar a un motor de diésel y se llama un Sulpak los isleños o pistón de fuego por el resto del mundo.
El Sulpak se hace generalmente de un cuerno de búfalo de agua o madera muy densa. Hay dos partes en el dispositivo, un pistón con una almohadilla en el extremo y un cilindro. El pistón tiene un pequeño hoyo al final que contiene un pedazo de yesca (tela Char funciona bien). También hay una pequeña ranura cerca del extremo del pistón que está envuelto con hilo para crear la junta tórica. El pistón normalmente lubric con grasa de cerdo, pero Crisco y Vaselina funciona bien.
El pistón se unta con el lubricante y una pequeña cantidad del lubricante se coloca en el hoyo al extremo del pistón. La tela Char entonces se mete en la grasa del hoyo.
Se empuja el extremo del pistón en el cilindro aproximadamente 1.25 cm. Se mantiene el cilindro en una mano y se golpea la almohadilla del pistón con la otra. Hale el pistón hacia atrás rápidamente y sople sobre la yesca. Si no se ilumina de inmediato tendrá que intentar el proceso de nuevo o asegúrese de que la junta tórica está suficientemente apretada.
No hay suficiente yesca para coger mucho fuego, así que la mejor cosa que encender una parte más grande de tela carbón y luego usar esto para encender la otra yesca que será parte del fuego.
Es muy difícil hacer Sulpak en lugares selváticas, entonces esta técnica no es buena para una emergencia a menos que tenga un Sulpak listo. Muchos aventureros del aire libre llevan su Sulpak con ellos cuando se van de acampada y el senderismo.
6
6a
6b
6c
6d
6e
6f
A menos que la leña que desea partir ha sido aserrada y tiene el extremo plano, será muy difícil para partir. Estabilízala en su extremo y asegúrese que puede quedarse parado por sí solo. Instruya a todos que se queden lejos, y no use el hacha si alguien está cerca. Agarre firmemente el mango del hacha con ambas manos y cuidadosamente coloque la hoja del hacha en la parte superior del tronco, en la orilla más cercana donde está parado. Extienda completamente los brazos cuando hace esto y retrocede si es necesario. Separe los pies por aproximadamente la misma distancia que los hombros son anchos y asegúrese de que sus pies estén firmes. Si es diestro, deslice su mano derecha hacia la hoja del hacha mientras lo acerca hacia sí mismo. Apunte y ponga el hacha sobre su cabeza, bájelo fuertemente mientras su mano derecha se desliza hacia abajo del mango. La mano derecha debe tocar con la izquierda casi al mismo tiempo el hacha corta la madera. Tenga en cuenta cómo el hacha da a la madera más lejos de donde estaba descansando al comienzo. Por esto es que debe apuntar a la orilla más cercana. Si se pasa de largo, caerá el mango sobre la orilla de la madera y dañará el hacha. Demasiadas veces y tendrá que reemplazar el mango.
Cuando corta la leña, trate de partirlo en dos partes iguales.
Para dividir una pequeña pieza de madera (menos de 10 cm de diámetro), coloque la hoja de un hacha al final de la leña, eleve la madera y el hacha juntos, y haga que caigan fuertemente sobre otra madera o una roca. Cuando caen sobre la segunda madera, el impulso del hacha hará entrarla en la madera. Levante los dos de nuevo y haga lo mismo varias veces hasta que la madera se divide. No estabilice la madera con una mano y le dé con la otra. Si falla darle a la leña y le da a su mano, causará una emergencia innecesaria.
7
7a
Hacer cuerda requiere algún aparato sencillo que puede hacer usted mismo con bastante facilidad. El primer aparato (lo llamaremos el retorcedor) se utiliza para retorcer tres hebras de hilo (o una cuerda más pequeña). Al hacer el retorcedor, sujete las dos placas que forman los mangos juntas firmemente y perfore tres agujeros a través de los dos al mismo tiempo. Esto asegurará que se alineen. La parte de gancho/manivela del retorcedor se puede hacer de alambre de percha. Primero haga las dos curvas de 90° en el centro, y entonces pase a través de los agujeros en las asas. Por último, forme los ganchos en un lado y la otra curva de 90° en el otro lado. (Esta última curva impide que la manivela se deslice fuera de los agujeros en el mango).
Mientras se tuercen los hilos, tenderán a girar juntos. Para hacer cuerda, esta tendencia tiene que ser controlada. Esto se hace con un segundo aparato (lo llamaremos el separador). Consiste de una tabla con tres agujeros perforados en ella, formando los puntos de un triángulo equilátero. Estos puntos deben ser por lo menos seis pulgadas de distancia uno del otro, y deben ser lo suficientemente grandes como para pasar las hebras de hilo.
Para hacer cuerda, corte tres piezas de cordel alrededor del 33% más larga que el largo deseado. Pase cada hebra a través de un agujero en el separador y luego ate un lazo antideslizante al final de cada uno (una figura de ocho en un seno funciona bien para esto). Llamaremos a este extremo de los hilos el extremo libre. Ponga estos bucles sobre un gancho de algún tipo y hale los hilos rectos. Amontone los extremos opuestos de los bucles juntos y amarrelos, otra vez en un bucle (y otra vez, una forma de ocho en un seno funciona bien para esto). Llamaremos a este extremo el atado. Asegúrese de que las tres hebras tienen el mismo largo de un bucle al otro. Dele el extremo atado a un ayudante y entonces conecte los bucles en el extremo libre a los ganchos en el retorcedor. Hale el retorcedor lejos del extremo atado (todavía fijado firmemente a otro gancho) hasta que los hilos estén rectos y apretados. Deslice el separador hacia el extremo común. Empiece arrancar el retorcedor de modo que los ganchos giren. Mientras arranca, su ayudante permitirá que las tres hebras de su lado del separador se retuercen entre sí. Mientras hacen esto, su ayudante deslizará el separador que hacia usted, yendo tan rápido como las hebras se unen entre sí. Tenga cuidado de mantener las hebras apretadas mientras hace esto para que no se unen entre sí en su lado del separador. Continúe retorciendo hasta que el separador alcance el retorcedor. Entonces, haga un nudo en el extremo libre de la cuerda, desengánchelo del retorcedor y deslice el separador para quitarlo. Amarre un nudo de tope o venda el extremo con cinta adhesiva. Corte las pocas pulgadas de filamento no retorcidas que permanezcan (o haga un empalme hacia atrás). Termine el extremo opuesto de la misma manera. ¡Voilá! ¡Ahora tiene una cuerda!
7b
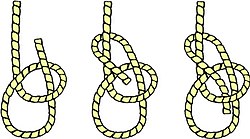
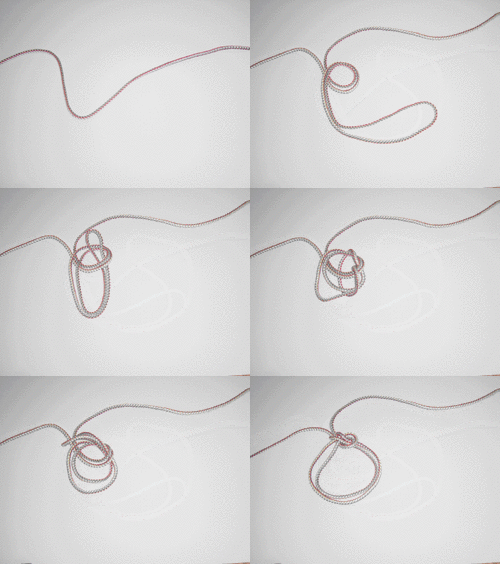
| As de guía |
|---|
|
Uso: Este nudo no se resbala o desata cuando se amarra correctamente. Puede ser amarrado alrededor de la cintura de una persona y se utiliza para levantarla, ya que el seno no se aprieta bajo una carga. En navegación por vela, el as de guía se utiliza para atar una driza a un punto de la vela.
Cómo amarrar:
|
| As de guía por seno |
|---|
|
Uso: Esto hace un lazo seguro en medio de una cuerda que no resbala.
Cómo amarrar:
|
| Ballestrinque |
|---|
|
Uso: Este nudo es la vuelta o el empalme de «utilidad general» para cuando se necesita un método rápido y sencillo de sujetar una cuerda alrededor de un poste, mástil o estaca (como atar mechas a palos en la especialidad de Arte de hacer velas) u otra cuerda (como en la especialidad de Macramé).
Cómo amarrar:
|
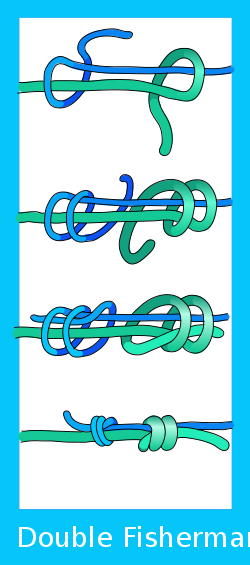
| Doble nudo de pescador |
|---|
|
Uso: Use el doble nudo de pescador para atar juntos dos cuerdas de tamaños desiguales. Este nudo y el triple nudo de pescador son las variaciones más usadas en la escalada, pero otros usos incluyen búsqueda y rescate.
|
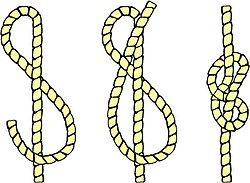
| Figura de Ocho |
|---|
|
Uso: Este nudo es ideal para mantener el extremo de una cuerda y que no se quite de una polea.
Cómo amarrar:
|
| Nudo Prusik |
|---|
|
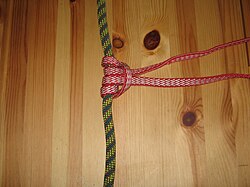
Uso: El nudo Prusik es un nudo de fricción utilizado en escalada, barranquismo, espeleología, rescate por cuerda y por arbolistas para agarrar una cuerda (a veces referido como un cuerda de agarre). El término Prusik se utiliza tanto para el nudo, para las vueltas de la cuerda y para la acción (hacer un Prusik).
Una cuerda Prusik es una vuelta circular con una circunferencia de 20 a 100 cm, dependiendo en cuál es la intención. Dos cuerdas Prusik están vinculadas a otra cuerda que se ancla arriba. Cuando el nudo Prusik está bajo tensión, agarra a la cuerda a la que está atada. Cuando no está bajo tensión, se puede mover fácilmente. El escalador coloca un pie en cada vuelta y pone todo de su peso en una de ellas, liberando la tensión en el otro. La cuerda sin tensión entonces se desliza hacia arriba en la cuerda vertical. El escalador entonces cambia su peso a la otra vuelta y se desliza el primero hacia arriba. Esto se repite hasta que la cuerda se ha ascendida. Los Prusiks funcionan con dos cuerdas, hasta dos cuerdas de diferentes diámetros. Los Prusiks proporcionan una agarrede alta resistencia y relativamente a prueba de fallos (es decir, se deslizarán antes de dañar a la cuerda o romperla), y se utilizan en algunas técnicas de rescate. Los Prusiks son buenas para usar en sistemas donde pueden ser necesarios múltiples agarres, y donde los agarres mecánicos no están disponibles. Aunque la técnica Prusik de escalar puede ser llamado viejo por algunos, el ejército de los Estados Unidos sigue incluyéndolo en su concurso anual de «Best Ranger». Los Rangers en la competición rutinariamente hacen una cuerda de 27 metros en menos de un minuto.Cómo amarrar:
|
| Margarita |
|---|
|
Uso: El nudo margarita se utiliza para hacer más pequeño la longitud de una cuerda. Se deshace fácilmente a menos que esté bajo tensión.
ADVERTENCIA: Mantenga este nudo bajo tensión o se desatará.
|
| Nudo llano |
|---|
|
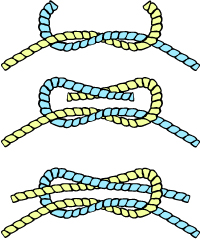
Uso: También conocido como el nudo rizo o cuadrado, el nudo llano se aprende fácilmente y es útil para varias situaciones. Es usualmente utilizado para atar dos cuerdas o sogas juntas en sus extremos. Este nudo se utiliza en el mar en rizos y enrollar velas. Se utiliza en primeros auxilios para atar una venda o un cabestrillo debido a que el nudo queda plano.
Cómo amarrar:
ADVERTENCIA: No confíe en este nudo para soportar el peso en una situación de vida o muerte. Se ha conocido a desamarrarse.
|
| Nudo tensor |
|---|
|
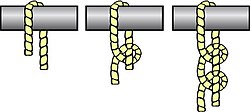
Uso: El nudo tensor es un nudo de con un seno ajustable para uso en líneas bajo tensión. Es útil cuando la longitud de una línea necesitará ser ajustada periódicamente para mantener la tensión. Se hace amarrando una vuelta de ballestrinque alrededor de la parte recta después de pasar alrededor de un objeto de anclaje. La tensión se mantiene deslizando la vuelta para ajustar el tamaño del seno, cambiando así la longitud efectiva de la parte recta sin rehacer el nudo. Cuando está bajo tensión, sin embargo, el nudo agarrará la cuerda y será difícil de hacer deslizar.
Se utiliza típicamente para asegurar las líneas de la tienda en actividades al aire libre que implican acampar, por arboristas al subir árboles, para La creación de amarres regulables en las áreas de marea y para asegurar las cargas en los vehículos. Un nudo versátil, el nudo tensor fue utilizado incluso por los astronautas durante STS-82, la segunda misión del transbordador espacial para reparar el telescopio espacial de Hubble. Cómo amarrar:
|
| Dos medio cotes |
|---|
|
Uso: Este nudo fiable está se amarra rápidamente y es el enganche más utilizado en los amarres.
Cómo amarrar:
|
7c
7d
Hay dos componentes en una letrina de campamento: el inodoro y un recinto.
- Recinto
- El propósito del recinto es dar privacidad. Puede ser tan simple como lonas colgadas en cuerda entre los árboles y bien aseguradas. También puede hacer un tipi de lonas y postes, o construir una estructura más elaborada con los postes usando cables de anclaje, y cubriéndolo con lonas. Otra posibilidad es usar una vieja tienda de campaña con su piso eliminado.
- Inodoro
- Hay muchas maneras de construir la parte dónde se sienta de una letrina. Un enfoque común es montar un asiento de inodoro en algún tipo de estructura, tal como una pequeña estructura en forma de cabina de leña construida utilizando los pedazos de madera de 8 cm de diámetro. También es posible construir una estructura de madera atada con bisagras de forma que puede plegarse cuando necesario (pero permanecer no colapsado el resto del tiempo) para el transporte. Otra forma de construir el inodoro es amarrar palos juntos para hacer un par de rieles horizontales - uno para sentarse y otro como respaldo. Como sea que se construye el inodoro, casi siempre se construye sobre un hoyo excavado en el suelo para mantener los excrementos. La profundidad de este hoyo depende de cuánto se espera que será usada la letrina. Deje un montón de tierra y una pala en el interior del recinto para que los excrementos puedan ser enterrados gradualmente a medida que se crean. Esto ayudará con el olor. Asegúrese de enterrar completamente el agujehoyoro cuando levanten el campamento.
8
9
10
11
11a
Véase la especialidad de Arte de Hacer Velas para más instrucción. ¿Por qué no desarrollarla de una vez?
11b
Note que esto es también un requisito para la especialidad de Trabajos en jabón - Avanzado.
11c
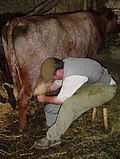
Tradicionalmente, la vaca, o las vacas, se paraban en el campo o en el prado mientras se las ordeñaba. Las vacas jóvenes, las vaquillas, tendrían que ser entrenadas para permanecerse quietas para ser ordeñadas. En muchos países, las vacas fueron atadas a un puesto y ordeñadas. El problema con este método es que se basa en bestias tranquilas y manejables, porque el extremo posterior de la vaca no está restringido. En países fríos donde las vacas se mantienen en establos, por lo menos durante el invierno, si no durante todo el año, todavía están atadas sólo por el cuello o la cabeza, particularmente donde se mantienen en pequeñas cantidades.
11d
11e
11f
11g
Véase la especialidad de Acolchado para más información.
12
13
13a
13b
13c
Planifique tener una canoa por cada dos personas. Los suministros deben ser cargados en el centro de la canoa, con los objetos más pesados colocados más bajo en el bote, y los objetos ligeros colocados encima de ellos. Recuerde que la canoa tendrá un poco de agua por los zapatos mojados, remos goteando, etc., así que no ponga cualquier cosa que debe mantenerse seco en la parte inferior del bote. Algunos han reportado éxito en la colocación de una lona primero, poner el equipo encima y luego subir los bordes por encima. Cómo sea que cargue el equipo en la canoa, asegúrese de atar todo. Si se vuelca la canoa durante el viaje, va a querer que el equipo se quede con el barco en vez de ir flotando alegremente con la corriente - o peor - hundirse hasta el fondo. Trate de recordar que esto es una posibilidad al momento de seleccionar su equipo. No lleve nada que no puede dejar en un fondo del río (como una tienda de campaña prestado, un hacha heredado o un par de gafas de diseño). Además, trate de recordar que dejar el equipo en el fondo del río es una forma de contaminación.
Acampar con canoa tiene una gran ventaja sobre ir con mochila en que se puede empacar una gran cantidad más de equipo en una canoa de lo que se puede en una mochila. Pero no se pase. Todavía tendrá que cargar todo durante el acarreo.
Una vez que se carga la canoa, revise su ajuste - es decir, revise que la proa y la popa se encuentran al mismo nivel. No quiere tener ningún lado sobresaliendo demasiado del agua, ya que hará que una canoa más fácil de volcarse.
Antes de dirigir a un grupo en un río, se debe explorarlo primero. Durante su viaje de exploración, estará buscando los peligros y evaluando las condiciones del río. El viaje debe responder estas preguntas:
- ¿Hay aguas rápidas?
- ¿Es la persona menos experta capaz de navegar por ellas?
- ¿Hay una manera fácil de salir del río más arriba de las rápidas?
Otra razón importante para explorar el río antes de traer el grupo es para que sea capaz de elegir el mejor sitio para acampar durante la ruta. Cuando va por el camino por primera vez, podría estar tentado a conformarse con un sitio sub-óptima si no sabe que hay un lugar mejor en la siguiente curva.
13d
Lea las respuestas y ayudas en las especialidades de Excursionismo y Senderismo antes de salir. Ambas tienen muchas información que puede ayudar en un viaje como este y un viaje de 24 kilómetros cumpirá con el requisito «grande» en las dos.
«Llevar todos los suministros necesarios» significa que no camina desde el punto A al punto B mientras alguien conduce un VUD cargado con todo su equipo.
