Difference between revisions of "AY Honors/Horsemanship - Advanced/Answer Key/es"
From Pathfinder Wiki
< AY Honors | Horsemanship - AdvancedAY Honors/Horsemanship - Advanced/Answer Key/es
(Created page with "<noinclude>") |
(Updating to match new version of source page) |
||
| (42 intermediate revisions by 2 users not shown) | |||
| Line 1: | Line 1: | ||
| − | + | {{HonorSubpage}} | |
| − | < | + | <!--{{Honor_Master|honor={{#titleparts:{{PAGENAME}}|1|3}}|master=Sportsman}}--> |
| − | {{ | + | <section begin="Body" /> |
| − | | | ||
| − | | | ||
| − | | | ||
| − | |||
| − | |||
| − | | | ||
| − | |||
| − | }} | ||
| − | |||
| − | |||
| − | |||
| − | |||
| − | |||
| − | <section begin="Body" /> | ||
{{ansreq|page={{#titleparts:{{PAGENAME}}|2|1}}|num=1}} | {{ansreq|page={{#titleparts:{{PAGENAME}}|2|1}}|num=1}} | ||
<noinclude></noinclude> | <noinclude></noinclude> | ||
| − | <!-- 1. | + | <!-- 1. Tener la especialidad de Equitación. --> |
| − | {{honor_prerequisite| | + | {{honor_prerequisite|honor=Horsemanship|displayname=Equitación}} |
<noinclude></noinclude> | <noinclude></noinclude> | ||
| Line 25: | Line 11: | ||
{{ansreq|page={{#titleparts:{{PAGENAME}}|2|1}}|num=2}} | {{ansreq|page={{#titleparts:{{PAGENAME}}|2|1}}|num=2}} | ||
<noinclude></noinclude> | <noinclude></noinclude> | ||
| − | <!-- 2. | + | <!-- 2. Etiquetar en un dibujo de un caballo, o señalar en un caballo vivo un mínimo de 30 diferentes partes de un caballo. --> |
| − | |||
| − | |||
| − | |||
<noinclude></noinclude> | <noinclude></noinclude> | ||
| Line 34: | Line 17: | ||
{{ansreq|page={{#titleparts:{{PAGENAME}}|2|1}}|num=3}} | {{ansreq|page={{#titleparts:{{PAGENAME}}|2|1}}|num=3}} | ||
<noinclude></noinclude> | <noinclude></noinclude> | ||
| − | <!-- 3. | + | <!-- 3. Demostrar y explicar cómo cuidar de los aperos (el equipo y accesorios de un caballo). --> |
| − | |||
| − | + | {{clear}} | |
| − | + | {{clear}} | |
| − | + | {{clear}} | |
| − | + | {{clear}} | |
| − | + | {{clear}} | |
| − | + | {{clear}} | |
<noinclude></noinclude> | <noinclude></noinclude> | ||
| Line 53: | Line 35: | ||
{{ansreq|page={{#titleparts:{{PAGENAME}}|2|1}}|num=4}} | {{ansreq|page={{#titleparts:{{PAGENAME}}|2|1}}|num=4}} | ||
<noinclude></noinclude> | <noinclude></noinclude> | ||
| − | <!-- 4. | + | <!-- 4. Demostrar y explicar la forma de capturar y colocar los amarres al caballo en condiciones seguras. --> |
<noinclude></noinclude> | <noinclude></noinclude> | ||
{{CloseReq}} <!-- 4 --> | {{CloseReq}} <!-- 4 --> | ||
{{ansreq|page={{#titleparts:{{PAGENAME}}|2|1}}|num=5}} | {{ansreq|page={{#titleparts:{{PAGENAME}}|2|1}}|num=5}} | ||
<noinclude></noinclude> | <noinclude></noinclude> | ||
| − | <!-- 5. | + | <!-- 5. Demostrar y explicar cómo atar un caballo en condiciones de seguridad con un nudo corredizo y con un nudo as de guía, utilizando la correcta longitud de la cuerda y tratando conforme la altura correcta desde el suelo. --> |
| − | + | {{clear}} | |
| − | |||
| − | + | {{:AY Honors/Knot/Manger_Knot/es}} | |
| − | {{: | ||
| − | === | + | ===As de guía=== |
| − | {{: | + | {{:AY Honors/Knot/Bowline/es}} |
| − | |||
<noinclude></noinclude> | <noinclude></noinclude> | ||
| Line 74: | Line 53: | ||
{{ansreq|page={{#titleparts:{{PAGENAME}}|2|1}}|num=6}} | {{ansreq|page={{#titleparts:{{PAGENAME}}|2|1}}|num=6}} | ||
<noinclude></noinclude> | <noinclude></noinclude> | ||
| − | <!-- 6. | + | <!-- 6. Demostrar y explicar la forma correcta de ensillar, colocar el bridón a un caballo y ajustar la longitud del estribo. --> |
<noinclude></noinclude> | <noinclude></noinclude> | ||
| Line 80: | Line 59: | ||
{{ansreq|page={{#titleparts:{{PAGENAME}}|2|1}}|num=7}} | {{ansreq|page={{#titleparts:{{PAGENAME}}|2|1}}|num=7}} | ||
<noinclude></noinclude> | <noinclude></noinclude> | ||
| − | <!-- 7. | + | <!-- 7. Demostrar las tres posiciones correctas, mientras cabalga/trota incluyendo los círculos y retrocesos: --> |
<noinclude></noinclude> | <noinclude></noinclude> | ||
{{ansreq|page={{#titleparts:{{PAGENAME}}|2|1}}|num=7a}} | {{ansreq|page={{#titleparts:{{PAGENAME}}|2|1}}|num=7a}} | ||
| Line 97: | Line 76: | ||
{{ansreq|page={{#titleparts:{{PAGENAME}}|2|1}}|num=8}} | {{ansreq|page={{#titleparts:{{PAGENAME}}|2|1}}|num=8}} | ||
<noinclude></noinclude> | <noinclude></noinclude> | ||
| − | <!-- 8. | + | <!-- 8. Demostrar una forma segura de desmontar en caso de emergencia. --> |
<noinclude></noinclude> | <noinclude></noinclude> | ||
{{CloseReq}} <!-- 8 --> | {{CloseReq}} <!-- 8 --> | ||
{{ansreq|page={{#titleparts:{{PAGENAME}}|2|1}}|num=9}} | {{ansreq|page={{#titleparts:{{PAGENAME}}|2|1}}|num=9}} | ||
<noinclude></noinclude> | <noinclude></noinclude> | ||
| − | <!-- 9. | + | <!-- 9. Pasear en un sendero para un total acumulado de siete horas, siguiendo todas las normas de seguridad y el uso de la posición correcta. --> |
<noinclude></noinclude> | <noinclude></noinclude> | ||
{{CloseReq}} <!-- 9 --> | {{CloseReq}} <!-- 9 --> | ||
{{ansreq|page={{#titleparts:{{PAGENAME}}|2|1}}|num=10}} | {{ansreq|page={{#titleparts:{{PAGENAME}}|2|1}}|num=10}} | ||
<noinclude></noinclude> | <noinclude></noinclude> | ||
| − | <!-- 10. | + | <!-- 10. Demostrar y explicar cómo utilizar una cuchilla para los cascos. --> |
| − | |||
| − | |||
| − | |||
{{clear}} | {{clear}} | ||
| Line 118: | Line 94: | ||
{{ansreq|page={{#titleparts:{{PAGENAME}}|2|1}}|num=11}} | {{ansreq|page={{#titleparts:{{PAGENAME}}|2|1}}|num=11}} | ||
<noinclude></noinclude> | <noinclude></noinclude> | ||
| − | <!-- 11. | + | <!-- 11. Demostrar un buen método para recoger (guardar) un caballo. --> |
<noinclude></noinclude> | <noinclude></noinclude> | ||
{{CloseReq}} <!-- 11 --> | {{CloseReq}} <!-- 11 --> | ||
{{ansreq|page={{#titleparts:{{PAGENAME}}|2|1}}|num=12}} | {{ansreq|page={{#titleparts:{{PAGENAME}}|2|1}}|num=12}} | ||
<noinclude></noinclude> | <noinclude></noinclude> | ||
| − | <!-- 12. | + | <!-- 12. Identificar un mínimo de ocho colores comunes de caballos, cinco marcas comunes de la cara y cinco marcas comunes de las piernas. --> |
| − | |||
| − | |||
| − | + | {{clear}} | |
| − | + | {{clear}} | |
| − | + | {{clear}} | |
| − | + | {{clear}} | |
| − | + | {{clear}} | |
| − | + | {{clear}} | |
| − | + | {{clear}} | |
| − | + | {{clear}} | |
| − | |||
| − | |||
| − | |||
| − | |||
| − | |||
| − | |||
| − | |||
| − | |||
| − | |||
| − | |||
| − | |||
| − | |||
| − | |||
| − | |||
| − | |||
| − | |||
| − | |||
| − | |||
| − | |||
| − | |||
| − | |||
| − | |||
| − | |||
| − | + | {{clear}} | |
| − | + | {{clear}} | |
| − | |||
| − | |||
<noinclude></noinclude> | <noinclude></noinclude> | ||
| Line 176: | Line 125: | ||
{{ansreq|page={{#titleparts:{{PAGENAME}}|2|1}}|num=13}} | {{ansreq|page={{#titleparts:{{PAGENAME}}|2|1}}|num=13}} | ||
<noinclude></noinclude> | <noinclude></noinclude> | ||
| − | <!-- 13. | + | <!-- 13. Demostrar y explicar el espaciamiento correcto, dirección en reverso y cómo rebasar a otros corredores en un lugar apartado para una caminata, con al menos otro corredor, siguiendo todas las normas de seguridad. --> |
<noinclude></noinclude> | <noinclude></noinclude> | ||
{{CloseReq}} <!-- 13 --> | {{CloseReq}} <!-- 13 --> | ||
{{ansreq|page={{#titleparts:{{PAGENAME}}|2|1}}|num=14}} | {{ansreq|page={{#titleparts:{{PAGENAME}}|2|1}}|num=14}} | ||
<noinclude></noinclude> | <noinclude></noinclude> | ||
| − | <!-- 14. | + | <!-- 14. Superar un recorrido con tres obstáculos simples creados al nivel del suelo en una caminata de equitación. Elegir entre los siguientes: --> |
<noinclude></noinclude> | <noinclude></noinclude> | ||
{{ansreq|page={{#titleparts:{{PAGENAME}}|2|1}}|num=14a}} | {{ansreq|page={{#titleparts:{{PAGENAME}}|2|1}}|num=14a}} | ||
| Line 202: | Line 151: | ||
{{ansreq|page={{#titleparts:{{PAGENAME}}|2|1}}|num=15}} | {{ansreq|page={{#titleparts:{{PAGENAME}}|2|1}}|num=15}} | ||
<noinclude></noinclude> | <noinclude></noinclude> | ||
| − | <!-- 15. | + | <!-- 15. Saber cómo refrescar y cuidar de un caballo después de un viaje exigente. --> |
| − | |||
<noinclude></noinclude> | <noinclude></noinclude> | ||
| Line 211: | Line 159: | ||
<noinclude></noinclude> | <noinclude></noinclude> | ||
| − | + | ||
| + | [[Category:Instructor Required{{GetLangSuffix}}|{{SUBPAGENAME}}]] | ||
| + | {{CloseHonorPage}} | ||
Latest revision as of 13:54, 2 January 2023
Equitación - Avanzado
Nivel de destreza
2
Año
2000
Version
10.02.2026
Autoridad de aprobación
División Norteamericana
1
Tener la especialidad de Equitación.
Para consejos e instrucciones, véase Equitación.
2
Etiquetar en un dibujo de un caballo o señalar en un caballo vivo un mínimo de 30 diferentes partes de un caballo.
3
Demostrar y explicar cómo cuidar de los aperos (el equipo y accesorios de un caballo).
4
Demostrar y explicar la forma de capturar y colocar los amarres al caballo en condiciones seguras.
5
Demostrar y explicar cómo atar un caballo en condiciones de seguridad con un nudo corredizo y con un nudo as de guía, utilizando la correcta longitud de la cuerda y tratando conforme la altura correcta desde el suelo.
| Nudo fugitivo |
|---|
|
Uso: Este nudo (también conocido como nudo bandolero) debe usarse cuando se ata un caballo a un objeto estacionario. Su principal ventaja es que puede desatarse rápidamente, entonces si el caballo comienza a entrar en pánico, puede liberarse rápidamente de la cuerda antes de que se enrede peligrosamente.
Cómo amarrar:
|
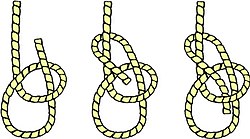
As de guía
| As de guía |
|---|
|
Uso: Este nudo no se resbala o desata cuando se amarra correctamente. Puede ser amarrado alrededor de la cintura de una persona y se utiliza para levantarla, ya que el seno no se aprieta bajo una carga. En navegación por vela, el as de guía se utiliza para atar una driza a un punto de la vela.
Cómo amarrar:
|
6
Demostrar y explicar la forma correcta de ensillar, colocar el bridón a un caballo y ajustar la longitud del estribo.
7
Demostrar las tres posiciones correctas, mientras cabalga/trota incluyendo los círculos y retrocesos:
7a
Sentado
7b
Levantado
7c
Colocar el caballo en dos patas (las patas traseras)
8
Demostrar una forma segura de desmontar en caso de emergencia.
9
Pasear en un sendero para un total acumulado de siete horas, siguiendo todas las normas de seguridad y el uso de la posición correcta.
10
Demostrar y explicar cómo utilizar una cuchilla para los cascos.
11
Demostrar un buen método para recoger (guardar) un caballo.
12
Identificar un mínimo de ocho colores comunes de caballos, cinco marcas comunes de la cara y cinco marcas comunes de las piernas.
13
Demostrar y explicar el espaciamiento correcto, dirección en reverso y cómo rebasar a otros corredores en un lugar apartado para una caminata, con al menos otro corredor, siguiendo todas las normas de seguridad.
14
Superar un recorrido con tres obstáculos simples creados al nivel del suelo en una caminata de equitación. Elegir entre los siguientes:
14a
Pasar sobre un tronco o palos, altura máxima 16 pulgadas (40 cm).
14b
Pasar entre dos barriles o pacas de heno espaciados a 45 pulgadas (1 metro) de distancia.
14c
Serpentear (zigzag) entre postes fijados a 12 pies (3.5 metros) de intervalo.
14d
Caminar en un gran agujero de heno, un círculo de 15 pies (4.5 metros), cruzar y salir sin pisar o cruzar cualquier borde.
15
Saber cómo refrescar y cuidar de un caballo después de un viaje exigente.


