Difference between revisions of "AY Honors/Unicycling/Answer Key"
m |
|||
| Line 89: | Line 89: | ||
</noinclude> | </noinclude> | ||
<!-- 6. Repair a punctured unicycle tire --> | <!-- 6. Repair a punctured unicycle tire --> | ||
| − | {{: | + | {{:AY Honors/Tire repair}} |
<!--T:27--> | <!--T:27--> | ||
Latest revision as of 12:03, 15 September 2021
1
Unicycles are made up of a few key parts:
- the wheel (which includes the tire, tube, rim, spokes, hub and axle),
- the cranks, pedals, fork-style frame, seatpost, and
- saddle (the seat of the unicycle).
The wheel is usually similar to a bicycle wheel with a special hub designed so the axle is a fixed part of the hub. This means the rotation of the cranks directly controls the rotation of the wheel (called direct drive). The frame sits on top of the axle bearings, while the cranks attach to the ends of the axle. The seatpost connects the frame to the saddle.
2
2a
Mounting the unicycle without having to hold on to anything.
2b
Basically sitting on your unicycle with little or no movement, but not dismounted.
2c
UnPlanned Dismount aka falling off.
3
- Wrist guards
- The most common impact points when falling from a unicycle are the hands and wrists. Of all the safety gear, wrist guards receive the most wear and tear.
- Knee and elbow pads
- The second most common impact point are the knees followed by the elbows.
- Helmet
- A helmet is especially important with specialty riding like Mountain Unicycling, and in some jurisdictions is required for road riding.
- Shin guards
- Shin guards become a necessary piece of equipment when using metal or pinned pedals. These types of pedals grip the shoes better, but can cause injury to the legs.
- Cycling shorts
- Padded cycling shorts are designed with a seamless, padded crotch, and long enough legs to extend down past the saddle, making them much more comfortable than "normal" shorts.
- Gloves
- Gloves are required for certain unicycling events such as racing. Gloves may be fingerless.
4
- Freestyle Unicycle
- Generally used for flatland skills and routines. Usually has a relatively high seatpost, a narrow saddle, a squared fork (used for one-footed tricks), and cotter-less cranks, as they do not need to withstand very much pressure. These unicycles are used similarly to flatland bicycles. Some examples of freestyle unicycles include Miyata, Nimbus, Schwinn, and Semcycle brands. Prices typically range from US$100 to $300. Wheel size is usually 20 inches, but smaller riders may use 16-inch unicycles. Some people prefer 24-inch wheels.
- Trials unicycle
- Designed for unicycle trials, trials unicycles are stronger than standard unicycles in order to withstand the stresses caused by jumping, dropping, and supporting the weight of the unicycle and rider on components such as the pedals and cranks. A recent development in trials unicycles is splined cranks and hubs, a feature that is very useful and somewhat expensive. Many trials unicycles also have wide, 19- or 20-inch knobby tires to absorb some of the impact on drops.
- Offroad Unicycles ("MUnis")
- "MUni" is an abbreviation for mountain unicycling. MUnis have many of the same components as trials unicycles, but have a few key differences. Usually, the tire diameters on mountain unicycles are either 24 or 26 inches, allowing the rider to more easily roll over obstacles such as roots and rocks. The seat is also thicker and more comfortable on MUnis to compensate for the rough terrain. Brakes are sometimes used for steep descents.
- Touring Unicycles
- Used for long distances, these unicycles are specially made to cover distances. They have a large wheel diameter, between 26 and 36 in., so more distance is covered in less pedal rotation. A 36" unicycle made by the Coker Tire company started the big wheel trend. Some variations on the traditional touring unicycle include the Schlumpf "GUni" (geared unicycle), which uses a two-speed internal fixed-geared hub. Larger direct-drive wheels tend to have shorter cranks to allow for easier cadence and more speed. Geared wheels, with an effective diameter larger than the wheel itself, tend to use longer cranks for control, as the speed comes from the gear ratio, not the wheel itself.
Variations here -> http://en.wikipedia.org/wiki/Unicycling#Variations, while I think it over.
5
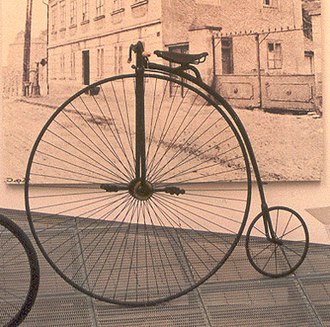
The unicycle's history began before the invention of the bicycle. The Comte De Gaye first developed unicycles during the late 18th century. His device, called a celerifere, was a wooden horse that had two wheels joined by a wooden beam. Germany's Baron von Drais improved the design by adding a steering mechanism, introducing his Draisienne or "Hobby Horse" in 1818. Kirkpatrick Macmillan, a Scottish blacksmith, added cranks and pedals to the rear wheel in 1839, and called it the Velocipede. The first mass-produced riding machine, the Michaux Velocipede, was designed in 1863. In 1866, James Starley developed the penny-farthing, a bicycle with a very large front wheel and a small rear wheel.
One theory of the advent of the unicycle is based on the popularity of the penny-farthing (or "Ordinary") during the late 19th century. Since the pedal and cranks were connected directly to the front axle, the rear wheel would go up in the air and the rider would be moved slightly forward. Many penny-farthing owners discovered they could dispense with the frame and just ride the front wheel and handlebars. Evidence for this theory of development can reportedly be found in pictures from the late 19th century showing unicycles with large wheels.
Over the years, unicycle enthusiasts have inspired manufacturers to create new designs, such as seatless ("ultimate wheel") and tall ("giraffe") unicycles. During the late 1980s some extreme sportsmen took an interest in the unicycle and off-road unicycling (MUni) was born.
6
Tools needed:
tire patch kit (patch, cement, sandpaper/roughening tool)
pen (ballpoint or marker)
tire-iron
Remove wheel with flat tire
It is assumed you have the skills and tools necessary to do this. I will not describe this process here. (A flat tire can be repaired without removing the wheel However that is an Advanced Procedure, and is not covered here.)
Identify where the hole/leak is
NOTE: If you can do this BEFORE removing the tire from the rim you can save yourself much effort and time later.
Holding wheel with flat tire (& tube) closely examine exterior of tire to find what has punctured it. Include a tactile examination -- run your fingers over the tire surface. 97% of the time you will find something, a small piece of (metal) wire, a small piece of glass (oftentimes glass is below the surface of the tire, in which case you are looking for glints of light reflecting off one surface of a shard of glass in your tire), or a biological object (splinter of wood or thorn), or a screw or a nail.
BEFORE removing object from your tire MARK THE LOCATION of the puncture. Also mark the location on the tire that corresponds to where the valve of your innertube is located. (Note: I've just told you to mark two (2) locations on your tire. This will save you time. You don't have to do it, though.)
If you do NOT find the location of the puncture mark the location of the innertube valve.
Remove the tire
If possible do not use any tools. (This does require some muscling on your part.) If your tire is a very tight fit over your rim use a tire-iron carefully. (In an "extreme situation" a flat-bladed screwdriver can be used. It is WAY-EASY to pinch-flat an innertube using a screwdriver.) Do NOT pinch your innertube between your tire-removing tool and the rim, or the tire. (If you are new to fixing flats you will probably do this once. We all do. It's part of the learning curve involved in wrenching on your bike. Learning to not pinch an innertube is best done with a wheel and tool in hand. Take your time. Good luck.)
Inspect the inside of your tire for punctures
Yes, you've inspected the outside, and now you are inspecting the inside. This is NECESSARY if you did not find the puncture yet. It is VERY RECOMMENDED even if you have found something already. The idea is to leave your tire, after all this is done, with NOTHING that will put more punctures in your innertube. Include a tactile inspection. Mark the location of any (additional) punctures you find. REMOVE all foreign objects from your tire after marking their location.
Find holes in innertube
(This is why you marked all those puncture locations and the valve location on your tire.) Align the innertube valve with the valve-location mark you made earlier on the tire. Inspect the innertube in the vicinity of all the tire-puncture marks for innertube punctures. MARK all innertube punctures.
Maybe you were unable to find any punctures in your tire. So now you have nothing to help you find the punctures in your innertube. You may have a pinch-flat. These can be anywhere on the surface of your innertube. (Punctures from objects generally happen to the surface of the innertube that is on the outside of the "donut surface" that the innertube describes.)
Fill your innertube with air & listen/feel for escaping air. MARK location(s) of puncture(s). Maybe you haven't found anything yet. In this case get a container with water (bucket, washbasin, whatever) and run your innertube through the water completely submerging the innertube a section at a time. Hold each section stationary under water (fill the innertube with air just before putting innertube into water) looking for small bubbles escaping from the innertube. If you do not have a basin available, mix some soap with water and apply the solution to the tire. As the air escapes it will make bubbles in the soap. When pumping air in to the innertube for this test don't be afraid to pump lots of air in. (Stop pumping when innertube is twice original size. This does not mean you need to pump it up this much. I'm saying if you have no other way of determining when enough air is in the innertube, stop at twice the original size.)
Assuming you have located all the punctures in your innertube, you are ready to begin the repair.
Repair innertube punctures
Roughen/clean a patch on the innertube, centered around (each) puncture. The roughened area must be larger than the patch you are going to apply. (Examine patch from your patch kit to determine this size.) You will use whatever tool your patch kit provides you with -- either a (small) piece of sandpaper or a metal grater.
Apply the patch cement. Apply a very thin coating to the entire area you roughened/cleaned. Allow the cement to get sticky. Test for stickiness by using a fingernail -- lightly touch one fingernail surface to a surface on the area of cement you previously applied. If it doesn't stick yet, wait. If it sticks some it's about right. If you wait too long it won't stick at all, in which case you get to clean it off and re-apply.
Assuming the cement is just sticky peel off the backing from the underside of your patch and apply patch to the innertube puncture, centered on the puncture. Leave the backing that is on the top-side of your patch on. (I generally make my puncture-location marks so big that when I roughen/clean the innertube the marks are visible outside that roughened/cleaned area. This makes the centering of the patch here a lot easier.)
Press the patch onto the surface of the innertube. Use the broad part of your thumb. Use the broad part of you tire iron. You are assisting the cement to establish a complete bond between the innertube and the patch. Take a minute or two and press! You are also pressing all air out of the patch-innertube bond. (Yeah, this is the part of this process that is best taught by example/demonstration. Sorry)
As you are pressing the patch onto your innertube you may notice the top-side backing on the patch begin to come loose. This is a Good Thing. If it doesn't, you get to figure out how to remove the top-side backing without removing the patch. (The top-side and bottom-side backing are there to keep the patch clean. A clean patch adheres best! Clean is Good.) "Better quality" patches have this top-side backing pre-slit making it easier to remove the top-side backing from the patch. (Most patch kits I've found recently are not "better quality".) After pressing patch onto the innertube remove top-side backing.
Repeat for all punctures.
Set innertube aside when all punctures have been patched to allow a few minutes for the cement to set and your patch to adhere.
Start cleaning up your work area. (You're almost done!)
Reassemble tire & innertube onto rim
Put just enough air into your innertube so it's barely round. Put innertube into tire. Fit one edge of tire over one side of wheel rim starting with the valve area. With your thumbs (and your tire iron IF NECESSARY) get all of one edge of tire over one rim. Starting at valve location push second edge of tire over wheel rim. Now you probably will have to use your tire irons. (This is why they come in sets.) If you have burley thumbs you may not need to use tire irons. (Yay!) Do everything you can to AVOID giving your (newly patched) innertube a pinch-flat. Take your time, working the tire over your wheel rim while keeping the innertube away from the rim edge. (This is why there is some air in the innertube. To avoid getting the innertube stuck between the tire and the rim edge.)
With tire completely mounted into wheel, between rims, adjust position of tire and innertube with respect to the rim so the innertube valve is sticking straight out of the valve hole. This is VERY IMPORTANT! A maladjusted innertube can put a lot of stress on one side of the innertube at the valve and rip the innertube away from the valve. Which will necessitate you replacing the innertube. (Holes at the innertube-valve junction are almost impossible to repair -- I've never been able to repair 'em anyway.)
Put 10-20 lbs of air into tire/innertube. Check valve for proper innertube-rim orientation. If the valve is sticking out of the valve hole at any angle (other than straight) let some air out and re-adjust innertube/tire and rim orientation. The rim and innertube are made to fit together so the valve sticks straight out. Any other angle on the valve indicates the need for readjustment.
When the valve has the correct angle (straight out) inspect rim-tire orientation. You are looking to make sure the tire bead is completely seated all around the rim. Look at where the tire goes into the rim. The tire should appear about "even" all the way around the edge of the rim. Tires usually have several concentric "rings" cast into the surface of the tire near the bead just to make this check easy. If you see the tire bead coming out of the rim in any one location do NOT put any more air into the tire. Seat the tire bead. You may have to let some air out of the tire.
When the tire bead is uniformly seated inflate the tire to full pressure. This is nearly always defined on a place on the tire. "Max pressure = ## lbs." should appear somewhere on the outside of your tire.
Hey! You're done! Clean up your work area. Put your wheel back onto your cycle. Go for a ride!
Check your tire the next day! If you had a patch that did not completely adhere you may have a slow leak. If this happens :-(( you get to find it (step 5) above) and repair it (step 6) above.) Remember to COMPLETELY remove the leaking patch before applying the new one. (Again, if you're new to this, you MAY have this happen once. It is frustrating. Somehow your patch did not completely adhre to the innertube. Dirty patch? Dirty innertube? Cement too dry? Patch not completely pressed on? These, and more, can result in a patch that does not completely adhere. I hope this does NOT happen to you.)
Happy riding! Gerhardt in Portland Apr '07
7
This will take some practice, so get practicing.


