Difference between revisions of "AY Honors/Camping Skills II/Answer Key/en"
(Updating to match new version of source page) |
(Updating to match new version of source page) |
||
| Line 192: | Line 192: | ||
<noinclude></noinclude> | <noinclude></noinclude> | ||
<!-- Note: The tent color for Camping Skills #2 patch is red. --> | <!-- Note: The tent color for Camping Skills #2 patch is red. --> | ||
| − | {{: | + | {{:AY Honors/Camping/Colors}} |
<noinclude></noinclude> | <noinclude></noinclude> | ||
Revision as of 01:54, 31 August 2021
1
Camping Skills II has been designed so that it is within the capabilities of Pathfinders who are in grade 6 or higher.
2
Review and practice the Leave No Trace 7 Principles:
- Plan ahead and prepare.
- Travel and camp on durable surfaces.
- Dispose of waste properly.
- Leave what you find.
- Minimize campfire impacts (be careful with fire).
- Respect wildlife.
- Be considerate of other visitors.
© 1999 by the Leave No Trace Center for Outdoor Ethics
Be considerate of other campers. When purchasing tents, buy ones in muted colors that will blend in with the environment. If most of your camping is done at camp grounds frequented by others, blues, greens, and browns are preferred to reds and oranges. People go camping to escape the garishness of the city—leave that behind. However, if you camp in isolated places, bright and flashy colors make it easier to find your tent again if you leave it temporarily.
More importantly, when traveling in areas that allow hunting, wear bright colors such as orange to alert other's to your presence. An orange vest or hat is common.
Be mindful of the noise level made in your camp. Don't be a nuisance. If camping in the wilderness, be sure to make your camp out of sight of the trail. Most National Forests have guidelines for where you can camp in relation to the trail. Find out what those guidelines are and follow them.
Do not enter anyone else's camp site without their permission, especially when traveling to or from your campsite to other places on the campground. It is very rude to cut through another camp. Use the road or trail, even if it will take longer.
Leave the area cleaner than you found it If you are leading a group of youngsters on a campout, have a contest before you pile back in your cars to go home: see who can collect the most litter (define "most" first though - it can mean by volume, by weight, or by item count). Offer a prize to the one who collects the most (such as getting to choose which seat he or she will sit in on the trip home).
3
4
Going on a camping trip does not absolve you from the need for hygiene and sanitation – it merely makes it a little less convenient. If you are camping on an established campground, use the toilet facilities provided. Otherwise, you will have to provide your own facilities. If you are camping with a small group, this can be as simple as digging a cat hole (no more than 10 cm![]() deep, depositing your waste in the hole, and burying it again. A hole of this depth will be occupied by a myriad of bacterial life which will take care of the rest for you. If camping with a larger group, you will need to dig a latrine. Whether using cat holes or a latrine, make sure they are dug at least 60 meters
deep, depositing your waste in the hole, and burying it again. A hole of this depth will be occupied by a myriad of bacterial life which will take care of the rest for you. If camping with a larger group, you will need to dig a latrine. Whether using cat holes or a latrine, make sure they are dug at least 60 meters![]() from any water source.
from any water source.
When cooking, be sure to clean your dishes and kitchen area immediately after use. Again, how you do this depends on the size of your group. When camping with a small group, wipe all dishes, pots, pans, and utensils as clean as you can with paper towels. Burn the paper towels. Then you can scrub the dishes out with clean sand and rinse them off. When camping with a large group, you will need to establish a dish washing area. Fill two tubs with water – use hot water if possible (and it almost always is). You can boil a small quantity of water and add it to a larger volume of cold water, and this will do nicely. One of these tubs will be for washing, the other for rinsing. You can optionally use a third tub for pre-rinsing, which will eliminate the need to wipe the dishes with a paper towel before washing. Add 15 ml![]() of bleach to the rinse water. Wipe the dishes as clean as you can first (or pre-rinse them), then wash them in the first tub with dish soap. Then rinse. Wash the eating dishes first, followed by the cooking dishes. When finished, dispose of the "grey water" as directed by campground management (if on a campground). Otherwise, dispose of the grey water at least 60 meters
of bleach to the rinse water. Wipe the dishes as clean as you can first (or pre-rinse them), then wash them in the first tub with dish soap. Then rinse. Wash the eating dishes first, followed by the cooking dishes. When finished, dispose of the "grey water" as directed by campground management (if on a campground). Otherwise, dispose of the grey water at least 60 meters![]() from any water source.
from any water source.
5
6
6a
Bring a song book, or sing from memory. If your group has any musicians, encourage them to bring any portable instruments along (guitar, ukulele, recorder, harmonica, etc.). Even kazoos can be pressed into service.
6b
Prepare ahead of time. You can download the Teacher's Lesson for the Junior's Sabbath School from http://powerpoints.adventist.org if desired.
6c
Make sure the story has an aim. A story with a moral lesson is an essential part of a worship service. A story without an aim is entertainment. If you can coordinate the story with the lesson, all the better.
6d
A "worship thought" can be a short sermon. One way to do this is to take a Bible story, figure out what the underlying message of that story is, and expound upon it. Read what Ellen White may have had to say about it (The Desire of Ages follows the gospels), or consult a Bible Commentary set. If you do not have one, perhaps your church, school, or pastor does.
7
This will depend a lot on the type of stove or lantern you have. Most camp stoves and lanterns these days use small propane canisters. Make sure the canister is connected properly. Then light a stove lighter (these are long-stemmed butane lighters) near the burner of mantle. Only after the flame is going should you turn on the gas. If you turn on the gas before you light the flame, the gas can build up and you'll have a small (or large!) fireball to contend with. This can be very dangerous. If you have trouble, turn the gas off and let it dissipate before attempting again. Once the stove or lantern lights, adjust the flame or brightness as desired.
8
While firewood can be cut with an axe, it takes much less effort, and less wood goes to waste if it is cut with a saw. To do this, prop one end of the to-be cut log off the ground. This can be done by laying it on a rock, on another log, or on anything strong enough to hold its weight. The end of the log should protrude past the support, and the log should be sawn just past this point. If you try to cut a log between the support and the ground, the weight of the log cause the log to sag as it is cut, and this will pinch the saw blade. If you make the cut past the support, the weight of the log will open the saw cut making it easier to saw through.
Dead wood can also be broken instead of sawn. This is often easier and quicker than sawing it, but care must be taken to do this properly, and it can only be done on smaller logs - up to 7 cm![]() in diameter or so. To do this, again, the log is propped up on a support on one end, while the other end lies on the ground. Then the camper brings his foot down sharply about 12-18 inches (30-45 cm) from the support, between the support and the ground. Be careful to keep your footing while doing this, and watch that the ends of the log do not fly off.
in diameter or so. To do this, again, the log is propped up on a support on one end, while the other end lies on the ground. Then the camper brings his foot down sharply about 12-18 inches (30-45 cm) from the support, between the support and the ground. Be careful to keep your footing while doing this, and watch that the ends of the log do not fly off.
9
Fuzz sticks
Adventist Youth Honors Answer Book/Camping/Fire/Fuzz sticks
Council fire
Adventist Youth Honors Answer Book/Camping/Fire/Council
Hunter's fire
Adventist Youth Honors Answer Book/Camping/Fire/Hunters
Fire safety
Adventist Youth Honors Answer Book/Camping/Fire/Fire safety
10
11
| A pot hanger or pot hook can be used to hang a cooking pot from a crane. This makes it easier to remove the pot without having to slide the hanging handle all the way to the end of the crane. This is particularly useful if you've built a crane that is supported on both sides of the fire. Carve a notch in a forked branch as shown to hang your cooking pot from a crane. |
| A pot hook can also be used to place your cooking pot on the crane, or remove it from the crane while keeping your hand further from the heat. A notched branch could also be used. |
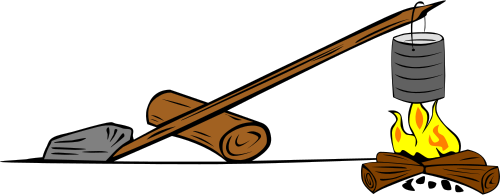
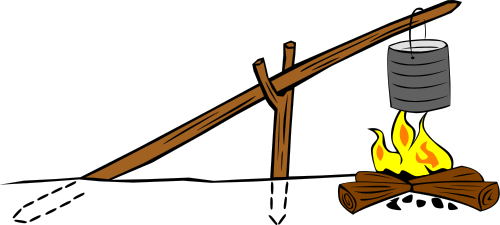
| This crane is the most simple of cranes. A long stick with a weight on the back propped over a log or rock will work fine. Feel free to use whatever is handy for propping up a crane. A large rock or two work as well as a log for this crane. |
| This crane allows for adjusting the heat of cooking by raising or lowering the cooking pot over the fire. By spiraling the piece of rope around the large stick, you can raise and lower the pot by twisting the stick to wind on more rope, or release more rope. The tripod could also be a forked branch driven into the ground. |
| A simple crane with a forked branch driven into the ground for support will work in areas where the soil is soft. Use a weight (Rock) to hold the crane down if the ground is too hard to drive the stick into for support. |
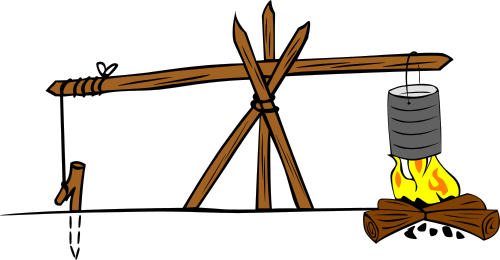
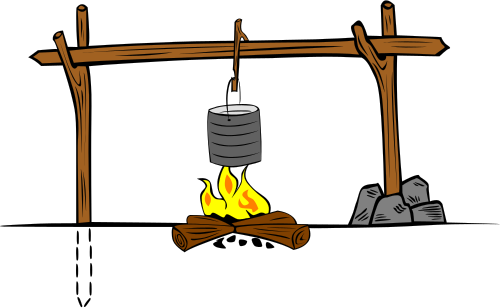
| This crane supported on both sides of the fire is a popular choice and provides a stable crane. As seen on the right hand forked branch, use a small pile of rocks to hold the vertical supports where the ground is too hard to drive in a branch. |
The pictures here are worth many thousands of words. A simple crane propped on a forked stick will hold a cooking container over a fire. It is best to use green wood for any sticks that will be close to the fire, as green wood will resist catching fire better than a dry stick. Be sure to secure any vertical members so that the crane will not fall over when you hang the pot on it. Drive them deeply into the ground, or pin them in place with large rocks. Test the crane before committing your soup to it. If the pot topples, you will extinguish your fire and lose your soup in one sad incident. But at least you'll have a story to tell.
12
Boiling
Adventist Youth Honors Answer Book/Camping/Boiling
Frying
Foods that are prepared by frying include
- Pancakes
- Scrambled or fried eggs
- French toast
- Vegetarian sausages
- Veggie burgers
- Grilled cheese sandwiches
Baking
Foods that are prepared for baking on a campout include:
- Bread on a stick
- Biscuits
- Cobbler (see the Dutch Oven Cooking honor for more ideas)
- Baked potatoes
- Corn on the cob
- Veggie burgers
Baked potatoes, corn on the cob, and veggie burgers can all be baked by wrapping them in aluminum foil and covering them with hot coals. Veggie burgers can have onions, carrots, and thin potato slices added to them and cooked in the same package. Delicious!
13
Tent site selection
Find an area that is large enough to pitch your tent and that is also flat. It is difficult to sleep on an incline. Avoid ridge tops as they will be windy and there is significant lightning danger there. Likewise avoid dry stream beds, especially in desert areas. Flash floods can be caused by rains many, many miles away. If camping near a river, camp above the high water line. The river may rise in the night. You can determine the high water line by observing trees on the river bank - they will have debris in the lower branches deposited there by flood waters. Camp on the lee side of a hill to avoid the wind.
Carefully examine the space above your tent site, making sure there are no dead branches, icicles, coconuts, or anything else that could fall on the tent and cause harm.
Pitching and striking a tent
Adventist Youth Honors Answer Book/Camping/Pitch and strike a tent
Cleaning a tent
Sweep the tent out before striking it. Remove muddy shoes before entering a tent, or take them off as soon as you enter the door. You can clean the floor in front of the door with paper towels. A stiff broom will also clean most debris from the walls, but you may need to use water and a mild detergent (such as dishwashing soap) to clean messes deposited by birds.
14
14a
If your sleeping bag came with a stuff sack, all you have to do is stuff it in. It's really that simple. If it did not come with one, you can purchase one separately. Otherwise, you'll have to roll it up. That's a little more difficult, but not that hard. First check for the tie-strings. They are usually at the foot of the bag. Zip the sleeping bag closed and fold it in half lengthwise with the tie-strings down - one tie string will be located near the center of the bottom, and the other will be located near the edge. Then go to the end opposite the tie strings and start rolling, keeping it tight as you go. When you get to the end, draw the tie strings around the bag and tie them with a shoelace knot.
14b
The most important thing you can do to keep your sleeping bag dry is to keep it in the tent and keep the tent door closed. Take off your shoes when you enter the tent (or before going in) so you do not track water all over the place. Keep your sleeping bag on your sleeping pad, as this will raise it off the floor slightly so that any water that drips off wet clothing cannot reach it.
14c
Turn the sleeping bag inside-out, throw it over a clothesline, and beat it with a stick. Unzip it and let it air out completely. Do not put a sleeping bag in a washing machine unless the washing instructions on the bag specifically say that you can. A washing machine will crush the fibers inside, reducing the insulation and padding value. A bed roll can be shaken vigorously like a rug, and it can also be beaten with a stick after hanging it on a clothesline.
Note
| Color | AY Class | Honor |
| Blue | Friend | Camping Skills I |
|---|---|---|
| Red | Companion | Camping Skills II |
| Green | Explorer | Camping Skills III |
| Silver | Ranger | Camping Skills IV |
References
