Difference between revisions of "AY Honors/Radio Electronics/Answer Key"
Jomegat bot (talk | contribs) m (Jomegat bot moved page AY Honor Radio Electronics to AY Honor Radio Electronics Answer Key: Bot: Moved page) |
Revision as of 15:34, 20 December 2020
Template:Honor desc Template:Honor Master
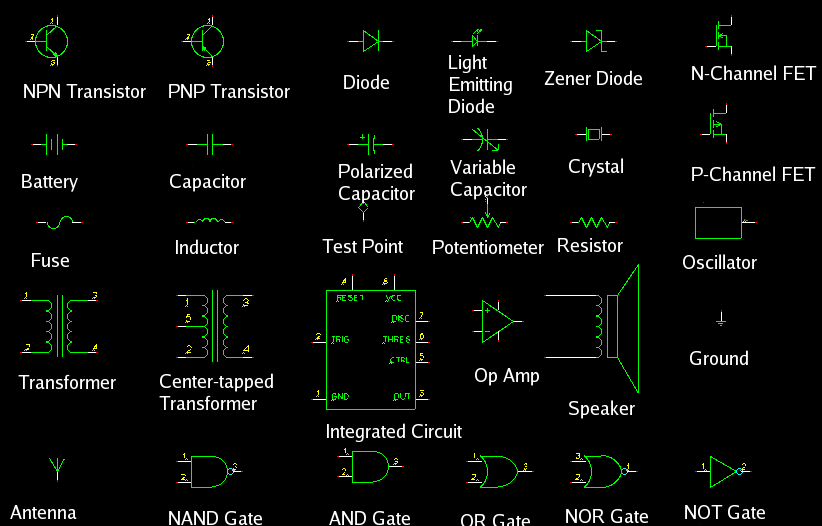
1. Identify at least 20 symbols used in electronics.
2. Identify the value of resistors by the color code
The value of a resistor is marked on the device itself by using bands of colors.
band A is first significant figure of resistance value in ohms
band B is the second significant figure
band C is the decimal multiplier
band D if present, indicates tolerance of value in percent (no color means 20%)
Resistors manufactured for military use may also include a fifth band which indicates component failure rate (reliability); refer to MIL-STD-199 for further details.
The Standard EIA Color Code Table per EIA-RS-279 is as follows:
| Color | 1st band | 2nd band | 3rd band (Multiplier) | 4th band (Tolerance) | Temp. Coefficient |
|---|---|---|---|---|---|
| Black | 0 | 0 | ×100 | ||
| Brown | 1 | 1 | ×101 | ±1% (F) | 100 ppm |
| Red | 2 | 2 | ×102 | ±2% (G) | 50 ppm |
| Orange | 3 | 3 | ×103 | 15 ppm | |
| Yellow | 4 | 4 | ×104 | 25 ppm | |
| Green | 5 | 5 | ×105 | ±0.5% (D) | |
| Blue | 6 | 6 | ×106 | ±0.25% (C) | |
| Violet | 7 | 7 | ×107 | ±0.1% (B) | |
| Gray | 8 | 8 | ×108 | ±0.05% (A) | |
| White | 9 | 9 | ×109 | ||
| Gold | ×0.1 | ±5% (J) | |||
| Silver | ×0.01 | ±10% (K) | |||
| None | ±20% (M) |
A useful mnemonic for remembering the first ten color codes is "Better Be Right Or Your Great Big Venture Goes West", where the first letter matches the first letter of the color code, by order of increasing magnitude.
Resistors are measured in ohms, so yellow violet red brown means 4,700 ohms, 1% tolerance.
3. Demonstrate proper soldering techniques
Soldering is a way of semi-permanently connecting electronic components together or to a circuit board. It involves heating the solder to its melting point and letting it re-solidify on the components themselves. The heating is done with a soldering iron.
Begin by turning on the soldering iron and waiting until it is hot enough to melt solder. You can test this by touching some solder to the tip of the iron. Clean the tip of the soldering iron by wiping it on a wet sponge. This may be repeated often when soldering a lot of joints.
The connection should also be bright and clean before attempting to solder them. They are often clean enough and require no attention, but if you have difficulty getting the solder to stick, clean them with some solder flux.
Place the tip of the iron on the components you wish to connect and heat them both. Do this while simultaneously touching the solder to the components - do not touch the solder to the iron. The goal is to heat the components to the point where they are able to melt the solder themselves. Otherwise you will end up with a "cold" solder joint which will fail sometime in the future.
If soldering wires, twist them together first. Although solder has a small amount of mechanical strength, it is not sufficient to withstand very much stress. Therefore, it should not be relied upon for anything other than making an electrical connection. If the joint is stressed, it can easily fail.
And always remember - solder is HOT, as are freshly soldered electronic components. Failure to be careful may result in a nasty burn.
4. Explain the use and operation of various important components in electronics such as resistors, variable capacitors, fixed capacitors, coils, transistors, integrated circuits, diodes, and transformers.
Resistor
The function of a resistor is to limit the current in a circuit. Resistors can also be combined into "voltage divider" circuits by placing them in series.
Fixed Capacitor
A fixed capacitor can be used to hold a charge. They are often used to smooth noise out of power supply circuits by placing them in parallel with the power supply. A capacitor cannot pass DC if it is placed in series. This is because the impedance of a capacitor varies with the frequency, and at zero Hertz (DC), its impedance is infinite. Large capacitors have less impendence at a given frequency than a small capacitor, and because of this, capacitors can be used in "frequency selective circuits" such as filters.
The value of a capacitor is measured in farads, or more commonly, in microfarads. A microfarad is a millionth of a farad. Large capacitors have tens or hundreds of microfarads. Smaller capacitors are measured in picofarads (a picofarad is a millionth of a microfarad, or a trillionth of a farad). The microfarad is often abbreviated as μF (sometimes uF) and picofarads are often abbreviated as pF.
Variable Capacitor
A variable capacitor can be used in a frequency selective circuit where the user has control over the selected frequency. An example of this would be in a radio or television tuner.
Coil
A coil is also known as an inductor. The impedance through a coil is also frequency dependent, but in the opposite way as in a capacitor. At DC, an inductor has nearly zero impedance, and the impedance increases with higher frequencies. Inductors are often used in conjunction with capacitors in frequency selective applications. They are also often used for filtering out noise from power supplies. Since a power supply is supposed to provide a constant voltage (0 Hertz), an inductor can be placed in series between the supply and the load. The inductor will absorb the higher frequencies so that the load does not see them.
Inductors are measured in henries, which is abbreviated as H.
Transistor
A transistor has two basic applications - it can be used as a switch and it can be used as an amplifier.
There are two basic types of transistors, bipolar and field effect.
A bipolar transistor has three terminals: the base, the collector, and the emitter. Current flowing from the base to the emitter controls the amount that can flow from the collector to the emitter. If no current flows from the base to the emitter, no current can flow from the collector to the emitter. This is how a bipolar transistor can be used as a switch.
There are two types of bipolar transistors: NPN and PNP. In an NPN bipolar transistor, the current flowing from the collector to the emitter is proportional to the current flowing from the base to the emitter. A small signal can be amplified by injecting it into the base of the transistor. In this case, the current from the collector to the emitter is an amplified version of the current flowing from the base to the emitter.
A PNP bipolar transistor works the same way as an NPN except that the direction of current flow is reversed - that is, it flows from the emitter to the base, and from the emitter to the collector. In the case of a PNP transistor, it helps to think about "pulling" current out of the base rather than "injecting" it into the base.
A field effect transistor is similar to a bipolar transistor. There are two types of field effect transistors (FETs): N-channel, and P-channel. They too have three terminals: the gate, the drain, and the source. If a voltage is applied between the gate and the source of an N-channel FET , the resistance from the drain to the source is reduced. If enough voltage is applied between the gate and the source, current can flow from the drain to the source unimpeded. If no voltage is applied, no current can flow from the drain to the source.
In a P-channel FET, the voltages and currents are reversed - that is, when the gate is more negative than the source, current can flow from the source to the drain.
Integrated Circuit
An integrated circuit - or "chip" is a collection of transistors and resistors etched into a silicon (or other semiconducting material) chip. Very complicated circuits can be built by combining many transistors onto a single chip. The number of transistors that can be put on a single chip is well over a million.
Diode
A diode is a device that allows current to flow in one direction, but not in the other. This can be used in constructing an AC to DC converter, or for protecting a circuit from outside voltage sources.
Transformer
A transformer consists of one or more coils located within close proximity to one another. When current passes through a coil, it generates a magnetic field. When the current varies, so does the magnetic field. When a varying magnetic field is set up near a coil, a current is induced in that coil. By placing two coils in a common magnetic field and injecting a varying current into one (the primary), a proportional current is induced in the other (the secondary). The ratio depends on how many turns each coil has. If a transformer boosts the voltage, it will reduce the current, and if it reduces the voltage, it will increase the current. Thus, the power through the transformer is preserved (other than a loss). Electric companies transmit power by passing the electricity through step up transformers so that less current (but very high voltage) can be transmitted over long distances. Power loss in a transmission line equals the current squared times the resistance, so reducing the current by stepping up the voltage saves a lot of energy. The voltage is stepped down again before it is delivered to a customer.
Transformers are also used to isolate two circuits so that only AC passes between them and their DC power supplies do not interfere with one another.
5. Know and understand Ohm's Law.
If a voltage is applied across a resistor, current will flow through it. Ohm's law describes the relationship between this current, voltage, and resistance. It can be written as
[math]\displaystyle{ V = I R }[/math]
Where v is voltage (measured in volts), i is current (measured in amps), and r is resistance (measured in ohms). The equation can also be written as
[math]\displaystyle{ I = \frac{V}{R} }[/math]
and
[math]\displaystyle{ R = \frac{V}{I} }[/math]
Basically, it means that if the voltage is held constant and the resistance is decreased, the current is increased. Or if the resistance is held constant and the current is increased, the voltage will also increase.
6. Determine how to correctly place or pin integrated circuits, transistors, diodes, and capacitors in a circuit board.
Integrated Circuits
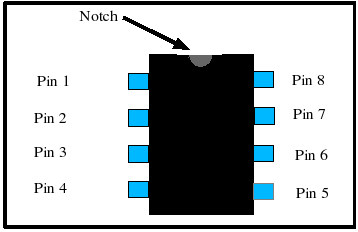
Integrated circuits usually have some means of indicating where "pin 1" is on the device. Once pin 1 is located, the remaining pins are numbered going counter-clockwise around the device. On a DIP, pin one is located to the left of a notch milled into the top of the IC as shown below:
Transistors
Transistors come in a variety of packages. To determine which pin is the base, collector, and emitter (bipolar transistors) or gate, source, and drain (field effect transistors), refer to the device's data sheet.
Diodes
A diode is usually marked with a stripe near its cathode. Current flows from the anode to the cathode, but not from the cathode to the anode. The stripe can be interpreted to look like a gate that won't let the current enter.
Capacitors
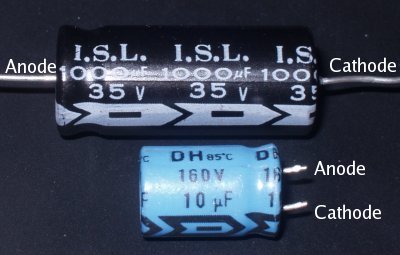
Only polarized capacitors are "pinned," and care must be taken to not plug them in backwards. If an electrolytic capacitor is charged in reverse, it can explode. Polarized capacitors are often marked with a stripe showing which terminal is the cathode (negative terminal). Sometimes the stripe will connect the cathode and the anode, but it will have arrows or minus signs on the stripe indicating direction of current flow (anode to cathode). In a schematic, the curved plate of the capacitor represents the cathode and the straight plate represents the anode.
In the picture above, the cathode of the black capacitor is on the right. The cathode of the blue capacitor is toward the bottom.
7. What is meant by a parallel and a series circuit?
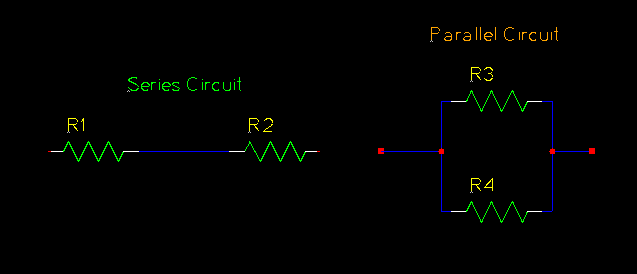
A series circuit is a circuit in which the components are placed end-to-end. A parallel circuit connects both terminals of two components together.
In a series circuit the current flowing through both devices will be equal, but the voltage across them will be different if the resistances are different.
In a parallel circuit, the voltage across the two elements will be identical, but the current divides between them. Some current goes through the top, the rest goes through the bottom.
8. From a kit or from scratch make two of the following:
Good places to find components for the projects detailed below include Radio Shack, Mouser, Digikey, and Jameco. All of these suppliers will sell to hobbyists in small quantities.
Another option for building these is to buy a kit. You can buy kits for individual projects or you can buy general purpose kits that will let you experiment with many different circuits. Check with Radio Shack to see their current offerings. Electronics kits can also be found at toy stores, especially those that emphasize "learning" toys. Such suppliers include Toys R Us and Imaginarium, both of which offer kits over the Internet via Amazon.
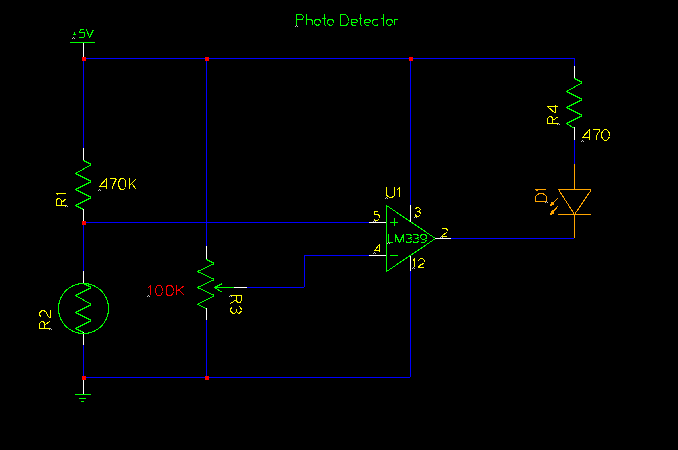
a. Photocell Guard or Counter
The Photocell Guard circuit is a photo sensitive switch that will either turn on or turn off some device. In modern terminology, it would be called a photo-sensitive switch. A Photocell Counter is a circuit which counts the number of times a photo-sensitive switch is activated. In modern terminology, it would be called a Photo-sensitive Counting Circuit.
In this circuit, R2 is a cadmium sulfide cell (CdS cell) - that is, a light-sensitive resistor. When exposed to light, the resistance of the cell decreases. In darkness, the cell has a higher resistance. R1 and R2 together form a voltage divider circuit. As the light striking CdS cell gets brighter, the voltage at the common terminal decreases. As it gets darker, the voltage increases. This voltage is applied to the positive terminal of a comparator IC. The negative terminal of the comparator is connected to the wiper of a potentiometer which forms a second voltage divider circuit. This voltage can be adjusted by tuning the potentiometer. When the light striking the CdS cell gets bright enough, it causes the voltage on the positive terminal to fall below the voltage on the negative terminal. This causes the output of the comparator to go to zero volts, thus lighting the LED. When it gets dark again, the LED will turn off.
The action of the LED can be reversed (on when dark, off when bright) by reversing the positions of R1 and R2 (the CdS cell), by swapping the positive and negative terminals of the comparator, or by connecting the LED through a resistor to ground instead of connecting it through a resistor to power.
b. Siren
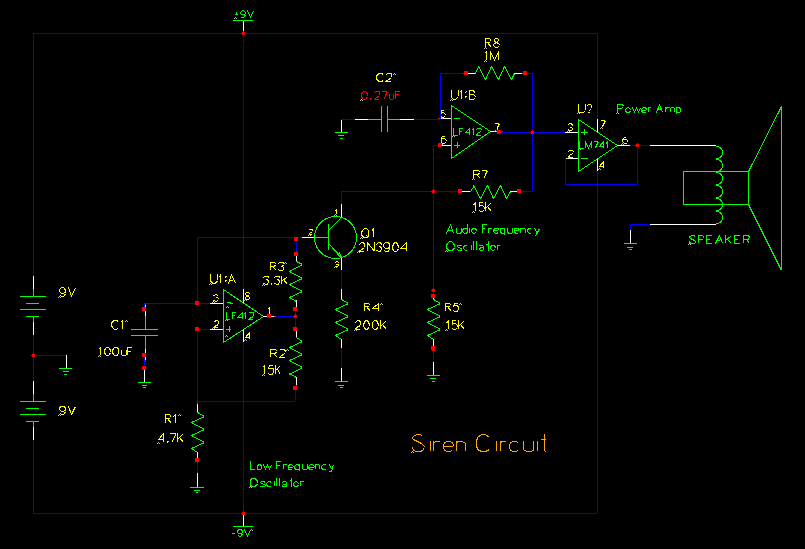
The circuit presented here looks intimidating at first glance, but as with most things, when it is broken down into smaller parts, it's a lot easier to understand.
The first thing to note is that this circuit requires a bipolar power supply - that is, a power supply that can provide both positive and negative voltages. This is accomplished here with two batteries. The circuit was tested with voltages ranging from ±4.5V to ±12V, so a pair of 9 volt batteries works pretty well.
Moving to the right we come to an op-amp configured as a low-frequency oscillator. This oscillator, in conjunction with the transistor Q1 controls the frequency of a second oscillator (denoted as the "Audio Frequency Oscillator" in the schematic.
The frequency of the low-frequency oscillator is set by the capacitor C1, and the resistors R1, R2, and R3. When the output of the amplifier (at pin 1) is high, C1 charges through R1. When the voltage across C1 exceeds the threshold voltage on the positive terminal of the op-amp, the output will go low. When this happens, C1 will then discharge though R1 and the voltage at the positive terminal will change to a negative value. When C1's voltage drops below the threshold voltage at the positive terminal, the output switches high again, and the cycle repeats. The threshold voltage at the positive terminal is set by the ratio of R1 and R2, as well as by the output of the amplifier:
[math]\displaystyle{ V_{thresh} = \frac{R1}{R1+R2} \times V_{out} }[/math]
If the voltage at the output of the low-frequency oscillator is observed on an oscilloscope, it will be shown as a square wave, oscillating between the two battery supply voltages. If this value were used to drive the base of Q1, the transistor would switch suddenly between full-on and full-off, and this would cause the audio oscillator's frequency to jump suddenly between two values (this makes it sound more like a cell phone ringing than a siren - try it!). To get a siren-effect, we need a smooth frequency transition, so the base of the transistor is driven with the voltage on the capacitor C1 which is a triangle wave.
The next portion of the circuit to consider is the audio frequency oscillator. This circuit is almost exactly the same as the low-frequency oscillator, except that the RC values have been changed so that it oscillates at a higher frequency, and the voltage divider circuit that sets the threshold voltage at the positive terminal (pin 5) is modified. The lower half of this voltage divider includes a transistor. As the transistor turns on, the resistance of the lower half of the voltage-divider is changed, and this will change the frequency of the audio oscillator. Thus, the pitch of the audio will increase and decrease at a rate set by the low-frequency oscillator.
Finally, we come to the power amplifier. This is a simple unity-follower op-amp, and its purpose is to drive the speaker and to isolate it from the audio oscillator. If the speaker were connected directly to the output of the audio oscillator, it would change the characteristics of that section, and we would not hear the siren effect.
c. Simple voltmeter
This link has some material on using an LM3914 as a Bar Graph Meter.
Here's another link for building a Digital Dashboard Meter.
There are several analog to digital converter (including the MAX136, MAX1496, and ICL7107) chips that will directly drive any of several 7-segment LED displays. A web search of these part numbers (or search for "3.5 digit LED" for other devices) should turn up a data sheet, and most data sheets have "typical application" sections showing how these can be connected.
d. Pressure sensor
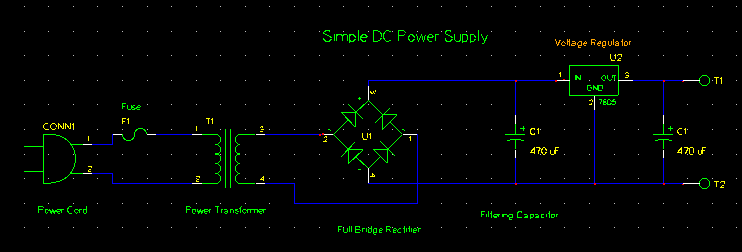
e. Simple DC power supply
In this DC power supply, household current (120VAC, 60Hz in North America) is applied to the power cord on the left. The fuse protects the circuit and should not be omitted. The voltage is then stepped down by the power transformer. Power transformers are available at Radio Shack and at hardware stores (see the doorbell section). Try to select a transformer that will output a voltage close to but a little higher than the desired DC output voltage.
Once the voltage has been stepped down, it goes through a network of diodes set up as a "full bridge rectifier." The diodes direct current to the top of the network and allow it to return through the bottom, regardless of whether the input voltage is positive or negative.
The capacitor then smooths out the voltage. Without the capacitor, the output from the diode network would continually drop to zero, and then rise back up to its peak value. The capacitor averages this out, giving a smoothed DC value.
The next element in the circuit is an LM7805, a 5-volt linear voltage regulator. This can be replaced with similar devices to get different voltages (i.e., an LM7812 for 12V, an LM7809 for 9 volts, etc.). The LM7805 will output a steady 5 Volts as long as the input voltage is sufficiently high. The transformer should be chosen such that the voltage input to the regulator is not much higher than 5V (6V or 7V would be good). Excess voltage is dropped across the device's input and output terminals, and is converted to heat. The greater this voltage, the more heat the device has to dissipate. Since it can only dissipate a finite amount of heat, this in effect limits the amount of power this circuit can provide. Attaching a heat sink to the LM7805 will also help.
The circuit should be mounted in some sort of enclosure to protect the 120VAC input power terminals. The power terminals themselves should be wrapped in electrical tape or in heat shrink tubing for additional protection.
f. Simple transistor radio
Although this FM Radio Project uses only one transistor, it is still fairly complicated. It might be better to buy a kit for this one. Check with Radio Shack.
9. Draw from memory, using proper symbols, the complete wiring diagram of the devices constructed in requirement 8.
The easiest way to commit these diagrams to memory is by understanding them. The photocell and power supplies are the easiest to understand, and if both are made, the power supply can be used to power the photocell circuit. The siren and radio circuits are somewhat more complicated, but they are also more rewarding.
10. List ten ways electronics are used in everyday life.
- Computers - for work and for play.
- Entertainment - Televisions, stereos, video games, toys, etc.
- Medical - Patient monitoring, diagnostics (MRI, CT-scans, X-rays), etc.
- Industrial - motor controllers, robotics, etc.
- Appliances - microwaves, timers, ovens, refrigerators, washing machines, dryers.
- Radio Communications - police and fire radios, CB radios, fleet radios.
- Telecommunications - telephones, fax machines.
- Fire Safety - fire alarms, smoke detectors, sprinkler systems.
- Water Supply - water towers signal pumping stations, etc.
- Security - metal detectors and x-ray machines at airports, anti-theft devices in stores, security camera.
- Music - amplifiers, synthesizers, sound mixers, recording equipment.
- Traffic Control - traffic signals.
- Automotive - Air bags, antilock brakes, diagnostics, electronic ignition, etc.
Historical Notes
This honor was original named Radio Mechanics. The name was changed to Radio Electronics in 1956.
