AY Honors/Masonry/Answer Key
1. Name at least six materials commonly used by masons in the erection of walls or buildings.
Primary materials include:
- Brick
- Concrete Block (also known as cinder block)
- Poured Concrete
- Stone
- Glass Block
- Tile
Secondary materials include
- Mortar
- Rebar
- Grout
2. Demonstrate ability to use properly the following:
- Level1.jpg
Level
- Line stretcher.jpg
Line Stretcher
- Masons jointer.jpg
S-Tool (jointer)
- Masonhammer.jpg
Mason's hammer
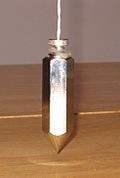
Plumb line
A plumb line is a string with a plumb bob at the end of it. The plumb bob hangs straight down, so the plumb line can be used to make sure that a wall is perfectly vertical and does not lean in any direction. A perfectly vertical line is said to be plumb.
Line stretcher (chicken legs)
A line stretcher is used for guiding the mason when laying brick or other materials in a straight line. Typically, the mason will build up the corners or ends of a wall first, stretch a line between them, and lay the remaining bricks between them. The line stretcher is often set about a sixteenth of an inch away from the wall so that the bricks do not touch it (otherwise they might push the line out).
Level
A spirit level or bubble level is an instrument designed to indicate whether a surface is level or plumb. Spirit levels feature a slightly curved glass tube which is incompletely filled with a liquid, usually coloured 'spirit' (a synonym for ethanol), leaving a bubble in the tube. Ethanol is used because of its low freezing point, −114°C, which prevents it from freezing in cold weather. Most commonly spirit levels are employed to indicate how horizontal (level) or how vertical (plumb) a surface is.
Trowel
A trowel is used for applying mortar to bricks, blocks, or other material. It is also used for "throwing a mortar line" - that is, laying a line of mortar atop the surface upon which that the bricks will be laid.
S-tool
An S-Tool is more commonly known as a jointer. The purpose of the S-tool is to place the grooves in the mortar between bricks. The concave grooves seen within the mortar lines of bricks are placed there by scraping the S-tool along the mortar well before it sets.
The S-tool should be used sometime between the time that the mortar is placed, and when it begins to harden. If the S-tool is used too late, then it will result in uneven lines throughout the mortar. The mortar will not have a smooth concave surface, and will look very raggedy.
Sometimes an S-tool is not used, and the mortar is placed on in excess; the slapping of the bricks causes it to drip down over the bricks, and it has a very nice effect when the bricks are painted afterwards.
Mason's hammer
A Mason's hammer has one flat traditional face and a short or long chisel-shaped blade. It can thus be used to chip off edges or small pieces of stone without using a separate chisel. The chisel blade can also be used to rapidly cut bricks or cinder blocks.
3. Demonstrate a knowledge of building cement characteristics (know how to prevent sweating, cracking, shrinking, crumbling, and loss of strength).
- Sweating
- Cracking
- Shrinking
- Crumbling
- Loss of strength
4. Make useable mortar and state proper proportions of ingredients (lime, sand, etc.).
There are two basic types of mortar: type N and type S.
Type N mortar is used for interior work and exterior work that is above grade (that is, not buried). It is made by combining:
- Lime (one part)
- Cement (one part)
- Sand (six parts)
Type S mortar is used for below-grade applications such as retaining walls and basements. It is made by combining:
- Lime (one part)
- Cement (two parts)
- Sand (nine parts)
Water is added to either of these mixtures and worked in with a trowel or a hoe until it reaches the desired consistency. Both types can be purchased pre-mixed so the mason need only add the water. Mixing is done on a hard flat surface, often in a wheelbarrow or on a sheet of plywood, but more properly in a mortar box.
5. Lay a straight stone, brick, or block masonry wall at least four feet (1.2 meters) high and ten feet (3.0 meters) long, including an inside or outside corner (surface must be struck and broomed).
Stone
Brick
Good bricklaying procedure depends on good workmanship and efficiency. Efficiency involves doing the work with the fewest possible motions. Each motion should have a purpose and should accomplish a definite result. After learning the fundamentals, every builder should develop methods for achieving maximum efficiency. The work must be arranged in such a way that the Builder is continually supplied with brick and mortar. The scaffolding required must be planned before the work begins. It must be built in such a way as to cause the least interference with other crewmembers.
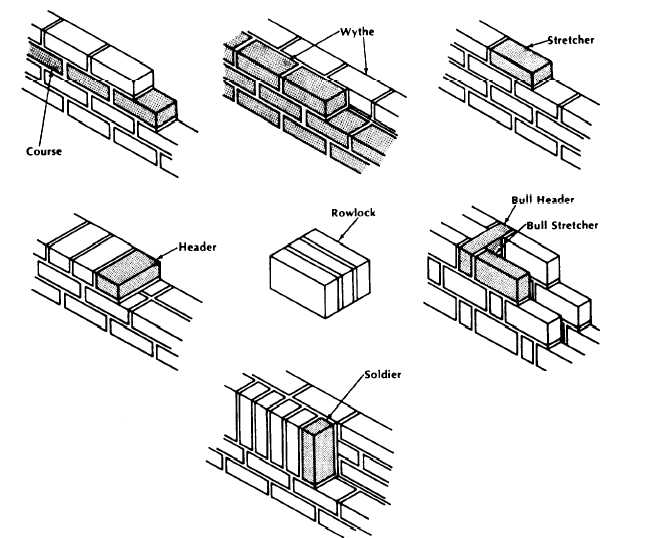
To efficiently and effectively lay bricks, you must be familiar with the terms that identify the position of masonry units and mortar joints in a wall. The following list, which is referenced in the figure below, provides some of the basic terms you will encounter.
- Course
- One of several continuous, horizontal layers (or rows) of masonry units bonded together.
- Wythe
- Each continuous, vertical section of a wall, one masonry unit thick. Sometimes called a tier.
- Stretcher
- A masonry unit laid flat on its bed along the length of a wall with its face parallel to the face of the wall.
- Header
- A masonry unit laid flat on its bed across the width of a wall with its face perpendicular to the face of the wall. Generally used to bond two wythes.
- Row lock
- A header laid on its face or edge across the width of a wall.
- Bull header
- A rowlock brick laid with its bed perpendicular to the face of the wall.
- Bull stretcher
- A rowlock brick laid with its bed parallel to the face of the wall.
- Soldier
- A brick laid on its end with its face perpendicular to the face of the wall.
Block
- Planning
The first step in laying a block wall is to carefully plan the project. When using concrete block to build a wall, it is important to select the dimensions of the wall based on the size of the block. Standard concrete blocks are 7 5/8" wide, 7 5/8" deep, and 15 5/8" long. Assuming that the mortar joint is 3/8" thick brings the block plus mortar dimensions to 8x8x16". You will want the outside dimension of the wall to be a multiple of a half-block length (minus one mortar joint) so that you do not have to cut blocks to a custom size. The height of the wall should also be a multiple of the block height (including the mortar joint).
- Locate the corners
- Layout
- Lay a full mortar bed
- Lay the first course
- Build the corners
6. Pour a level footing, using hand mixed cement and proper reinforcement.
7. Make the forms and lay a piece of concrete walk or floor, using commercially mixed cement. Finish it and rule it.
8. Write a paragraph describing the behavior of cement; that is, its reaction to water, its adhesive qualities, how long it takes to set, etc.
Historical Notes
Masonry was introduced in 1937, discontinued in 1956, and revised and reintroduced in 1986.


