Respuestas para la especialidad JA de Herrería
Nivel de destreza
2
Año
2015
Version
05.02.2026
Autoridad de aprobación
División Norteamericana
1
- Herrero
- Una persona que fabrica o repara objetos de hierro, aleaciones de hierro u otro metal maleable, a mano. Si bien muchas veces son la misma persona, con el propósito de esta especialidad el herrero hace las herraduras, un herrador calza el caballo.
- Herrería
- El arte de trabajar el hierro con una forja, yunque, martillo y otras herramientas.
2
- Forja
- El proceso de martillar el metal en una forma deseada mientras el metal está caliente y en un estado plástico. Por lo general, el artículo terminado no tiene ningún parecido con la pieza de metal original.
- Fabricación
- Implica cortar piezas de material dimensional y ensamblar las piezas en el artículo deseado, generalmente mediante soldadura.
3
- Use ropa de fibras naturales, como algodón, lana y/o cuero.
- Cuando los sintéticos como el nailon, el rayón, etc. se incendian, pueden derretirse en la piel y causar quemaduras graves.
- Use gafas de seguridad en todo momento.
- El acero forma una capa oxidada cuando se calienta al menos al rojo vivo. Esta capa se llama cascarilla de óxido y está unida sin apretar. Esta cascarilla está muy caliente y sale volando cuando se golpea.
- Use protección para los oídos, como tapones para los oídos u orejeras.
- El anillo del yunque puede provocar acúfenos y pérdida de audición.
- Use zapatos CERRADOS que le queden bien. ¡NO se permiten chanclas ni sandalias! (Lo ideal es que los zapatos suban debajo de los pantalones como botas de cuero o zapatillas de deporte altas).
- La cascarilla está muy caliente y puede causar quemaduras graves.
- El acero y otros metales son pesados, incluso cuando se caen desde 30 pulgadas, pueden causar lesiones.
- Cuando trabaje con una forja de carbón NO vierta agua directamente sobre una forja en caliente, con o sin carbón.
- Verter agua en una fragua caliente puede causar una explosión y puede romper la fragua.
- Se recomienda usar chaparreras de cuero, un delantal de soldador o incluso un delantal de maquinista de algodón.
- Un delantal ayuda a proteger su ropa de daños. La herrería, sobre todo con carbón, es muy sucia.
- El uso de guantes es opcional y generalmente no se recomienda.
- La mayoría de los guantes no lo protegerán de quemarse la piel si se produce contacto con el metal al trabajar a temperaturas de forja.
- Los guantes tienden a dar a los principiantes una falsa sensación de seguridad.
- NO caliente metal galvanizado ya que los humos son MORTALES. Provoca intoxicación por zinc. Nunca coloque nada galvanizado en el fuego, tenga especial cuidado cuando utilice metal recuperado. Varios herreros experimentados han muerto por intoxicación por zinc.
- Asegúrese de tener una ventilación adecuada. El monóxido de carbono (CO) es mortal y el humo puede provocar una reacción asmática.
4
When metal is hot and in a plastic state, the atoms are excited and moving. To harden the metal you need to quench it (cool it rapidly) and freeze the atoms in a crystalline structure. However this rapid cooling makes the steel very brittle, as the crystalline structure is very random.
Therefore you temper the metal. Tempering is the process of re heating the metal to a critical point lower than the temperature it was before it was hardened and allowing it to cool more slowly. This process allows the atoms to align themselves in a more uniform structure, making the metal “flexible” and less likely to shatter.
For steel to harden properly, you must use a high carbon steel. If you harden a low carbon steel it will revert back to its un-hardened state as the atoms are always moving and do not have the crystalline carbon structure to keep them in place. In the advanced honor you will be asked to make a chisel, then harden and temper it.
5
Lignite (pronounced lig·nite), sub-bituminous, and anthracite (pronounced an·thra·cite), or hard coal tend to have too much sulfur and other impurities frequently making them less suitable for forging. However since anthracite is still used as a heat source in some parts of the United States it tends to be easier to find and less expensive than soft coal thus many experienced smiths have switched to it.
Coal is a natural product and has different characteristics depending on how it was formed. The vein or mine it comes from will also determine the quality of the coal, and the impurities it contains.
COKE – Coke is formed when coal is heated and the impurities are driven out. Coke is almost pure carbon.
Propane (or Natural Gas)
Other Less Common Fuels such as Wood, Charcoal, Corn husks, Etc.
- c) Blower (or Bellows) and Ducting
- to introduce large quantities of air to the fire. Not required for some natural gas or propane forges.
- d) Anvil
- is either traditional / commercially made or made from available materials such as a railroad track. In accordance with Newton’s third law of motion. “For every action, there is an equal and opposite reaction.” The anvil works the other side of the metal you are pounding on.
- e) Hammer
- or other suitable object that can be used to pound on the metal.
- f) Tongs
- that are long enough and strong enough to retrieve and hold hot metal as it is moved to and from the fire.
- g) Vise
- has a long leg that transfers some of the force to the ground. It is used to hold and clamp a piece of metal while it is twisted, hammered or otherwise worked. Also known as a blacksmith vise, stump vise, pole vise or post vise
- h) Safety Glasses
- used to protect your eyes from flying scale, sparks, etc.
- i) Ear Plugs
- or ear muffs to protect your hearing.
6
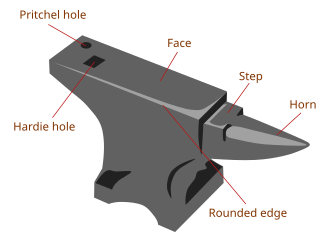
Anvils come in many shapes and sizes. The shape that is most common today is the “London Pattern” which became common in the 1800s. While the size of the different parts vary from anvil to anvil, most anvils have the following standard features: A body, a face, a horn, a step, a Hardie (or Hardy) hole, and a Pritchel hole.
6a
The body (and base) help form the mass of the anvil and most work is performed over these areas.
6b
The horn or “front” end of the anvil is curved. This allows the smith to hammer different curves into the piece they are working on. The resulting curve depends on how the piece is held, as well as which part of the horn is used while the smith hammers on it. The horn can also be known as a Bick, a Beak or a Pike.
6c
The table or step is a flat area above the horn, lower than the face. This area is often used as a cutting area, to prevent damage to the face.
6d
The face is the main large rectangular flat area where most of the work takes place. It also contains the Hardie hole and the Pritchel hole.
6e
The Hardie, or Hardy, hole is a square hole through the anvil that allows you to secure various tools called hardies. These hardies can include hot or cold cut chisels, various Swages (used for shaping or marking the metal, in general a block of metal with a recess for forcing the metal into the shape of the recess), Bickerns (smaller, specialized versions of the horn), lower fullers, etc.
6f
The Pritchel hole is a round hole meant as an aid in drifting (punching) holes through the metal you’re working on.
7
7a
i
ii
iii
iv
v
vi
7b
i
ii
iii
iv
v
8
8a
i
ii
1. Cara
2. Peña
8b
i
ii
iii
iv
9
10
- i) Flat
- ii) Box
- iii) Bolt
- iv) V
- v) Clip (ring)
- vi) Scrolling
- vii) Wolf Jaw
11
11a
i Start
ii
11b
i
ii
12
12a
12b
12c
12d
13
13a
13b
13c
13d
13e
13f
13g
13h
14
14a
14b
14c
15
15a
15b
15c
16
17
"Now there was no blacksmith to be found throughout all the land of Israel, for the Philistines said, “Lest the Hebrews make swords or spears.” 20 But all the Israelites would go down to the Philistines to sharpen each man’s plowshare, his mattock, his ax, and his sickle; and the charge for a sharpening was a pim[a] for the plowshares, the mattocks, the forks, and the axes, and to set the points of the goads."
Israel was oppressed by making sure they had no blacksmiths - a way to prevent them from building weapons. It was also a way to make money off the Israelites, and because the price is mentioned specifically it was evidently very high.
"Also he carried into captivity all Jerusalem: all the captains and all the mighty men of valor, ten thousand captives, and all the craftsmen and smiths. None remained except the poorest people of the land."
Tells how Nebuchadnezzar carried all the important people to Babylon, including the smiths.
17c
Be safe and enjoy yourself.
Blacksmithing has the potential to cause injury, therefore it must be taught by a competent instructor. To locate an instructor contact your local or state blacksmithing association. Contact information for most states can be found under the affiliates tab on the ABANA Website at http://www.abana.org/. Contact your state or local affiliate to find out if they have an instructor in your area. Due to the hazards involved, and the manual dexterity required, it is recommended that the honor be limited to teens, TLT’s, and adult leaders with a ratio of no more than 4 students per instructor/forge. You will also need 1 anvil for every 2 students or a lot more time and extra steel to replace the steel that is burned up.
Resources
Books:
Instructional Videos:
- Basic Blacksmith Shop Tools by David Burress of Calerin Forge. Nov. 2013.
- Do's and Don'ts of Blacksmithing by RealWoodsmen. Sept. 2013.
- Essentials of Blacksmithing by The Consummate Dabbler. Apr. 2014.
- BBC Presents Mastercrafts of Blacksmithing by 3 River Blades. Dec. 2012.
Websites and Online Resources:
- anvilfire.com! An online question and answer forum, excellent resource.
- Artist Blacksmith's Association of North America (ABANA). Use them to find a local affiliate.
- Kayne & Sons Blacksmith's Depot carries a complete selection of blacksmithing supplies. I recommend the wolf jaw set as a starter set of tongs.


