AY Honor Blacksmithing Answer Key
1
- Blacksmith
- A person who makes or repairs things made of iron, iron alloys or other malleable metal, by hand. While many times they are the same person, for the purpose of this honor the blacksmith makes the shoes, a farrier shoes the horse.
- Blacksmithing
- The art of working iron with a forge, anvil, hammer, and other tools.
2
- Forging
- The process of hammering the metal into a desired shape while the metal is hot and in a plastic state. Usually the finished item bears no resemblance to the original piece of metal.
- Fabrication
- Involves cutting pieces of dimensional stock and assembling the pieces into the desired item, usually by welding.
3
- Wear natural fiber clothing, such as cotton, wool and/or leather.
- When synthetics such as Nylon, Rayon, etc. catch fire, they can melt to the skin causing a severe burn.
- Wear safety goggles or safety glasses at all times.
- Steel forms an oxidized layer when heated to at least a red heat. This layer is called scale and is loosely attached. This scale is very hot and flies off when you hit it.
- Wear hearing protection, such as ear plugs or ear muffs.
- The ring of the anvil can cause tinnitus and hearing loss.
- Wear good fitting CLOSED TOE shoes. Flip flops or sandals are NOT allowed! (Ideally the shoes should come up under the pants like leather boots, or high top sneakers.)
- Scale is very hot and can cause serious burns.
- Steel and other metals are heavy, even when dropped from 30 inches, they can cause an injury.
- When working with a coal forge DO NOT pour water directly on a hot forge, with or without coals.
- Pouring water on a hot forge may cause an explosion and can crack the forge.
- Wearing leather chaps, a welder’s apron or even a cotton machinist apron is recommended.
- An apron helps protect your clothing from damage. Blacksmithing, particularly with coal, is very dirty.
- Wearing gloves is optional and generally not recommended.
- Most gloves will not protect you from burning your skin, if contact occurs with the metal when working at forging temperatures.
- Gloves tend to give beginners a false sense of security.
- DO NOT heat galvanized metal as the fumes are DEADLY. It causes zinc poisoning. Never put anything galvanized in the fire, be particularly careful when using reclaimed metal. Several experienced smiths have died from zinc poisoning.
- Make sure you have adequate ventilation. Carbon Monoxide (CO) is deadly, and the smoke can cause an asthmatic reaction.
4
When metal is hot and in a plastic state, the atoms are excited and moving. To harden the metal you need to quench it (cool it rapidly) and freeze the atoms in a crystalline structure. However this rapid cooling makes the steel very brittle, as the crystalline structure is very random.
Therefore you temper the metal. Tempering is the process of re heating the metal to a critical point lower than the temperature it was before it was hardened and allowing it to cool more slowly. This process allows the atoms to align themselves in a more uniform structure, making the metal “flexible” and less likely to shatter.
For steel to harden properly, you must use a high carbon steel. If you harden a low carbon steel it will revert back to its un-hardened state as the atoms are always moving and do not have the crystalline carbon structure to keep them in place. In the advanced honor you will be asked to make a chisel, then harden and temper it.
5
5a
A place to build a contained fire which will reach over 2,000° Fahrenheit.
5b
A material capable of producing temperatures greater than 2,000° Fahrenheit.
COAL – The best coal for blacksmithing is usually bituminous (pronounced bi·tu·mi·nous) or soft coal, as it tends to have less sulfur, and starts easier. Therefore soft coal is generally preferred by beginning smiths.
Lignite (pronounced lig·nite), sub-bituminous, and anthracite (pronounced an·thra·cite), or hard coal tend to have too much sulfur and other impurities frequently making them less suitable for forging. However since anthracite is still used as a heat source in some parts of the United States it tends to be easier to find and less expensive than soft coal thus many experienced smiths have switched to it. Coal is a natural product and has different characteristics depending on how it was formed. The vein or mine it comes from will also determine the quality of the coal, and the impurities it contains.
COKE – Coke is formed when coal is heated and the impurities are driven out. Coke is almost pure carbon.
Propane (or Natural Gas)
Other Less Common Fuels such as Wood, Charcoal, Corn husks, Etc.
5c
To introduce large quantities of air to the fire. Not required for some natural gas or propane forges.
5d
Is either traditional / commercially made or made from available materials such as a railroad track. In accordance with Newton’s third law of motion. “For every action, there is an equal and opposite reaction.” The anvil works the other side of the metal you are pounding on.
5e
Or other suitable object that can be used to pound on the metal.
5f
That are long enough and strong enough to retrieve and hold hot metal as it is moved to and from the fire.
5g
Has a long leg that transfers some of the force to the ground. It is used to hold and clamp a piece of metal while it is twisted, hammered or otherwise worked. Also known as a blacksmith vise, stump vise, pole vise or post vise.
5h
Used to protect your eyes from flying scale, sparks, etc.
5i
Or ear muffs to protect your hearing.
6
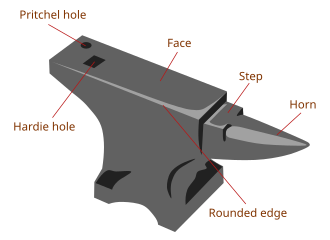
Anvils come in many shapes and sizes. The shape that is most common today is the “London Pattern” which became common in the 1800s. While the size of the different parts vary from anvil to anvil, most anvils have the following standard features: A body, a face, a horn, a step, a Hardie (or Hardy) hole, and a Pritchel hole.
6a
The body (and base) help form the mass of the anvil and most work is performed over these areas.
6b
The horn or “front” end of the anvil is curved. This allows the smith to hammer different curves into the piece they are working on. The resulting curve depends on how the piece is held, as well as which part of the horn is used while the smith hammers on it. The horn can also be known as a Bick, a Beak or a Pike.
6c
The table or step is a flat area above the horn, lower than the face. This area is often used as a cutting area, to prevent damage to the face.
6d
The face is the main large rectangular flat area where most of the work takes place. It also contains the Hardie hole and the Pritchel hole.
6e
The Hardie, or Hardy, hole is a square hole through the anvil that allows you to secure various tools called hardies. These hardies can include hot or cold cut chisels, various Swages (used for shaping or marking the metal, in general a block of metal with a recess for forcing the metal into the shape of the recess), Bickerns (smaller, specialized versions of the horn), lower fullers, etc.
6f
The Pritchel hole is a round hole meant as an aid in drifting (punching) holes through the metal you’re working on.
7
7a
i
ii
iii
iv
v
vi
7b
i
ii
iii
iv
v
8
8a
i
ii
1) The FACE:
2)The PEEN:
8b
i
ii
iii
iv
9
10
- i) Flat
- ii) Box
- iii) Bolt
- iv) V
- v) Clip (ring)
- vi) Scrolling
- vii) Wolf Jaw
11
11a
i
ii
11b
i
ii
12
12a
12b
12c
12d
13
13a
13b
13c
13d
13e
13f
13g
13h
14
14a
14b
14c
15
15a
15b
15c
16
17
"Now there was no blacksmith to be found throughout all the land of Israel, for the Philistines said, “Lest the Hebrews make swords or spears.” 20 But all the Israelites would go down to the Philistines to sharpen each man’s plowshare, his mattock, his ax, and his sickle; and the charge for a sharpening was a pim[a] for the plowshares, the mattocks, the forks, and the axes, and to set the points of the goads."
Israel was oppressed by making sure they had no blacksmiths - a way to prevent them from building weapons. It was also a way to make money off the Israelites, and because the price is mentioned specifically it was evidently very high.
"Also he carried into captivity all Jerusalem: all the captains and all the mighty men of valor, ten thousand captives, and all the craftsmen and smiths. None remained except the poorest people of the land."
Tells how Nebuchadnezzar carried all the important people to Babylon, including the smiths.
17c
Be safe and enjoy yourself.
Blacksmithing has the potential to cause injury, therefore it must be taught by a competent instructor. To locate an instructor contact your local or state blacksmithing association. Contact information for most states can be found under the affiliates tab on the ABANA Website at http://www.abana.org/. Contact your state or local affiliate to find out if they have an instructor in your area. Due to the hazards involved, and the manual dexterity required, it is recommended that the honor be limited to teens, TLT’s, and adult leaders with a ratio of no more than 4 students per instructor/forge. You will also need 1 anvil for every 2 students or a lot more time and extra steel to replace the steel that is burned up.
Resources
Books:
- Anvils in America, by Richard Postman. 1998 ISBN-10: 9066325605
- The Backyard Blacksmith, by Lorelei Sims. 2006 ISBN-10: 592532519
Instructional Videos:
- Basic Blacksmith Shop Tools by David Burress of Calerin Forge. Nov. 2013.
- Do's and Don'ts of Blacksmithing by RealWoodsmen. Sept. 2013.
- Essentials of Blacksmithing by The Consummate Dabbler. Apr. 2014.
- BBC Presents Mastercrafts of Blacksmithing by 3 River Blades. Dec. 2012.
Websites and Online Resources:
- anvilfire.com! An online question and answer forum, excellent resource.
- Artist Blacksmith's Association of North America (ABANA). Use them to find a local affiliate.
- Kayne & Sons Blacksmith's Depot carries a complete selection of blacksmithing supplies. I recommend the wolf jaw set as a starter set of tongs.


