AY Honors/Weaving/Answer Key
1
Weaving is an ancient textile art and craft that involves placing two sets of threads or yarn called the warp and weft on a loom and turning them into cloth. This cloth can be plain (in one color or a simple pattern), or it can be woven in decorative or artistic designs, including tapestries.
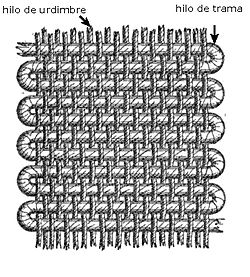
In general, weaving involves the interlacing of two sets of threads at right angles to each other: the warp and the weft. In plain weaving, the weft goes over one thread of weft and under the next. On the next pass, it goes under and then over. This repeats. In other weaving patterns the sequence varies.
2
2a
The warp is the set of lengthwise yarns through which the weft is woven. "Warp" means "that which is thrown across" (Old English wearp, from weorpan, to throw, cf. German werfen, Dutch werpen). When weaving with a loom, the warp yarns are fully attached before weaving begins.
2b
The woof, as often as not called the weft, is the yarn which is drawn under and over parallel warp yarns to create a fabric.
2c
A shuttle is a tool designed to neatly and compactly store weft yarn while weaving. Shuttles are thrown or passed back and forth through the shed, between the yarn threads of the warp in order to weave in the weft.
2d
The yarn beam is a stout pole at the head of the loom around which the warp threads are wrapped. As the cloth is woven, the yarn beam may be turned, unrolling additional yarn. This allows the weaver to make cloth that is longer than the loom.
2e
A heddle is an integral part of a loom. Each thread in the warp passes through a heddle, which is used to separate the warp threads for the passage of the weft. The heddle is usually made of cord or wire, and is suspended on a shaft of a loom. Each heddle has an eye in the center where the warp is threaded through. As there is one heddle for each thread of the warp there can be near a thousand heddles used for fine or wide warps. A handwoven tea-towel will generally have between 300 and 400 warp threads, and thus use that many heddles.
2f
The cloth beam is a stout pole similar to the yarn beam, but it is situated at the foot of the loom. As the cloth is woven, it is rolled around the cloth beam. As with the yarn beam, the cloth beam allows the weaver to make cloth longer than the loom.
3
A cardboard loom is incredibly simple to make. Get a flat, rectangular piece of heavy cardboard and draw a line across the two shorter edges about 12mm![]() from the edge. Then make evenly space marks along these lines about (5mm
from the edge. Then make evenly space marks along these lines about (5mm![]() ) apart (or closer). If you use thick yarn, you can get away with wider spacing. Cut in along the evenly spaced marks from the edge to the first line. Do this to the opposite end as well. The "loom" is now ready for weaving.
) apart (or closer). If you use thick yarn, you can get away with wider spacing. Cut in along the evenly spaced marks from the edge to the first line. Do this to the opposite end as well. The "loom" is now ready for weaving.
Though this requirement does not ask the Pathfinder to actually weave an envelope purse, you may have trouble convincing them that they have made a workable loom unless you demonstrate how it is used. You may certainly require them to weave an envelope purse if you see fit.
Tape the end of a piece of yarn to the back of the loom and then run the yarn through one of the slits near the edge of the cardboard. Wrap the yarn around the cardboard to form the warp, using the slits as the heddle. Then cut off the yarn and tape it down. At this point, you may begin weaving the woof into the warp. When the woof reached the far edge you may cut the warp yarns apart so that you have equal lengths of yarn hanging off both ends of the cloth. These can be tied together in pairs to leave a fringe. To make a purse, fold the cloth into thirds and whip stitch the edges with more yarn. The upper third will serve as a flap. The whip stitching should start at the bottom center. When you reach the upper edge, use the yarn as a purse handle, and then whip stitch down the other side until you reach the bottom center again. Tie it off and declare victory.
If the boys in your club object to making a purse, use a little imagination to make a hatchet cover instead. They are essentially the same, except that a hatchet cover must have a gap in the bottom for the hatchet handle to slip through. This opening should be lined up to match the hatchet.
4
This can be done on the cardboard loom made in the previous requirement or on a more sturdy store-bought loom. There are many ways to use three colors (or more). One way is use two colors for the warp, alternating at regular intervals, and then using a third color for the woof. You can also use a single color for the warp and two colors for the woof. Regular patterns make more attractive cloth.
When doing the weaving, be careful to not pull the woof too tight or the cloth will pinch in about the center.
5
Small, inexpensive looms and loops can be found in the craft departments of large stores or in craft supply stores. These looms are typically 18 cm![]() square and have several pegs located around the edges. The loops themselves are the byproduct of the hosiery industry, being cut from the toes of stockings during their manufacture. They are stretched across the loom and looped over the pegs to form the warp. A hook is then woven through the warp, and a weft loop is attached to it and pulled through. The weft loop is then hooked over a peg. Once all the weft loops are in place, the hook tool can be used to form a running chain around the edge. Each loop is lifted from the peg and passed through the end of an adjacent loop. Then that loop is unhooked and passed through the end of its neighbor. This procedure is followed until all the loops have been unhooked. The last loop is pulled through a little farther than the others and pulled tight.
square and have several pegs located around the edges. The loops themselves are the byproduct of the hosiery industry, being cut from the toes of stockings during their manufacture. They are stretched across the loom and looped over the pegs to form the warp. A hook is then woven through the warp, and a weft loop is attached to it and pulled through. The weft loop is then hooked over a peg. Once all the weft loops are in place, the hook tool can be used to form a running chain around the edge. Each loop is lifted from the peg and passed through the end of an adjacent loop. Then that loop is unhooked and passed through the end of its neighbor. This procedure is followed until all the loops have been unhooked. The last loop is pulled through a little farther than the others and pulled tight.
References
- http://members.aol.com/mrsspyboy/weaving1.htm
- Wikipedia articles


