AY Honor Archery Answer Key used by General Conference
1
Handle, riser, arrow rest, upper limb, lower limb, belly, back, window, recurve, bow nock, string loop, string, serving, kisser button, nocking point, brace height or fist mele, sight, sling.
2
Nock, index, index or "cock" feather, hen feathers, shaft, spine, crest, point-tip-pile.
3
- Don't shoot straight up.
- Never run on the archery range.
- Approach the target from the side, not the front so you don't get poked by the arrows sticking out of the target.
- Be sure your equipment is in good working order.
- Be aware of who is around you at all times.
- Don't "hide" behind the target.
- Don't walk in front of another archer.
- Don't talk on the shooting line.
- While loading your bow be sure that the arrows are always pointing toward the target.
4
There are three basic ways of stringing and unstringing a bow. Two of them are safe, and one is not. The unsafe method is also presented because it is very commonly practiced. It is presented here so that you can recognize when another person is using it, and by so doing, placing himself at risk. If you see someone using this method, please educate them.
1. Bow Stringer
A bowstringer is a device that makes it safe and easy to string a bow. The archer steps on the bow stringer and then pulls the bow upward causing it to flex. This brings the tips of the bow closer together, and the string can then be looped over the string notch.
2. Step through
In this method; the archer begins by placing one end of the string into the string notch on the lower limb of the bow. The archer then "steps into" the bow by placing the right leg between the bow and the string, locking the bottom limb of the bow around the right calf and foot. The bow's belly should be to the archer's left, and the bottom tip should rest against the left side of the archer's right foot. The outside of the right knee will then be in a position to brace the bow near its handle. As the right hand is used to flex the bow and the left hand is used to loop the string around the upper string notch. This method can damage your bow if done incorrectly. This is the least favored way of the 3 stringing options.
Push Pull
Though the push pull method of stringing is safe for your bow and has been popularized for that reason, it is very dangerous to the archer since, as you can see in the photo, the top limb is directly aligned with your head, and any slip while using this method can result in permanent eye damage and even death, especially from recurve bows since the back of a recurved limb creates a point which acts as a force multiplier. Children should never be taught this method of stringing a bow and even experienced professional bow technicians have been injured through its use[1]. We present the method here so that if you see someone using it, you can educate them. Do not use this method to string a bow.
The bow is placed as shown in the picture. The bottom "bow nock" will be up against the instep of the shoe. By pushing with the palm of the top hand and pulling with the bottom hand the bow is bent. The fingers of the top hand pluck the string on or off.
Always Check the String
When you have strung the bow, turn it away from you 180 degrees to check the string. That way if the string slips off, the bow will kick out away from you. Whichever method for stringing a bow is selected, it is important to check both ends of the bow to ensure that is has been strung properly. Do this whether you have strung it yourself or if someone else has strung it for you. The string on an improperly strung bow can come off when the bow is drawn, potentially causing injury.
5
5a
Hitting your arm is one of the unpleasantries of archery. You can protect yourself with an armguard while learning how not to hit your arm. A leather or plastic armguard with elastic bands should be placed on the inside of your forearm just below your elbow. If you have a slight hyperextension to your elbow you can purchase a long armguard which will cover the inside of your entire bow arm.
5b
The purpose of a finger tab or glove is to protect the archer's finger from the string.
There are several types of finger tabs available. The "Marshall" style has one hole and the "Western" style has two holes. Either one works fine. They should be trimmed to fit the archer.
The "archers glove" covers the finger tips and secures around the archer's wrist.
5c
A quiver by definition is "anything that holds arrows". There are several types of quivers including:
- The side quiver which hangs from a belt
- The back quiver which hangs from the shoulder.
- The side quiver which hooks onto a pocket.
- The pocket quiver.
- The ground quiver which sits on the ground.
5d
The purpose of a bow sling is to keep you from dropping your bow. There are two types of bow slings: the wrist sling and the finger sling.
A wrist sling is a strap that is connected to your bow for you to put your hand through while gripping your bow.
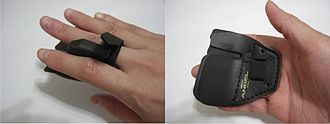
A finger sling is a 2 inch string with a loop at each end. After gripping your bow the loops go over the thumb and your index finger.
5e
The string "kisser" is a point on the string that touches your lip or corner of your mouth.
If you are using a "center draw" (see, Anchor) the string is in the middle or your chin and the middle of your nose. A "kisser" would be a small disc on the string that would touch your lip. This assures a vertical alignment of your bow.
6
6a
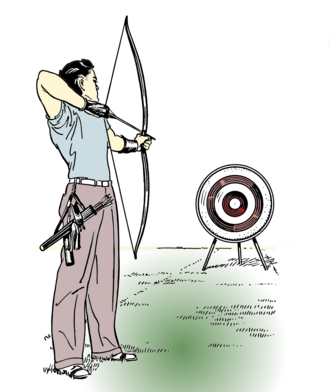
The stance is the position the feet and body assume when addressing the target.
Setting your feet is the first step in setting up a good shot. A good foundation is important in anything, especially in archery.
First, lay an arrow pointing toward your target and perpendicular to the shooting line. Second, place your feet straddling the shooting line with your toes slightly touching the arrow.
Your feet should be placed approximately the same distance apart as your shoulders as a starting point. Once you find a comfortable stance it is important to remember where to put your feet each time you return to the shooting line.
6b
To place an arrow on the bowstring. The attachment to the rear of an arrow which is placed on the bowstring and holds the arrow on the string.
There are two ways to put and arrow on the string. One is right and one is wrong. The index feather or "cock" feather should point away from the bow. This feather is usually a different color than the other two which are also known as "hen" feathers. Doing this allows the hen feathers to gracefully clear the bow. If the "index" feather is pointed toward the bow it will kick out away from the bow as it tries to clear the bow during the shot.
The picture shows the most common way of placing the fingers on the string. The thumb and small finger should not be involved in the shot in any way or fashion. They should be relaxed and folded down as if you were saying "I'm THREE years old".
After nocking the arrow, place three fingers on the string. Two under the arrow and 1 over the arrow then slide them together, lightly touching the arrow. The string should be at the first joint near the end of your fingers. This is a starting point. Competitive archers try to get the string at the very end of their fingers for a quicker release but this takes years of training.
6c
This is the act of pulling the string back. The archer should start with the bow arm pointed directly at the target before pulling the string. Some young archers like to pull the string while raising their bows but this is a waste of energy and creates fatigue while shooting. Be very deliberate with little wasted motion.
6d
The "anchor" is a combination of points to which the bowstring and/or the index finger of the drawing hand are drawn to on the face and neck. There are multiple ways of "Anchoring" the string after you have drawn the bow. Here are two of the most common ones.
The Side Draw: Hunter or Field Style - Pull the string back so the index finger of your string hand touches the corner of your mouth. This places the arrow directly beneath the eye that you are aiming with. This is recommended for all beginners. As archers continue to progress and put an aiming device on their bow they can progress to the next one.
The Center Draw: Target or Olympic Style - Pull the string hand under your jaw so the string is in the middle and in front of the chin. The string should also touch the nose. The string hand is in line with and directly under the jaw bone.
Remember that anchoring in the same place and the same way every time is critical no matter how you choose to anchor.
6e
To superimpose a sight pin on the center of a target or, when not using a sight, the placement of the tip of the arrow on a particular point for a given distance.
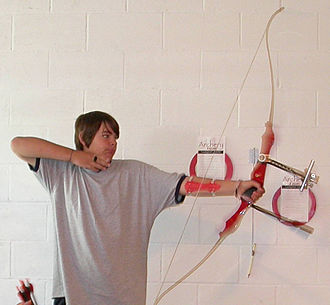
Hold means to get everything locked into place and be sure that you are ready to release the arrow. There should be a straight line from the back elbow right through the arrow to the back of the bow (see photo).
Aim is the process of deciding when to let go of the string. An archer without a sight uses an "instinctive" method or guessing how high or low to aim.
A sight is a reference point for aiming but is only useful if the archers shoots the same way every time.
An archer without a sight can use a sighting method called "point of aim".
6f
The release is the act of allowing the string to leave the fingers.
The release is the most important part of the shot. It is when everything comes together in a fraction of a second. The best way to perform the release is to just relax the fingers. As the arrow goes toward the target, the string hand should go in exactly the opposite direction.
6g
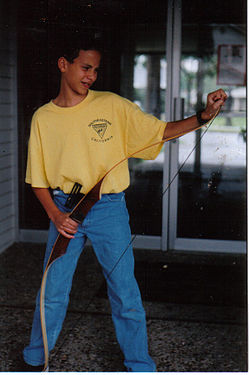
"Follow through" refers to the movement of the drawing hand and arm after the release.
Once the archer has released the arrow, nothing should move. The archer must give the arrow time to clear the bow. To insure this, instruct your archers to wait until the arrow hits the target before moving at all. In the picture you can see that my release hand goes in the exact opposite direction as the arrow. Making sure that your shoulders don't collapse is very important. Also, notice that I am still aiming, long after the arrow is gone.
7
If the nocking point is too high, the arrow will be pointed "down" and come out of the bow low.
If the nocking point is too low, the arrow will be pointed "up" and come out of the bow high.
Nock rings can be placed on the bow to allow for consistency. A bow square and nock pliers can be used to set the nocking point properly.
8
- a. Indoors: 30 arrows (5 rounds) at 18 meters score 50 points on a 60 cm target.
- b. Outdoors: 30 arrows (5 rounds) at 25 meters score 170 points on a 122 cm target.
| Note: The editors of this answer book feel that there is an error in the official version of this requirement. More Information The official requirement does not specify the number of points to be scored on an outdoor target. Furthermore, a novice level honor should probably not have a scoring requirement.
|
A standard "Olympic Bow" is a recurve (not compound) bow with no more than 3 stabilizer extensions, a sight, and a clicker. An archer must use fingers and not a mechanical release and may not have a string peep sight or magnified aiming device.
9
- Don't shoot straight up.
- Never run on the archery range.
- Approach the target from the side, not the front so you don't get poked by the arrows sticking out of the target.
- Be sure your equipment is in good working order.
- Be aware of who is around you at all times.
- Don't "hide" behind the target.
- Don't walk in front of another archer.
- Don't talk on the shooting line.
- While loading your bow be sure that the arrows are always pointing toward the target.
