Difference between revisions of "AY Honors/Camping Skills III/Answer Key/es"
(Created page with "<noinclude>") |
(Created page with "</noinclude> <!-- 12. Localizar adecuadamente y construir una de las siguientes estructuras y describir su importancia para el individuo y el medio ambiente: -->") |
||
| Line 178: | Line 178: | ||
{{ansreq|page={{#titleparts:{{PAGENAME}}|2|1}}|num=12}} | {{ansreq|page={{#titleparts:{{PAGENAME}}|2|1}}|num=12}} | ||
<noinclude></noinclude> | <noinclude></noinclude> | ||
| − | <!-- 12. | + | <!-- 12. Localizar adecuadamente y construir una de las siguientes estructuras y describir su importancia para el individuo y el medio ambiente: --> |
You should take into consideration where your sleeping area(s) are in relation to these ''water-related'' areas. Specifically, water flows downhill, so, you do not want water runoff from the 'sink and dishwashing' or 'shower water' flowing to your sleeping area(s). | You should take into consideration where your sleeping area(s) are in relation to these ''water-related'' areas. Specifically, water flows downhill, so, you do not want water runoff from the 'sink and dishwashing' or 'shower water' flowing to your sleeping area(s). | ||
Revision as of 01:13, 16 January 2021
| Campamento III | ||
|---|---|---|
| Asociación General
|
Destreza: 2 Año de introducción: 1986 |
|
Requisitos
| Conexión Logros para la Investidura: Esta especialidad está relacionada con los requisitos de Logros para la Investidura para EXPLORADOR Vida al Aire Libre que requiere el desarrollo completo de esta especialidad. |
1
Campamento I ha sido diseñado para que esté dentro de las capacidades de los Conquistadores que están en el grado 7 o más alto.
2
Seleccionar Sitio de Campamento
Adventist Youth Honors Answer Book/Camping/Choosing a campsite/es
Seguridad Contra Incendios
Adventist Youth Honors Answer Book/Camping/Fire/Fire safety/es
3
4
4a
4b
4c
5
5a
5b
5c
5d
5e
5f
6
Una herramienta puede ser afilada con una piedra de afilar. La mayoría de las piedras de afilar deben mantenerse húmedas cuando están en uso - algunas están mojadas con agua y otras están mojadas con aceite. Las piedras con grano más fino usan típicamente el aceite, pero puede usar el agua en ellas también. El propósito de mojar una piedra de afilar es permitir que el acero removido del cuchillo se vaya flotando. Cuanto más fina sea la piedra, más fina será la orilla que hará en una herramienta, pero más tiempo tardará en afilarla. Por esta razón, una herramienta muy sin filo debe ser afilada primero con una piedra más gruesa, y luego con una piedra más fina. Entonces debe mantenerse afilado. Puede mantener un cuchillo afilada por respetarla - no corte en el suelo con un hacha y no meta la navaja en el suelo tampoco. La suciedad es muy abrasiva y una roca se dañará la orilla muy rápidamente. Cierre un cuchillo de bolsillo cuando haya terminado de usarlo y no permita que el extremo de la navaja toque nada más que las cosas que está intentando cortar con ella.
Hacha
Es tentador tomar un hacha sin filo a un dispositivo eléctrico, pero a menos que tenga mucho cuidado, esto podría ser un gran error. Una amoladora no sólo eliminará el acero de un hacha, sino que también lo calentará. Es muy fácil calentarlo demasiado, haciendo que el acero pierda su temperamento (el acero templado es duro y tiene una orilla mejor que el acero no templado). El acero es templado calentándolo hasta el punto de que se convierta en no magnético, luego enfriándolo rápidamente. Si se deja enfriar lentamente, los cristales de hierro de la hoja se alinearán con el campo magnético de la Tierra mientras se enfrían, y los cristales alineados hacen el acero blando. Así que el primer consejo que se puede dar al afilar un hacha es mantenerse alejado de una amoladora.
En su lugar, use una lima o una piedra. Sostenga la lima para que pase sobre la orilla de la hoja, pero en un ángulo pronunciado. Afile un lado y luego el otro.
Cuchillo
Para afilar un cuchillo, sosténgalo en un ángulo de 15° y raspe a lo largo de una piedra de afilar, como si estuviera tratando de afeitar una fina capa de la piedra. Asegúrese de afilar ambos lados.
7
8
Adventist Youth Honors Answer Book/Camping/Tent/Styles/es
Diferentes tipos de tiendas de campaña se usan para diferentes propósitos. Una tienda de campaña de 4 estaciones será bueno para cualquier tipo de condiciones, mientras otros tipos de tiendas (la mayoría hoy en día son de 3 estaciones) no son tan buenas en todas las estaciones (usualmente la estación de invierno no es un buen momento para usar tales tiendas de campaña). Entonces, las estaciones son una forma de señalar diferentes tipos de tiendas de campaña.
Los diferentes tipos de acampar sería otra manera de distinguir los tipos de tiendas de campaña. Una tienda familiar lo más probable pesará bastante y será voluminosa. Usualmente tendrá «mucho» espacio (puede caber 6 personas). Una tienda de mochila es pequeña y ligera. Generalmente, no pondrá equipo en una tienda de mochila (cuelga su equipo o lo mantiene fuera de su tienda). Una tienda de mochila cabrá cómodamente a dos personas usualmente. Una tienda de alta montaña puede soportar el clima y terreno fuerte, además de ser ligera. Las tiendas de alta montaña están diseñadas para que algún equipo pueda guardarse dentro de la tienda (siendo así un poco más espaciosos que las tiendas de mochila). Las tiendas de alta montaña también pueden permitir que hasta 3 o 4 personas duerman cómodamente en una sola tienda.
La manera final de clasificar las tiendas de campaña por tipos diferentes es por el material usado. Las tiendas pueden ser clasificadas por los materiales utilizados para construirlas (como postes de aluminio vs. postes de fibra de carbono, etc.).
9
Cada respiración que una persona exhala contiene agua debido al contenido de humedad de los pulmones, la garganta, la boca y la cavidad nasal. Esta humedad se eleva hasta que entra en contacto con una superficie fría como el interior de la tienda, donde se condensa.
Una buena tienda se hará de material transpirable que permite la humedad pasar (como una malla de nylon) y habrá una tela para la lluvia en el exterior para mantener la lluvia fuera de la tienda. El vapor de agua pasa a través de la malla y se condensa sobre la tela. Entonces corre por la parte inferior de la tela y gotea por el borde fuera de la tienda.
10
Tensor
Adventist Youth Honors Answer Book/Knot/Taut-line hitch/es
Dos medio cotes
Adventist Youth Honors Answer Book/Knot/Two half hitches/es
11
- Esta es su actividad.
12
You should take into consideration where your sleeping area(s) are in relation to these water-related areas. Specifically, water flows downhill, so, you do not want water runoff from the 'sink and dishwashing' or 'shower water' flowing to your sleeping area(s).
Also, the location of the 'latrine' should be considered depending on where you get your water source. For example, you do not want to put the 'latrine' upstream and take your shower and wash your dishes downstream. But pay attention! Just because your latrine is downstream and downhill from you does not mean it is downstream and downhill from other campers. Be considerate. A latrine should never be located within 60 meters![]() of any water supply.
of any water supply.
12a
12b
12c
13
Square Lashing
Adventist Youth Honors Answer Book/Lashing/Square
Diagonal Lashing
Adventist Youth Honors Answer Book/Lashing/Diagonal
Shear Lashing
Adventist Youth Honors Answer Book/Lashing/Shear
Continuous Lashing
Adventist Youth Honors Answer Book/Lashing/Continuous
Adventist Youth Honors Answer Book/Lashing/Simple Object
14
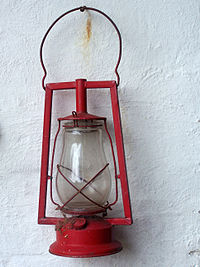
Replace Mantel on Camp Lantern
- As with most things, practice and repetition makes a task simple.
- Turn OFF the gas valve completely.
- Remove the lantern cover and the glass covering. Place these in a safe and stable place.
- Remove any remains of the old mantel. Do this carefully if the lantern is still HOT.
- Tie the new mantel in place on the gas pipe. There is a string around the collar that slips over the gas pipe.
- Pressurize the gas tank.
- Hold a lighted match near the mantel. The mantel should begin to burn. Do not turn on the gas. If your lantern has an electronic ignition, it is still better to use a match when lighting a new mantel for the first time, as the ignition can cause the mantel to break.
- Replace the glass cover and the lantern cover.
- Slowly open the gas valve when the mantel starts to glow brightly.
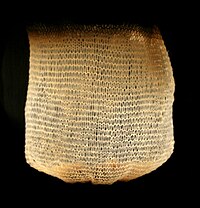
The mantle is a roughly pear-shaped ramie-based artificial silk or rayon fabric bag made from silk or fabric impregnated with rare-earth metallic salts that will convert to solid oxides after being heated in a flame. A mantle will glow brightly in the visible spectrum while emitting little infrared radiation. The rare earth oxides (cerium) and actinide (thorium) in the mantle have a low emissivity in the infrared (in comparison with an ideal black body) but have high emissivity in the visible spectrum. There is also some evidence that the emission is enhanced by candoluminescence, the emission of light from the combustion products before they reach thermal equilibrium. The combination of these properties yields a mantle that, when heated by a kerosene or liquified petroleum gas flame, emits intense radiation that is mostly visible light, with relatively little energy in the unwanted infrared, increasing the luminous efficiency.
The mantle aids the combustion process by keeping the flame small and contained inside itself at higher fuel flow rates than in a simple lamp. This concentration of combustion inside the mantle improves the transfer of heat from the flame to the mantle. The mantle shrinks after all the fabric material has burnt away and becomes very fragile after this first use.
Demonstrate refilling gas in a Lantern and Stove
- Be sure not to spill any fuel, or if you do, make sure you clean up properly.
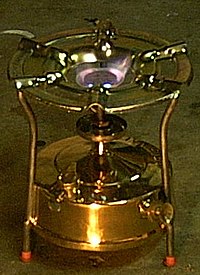
Maintain Pressure Pump on a Camp Stove
- Most stoves can use either liquid or gas fuel. Gas-fuel stoves are simpler to operate than liquid fueled stoves. The gas, being already pressurized, flows from the fuel canister into the burner, where it ignites, in the same manner as a domestic kitchen stove.
- Liquid-fuel stoves are more complex because the liquid fuel must be vaporized prior to burning. To accomplish this, the stove design brings the fuel line containing the liquid fuel near the flame of the burner. The heat from the flames converts the liquid fuel to a gas before it reaches the burner, where it mixes with air and is ignited. Some models use a spray system which does not require preheating.
- Most stoves operating with liquid fuels must be heated or primed before the burner is turned on. Many stoves require the operator to open the fuel valve briefly without igniting the fuel, so that it flows into a small pan. This small quantity of fuel is then lit and allowed to burn down. When the fuel valve is opened again, the fuel vaporizes from the heat of the pan. Some stoves do not have this apparatus, and must be preheated by the application of an external heat source such as a solid fuel block.
- In many stoves, the priming pressure is generated by a small hand pump that forces air into the fuel container. As the fuel is consumed, the pressure decreases according to Boyle's Law, so the pump must be operated occasionally during use to maintain steady stove operation.
- In the picture (above/right), the pressure pump knob is also the cover to the fuel tank. This MUST fit on the tank properly. If this cover is not correctly fitted, you cannot pressurize the stove. You would pressurize the tank by operating the pump several times before lighting the stove. During the course of use, you will need to operate the pump again, to maintain the pressure in the tank.
Note
References
- Categoría: Tiene imagen de insignia
- Adventist Youth Honors Answer Book/Honors/es
- Adventist Youth Honors Answer Book/es
- Adventist Youth Honors Answer Book/Skill Level 2/es
- Categoría: Libro de respuestas de especialidades JA/Especialidades introducidas en 1986
- Adventist Youth Honors Answer Book/General Conference/es
- Adventist Youth Honors Answer Book/Recreation/es
- Adventist Youth Honors Answer Book/Recreation/Primary/es
- Adventist Youth Honors Answer Book/Stage 100/es
- Adventist Youth Honors Answer Book/IAConnection/es
- Adventist Youth Honors Answer Book
