AY Honor Camping Skills III Answer Key
1
Camping Skills III has been designed so that it is within the capabilities of Pathfinders who are in grade 7 or higher.
2
Campsite Selection
To help remember the things that are important to camp site selection, remember the six W’s:
- Wind- Find areas that are protected from the wind. This requires knowing or guessing at the normal wind direction (hint look at the direction trees are leaning and the current wind direction)
- Water- Fresh water should be available for drinking, beware of drainage areas, flooding and other water related hazards. Marshy areas can have a high mosquito population that can make camping miserable.
- Weather- Knowledge of the weather patterns of an area can help you decide the best location for the camp site.
- Wild things- Beware of signs of large mammals such as bear, wolves, and mountain lions. Also watch out for the small wild things such as snakes, spiders, ticks, biting flies and mosquitoes.
- Wood- Adequate wood should be available for a campfire, and no dead wood above sleeping area. Survey the trees to make sure that they will not fall on you in strong winds.
- Willingness- Make sure the owner of the property is willing for you to camp on it. Make sure you have the proper permits for camping areas.
Fire Safety
- Locate the fire in a safe place. It should be clear for 10 feet (3 meters) all around.
- Do not light a fire beneath overhanging branches or tents, shelters etc.
- Do not use accelerants, such as lighter fluid, gasoline, kerosene, etc. Learn to light a fire without these.
- Put the fire out completely before leaving it. If it's too hot to put your hands in the ashes, it's not sufficiently out. Douse it down with water, turn the coals with a shovel, and be sure to extinguish every coal and ember.
- Do not build a fire on top of flammable material such as grass or leaves.
- Cut away the sod (keep it moist so it stays alive, and replace it before your leave), and clear away the duff and litter.
- Keep fire extinguishing supplies handy and near the fire. A bucket of water or sand, or a fire extinguisher are recommended.
- Do not remove burning sticks from a fire.
- Watch for embers that escape the fire pit and extinguish them immediately.
- Wear proper footwear around a fire.
- Be aware that paper, cardboard, and leaves create floating embers that rise out of the fire pit and may land dozens of yards away.
- Do not light a fire when conditions are adverse (high winds, or drought conditions) or when fires are prohibited by law.
3
Weekend campout are a lot of fun, especially if the campers have some knowledge of camping! Once every five years, Seventh-day Adventist Divisions hold a division-wide camporee, where people from all over their division attend. Many clubs from outside the division also attend. In 2009, the North American Division held a camporee in Oshkosh Wisconsin, and it was attended by 33,000 Pathfinders! The NAD also held camporees in Oshkosh in 1999 and in 2004, and at other locations prior to that.
Within the Divisions are Unions, and many of them hold camporees every five years as well. Union Camporees are held between Division Camporees. Unions are groups of local Conferences. Many Pathfinder clubs attend Conference Camporees every year - and some conferences have camporees twice a year (once in the fall, and again in the spring). In addition to these camporees, some clubs go camping by themselves as a club. This is a special bonding time for members of the local Pathfinder club. Of course, Pathfinders also like to camp with their friends and families, and those trips can also be used to meet this requirement. Remember, the more you know about camping, the more fun it is!
4
4a
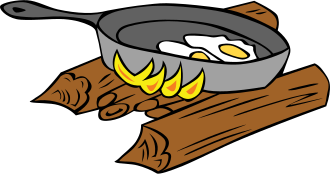
The hunter's fire is a cooking fire. The logs on top are spaced close enough together such that a pot, pan, or Dutch oven can be placed on them. Try to lay it as level as possible.
4b
This fire can be used for baking, though it is not as efficient as a reflector oven (which is has a metallic reflecting surface and often surrounds the item. The fire itself can be of any other form, and is placed in front of the reflector. The item to be baked is placed between the reflector and the fire. This fire is also good for getting oneself warm. The reflector can also be a large rock. If you sit (or sleep) between the reflector and the fire, the side of you facing the fire will be warmed directly, while the reflector throws heat to the opposite side. Very toasty.
If making the reflector from logs, the vertical members should be driven deeply into the ground to support the weight of the horizontal members. You can also use rocks to support them.
4c
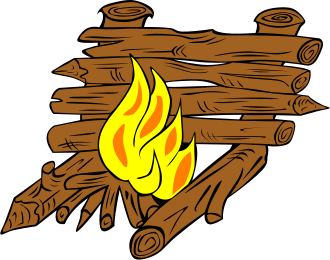
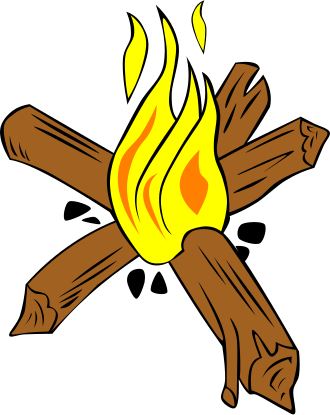
The advantage of this fire is that the logs can be of any length, avoiding the need to cut them up. As the ends of the logs burn, they are pushed into the fire. The fire is lit at the center of the star. If the logs are propped up on the fire ring, gravity will feed them in as they burn.
5
5a
In the Pacific Islands near the Philippines, there is a fire building technique that uses compressed air to ignite a small piece of tinder. The technology to do this is similar to a diesel engine and is called a sulpak by the islanders or fire piston by the rest of the world.
The sulpak is usually made out of a water buffalo horn or very dense wood. There are two parts to the device, a piston with a pad on the end, and a cylinder. The piston has a small divot in the end of it that holds a piece of tinder (char cloth works well). Also there is a small groove near the end of the piston that is wrapped with thread to create o-ring. The piston is normally lubricated with pig fat, but Crisco, and Vaseline work well.
The piston is smeared with the lubricant, and a small amount of lubricant is placed in the divot at the end of the piston. The char cloth is then pressed into the grease in the divot.
Push the end of the piston into the cylinder about a half inch. Then hold the cylinder in one hand and hit the pad of the piston with the other. Then pull the piston back out quickly and blow on the tinder. If it doesn't glow immediately you will need to try the process again, or check to make sure that the "o-ring" is tight enough.
There is not enough tinder to catch much on fire, so the best thing to do is light a larger chunk of char cloth and then use this to light the other tinder that will be part of the fire.
It is very difficult to manufacturer the sulpak in the wilderness, so this technique is not good for an emergency unless you just happen to have a sulpak with you. Many outdoor wilderness adventurers will carry their sulpak with them when they go camping and hiking.
Outdoors Magazine.com has a good article with pictures of how to make and use a fire starting piston.
5b
A piece of curved glass can sometimes be used to focus the rays of the sun, igniting the tinder. The glass must be smooth enough to not overly-distort the point of light. A magnifying glass is the typical sort of lens used for this, but there are other possibilities in a pinch.
It is possible, for instance, to use a piece of ice shaped into a sphere to do the same job. Getting the piece of ice round enough and, clear enough, and smooth enough to ignite a fire, however may prove to be difficult.
Others have reported success in polishing the bottom of a soda can, and using it as a mirror to reflect the sun's rays onto a point. Again, it takes a lot of patience to polish the can well enough to be able to light a fire this way, but it has been done. The polishing material can be any fine rouge-like substance, such as clay. The surprising thing about this particular technique is that a chocolate bar has been used as the polishing compound!
5c
Using flint and steel to light a fire is somewhat difficult. In order to use a flint and steel, you take a hard, sharp-edged rock in one hand and the steel striker in the other. The "flint" can be any hard, sharp rock, such as flint, jasper, or quartz. The striker can be any piece of high-carbon steel, such as a knife blade, though strikers made specifically for this purpose work much better.
The other essential item needed for starting a fire with flint and steel is a char cloth. A char cloth is a piece of partially burned cotton cloth. It can be made by cutting pieces of cotton into 1-inch squares, placing them in small a metal container (such as an Altoids tin), and placing that in a fire. If the cotton cannot get much oxygen, it will char rather than burn. Remove the tin from the fire when it quits smoking.
Before you begin, lay your fire so that when you ignite the tinder with the flint and steel, you can place it in the fire and get it going. Once the tinder is lit, it's too late to lay the fire, as the tinder will burn for only half a minute or so.
Place the char cloth on the flint even with a sharp edge, but not covering it. Hold the striker loosely in the right hand (assuming you are right-handed) and strike it against the flint (held in the other hand) as if you were trying to shave the striker with the rock. Flint is harder than steel, so it will indeed shave a piece of steel off the striker. When this piece of red-hot steel is shaved from the striker, it will fly off and hopefully land on the char cloth. You may need to repeat this several times before a spark does actually land on the char cloth, but when it does, the char cloth will catch the spark and begin to glow itself. You then take the glowing char cloth and set it against your tinder. Raw cotton and oakum work especially well as tinder. Blow on it gently until you get a flame. If you don't blow hard enough, the ember will not ignite the tinder. If you blow too hard, you will burn through the tinder without igniting it. Once it flames up, place it in the fire you have already laid.
5d
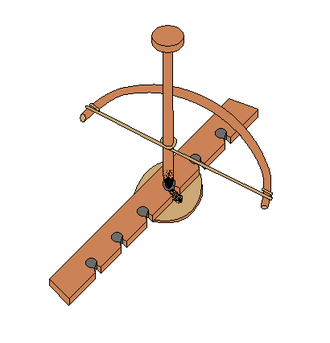
The "bow and drill" method is well-known and it is a lot of work. The bow is similar to that used for archery. To make such a bow, find a thin rope or flexible but sturdy bit of cordage, and a sturdy stick 60-120 cm![]() long. Tie the rope to one end of the stick, and make another knot on the other end of the stick, with the rope between the ends not quite taut.
long. Tie the rope to one end of the stick, and make another knot on the other end of the stick, with the rope between the ends not quite taut.
The drill (or spindle) is another straight stick, thin but strong, preferably stripped of bark, sharpened on the bottom end and rounded on the top. The center of the bowstring (rope) is wrapped around the drill, with the bow and spindle at right angles to each other. The end of the spindle is placed on a fireboard.
The fireboard is a piece of dry, softwood (cedar is excellent), with a conical impression in the top surface (such as might be made with a countersink). This impression is bored near the edge of the fireboard, and a notch is cut into it. The apex of the notch should be at the center of the impression. Place a card or a piece of bark beneath the notch to catch the hot wood which the spindle will grind off the fireboard.
The top of the spindle is rounded and smoothed, and placed in a socket made of a hardwood, bone, stone, or something similar. The socket should be smoothed and greased to reduce friction - you do not want to generate heat in the socket.
You should also have a piece of charcloth, which is useful when lighting any kind of primitive. A charcloth is a charred piece of cotton. You can make several by cutting up an old pair of jeans into 2"x1.5" rectangles. Place them in a tin (such as an Altoid tin) with a hole drilled in the top (or bottom). Put the tin (with the cloth inside) into a campfire and carefully remove after about 30 minutes. The tin will prevent the cloth from fully combusting because it limits the oxygen supply. Remove the pieces of cloth and bring them with you when you are ready to light a fire.
Once the equipment is ready, gather some tinder. This tinder should be easily lit. Dry grass, pine needles, and dryer lint all work well for this. Form the tinder pile into the shape of a bird's nest. Then make sure you have enough kindling on hand and an easily lit fire laid with fuel ready to go. When tinder bursts into flames, it is not the right time to start looking for kindling and fuel. Do this ahead of time.
Once the spindle is in place with its bottom tip in the impression in the fireboard, the top held firmly by the socket, and the cord wrapped around its center, the fire builder will move the bow back and forth quickly to rotate the spindle. Long strokes are better than short strokes.
If the socket is pressed too hard, the spindle will not spin. If it is not pressed hard enough, the spindle will come loose.
After only a few seconds of spinning the spindle, the fireboard should begin to smoke. Keep working the bow. After about a minute of smoke, look for a pile of hot wood powder to accumulate in the notch, caught on the card or bark placed beneath it. Stop working the bow and see if the wood powder continues to smoke. If it does not, work the bow again.
When the wood powder continues to smoke after the spindle stops, carefully pick up the card or bark, slide the wood powder into the center of the charcloth, and gently blow on the wood powder. Slowly increase the strength of the air stream blown into the tinder. It should glow red, and as more air is forced into it. In short order, the ember should ignite the charcloth. When it does, slide the charcloth into the tinder and continue blowing. Eventually when you take your next breath, the tinder pile will burst into flames. Place the burning tinder beneath the kindling and tend the fire as you would any newly lit fire.
5e
The term metal match, or 'firesteel' has become synonymous with so called 'artificial flints' which are metal rods of varying size composed of ferrocerium, an alloy of iron and mischmetal. Mischmetal is an alloy primarily of cerium that will generate sparks when struck. Iron is added to improve the strength of the rods. Small shavings are torn off the rod with either a supplied metal scraper, a piece of hacksaw blade, or, commonly, the back of a knife ground at a suitable angle. These shavings then ignite at high temperatures, and they are much more effective than their historical equivalent.
While it takes practice and properly prepared tinder to create a sustained fire, the modern firesteel is considered by survival instructors and serious outdoorspeople to be one of the most reliable ways of making fire in severe conditions. Two good examples of firesteel are made by Light My Fire and Blastmatch. The sparks produced by these products are extremely hot, 3000 C°![]() , and easily light toilet paper or small pieces of wood or commercial tinder products.
, and easily light toilet paper or small pieces of wood or commercial tinder products.
Traditionally a flint and steel were used; however, the flint was not the important part. With a proper striker, you can get sparks using any hard, non-porous rock that has a sharp edge, even petrified wood. The spark comes from chipping small pieces of steel off the striker; finely divided metals ignite immediately in air, with steel burning at yellow-white heat.
Charpaper can be used as an intermediate step between the striking and the tinder. Charpaper is traditionally made from cotton that has been processed into charcoal. You can make charpaper by taking several patches of cotton denim (from an old pair of jeans for example) and laying them one atop another inside a small tin (such as the ones in which Altoids are packaged). Drill a 3 mm![]() diameter hole in the lid of the tin. Then throw it into a campfire. It should smoke, but not ignite, as not enough oxygen can get into the tin. Once it stops smoking, you can carefully remove it from the fire and let it cool. You should have several charpapers inside, ready for the next fire you light.
diameter hole in the lid of the tin. Then throw it into a campfire. It should smoke, but not ignite, as not enough oxygen can get into the tin. Once it stops smoking, you can carefully remove it from the fire and let it cool. You should have several charpapers inside, ready for the next fire you light.
When a spark comes into contact with charpaper, it makes the charpaper glow, but the charpaper will not ignite. After the charpaper glows, you put it against your tender and blow. This works much better than attempting to get a spark to stay on the tinder. Igniting the tinder from the glowing charpaper takes practice. Too much oxygen and the tinder is consumed without bursting into flame; not enough oxygen, and it simply doesn't light. But if you get it just right, it will burst into flames rather suddenly. Be ready for this, as you will then be holding a burning wad of tinder in your hands. Place it in your pre-laid fire immediately.
5f
Making fire from an electric spark can be dangerous and should only be used in an emergency. You will need to set up some tinder ahead of time and then prepare to throw an electrical spark. This can be done with jumper cables from an automobile by connecting one end of the terminals to the battery, and then quickly touch the other ends together next to the tinder. Do not hold the terminals together for more than an instant or you will drain the battery.
6
A tool can be sharpened with a whetstone. Most whetstones need to be kept wet when they are in use - some are wet with water and others are wet with oil. Stones with finer grain typically use oil, but you can use water on them as well. The purpose of wetting a whetstone is to allow the steel removed from the blade to float away. The finer the stone, the finer the edge it will make on a tool, but the longer it will take to sharpen it. For this reason, a very dull tool should be sharpened first with a coarser stone, and then with a finer stone. Then it should be kept sharp. You can keep a blade sharp by respecting it - do not chop into the ground with a hatchet, and to not stick a knife blade in the ground either. Dirt is highly abrasive, and a rock will ding the edge very quickly. Close a pocket knife when you are finished using it, and do not allow the business end of a blade to touch anything other than the things you are trying to cut with it.
Hatchet
It is tempting to take a dull hatchet to a power grinder, but unless you are very careful, this could be a huge mistake. A grinder will not only remove steel from a blade, it will also heat it. It is very easy to heat it too much, causing the steel to lose its temper (tempered steel is hard and holds an edge better than untempered steel). Steel is tempered by heating it to the point that it becomes non-magnetic, then quickly cooling it. If it is allowed to cool slowly, the iron crystals in the blade will align themselves with the Earth's magnetic field as they cool, and aligned crystals make for soft steel. So the first advice we can give on sharpening a hatchet is to stay away from the grinder.
Instead, use a file or a stone. Hold the file so that it passes over the edge of the blade, but at a steep angle. Sharpen one side, and then the other.
Knife
To sharpen a knife, hold the blade at about a 15° angle and scrape it along a whetstone as if you were trying to shave off a thin layer of the stone. Be sure to sharpen both sides.
7
A one-pot meal is any meal that can be cooked entirely in one pot. Often, dehydrated foods are used for this, as they are extremely space and weight efficient. You can buy many dehydrated food packages at an outdoor outfitter, but the selection is limited for the observant Adventist. Many of these foods contain unclean meats (Lev 11) or wine, but there are a few that meet Adventist dietary requirements. If one turns from the outfitters and looks in a grocery store, even more choices are available. Many rice mixes are ideal candidates as one-pot meals (red beans and rice, dirty rice, etc.). Soup mixes also work well, as do pastas, macaroni and cheese, etc.
8
With the modern materials available these days, tent manufacturers have the ability to change types, styles and shapes of tents.
- The tent poles hold and keep the shape of the tent.
- Poles can be made to be dismantled so that they can be easily transported, are color-coded, and/or linked by chain or a cord, to make it easier to set up a tent.
- Very few guy ropes are needed to tie down the tent (and sometimes none).
- Exact placement of the guy ropes is unnecessary.
Rigid Poles
Many tents which use rigid steel poles are free-standing and do not require guy ropes, though they may require pegs around the bottom edge of the fabric. These tents are usually so heavy (25 to 80 kg) that it takes a rather strong wind to blow them away.
- Frame tents are double-skin tents. They have a living area and one or more cotton/nylon/polyester inner tents. The outer tent is draped over a free-standing steel frame, and may be made of canvas or polyester (the latter often has a hydrostatic head of 3000mm, i.e. three season camping). The living area is generally at least as large as the sleeping area, and there may be a specific section with window and extra air vents for use as a kitchen. The walls are nearly vertical and are typically about 150 to 180 cm high (5 ft to 6 ft). The center of the gently sloping roof is often 210 cm (7 ft) high or more and provides reasonable headroom throughout. The smaller 2-person models were less than 3 metres square (10 ft), but these have largely been replaced by dome or tunnel tents. The larger 8-person models may exceed 5 metres (16 ft) in length and/or width.
- Cabin tents are single-skin tents used mainly in the USA. They often have nylon walls, polyester roof, and a polyethylene floor, plus an awning at one or both ends. With a hydrostatic head of only 1000 mm, they may best be considered as summer tents. Removable internal dividers allow the cabin to be split into 'rooms'. Sizes may range from 13 ft by 8 ft (2 rooms) up to 25 ft by 10 ft (4 rooms), with wall and roof heights similar to those of frame tents. There are three separate pole units, with each unit consisting of two uprights and a connecting ridge. These pole units support the centre and ends of the roof, and are usually outside the tent.
Flexible Poles
Flexible poles used for tents in this section are typically between 3 and 6 metres long (10 and 20 feet) and are normally made of tubes of fibreglass with an external diameter less than 1 cm (1/3 inch). For ease of transportation, these poles are made in sections some 30 cm to 60 cm long (1 to 2 ft), with one end of each section having a socket into which the next section can fit. For ease of assembly, the sections for each pole are often connected by an internal cord running the entire length of the pole.
- Dome tents have a very simple structure and are available in a wide variety of sizes ranging from lightweight 2-person tents with limited headroom up to 6 or 9-person tents with headroom exceeding 180 cm (6 ft). These may be single wall, or single-wall with partial flysheet, or double wall. Depending on the pole arrangement, some models pitch outer-tent first, while others pitch inner-tent first. The former helps keep the inner tent dry, but the latter is easier to pitch.
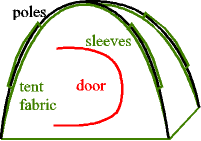
- The basic dome has a rectangular floor and two poles which cross at the peak; each pole runs in a smooth curve from one bottom corner, up to the peak, and then down to the diagonally opposite bottom corner. There are usually special fittings at each corner which fit into sockets at the ends of each pole - pole tension keeps everything in shape. The poles usually run outside the tent fabric, which is attached to the poles by sleeves. In some new models clips are also used. Dome tents do not require guy ropes and pegs for structural integrity, but must be pegged down in high winds.
- The basic dome design has been modified extensively, producing tents with three poles, tents with irregularly-shaped bases, and other unusual types. A common variation is to add a third pole going from corner to corner on one side; this is angled away from the tent, and supports an extended flysheet or outer tent to give a porch/storage area.
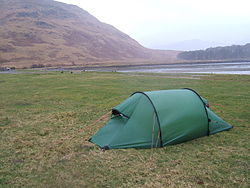
- Tunnel tents may offer more usable internal space than a dome tent with the same ground area, but almost always need guy ropes and pegs to stay upright. These are almost always double wall tents. Sizes range from 1-person tents with very limited headroom up to 8 or 10-person tents with headroom exceeding 180 cm (6 ft). Tunnel tents have a low end profile making them great for high wind situations.
- A basic tunnel tent uses three flexible poles, arranged as three parallel hoops, with tent fabric attached to form a tunnel. The most common designs have a sleeping area at one end and a porch/storage/living area at the other. Smaller designs may use only 2 poles and larger designs may use 4 poles; the latter may have a sleeping area at each end and a living area in the middle.
- Hybrid dome/tunnel tents are now common. One variation is to use a basic dome as the sleeping area; one or two hooped poles to one side are linked by a tunnel to the dome to provide a porch. Another variation is to use a large dome as the living area, with up to 4 tunnel extensions to provide sleeping areas.
- Geodesic tents are essentially dome tents with 2 or more extra poles which criss-cross the normal two poles to help support the basic shape and minimise the amount of unsupported fabric. This makes them more suitable for use in snowy conditions. To help withstand strong winds they are rarely more than 120 or 150 cm high (4 to 5 ft).
- Single-hoop tents use just one flexible pole and are often sold as light-weight 1 or 2-person tents. These are the modern equivalent of older style pup tents, and have the same feature of somewhat limited headroom. Different styles may have the pole going either along or across the tent.
Older Tent Styles
Most of these tent styles are no longer generally available. Most of these are single-skin designs, with optional fly sheets for the ridge tents.
All the tents listed here had a canvas fabric and used a substantial number of guy ropes (8 to 18). The guys had to be positioned and tensioned fairly precisely in order to pitch the tent correctly, so some training and experience were needed. This made these styles relatively unsuitable for casual or occasional campers. Pup tents might use wooden or metal poles, but all the other styles mentioned here used wooden poles.
- A pup tent is a small version of a ridge tent intended for 2 or 3 people. It usually has a rectangular floor of size ranging from 4 ft by 6 ft up to 6 ft by 8 ft, and ridge heights ranging from 3 ft up to 5 ft. The side walls are usually about 1 ft high. There are guy ropes for each pole, at each corner, and in the centre of each side, and these guy ropes help to maintain the required shape. Earlier versions had a single upright pole at each end, while later versions often have two poles at each end, arranged rather like an 'A' shape, in order to make access easier. Some models have a horizontal ridge pole joining the tops of the end poles to support the centre of the tent.
- A ridge tent can sleep 5 to 8 people. They usually have a rectangular floor of size ranging from 8 ft by 10 ft up to 10 ft by 16 ft, and ridge heights around 6 ft to 7 ft. The side walls are usually about 3 ft high. They normally have a single upright pole at each end with the tops joined by a horizontal ridge pole. Longer models might have an additional upright pole in the centre to help support the ridge pole. They often have two guy ropes at each corner, and guy ropes every 2 ft along the sides. If strong winds are expected then two additional storm guy ropes are attached to the top of each pole.
- A square centre-pole tent was often used for family camping in the first half of the 20th century. Despite the use of 9 poles and 12 guy ropes, such a tent could be pitched by an (experienced) family of four in some 10 to 15 minutes. These tents had a square floor of size ranging from 8 by 8 ft up to 15 by 15 ft. There were poles about 5 ft high at each corner and in the middle of each side, and a 10 ft or 12 ft pole in the centre - the walls were vertical and the roof was pyramid-shaped, so there was plenty of headroom over most of the tent.
- A Sibley tent (bell tent) had a circular floor plan some 10 ft to 15 ft across, a single central pole some 10 ft high, and walls about 3 ft high. Guy ropes were connected every 2 ft around the top of the walls - these had to carefully tensioned to hold the pole upright and keep the tent in shape.
Different types of tents are used for different purposes. A 4 season tent is going to do well for any type of conditions, where as other types of tents (most today are 3 season) don't do as well in all seasons (usually the winter season is not a good time to use such a tent). So, seasons are one way of signifying different types of tents.
The different types of camping would be another way to distinguish the types of tents. A family tent is more than likely going to be heavy (weight wise) and bulky. It will often have lots of room (can fit 6 people). A backpacking tent is small and light weight. Usually you won't put gear in a backpacking tent (you hang your pack or keep it out of your tent). A backpacking tent will fit people snuggly (usually no more than 2 per tent). A mountaineering tent can stand the rough climate and terrain in addition to being light weight. Mountaineering tents are designed for some gear to fit inside the tent (thus being a little bit more spacious than backpacking tents). Mountaineering tents may also allow for up to 3 or four people to sleep snuggly in a single tent.
The final way to classify tents by different types is by material used. I don't use this method for teaching camping skills 3 though. Tents may be classified by the materials used to build them (like aluminum poles vs carbon fiber poles, etc.).
9
Each breath a person exhales contains water because of the moisture content of the lungs, throat, mouth and nasal cavity. This moisture rises until it comes in contact with a cool surface such as the inside of the tent, where it condenses.
A good tent will be made of breathable material that allows the moisture to pass through (such as a nylon mesh), and there will be a rain fly on the outside to keep rain out of the tent. Water vapor passes through the mesh and condenses on the fly. It then runs off the underside of the fly and drips off the edge outside the tent.
10
Taut-Line Hitch
| Taut-line hitch |
|---|
|
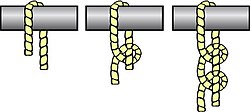
Use: The Taut-Line Hitch is an adjustable loop knot for use on lines under tension. It is useful when the length of a line will need to be periodically adjusted in order to maintain tension. It is made by tying a Rolling hitch around the standing part after passing around an anchor object. Tension is maintained by sliding the hitch to adjust size of the loop, thus changing the effective length of the standing part without retying the knot. When under tension, however, the knot will grip the cord and will be difficult to cause to slip.
It is typically used for securing tent lines in outdoor activities involving camping, by arborists when climbing trees, for creating adjustable moorings in tidal areas, and to secure loads on vehicles. A versatile knot, the Taut-line hitch was even used by astronauts during STS-82, the second Space Shuttle mission to repair the Hubble Space Telescope. How to tie:
|
Two Half Hitches
| Two half hitches |
|---|
|
Use: This reliable knot is quickly tied and is the hitch most often used in mooring.
How to tie:
|
11
- This is your activity.
12
You should take into consideration where your sleeping area(s) are in relation to these water-related areas. Specifically, water flows downhill, so, you do not want water runoff from the 'sink and dishwashing' or 'shower water' flowing to your sleeping area(s).
Also, the location of the 'latrine' should be considered depending on where you get your water source. For example, you do not want to put the 'latrine' upstream and take your shower and wash your dishes downstream. But pay attention! Just because your latrine is downstream and downhill from you does not mean it is downstream and downhill from other campers. Be considerate. A latrine should never be located within 60 meters![]() of any water supply.
of any water supply.
12a
A camp sink need not be any more than a few large containers placed on a table. For the containers, you can use a large salad bowl or a plastic storage tub. The table to place them on can be constructed by finding two trees at least 20 cm![]() in diameter and about 2 meters
in diameter and about 2 meters![]() apart. Then using square lashing, attach two long poles to either side of the trees, at waist-height. Use continuous lashings to lash several shorter poles across the support poles to make the table surface. The short poles should all be as close to the same diameter as possible, or if that's impossible, arranged from smallest to largest.
apart. Then using square lashing, attach two long poles to either side of the trees, at waist-height. Use continuous lashings to lash several shorter poles across the support poles to make the table surface. The short poles should all be as close to the same diameter as possible, or if that's impossible, arranged from smallest to largest.
12b
There are two components to a camping latrine: the "commode", and an enclosure.
- Enclosure
- The purpose of the enclosure is to provide privacy. It can be as simple as hanging tarps from rope stretched between trees and well-secured. You can also make a teepee from tarps and poles, or build a more elaborate structure from poles using lashings, and covering that with tarps. Another possibility is to use an old tent with its floor removed.
- Commode
- There are many ways to build the commode portion of a latrine. One common approach is to mount a toilet seat on some sort of structure, such as a small log cabin-like structure built using 3-inch (8 cm) diameter logs. It is also possible to build a structure from lumber fastened together with hinges so that it can be collapsed at will (but remain uncollapsed otherwise!) for transport. Another way to build the commode is by lashing poles together to make a couple of horizontal rails - one for sitting on, and another as a back rest. However the commode is built, it is almost always situated over a hole dug in the ground to hold the waste. The depth of this hole depends on how much usage the latrine is expected to accommodate. Leave the dirt pile and a shovel inside the enclosure so that the waste may be gradually buried as it is created. This will hold down the smell. Be sure to completely bury the hole when breaking camp.
12c
Most outdoor outfitters carry camp showers, but the trick is setting up a showering area that will provide clean feet and privacy.
Clean feet can be had by building a platform similar to the table shown above, except that it need not be lashed to any trees - it can simply lie on the ground. If you do not build a platform, you will create a mud hole when you shower, and then everything will be clean except your feet. Somehow the mud on the feet have a way of migrating elsewhere too, rendering the whole showering experience an exercise in futility. Don't scrimp on the rope when attaching the spars to the poles - the platform must be secure and stable, and the spars must not roll around. Lash them down securely.
For privacy, you can bring a tarp, and string up an enclosure using trees for support. Make the enclosure large enough to hold a chair so the freshly cleaned Pathfinder can remain freshly clean as he/she dries off, gets dressed, and puts on his/her shoes.
Another option is to buy a shower tent which is a small tent tall enough to stand in and equipped with mesh around the edges of the floor. This allows the water to drain out, but allows the camper to stand on an otherwise regular tent floor, thus keeping the feet clean.
13
Square Lashing
Square lashing is a type of lashing knot used to bind poles together. Large structures can be built with a combination of square and diagonal lashing, with square lashing generally used on load bearing members and diagonal lashing usually applied to cross bracing. If any gap exists between the poles then diagonal lashing should be used.
Square lashing steps (see image at right);
- Begin with a timber hitch on the vertical pole beneath the horizontal pole and tuck the loose end under the wrapping.
- Wrap in a square fashion about three times around the poles.
- Frap between the poles two or three times, pulling often to work the joint as tight as possible.
- Tie two half hitches around the horizontal pole
- Cinch the half hitches into a clove hitch, an additional clove hitch may be added if desired.
When the turns are taken around the vertical pole they should be inside the previous turns. The ones around the cross pole should be on the outside of the previous turns. This makes sure that the turns remain parallel and hence the maximum contact between the rope and wood is maintained.
Strength is improved if care is taken to lay the rope wraps and fraps in parallel with a minimum of crossing.
An alternative method is known as the Japanese square lashing. The Japanese square lashing is similar to the standard square lashing in appearance, but in fact is much faster and easier to use. One drawback to consider is that it is difficult to estimate how much rope is needed, which can lead to needlessly long working ends.
- Begin by placing the middle of the rope under the bottom pole
- Lay both ends over the top pole, and cross under the bottom pole. Do this about three times. Take care to keep the wrappings as tight as possible.
- After the last wrap, cross the ropes again over the bottom pole and frap around the wrappings. Do this enough times (at least 3) to finish with a square knot.
A properly executed lashing is very strong and will last as long as the twine or rope maintains its integrity. A lashing stick can be used to safely tighten the joint.
Diagonal Lashing
Diagonal lashing is a type of lashing used to bind spars or poles together, to prevent racking. It is usually applied to cross-bracing where the poles do not initially touch, but may by used on any poles that cross each other at a 45° to 90° angle. Large, semipermanent structures may be built with a combination of square lashing, which is stronger, and diagonal lashing.
Bailing twine has sufficient strength for some lashing applications but rope should be used for joining larger poles and where supporting people sized weights.
Diagonal lashing steps (see image at right);
- Begin with a timber hitch around the juncture of the two poles.
- Make three turns in each direction - tightening steadily as you go.
- Make two frapping turns, tightening the joint as much a possible.
- To end, make two half hitches
- Cinch the half hitches into a clove hitch
A lashing stick can be used to safely tighten the joint. Strength will be improved if the first turn is 90° to the timber hitch and if care is taken to lay the rope turns parallel with no crossings.
Shear Lashing
Shear lashing uses two or three spars or poles, 15 - 20 feet of rope.
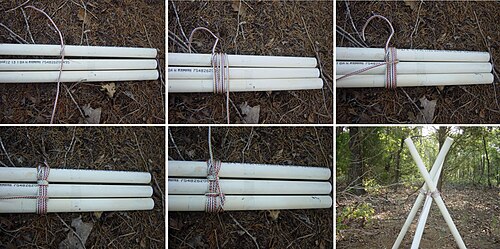
To tie a shear lashing, lay the two poles side-by-side and parallel to one another. Tie a clove hitch around one spar. Then wrap the free end of the rope around both spars about seven or eight times. Pull them as tight as you can. Then make three fraps around the lashing, and again, pull the rope as tight as you can. Finally, tie a clove hitch on the second spar.
To use sheaer lashing around with three poles, lay all three poles side by side and parallel to one another. Tie a clove hitch on one pole, and wrap the rope around all three seven or eight times. Pull the rope tight. Make three fraps between two of the poles, then cross over and make three more between the other two poles. Pull the frapping as tight as you can and finish it off with a clove hitch.
Continuous Lashing
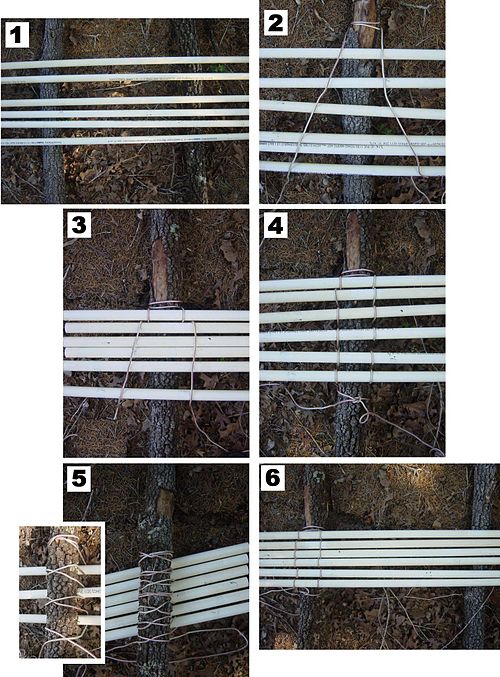
Continuous Lashing is a fun technique. It is used to create shelves, tables, and other structures.
Comments on the pictures on the right'
- Support poles under the 'surface' poles.
- Attach string to the support pole using a clove hitch.
- Clove hitch, up over surface pole, back down & cross under below support pole, and up over the second surface pole.
- Detail of lashing as seen from top.
- Detail of lashing as seen from bottom. Inset shows details of clove hitch, and cross-under below support pole.
- View from the top.
- Start with a string/rope that is 4 or 5 times longer than the length of your project.
- Find the middle/center of the string and attach it to one of the support poles.
- Put one of the surface sticks on top of the support pole and bring both ends of the string over this surface stick.
- Continue back down below the support pole.
- Cross the string under the support pole.
- Bring it back up and over the next surface stick and then back down and cross under the support pole.
- Repeat for the remaining surface sticks.
- End off with a square knot when all the surface sticks are attached.
AY Honors/Lashing/Simple Object
14
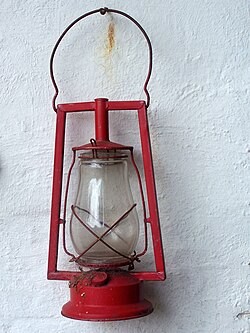
Replace Mantel on Camp Lantern
- As with most things, practice and repetition makes a task simple.
- Turn OFF the gas valve completely.
- Remove the lantern cover and the glass covering. Place these in a safe and stable place.
- Remove any remains of the old mantel. Do this carefully if the lantern is still HOT.
- Tie the new mantel in place on the gas pipe. There is a string around the collar that slips over the gas pipe.
- Pressurize the gas tank.
- Hold a lighted match near the mantel. The mantel should begin to burn. Do not turn on the gas. If your lantern has an electronic ignition, it is still better to use a match when lighting a new mantel for the first time, as the ignition can cause the mantel to break.
- Replace the glass cover and the lantern cover.
- Slowly open the gas valve when the mantel starts to glow brightly.
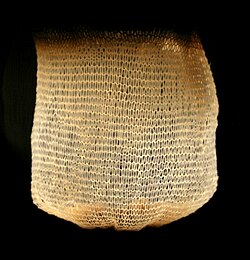
The mantle is a roughly pear-shaped ramie-based artificial silk or rayon fabric bag made from silk or fabric impregnated with rare-earth metallic salts that will convert to solid oxides after being heated in a flame. A mantle will glow brightly in the visible spectrum while emitting little infrared radiation. The rare earth oxides (cerium) and actinide (thorium) in the mantle have a low emissivity in the infrared (in comparison with an ideal black body) but have high emissivity in the visible spectrum. There is also some evidence that the emission is enhanced by candoluminescence, the emission of light from the combustion products before they reach thermal equilibrium. The combination of these properties yields a mantle that, when heated by a kerosene or liquified petroleum gas flame, emits intense radiation that is mostly visible light, with relatively little energy in the unwanted infrared, increasing the luminous efficiency.
The mantle aids the combustion process by keeping the flame small and contained inside itself at higher fuel flow rates than in a simple lamp. This concentration of combustion inside the mantle improves the transfer of heat from the flame to the mantle. The mantle shrinks after all the fabric material has burnt away and becomes very fragile after this first use.
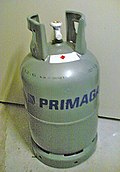
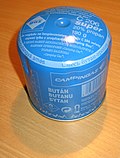
Demonstrate refilling gas in a Lantern and Stove
- Be sure not to spill any fuel, or if you do, make sure you clean up properly.
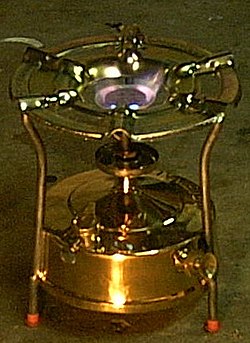
Maintain Pressure Pump on a Camp Stove
- Most stoves can use either liquid or gas fuel. Gas-fuel stoves are simpler to operate than liquid fueled stoves. The gas, being already pressurized, flows from the fuel canister into the burner, where it ignites, in the same manner as a domestic kitchen stove.
- Liquid-fuel stoves are more complex because the liquid fuel must be vaporized prior to burning. To accomplish this, the stove design brings the fuel line containing the liquid fuel near the flame of the burner. The heat from the flames converts the liquid fuel to a gas before it reaches the burner, where it mixes with air and is ignited. Some models use a spray system which does not require preheating.
- Most stoves operating with liquid fuels must be heated or primed before the burner is turned on. Many stoves require the operator to open the fuel valve briefly without igniting the fuel, so that it flows into a small pan. This small quantity of fuel is then lit and allowed to burn down. When the fuel valve is opened again, the fuel vaporizes from the heat of the pan. Some stoves do not have this apparatus, and must be preheated by the application of an external heat source such as a solid fuel block.
- In many stoves, the priming pressure is generated by a small hand pump that forces air into the fuel container. As the fuel is consumed, the pressure decreases according to Boyle's Law, so the pump must be operated occasionally during use to maintain steady stove operation.
- In the picture (above/right), the pressure pump knob is also the cover to the fuel tank. This MUST fit on the tank properly. If this cover is not correctly fitted, you cannot pressurize the stove. You would pressurize the tank by operating the pump several times before lighting the stove. During the course of use, you will need to operate the pump again, to maintain the pressure in the tank.
Note
| Color | AY Class | Honor |
| Blue | Friend | Camping Skills I |
|---|---|---|
| Red | Companion | Camping Skills II |
| Green | Explorer | Camping Skills III |
| Silver | Ranger | Camping Skills IV |
