Difference between revisions of "AY Honors/Leather Craft - Advanced/Answer Key"
| Line 51: | Line 51: | ||
*Outline a tab on each end of the pattern. The width of the tab should be half the thickness of the hatchet head. | *Outline a tab on each end of the pattern. The width of the tab should be half the thickness of the hatchet head. | ||
*Add a quarter inch to the blade end of the outline. | *Add a quarter inch to the blade end of the outline. | ||
| − | *Draw the flap that will fold around the hatchet head and fasten with a snap. In the photo above, the flap joins the pattern at | + | *Draw the flap that will fold around the hatchet head and fasten with a snap. In the photo above, the flap joins the pattern at the end of the blade - this was a mistake. It is better to continue the sweep of the blade's outline, including the allowance for the seam. The other thing to watch for is that the other end of the flap allows for room to wrap around the thickness of the blade at the handle. That end of the flap is longer than the tip end. |
*Cut out the pattern and fold it around the hatchet head, testing the fit. | *Cut out the pattern and fold it around the hatchet head, testing the fit. | ||
*Transfer the pattern to a piece of leather and cut it out. | *Transfer the pattern to a piece of leather and cut it out. | ||
*Fold the rear tabs and stitch them together to make a T-shaped seam. The first stitch is made across the top of the T. A second stitch is made to fasten the two tabs together (forming the vertical part of the T). Sewing the seam will be a lot easier if you make the needle holes with an awl first. | *Fold the rear tabs and stitch them together to make a T-shaped seam. The first stitch is made across the top of the T. A second stitch is made to fasten the two tabs together (forming the vertical part of the T). Sewing the seam will be a lot easier if you make the needle holes with an awl first. | ||
| − | *Fasten the snaps to the folding tab. To make sure | + | *Fasten the snaps to the folding tab. To make sure the snaps are properly aligned and the flap is not too tight, put the hatchet in the sheath (such as it is). Slip a piece of scrap leather between the hatchet blade and the sheath directly beneath the place where the snap will go. Then fold the flap over and punch through both pieces with a hollow punch. The piece of scrap leather will keep you from dulling the punch when you break through the second layer of sheath. If using a rotary punch, punch the snap hole on the flap first, fold it closed, and mark the hole beneath by poking a marker or an awl through the hole. Once the holes are punched, rivet the snap in place. |
*Make a saddle stitch along the blade. Again, the stitching will be a lot easier if you make the holes with an awl. Be sure to pierce both pieces at the same time. Start stitching at the top end of the blade (farthest from the handle). If you start at the other end, you may have difficulty tying off the saddle stitch. Pass the needles through only one piece of leather for the final hole, so that the two ends may be tied together on the inside of the piece. It is easiest to tie them off if you turn the sheath inside out first. | *Make a saddle stitch along the blade. Again, the stitching will be a lot easier if you make the holes with an awl. Be sure to pierce both pieces at the same time. Start stitching at the top end of the blade (farthest from the handle). If you start at the other end, you may have difficulty tying off the saddle stitch. Pass the needles through only one piece of leather for the final hole, so that the two ends may be tied together on the inside of the piece. It is easiest to tie them off if you turn the sheath inside out first. | ||
*Once the saddle stitching is done, you may opt to place a dot of white glue on the knot (both in the saddle stitch and in the back seam). | *Once the saddle stitching is done, you may opt to place a dot of white glue on the knot (both in the saddle stitch and in the back seam). | ||
Revision as of 18:13, 26 February 2009
1. Have the Leather Craft Honor.
2. Show how to punch holes, set snaps, do saddle stitching, and do two types of lacing.
Punching Holes

There are basically two types of leather punches: the rotary punch and the hollow punch.
- Rotary punch
- The rotary punch looks like a regular paper hole punch, except that it has a "spur" on the end allowing the user to select the size of the hole to be made. This type of punch should not be used when making holes for lacing or sewing. It is more suited to punching holes for a belt, a wrist band, or a snap.
- Hollow punch
- A hollow punch looks a bit like a small pipe with a sharpened end. The sharpened end is held against the leather and the other end is then struck with a mallet. The leather should be backed by a piece of soft wood. A small leather disc is removed from the piece and goes up into the punch. The punch usually features a slot in the side so that these discs can be removed.
Setting Snaps
Before a snap can be set, a hole must be punched in the two pieces of leather where the snaps will go. It is best to punch both pieces at the same time so that the holes (and thus the two parts of the snap) will line up. Choose a punch that will make a hole which will provide a snug fit for the snap.
Once the holes are punched, insert the finished side of the snap into the hole which will be most visible on the finished piece.
Setting the snap requires the use of a two-part tool specially designed for this purpose. The first part of the tool is a small anvil. The finished side of the snap is placed in the concave surface of the anvil. Note that the snap should still be positioned in the hole punched earlier, and the leather should be situated with its finished-side down. The other half of the snap is then placed on the first half, and the second part of the tool is brought to bear. This part of the tool is similar to a punch, but it is designed to mushroom over the first half of the snap, forming a rivet joint. The tip of the tool is placed on the shaft of the bottom half of the snap, and then struck sharply with a mallet. Repeated blows may be necessary to form a tight rivet joint.
Setting the other half of the snap is done in the same way.
Saddle Stitching

In saddle stitching, two needles are used, one on each end of the thread. One needle is passed through the first hole in the piece and pulled through until there is an equal length of thread on both sides of the hole. Then both needles are passed through the next hole (one at a time). The stitch is pulled tight, and then both needles are passed through the next hole. This is repeated until the seam is finished. To tie off the saddle stitch, pass each needle through only one of the two pieces and tie them together with a square knot on the inside of the seam.
Lacing
- Running stitch
- The running stitch is the simplest type of lacing. Begin by tying an overhand knot in one end. Lay the two pieces of leather to be joined together and punch a row of holes through both thicknesses. Pass the end of the lace through the holes from top to bottom. Pull it tight until the knot meets the hole. Then pass the lace through the next hole from the bottom piece to the top piece. The third stitch goes from top-to-bottom, the fourth from bottom-to-top, etc.
- Whip Stitch
- Punch a row of holes through two pieces of leather as with the running stitch. Tie a knot in one end of the lacing and pass the other through the first hole, from top-to-bottom. In a whip stitch, all the lacing passes through from the top to the bottom. The lace wraps around the edge of the pieces to get from the bottom to the top. This makes the same pattern the piece of wire in a spiral notebook makes.
- Cross whip stitch
- The cross whip stitch is made like the whip stitch, but the lace passes through every other hole. A second piece of lace does the same thing, but through the holes skipped by the first length of lace.
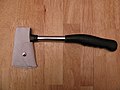
3. Make a sheath for a hatchet, knife, or ax.
Hatchet or Ax Sheath
Follow the same procedure for making an ax sheath as for a hatchet sheath. These instructions custom fit the sheath to the ax or hatchet head.
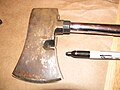
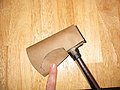
Trace an outline of the hatchet head.
Flip the hatchet over and trace it again.

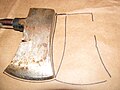
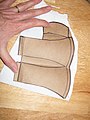
Draw the rear tabs.
Allow stitching space, and draw the flap.
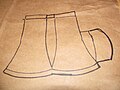
Finished pattern.
Test fit.
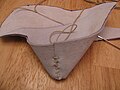
Transfer the pattern to leather and cut it out.
Stitch up the back.
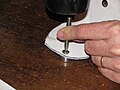
Attach the snaps.
Saddle stitch the blade side.
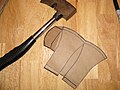
Finished product.


- Lay the hatchet on a large paper bag and trace an outline of the hatchet head.
- Flip the hatchet over and trace another image. The butt end of the hatchet head needs to be spaced such that it is as wide as the hatchet's thickness. The blade ends of the two outlines should touch.
- Outline a tab on each end of the pattern. The width of the tab should be half the thickness of the hatchet head.
- Add a quarter inch to the blade end of the outline.
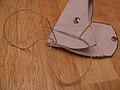
- Draw the flap that will fold around the hatchet head and fasten with a snap. In the photo above, the flap joins the pattern at the end of the blade - this was a mistake. It is better to continue the sweep of the blade's outline, including the allowance for the seam. The other thing to watch for is that the other end of the flap allows for room to wrap around the thickness of the blade at the handle. That end of the flap is longer than the tip end.
- Cut out the pattern and fold it around the hatchet head, testing the fit.
- Transfer the pattern to a piece of leather and cut it out.
- Fold the rear tabs and stitch them together to make a T-shaped seam. The first stitch is made across the top of the T. A second stitch is made to fasten the two tabs together (forming the vertical part of the T). Sewing the seam will be a lot easier if you make the needle holes with an awl first.
- Fasten the snaps to the folding tab. To make sure the snaps are properly aligned and the flap is not too tight, put the hatchet in the sheath (such as it is). Slip a piece of scrap leather between the hatchet blade and the sheath directly beneath the place where the snap will go. Then fold the flap over and punch through both pieces with a hollow punch. The piece of scrap leather will keep you from dulling the punch when you break through the second layer of sheath. If using a rotary punch, punch the snap hole on the flap first, fold it closed, and mark the hole beneath by poking a marker or an awl through the hole. Once the holes are punched, rivet the snap in place.
- Make a saddle stitch along the blade. Again, the stitching will be a lot easier if you make the holes with an awl. Be sure to pierce both pieces at the same time. Start stitching at the top end of the blade (farthest from the handle). If you start at the other end, you may have difficulty tying off the saddle stitch. Pass the needles through only one piece of leather for the final hole, so that the two ends may be tied together on the inside of the piece. It is easiest to tie them off if you turn the sheath inside out first.
- Once the saddle stitching is done, you may opt to place a dot of white glue on the knot (both in the saddle stitch and in the back seam).
- Ta da! Put the hatchet in the sheath and snap it closed!
Knife Sheath
4. Complete a figure-carved belt, doing your own tooling.
The amount of leather you will need for this will depend on the waist-size of the intended recipient of the belt. The width should be roughly 2.5cm![]() , but some variability here is OK - just make sure it will fit through the belt loops.
, but some variability here is OK - just make sure it will fit through the belt loops.
The length of the belt should be equal to the waist size of the intended wearer plus about 15cm![]() . Ten centimeters
. Ten centimeters![]() of this excess will be allowed for the end that goes through the buckle, and the remainder will be for the end that attaches permanently to the buckle. Once the belt has been cut out, you can tool it using the standard means. It is not necessary (or even desired sometimes) to tool the entire length of the belt.
of this excess will be allowed for the end that goes through the buckle, and the remainder will be for the end that attaches permanently to the buckle. Once the belt has been cut out, you can tool it using the standard means. It is not necessary (or even desired sometimes) to tool the entire length of the belt.
When tooling has been completed, the belt can be dyed. Finally, the holes should be punched and the buckle attached.
If you prefer, you could make a guitar strap instead.
5. From your own design, cut from leather, tool, punch, and lace a project such as a case, purse, bag, or an equivalent.
There are many items you use in everyday life and as a Pathfinder that can benefit from having a carrying case. Here are a few such things:
- Bible
- Binoculars
- MP3 player
- Cell phone
- Eyeglasses
- Toiletries
- Flint and steel
- Notebook
- Daily planner
- Pathfinder pins
- Laptop Computer
- PDA
- Camera
You may prefer to make a garment or accessory:
- Vest
- Hat
- Gloves
- Moccasins
6. Show six leather items you have made.
You should already have made:
- a sheath (knife, hatchet, or ax)
- a belt
- an item of your own design
- an item you made when completing requirement 4 of the standard level of the Leather Craft honor.
You will therefore only need to make two more items to meet this requirement. You can make items of your own design, or make items that someone else has already designed, or one of each. It's up to you.
