AY Honor Dressmaking Answer Key
1
For tips and instruction see Basic Sewing.
2
These are all items you can buy in a department store or even in a thrift shop. It is also possible that you have an older relative who no longer sews and would love to give your some sewing supplies, especially if you show a real interest in learning the craft. Don't feel as though you need to buy everything on the list right away. You can spread out your acquisitions over time as you hunt for bargains.
3
Basting
In sewing, to baste or tack is to make quick, temporary stitching intended to be removed. Tacking is used in a variety of ways:
- To temporarily hold a seam or trim in place until it can be permanently sewn, usually with a long running stitch made by hand or machine called a tacking stitch or basting stitch.
- To temporarily attach a lace collar, ruffles, or other trim to clothing so that the attached article may be removed easily for cleaning or to be worn with a different garment. For this purpose, tacking stitches are sewn by hand in such a way that they are almost invisible from the outside of the garment.
- To transfer pattern markings to fabric, or to otherwise mark the point where two pieces of fabric are to be joined. A special loose looped stitch used for this purpose is called a tack or tailor's tack.
- A basting stitch is essentially a straight stitch, sewn with long stitches and unfinished ends. The basting stitch is used for temporarily holding sandwiched pieces of fabric in place. The stitch is removed after the piece is finished. Often used in quilting or embroidery.
Overcast
An overcast stitch is made at the edge of a piece of fabric to prevent it from unraveling. It is made by passing the needle through the top of the fabric near the edge, and then pulling the thread over the edge and passing it through the top again. The thread makes a spiral around the edge of the fabric, much as a spiral notebook is bound by a wire.
Zigzag
In sewing, a zigzag stitch is a machine stitch in a zigzag pattern. Tightly spaced zigzag stitches are used to emulate embroidery stitches such as satin stitch, and to reinforce buttonholes. A zigzag stitch is also used as a non-structural seam, to temporarily hold two panels together edge-to-edge (and eliminate the ridge that would "x-ray" through). This is done when another panel will overlay the seam and provide support.
Blind Hem
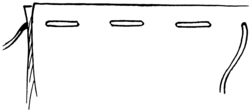
A blind hem is a stitch that is nearly invisible on the finished side of the fabric. It can be used for hemming a garment, drapes, or curtains. If done by machine, the sewing machine must have a blind stitch as well as a specialized presser foot made for this purpose.
In the machine stitch, three running stitches are alternated with one zigzag stitch. The running stitch is made in the seam, and the zigzag goes out to the edge of the hem picking up only one or two threads of the weave.
When hand-stitching a blind hem, the principle of picking up only one or two threads still applies, but only on the front side of the fabric. On the wrong side, the stitches will be somewhat long and could be quite visible.
4
One way to meet this requirement is to visit a fabric store. Find examples of each of these types of fabric (fabric type will be labeled at the top of the roll). Examine them closely, and touch them.
If you are teaching this class bring in a few swatches of each type of fabric. Label each, and pass them around to your Pathfinders, telling them about each one. Tell them to closely examine and feel each sample.
5
Sometimes new fabric sports unfortunate creases across the bias. Any such creases should most definitely be removed with an iron before a pattern is cut from the fabric. This is because the crease will alter the lay of the fabric and distort the pattern. This distortion will be transferred to the garment.
Once all the creases have been removed, lay the cloth on a working surface large enough to accommodate the piece you wish to cut from it. Spread it out flat, and make sure no sewing tools have found their way beneath the fabric. Once this has been done, you are ready to lay the pattern on the material and pin it down.
At this point, you have a choice of either transferring the pattern to the material with tracing paper, or simply cutting the fabric as per the pattern.
If using a graded pattern, you should not cut out the pattern following the cut lines for any but the largest pattern. If you would like to make one of the smaller sizes provided by the pattern, you can either fold the pattern along the proper cut lines, or trace them with tracing paper and a tracing wheel.
6
Read the instructions that came with the pattern before beginning the project. If you do not understand all the steps, keep reading. Study them until you do understand. Sometime enlightenment is difficult to achieve until you have actually followed the previous instructions and have cloth in hand and are ready to execute the step itself. Don't give up before you start!
The outside of the pattern's package will tell you how much and what types of material you will need to make the item. Read this carefully.
The next step is to lay out the cloth and cut out the pieces (see requirement 5). The pattern will also tell you how to lay the pieces on the cloth to minimize the amount of cloth you need for the item.
Once the pieces are cut out, follow the instructions in the pattern. Once you have made a seam, take it to the ironing board and press it, but see if the pattern tells you whether you need to press the seam open, to the back, or to the front. Hems are easier to sew if you press them first.
If you do not wish to make a shirt, blouse, skirt, or shop apron, perhaps you would enjoy making Bible costumes. If your whole club (or unit) is working on this honor together, you will have the opportunity to outfit an entire troop for a VBS program or a Christian Drama program.
References
Note on Patch
Because the honor was reclassified, the current patch has a Golden background.


